What Did You Do To (or With) Your Cayenne Today ?
#1201
#1203
@01010011 Did you ended getting one? Any update?
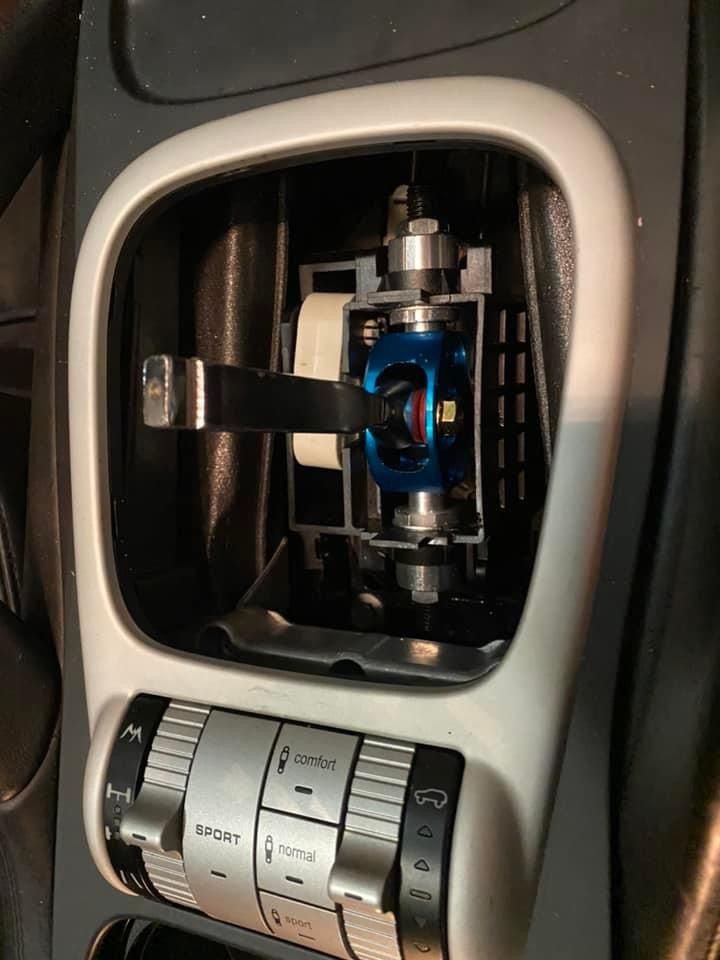
I had to modify by cutting off a bit on each end marked with the red lines (I didn't keep a record of exactly how much I lopped off; it was trial and error until it fit).

The result is a tighter, (but notcher) feel. Side-to-side play is pretty much gone, but I still have a little bit of front-and-back play that I think would require a new shift cable to fix.
I actually don't really like how short the actual lever is now; it's far away from the steering wheel and looks a little bit strange, since it barely sticks up past the grab handles now. But the feel is overall better. At some point, I may see if I can rig up some sort of extension to lengthen the lever, but that will likely exaggerate the play still remaining due to the cable. I didn't take a photo when I did it, and the vehicle is stored away from my primary residence so I don't have access at the moment to shoot one.
As far as other things I can remember about the process (I did it a little while ago now, but it also was split up over several weekends with weeks between so I don't remember everything):
- The **** was a pain to get off, and I ended up breaking the locking collar. Other threads I found on here discuss that. Mine was really tight, and after unlocking by twisting, it just would not come off pulling straight up like what is supposed to happen. I fiddled and pried at it and eventually got it off somehow, but now it doesn't lock back in place. It's fine as long as I don't yank upwards on it (which isn't something you would normally do when shifting).
- The side piece (red arrow; image of a 996 shifter from the Pelican Parts guide, which I kind of followed) rubs a bit and doesn't slide smoothly, as I think the new shifter is a little bit too wide. But it still works. Hopefully, the rubbing won't cause any long-term issues.

- At first, I tightened one of the cables too much, and the end popped off the shifter going into one gear (I think it was either 5th or 6th? Or maybe 2nd or 4th, I can't remember now). So try rowing through the gears a few times with the shifter housing bolted down, but all the cosmetic pieces still removed to make sure it all works before buttoning everything up.
The following users liked this post:
ventoGT (04-20-2024)
#1206
Rennlist Member
Took it up to about 160 MPH or so.
It had more left, but Darwin was knocking so I had to go.
I hope to take it to the salt flats when it is dry and just see what it does flat out.
Has anybody taken it up to the limiter? Where? Any special safety gear you’d recommend, or just buckle and go?
It had more left, but Darwin was knocking so I had to go.
I hope to take it to the salt flats when it is dry and just see what it does flat out.
Has anybody taken it up to the limiter? Where? Any special safety gear you’d recommend, or just buckle and go?
#1207
@flsupraguy @Crozzer I would love some feedback please.
How do you like the headlights? Did you replace your HID xenon units or had halogen setup prior?
how do these compare to OEM xenons HIDs at night? Did you have to adjust them after the install or was the cut off line spot on right out of the box? Any photos of the light beam? Thank you for your input.
#1208
Rennlist Member
@flsupraguy @Crozzer I would love some feedback please.
How do you like the headlights? Did you replace your HID xenon units or had halogen setup prior?
how do these compare to OEM xenons HIDs at night? Did you have to adjust them after the install or was the cut off line spot on right out of the box? Any photos of the light beam? Thank you for your input.
How do you like the headlights? Did you replace your HID xenon units or had halogen setup prior?
how do these compare to OEM xenons HIDs at night? Did you have to adjust them after the install or was the cut off line spot on right out of the box? Any photos of the light beam? Thank you for your input.
I had xenon, and kept xenon.
I think you will likely find that both low and high want some adjusting. Best done at night or in a dim lit space. Park about 4-6 feet from a wall, and use painters tape as a means to mark where a beam is hitting. Then when you adjust you can see how much you moved it.
I have not found a DIY or official specs on adjusting the beam pattern. Width you can measure bulb to bulb on the car, then replicate that on the wall. For height just go drive it at night, adjust, etc.
adjusters for the low are accessible while installed, through two holes in the track the hood sets into, near a rubber bumper. Adjusters for high beams are torx heads inside and require the bucket to be pulled in and out to adjust.
Inspect those things very carefully for cracks, etc. I got two bad ones before getting a third that was not busted on arrival.
The following users liked this post:
frederickcook87 (05-15-2024)
#1212
Track Day
Changed my rear diff oil as I'm on 90k miles, fairly easy but after 19 years of life in not so dry Scotland it was fun getting the corroded plugs out.
#1214
Instructor

Gave it to the dealer last week for a regular service for the first time in 3 years.
Quoted me 11,620$
 (2996 $ just for a high-pressure fuel pump).
Also, it's getting fresh P-Zero tires and the tailgate finally fixed.
Apart from that there is an oil leak from the vacuum pump and some work in front and rear subframe (sth related to casings), also the motor mounts need replacing.
Nevertheless, didn't expect that to be so horrendously pricey, was estimating to be max 6k.
Last edited by DARIOcaptain; 04-20-2024 at 09:09 PM.
The following users liked this post:
DARIOcaptain (04-21-2024)


