When you click on links to various merchants on this site and make a purchase, this can result in this site earning a commission. Affiliate programs and affiliations include, but are not limited to, the eBay Partner Network.
The part where the oil coolers sit and the shark werk elbows bolt into.
That part bolts to the top of the block but using RTV to seal it where the cases meet. I had mine leak the first time I had it off(my fault). I used the approved RTV both times just messed it up the first time.
Thanks.. that sounds a nightmare...? Was it an engine out job to fix ?
Any tips on how to avoid the same happening with my rebuild?! Just make sure its meticulously clean and use the approved rtv I guess?
Originally Posted by o7silverturbo
I just use rubber safe silicone spray when install o rings. You dont want to use oil as it can make the o rings if they are not meant to have oil on them. It can make them swell over time and leak
thanks, Ive ordered the OPC recommended stuff, although as you say I bet its just expensive silicone grease! Also,could anyone pm me the WM for this part? I have no WM at all for it and no idea what the RTV needed is either thanks
Thanks.. that sounds a nightmare...? Was it an engine out job to fix ?
Any tips on how to avoid the same happening with my rebuild?! Just make sure its meticulously clean and use the approved rtv I guess?
thanks, Ive ordered the OPC recommended stuff, although as you say I bet its just expensive silicone grease! Also,could anyone pm me the WM for this part? I have no WM at all for it and no idea what the RTV needed is either thanks
The RTV number is 000-043-305-47
Also its is an engine out job to repair it. So i just waited until I did some other work and repaired the leak. It was clean and everything....the case gets wider at one spot and I ran the bead of RTV where I thought it was suppose to be and it missed the corner when I reinstalled that oil cooler stand. Its hard to explain without looking at it.
Also its is an engine out job to repair it. So i just waited until I did some other work and repaired the leak. It was clean and everything....the case gets wider at one spot and I ran the bead of RTV where I thought it was suppose to be and it missed the corner when I reinstalled that oil cooler stand. Its hard to explain without looking at it.
Thanks
Will be sure to double check that when I do the RTV stage. Appreciate the heads up + the rtv PN.
I was waiting on Porsche to fulfill my last supplemental parts order (Their Easton, PA warehouse was flooded during one of the recent rain events. I also ordered some drill/tap items to make that process go smoother. I will be heading up to the P-Car dealer today to borrow the timing tool with the goal of timing the engine and securing the cam covers tonight. Once that is done I can start going to town on the cooling bits. I would like to clean up the engine a bit, but I do not want to remove the protective coating, so it will mainly be some vacuuming and light cleaning.
With the new parts I was able to secure the sprockets to the cams and hand tighten them awaiting the timing. When that gets done I will post some cam pictures. I was pleasantly surprised that the actual pinning was straightforward.
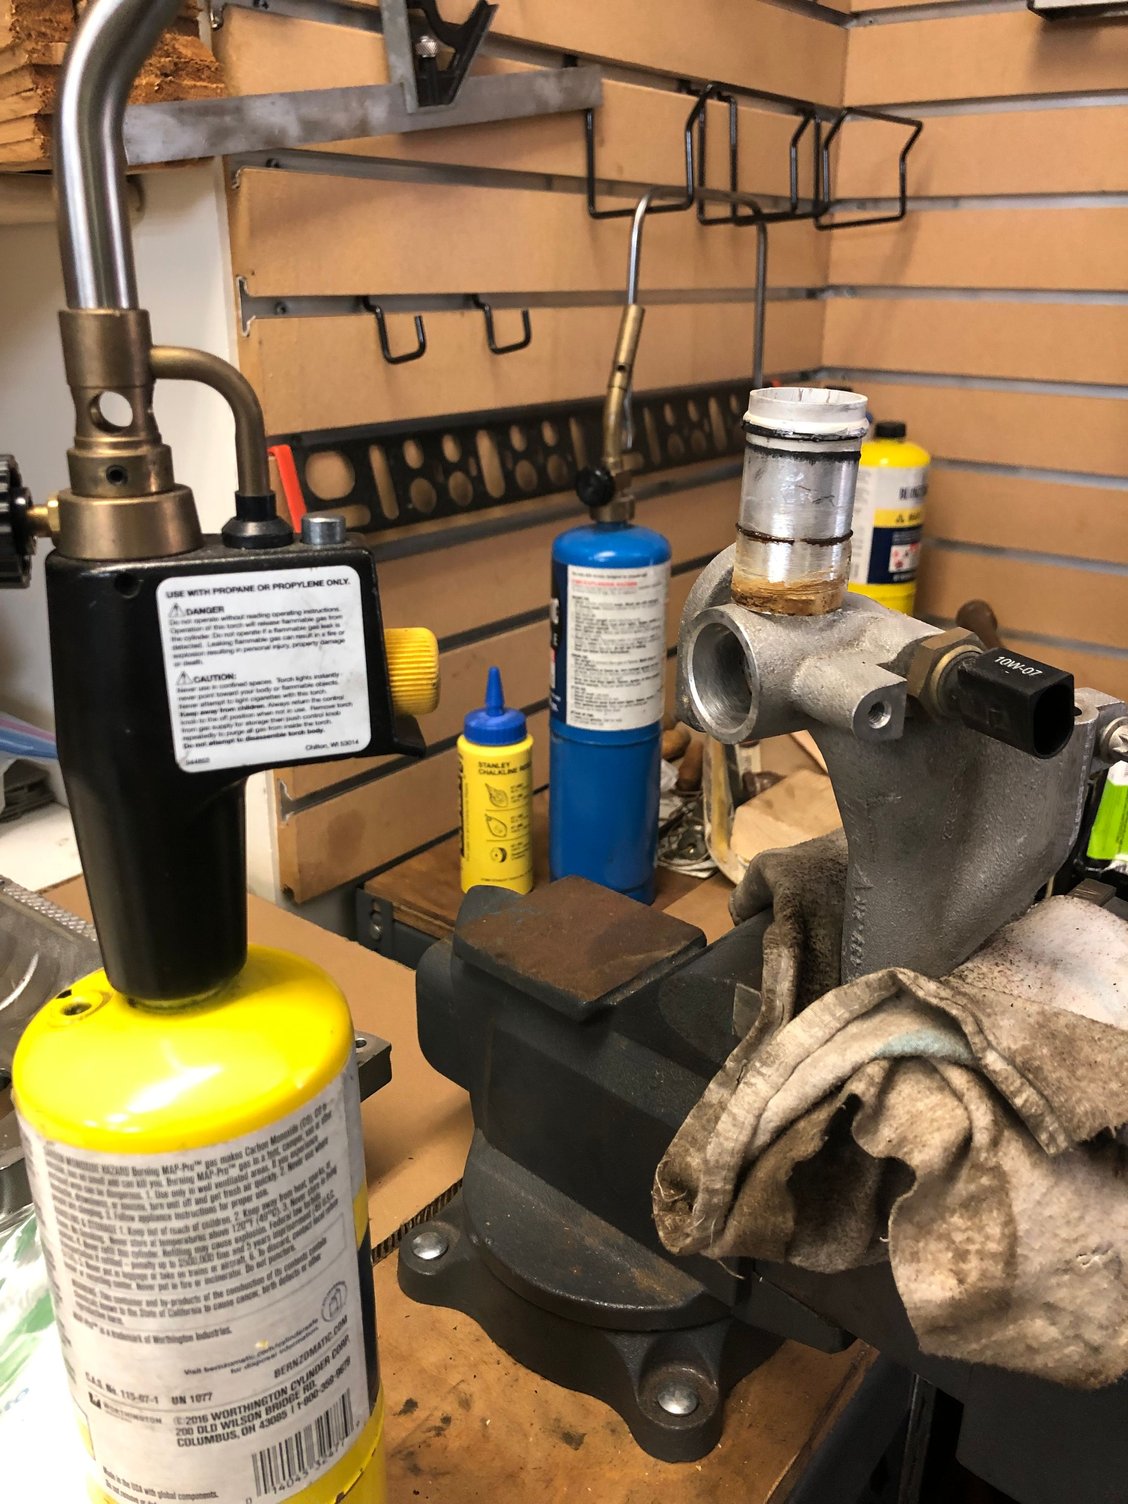
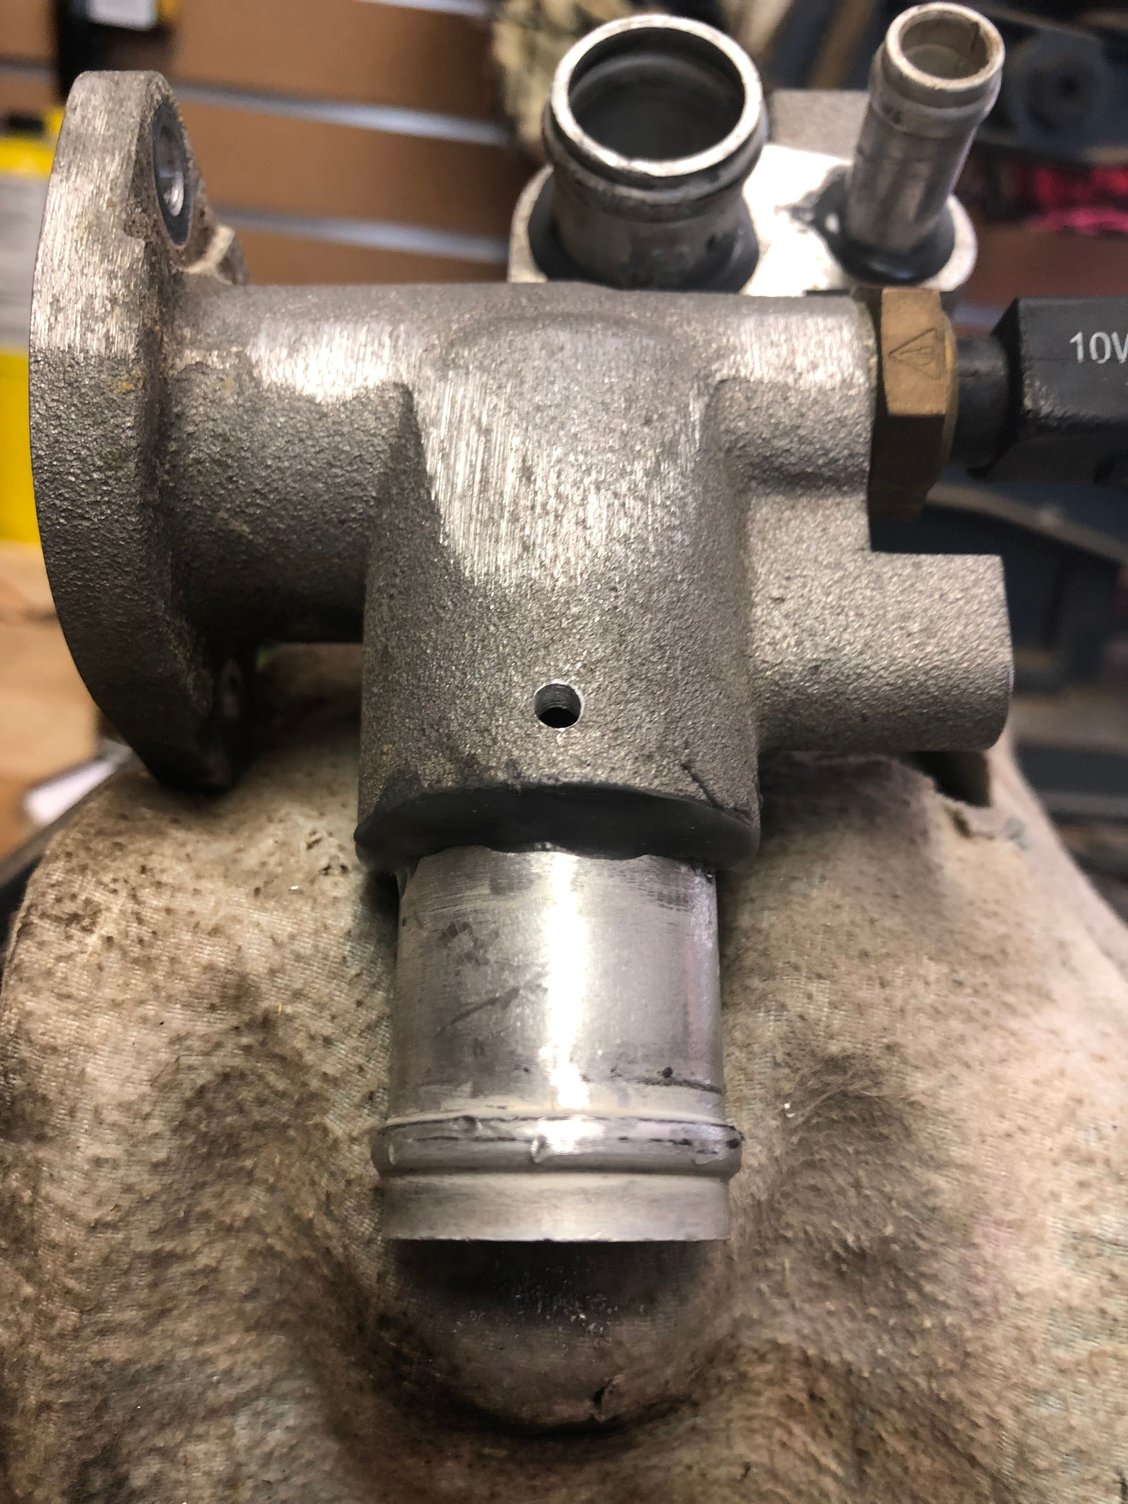
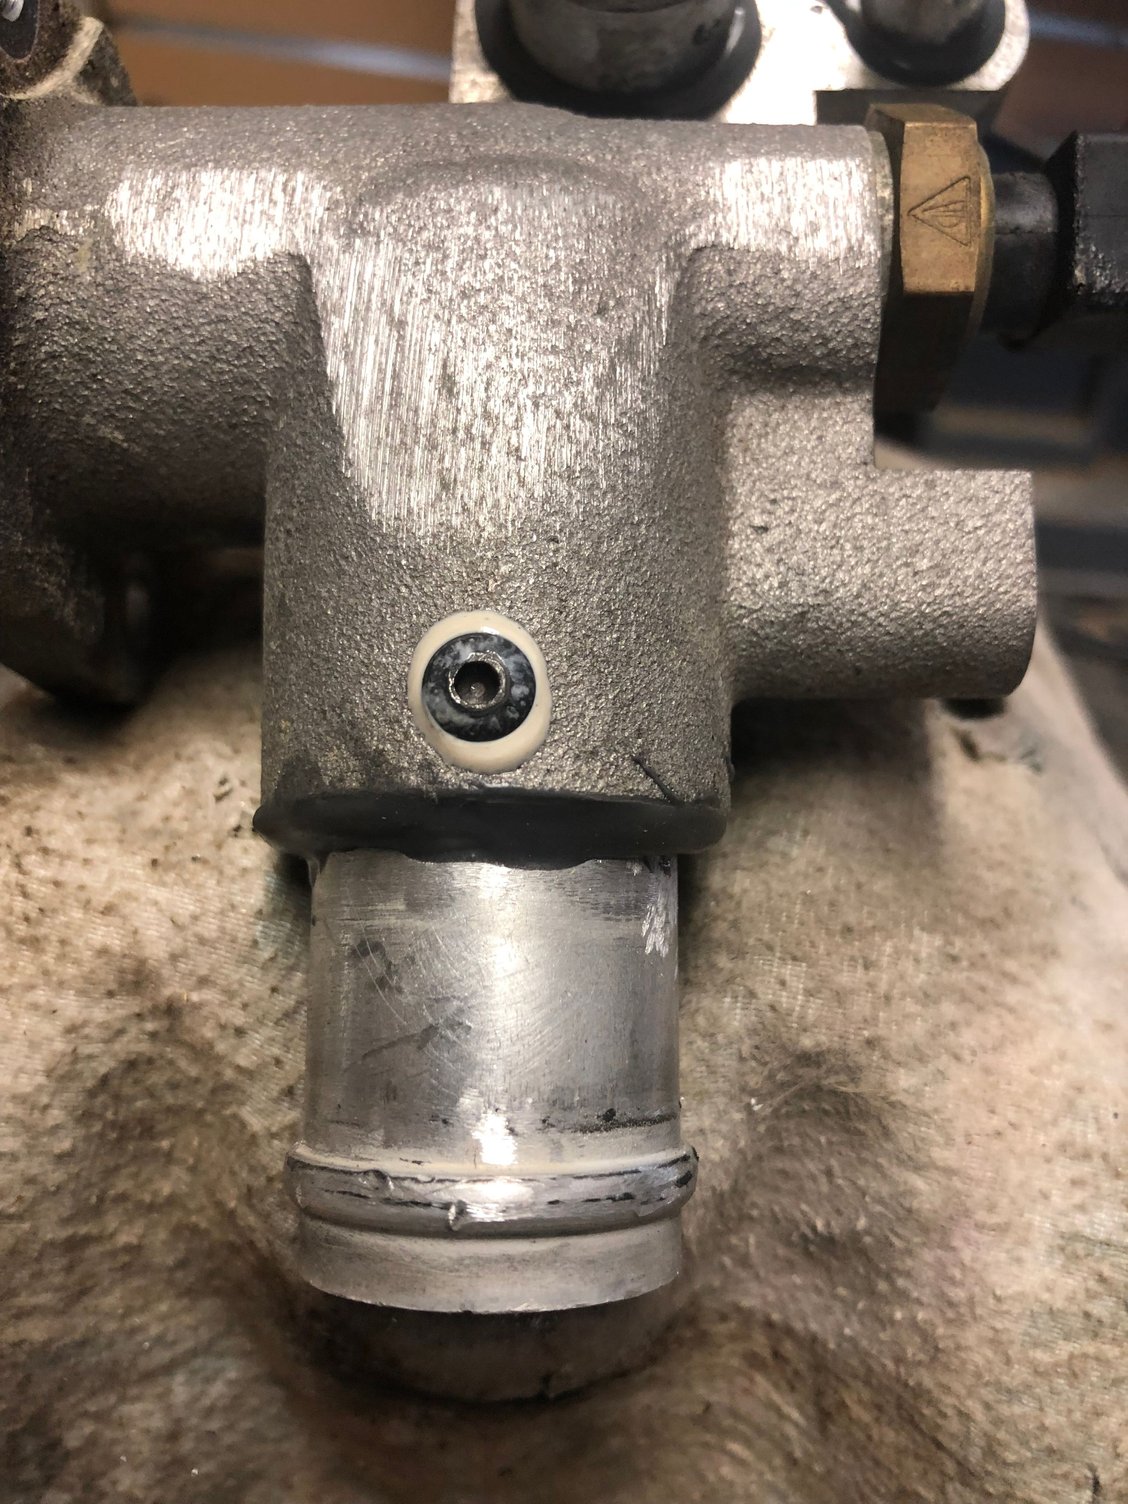
What I did manage to get done while waiting, was extracting, then epoxying and finally pinning the coolant pipes. I initially used a plumber's propane torch, but after looking at a video of a shop doing this, I grabbed my map torch. That made pretty quick work of it once I got used to how much heat to apply (which was slightly different for each fitting, the last one the center front manifold taking the most time since there was such a major heat sink surrounding it. Allowing 48+ hours to fully cure, my extra die cutter and new drill bits arrived, so i was able to drill (1.8") and tap (M4x0.7), then pin the fittings with a screw (M4X10 - which was long for some fittings, but pretty good for most). I used a high temp thread sealant to secure the screws in place and eliminate any possible seepage around them. The most challenging (for me) was dealing with the excess epoxy. While in the video (you can watch it here:
he says not to worry about too much epoxy (it will be scraped off as you insert it) I noticed there was some epoxy being pushed out inside the housing. Since 4 of the 7 were off the car, they were easier to deal with. I was able to get to two of the remaining three pretty easily, but the inward facing one on the front manifold was tough to get clean. I used a combination of some flattened bent wire and cloth treated with some acetone to carefully clean just the over spill. They seemed to clean up well. Since this was my first attempt at tapping a screw in a while I was a bit nervous, but the ratchet tool I acquired made it easier to keep pressure on the tool while turning and cutting the threads and keeping everything aligned. Overall I was pleased with the outcome.
MAP torch and one of the fittings:
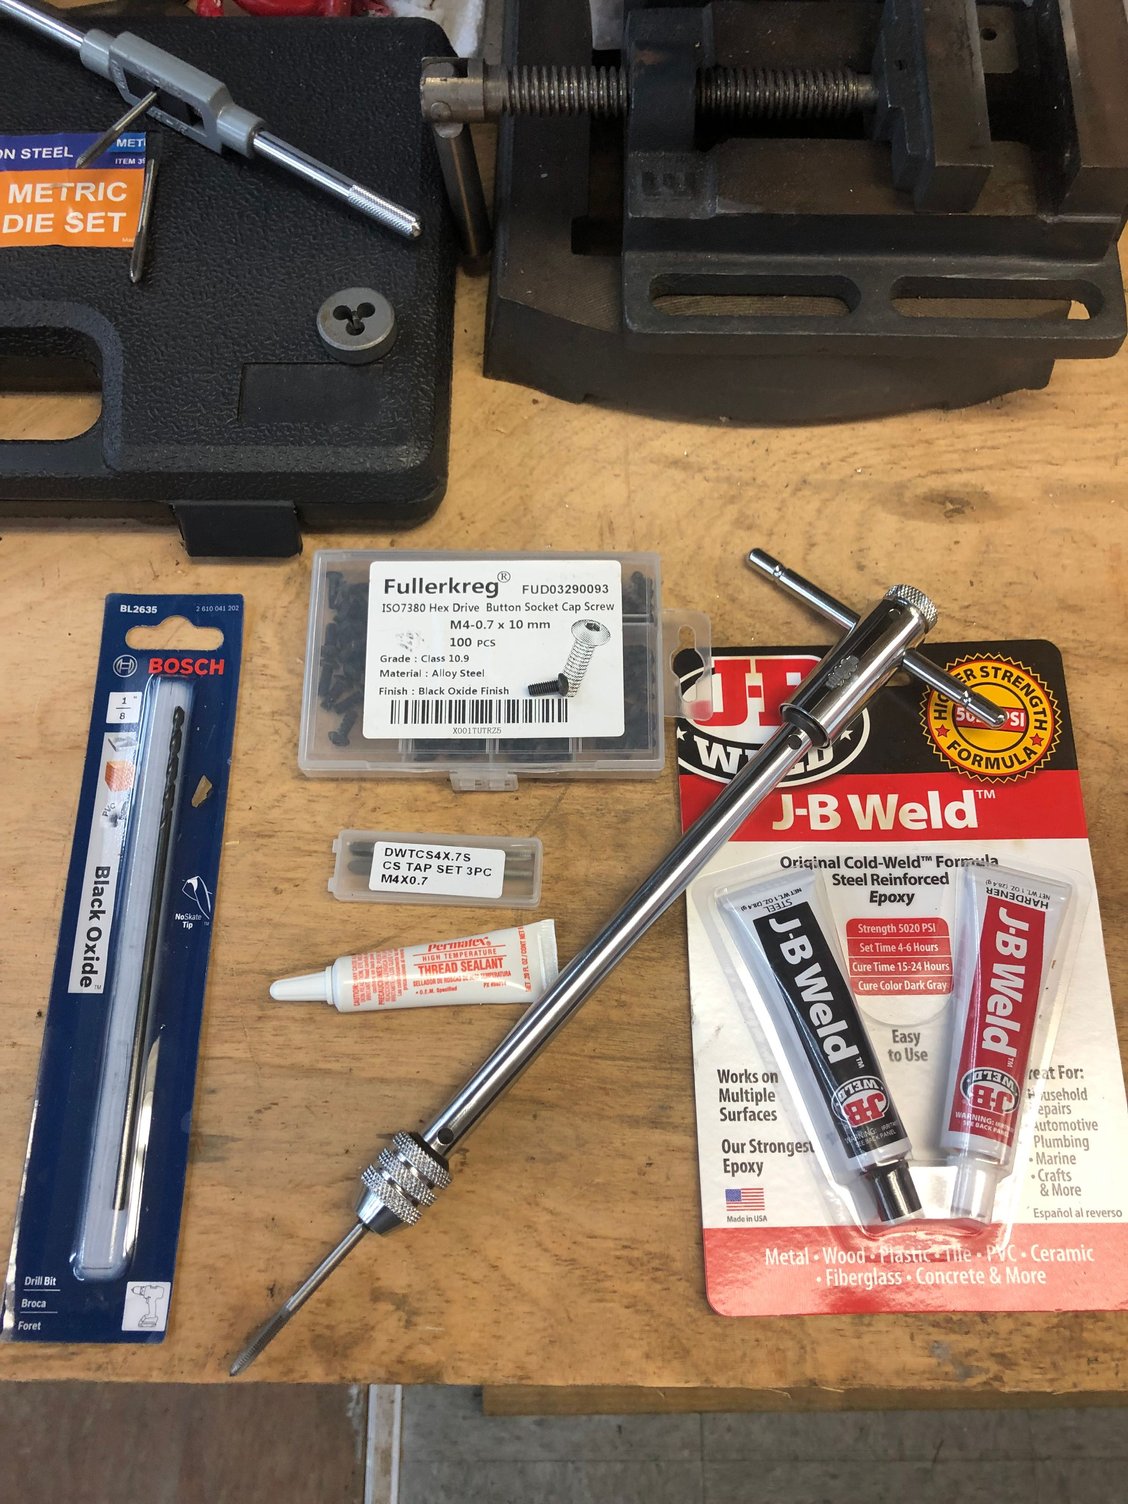
Items purchased for the Coolant Pipe Pinning task (crappy chinese die set, button head M4x10 screws, long 1/8" drill bit, JB Weld Original, Ratcheting Tap Tool Handle, Extra M4x0.7 taps, High Temp Thread Sealant):
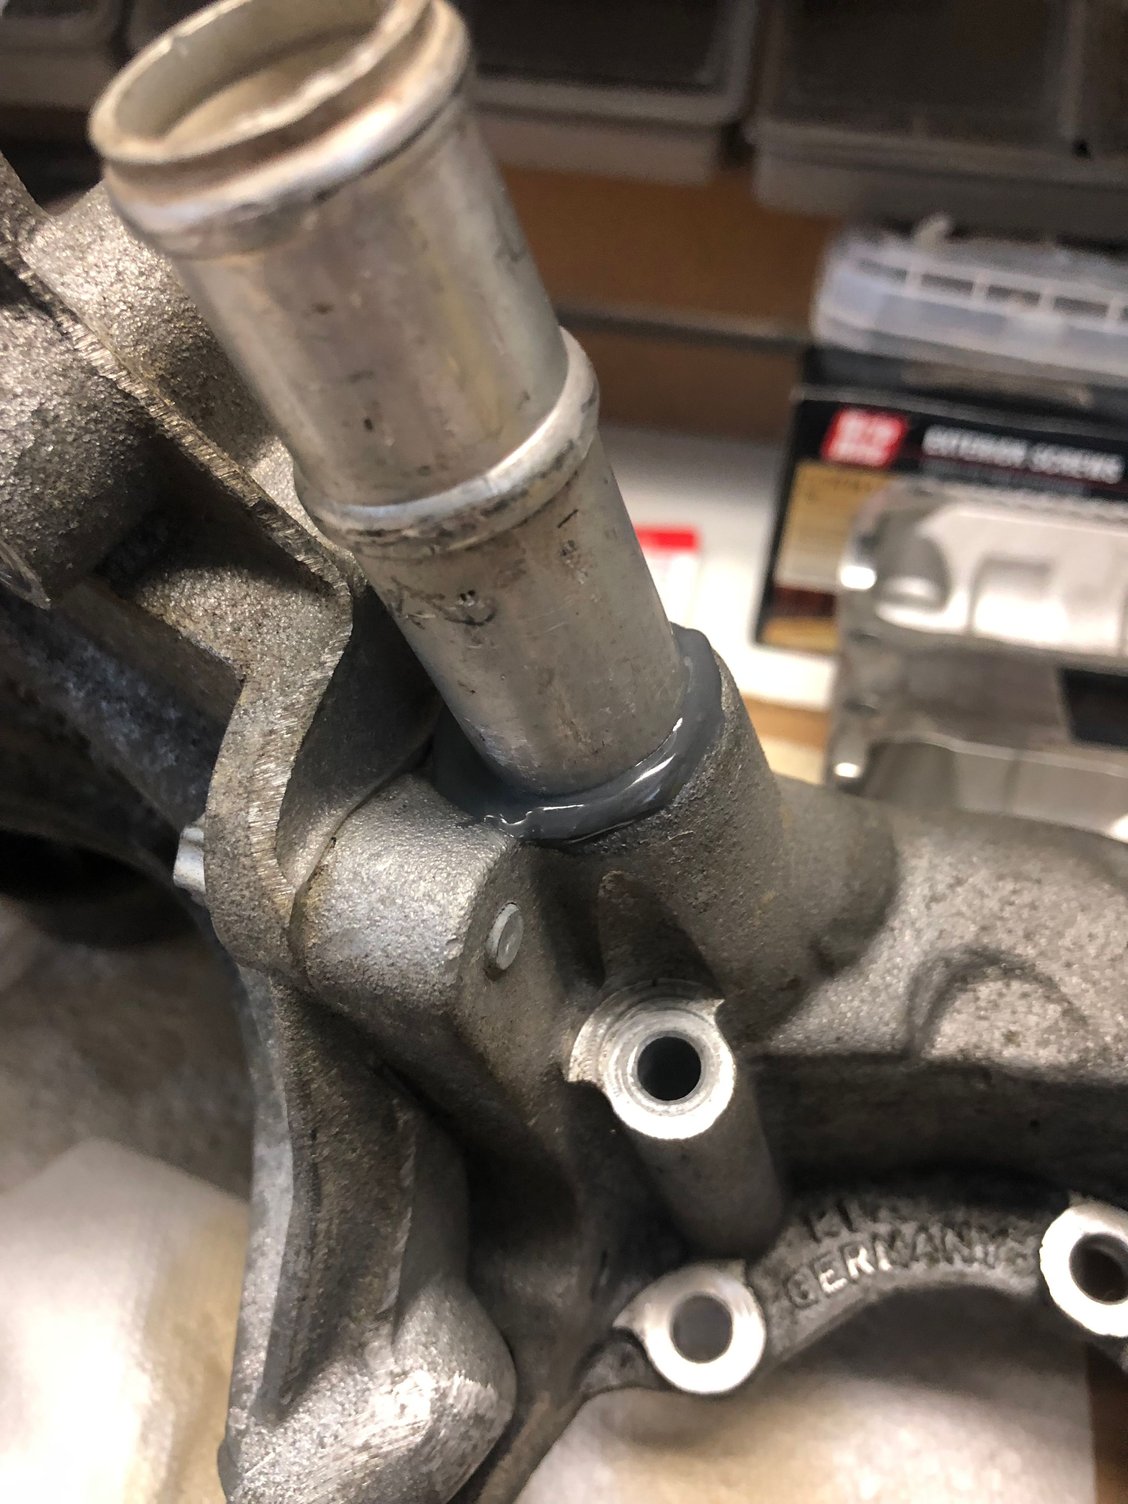
Fittings Glued:
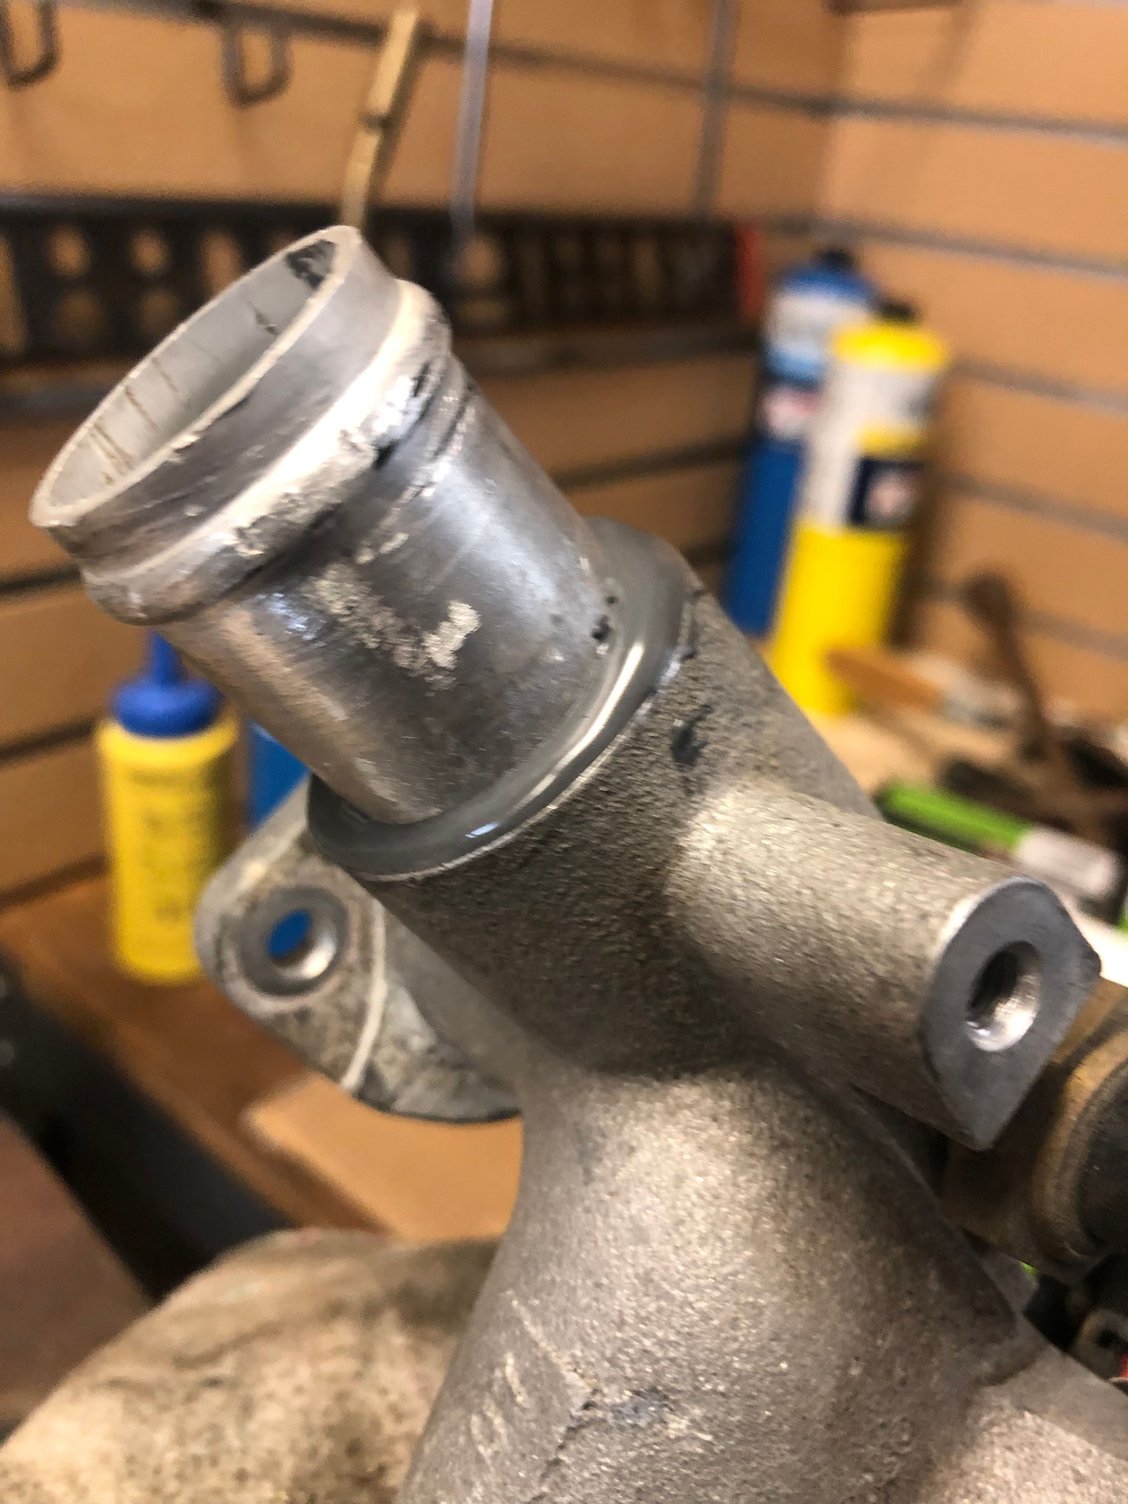
Drilled & tapped:
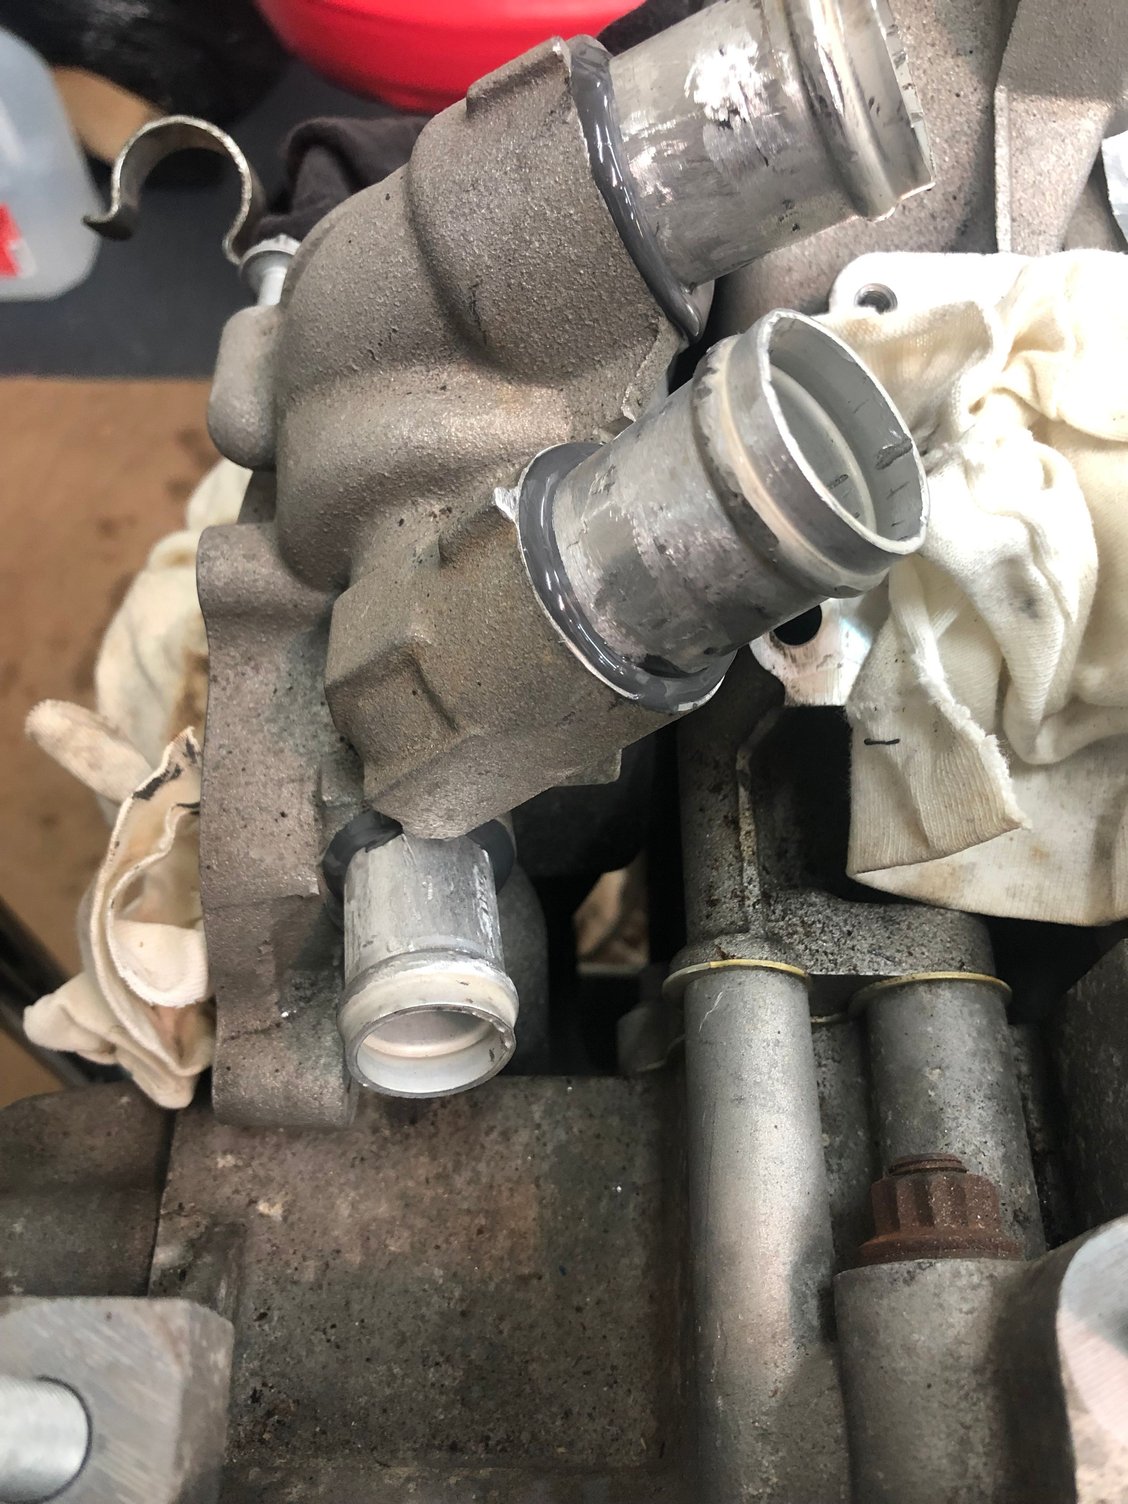
Pinned:
So another big item off the list. Off to pick up the cam tool (now that I have the cam bolts and cam cover sealant) and tackle the most fearful of all the jobs - keeping the pistons from destroying themselves and the valves. I fell like embossing some timing marks in the dang case....
Great work Ed, I am lagging behind a little!
I have to clean the manifold and other bits up this weekend and given time will be sealing them then. I look forward to your write up from the Cam timing. After reading up on it it doesnt seem to be too bad (apart from I cant borrow a cam locking tool set from anyone here in the uk as far as I am aware so if I have to do it I will buy the copy set from the us).
If you use a cylinder whistle in cyl 1 and 4 , then you will know for sure your at correct TDC for that bank/cylinder. So if your setting cyl 1 TDC and the whistle blows on cyl one as you are approaching TDC, your on the compression/firing stroke (not where you want to be), so rotate the engine another 360 degrees, bank 4 whistle will blow and you are now at TDC on the exhaust stroke which is where you need to be. By doing that it's impossible to install a cam 180 degrees out by mistake.
That is what I was informed by a member who has done them before and it made total sense as I am from a long term inline 6 background before this, my first 997tt so I read up a lot on cam timing in case I need cams out myself.
Look forward to seeing further updates
Do you have the WM for setting cam timing? if you need it fire me a pm Ed as I am pretty sure I have it.
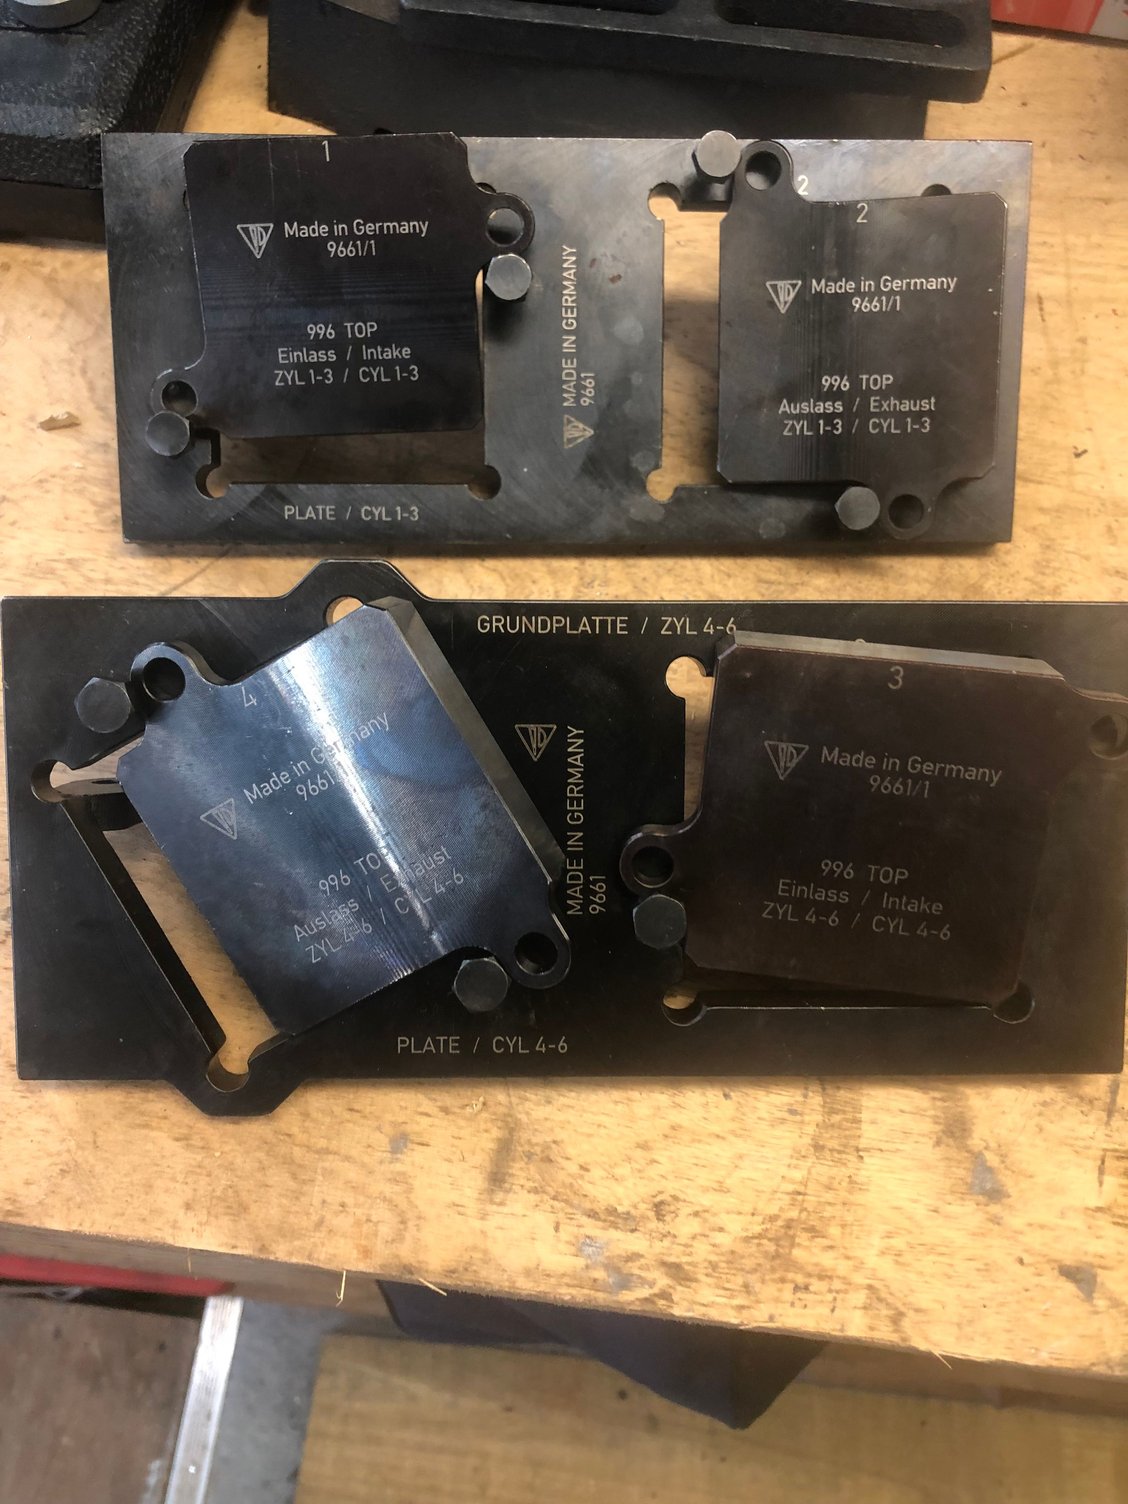
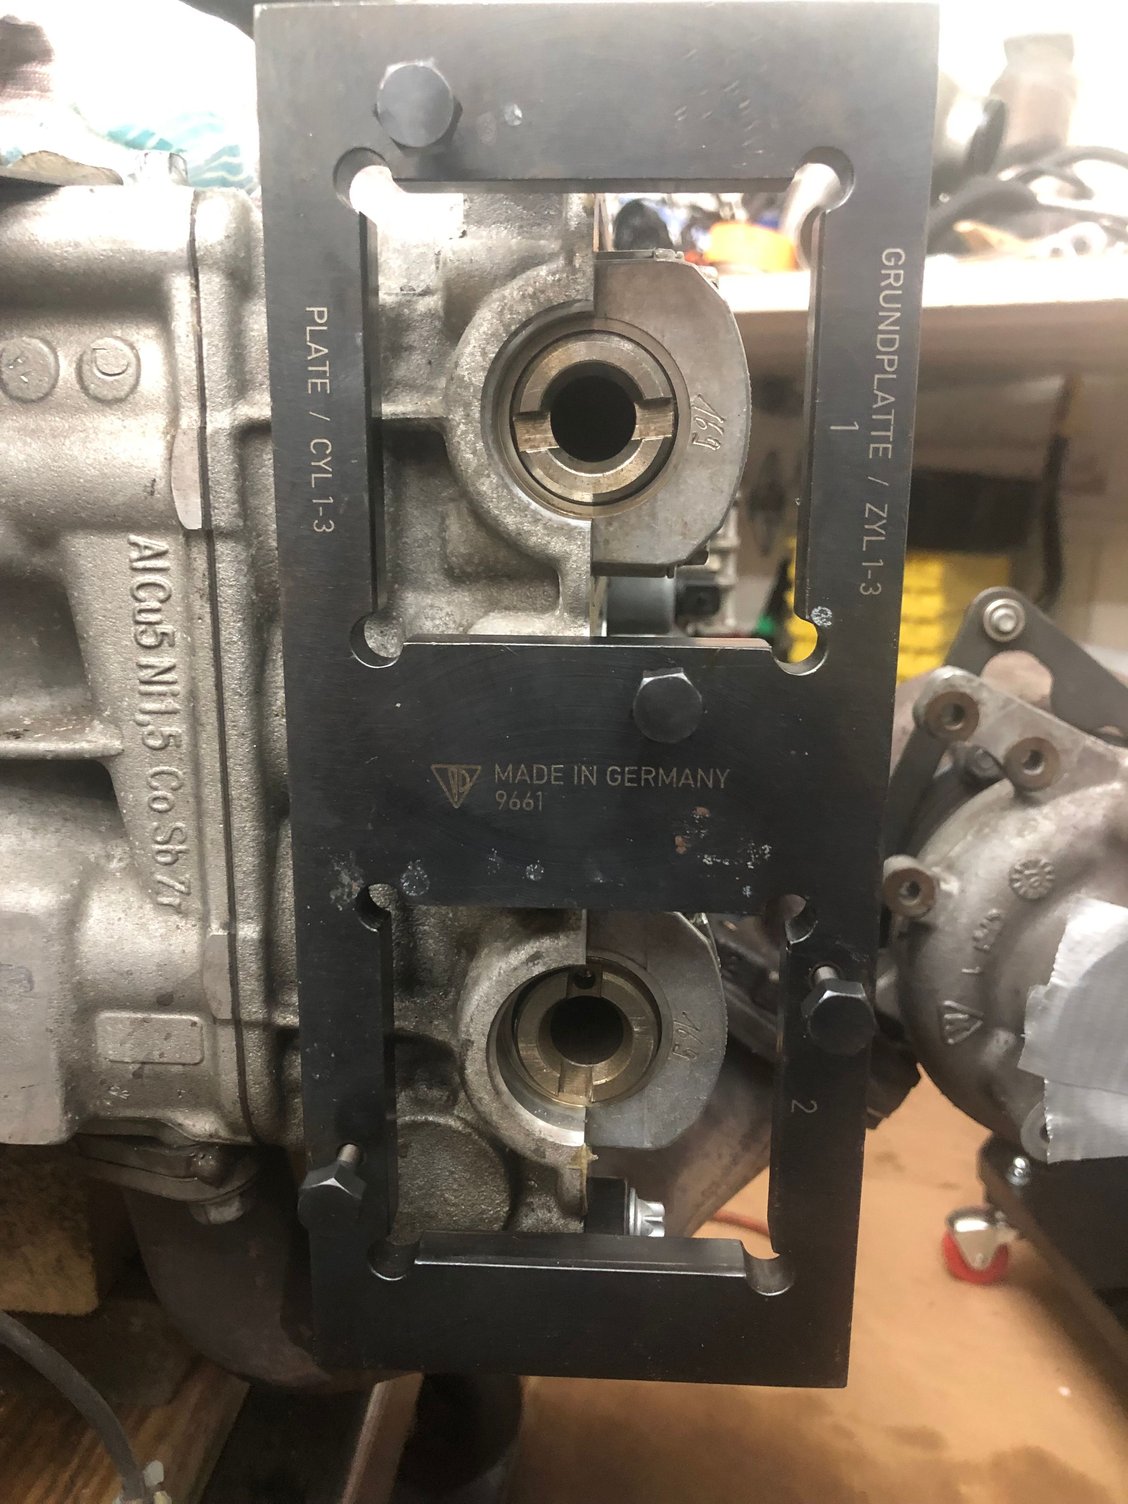
Got the tool. If you ever wanted to see what a $4K tool looks like:
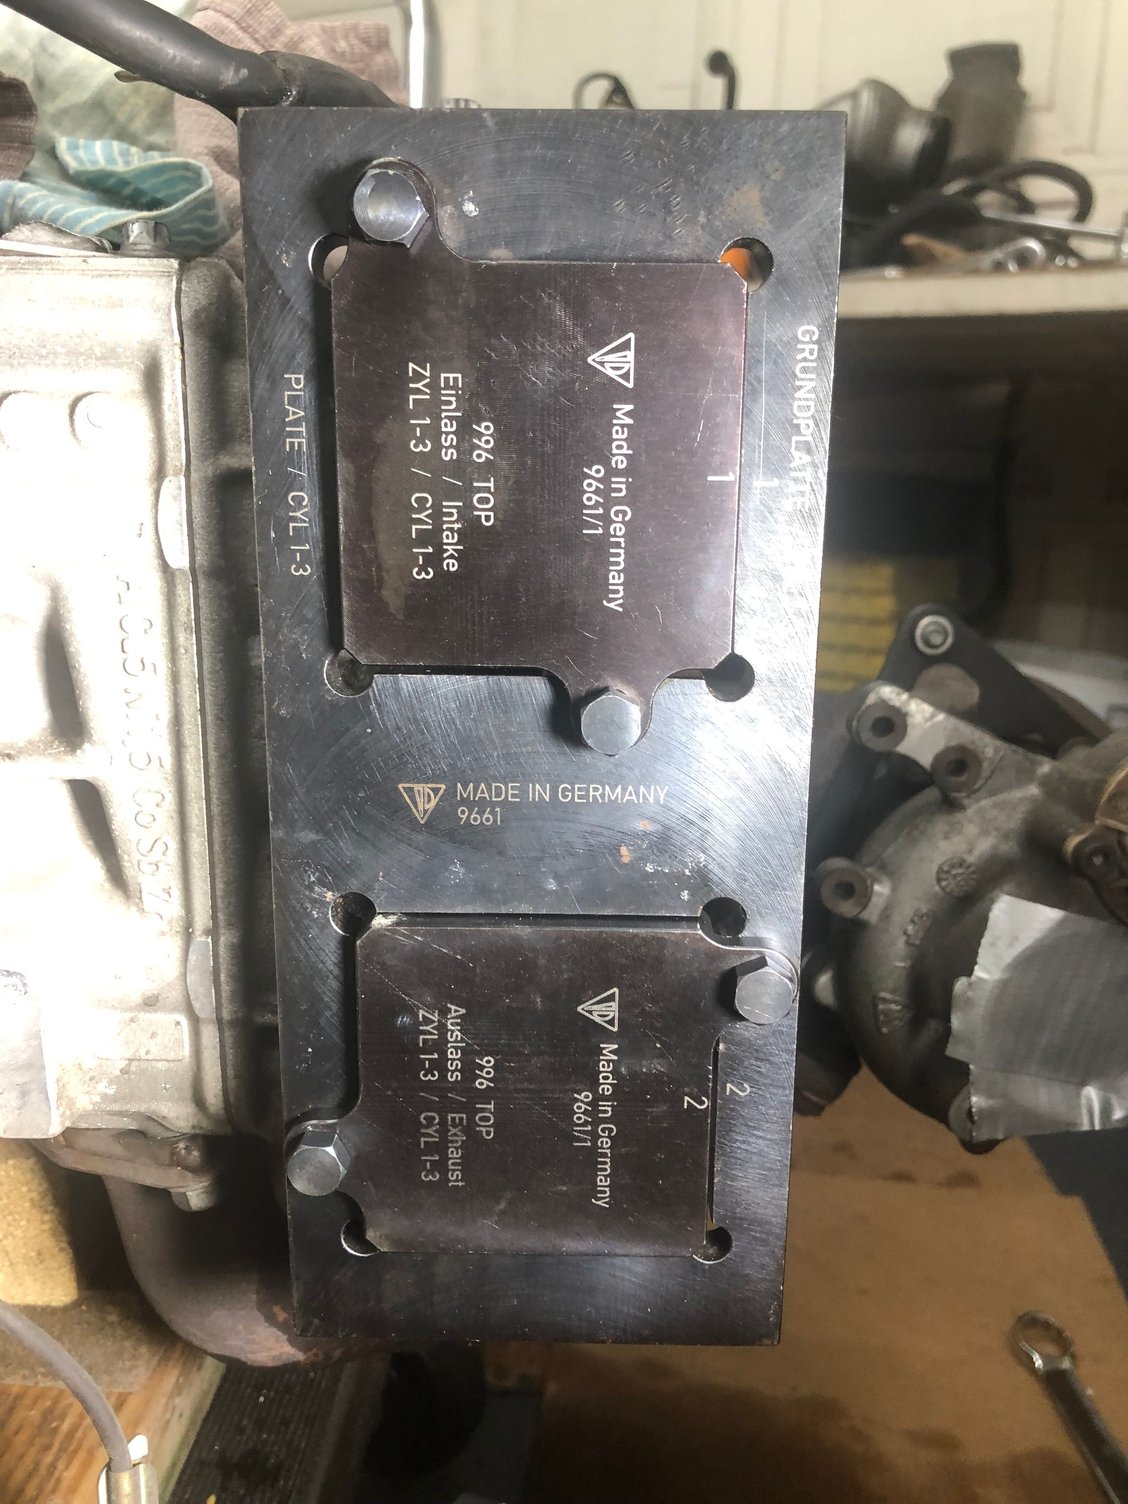
Plates reversed to show you what fits into the cam ends:
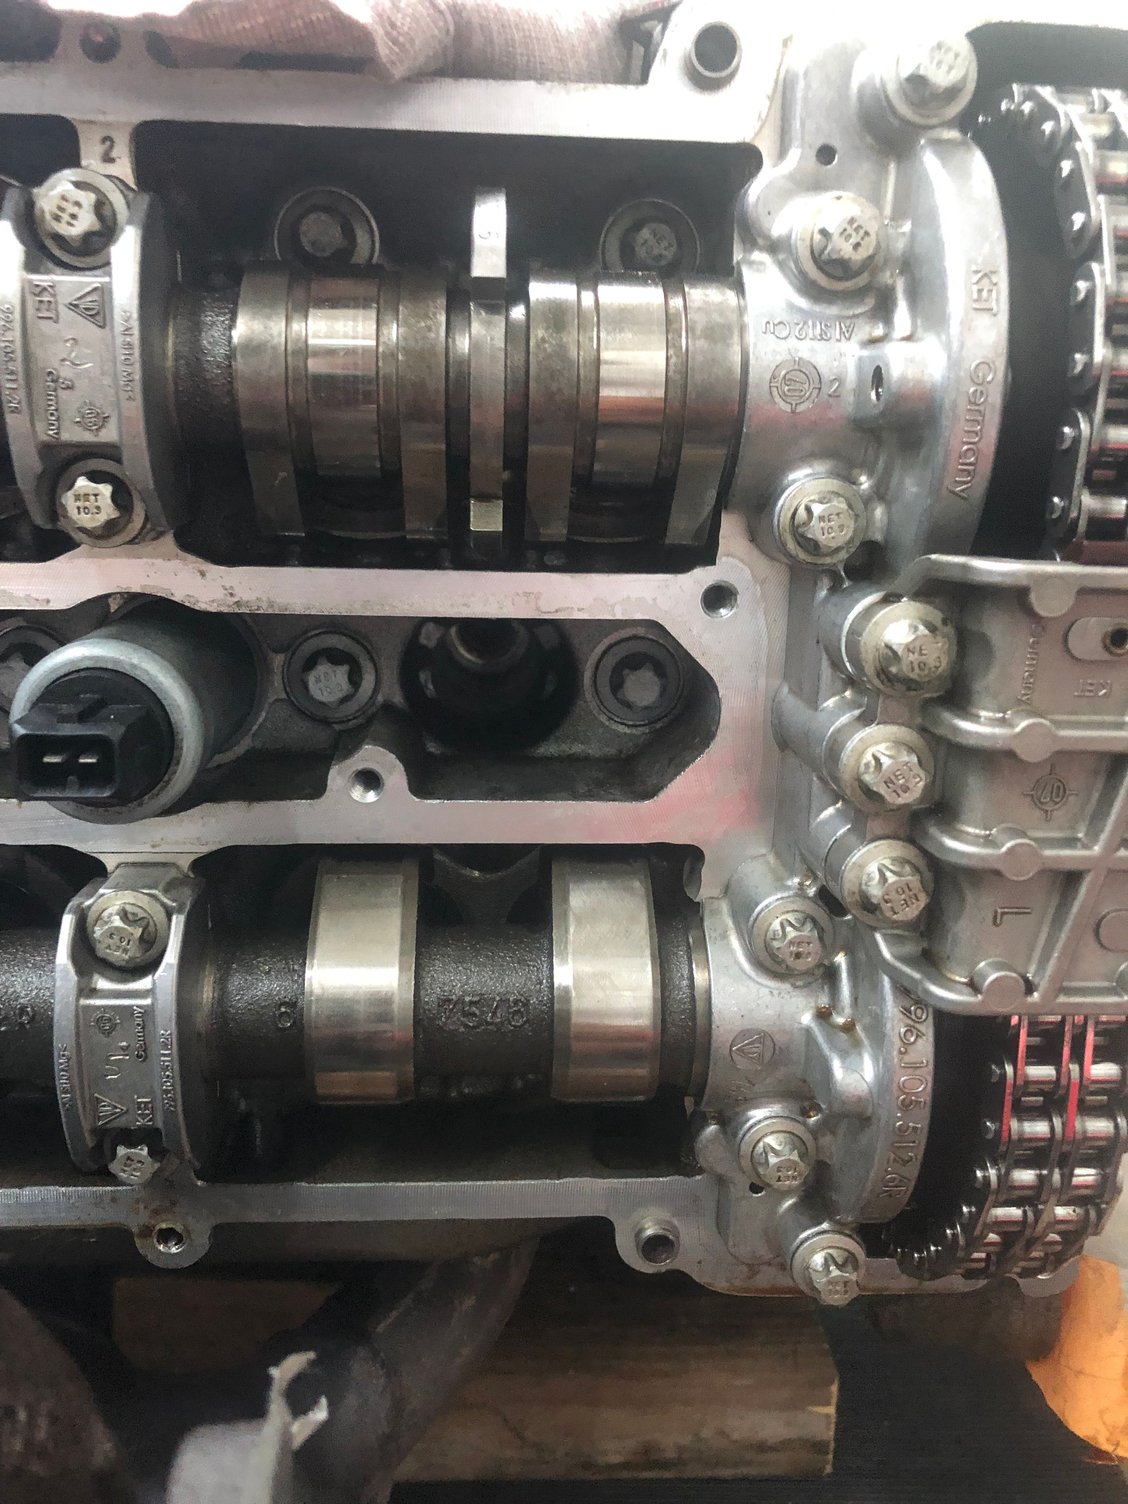
Number one task is to determine TDC. I went old school and used a screwdriver (checking a dozen times for that sweet spot just before it starts to drop). Once you have TDC (which I had from when I took everything apart), the cams must be installed oriented the right way (1-3 - Cyl 1 exhaust/intake lobes face inward toward each other, 4-6, Cyl 4 face outward away from each other):
1-3:
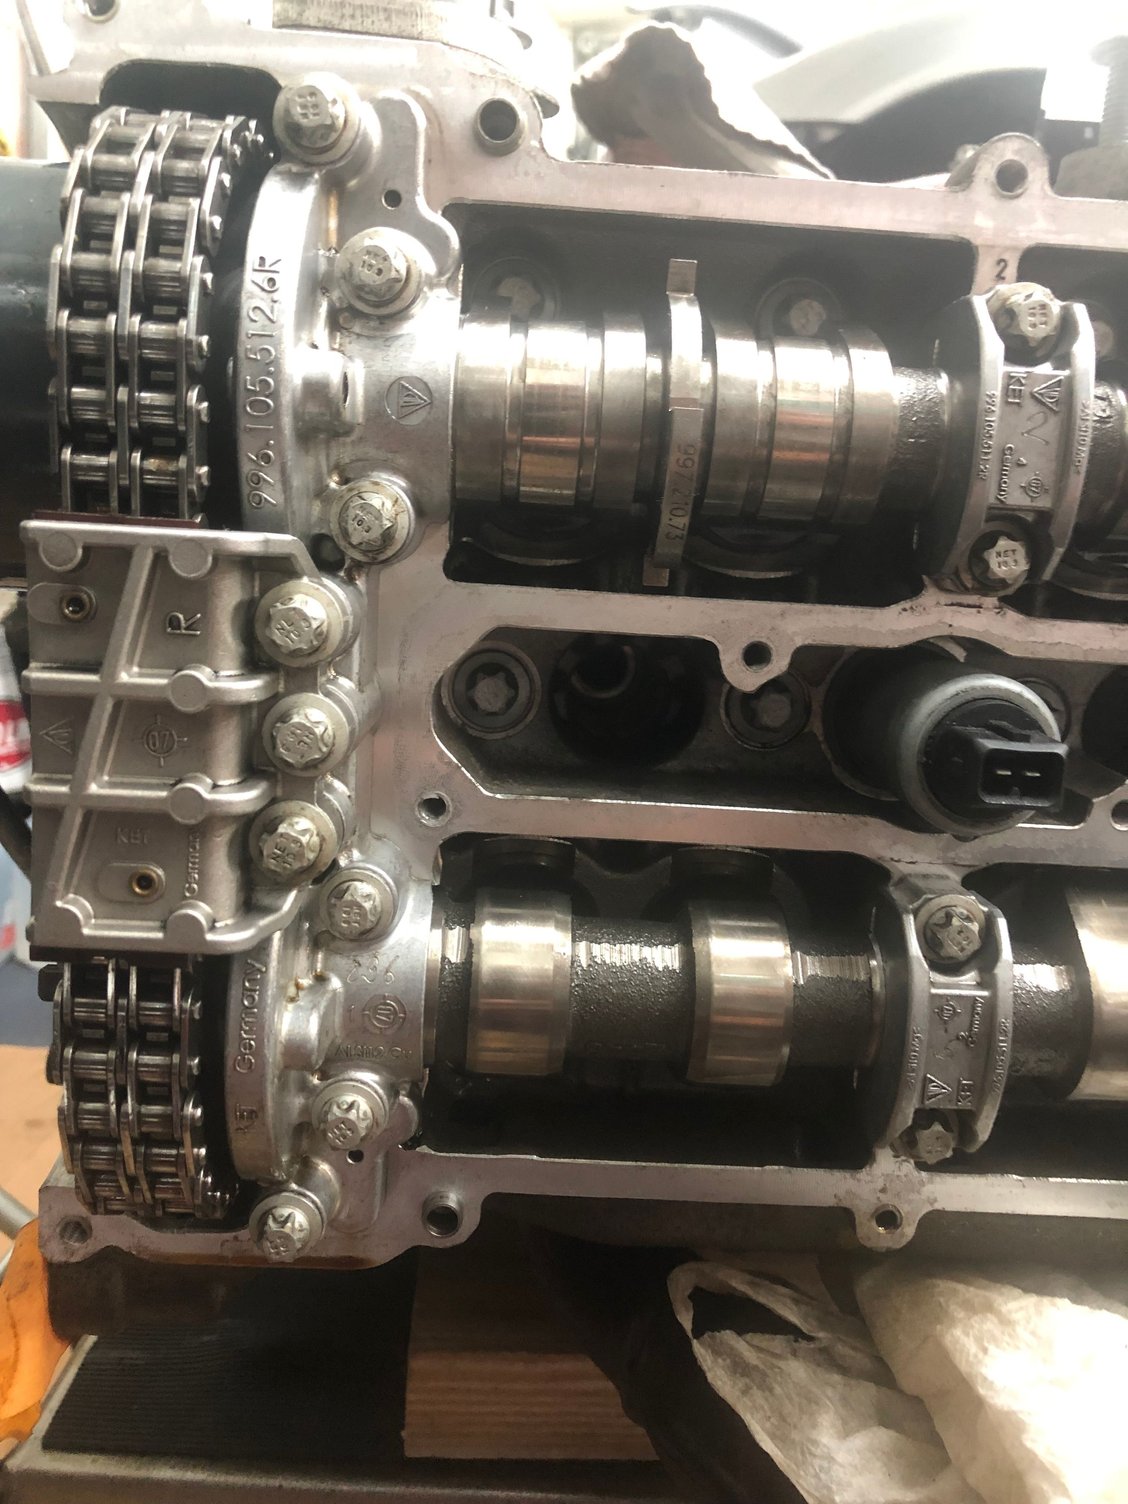
4-6:
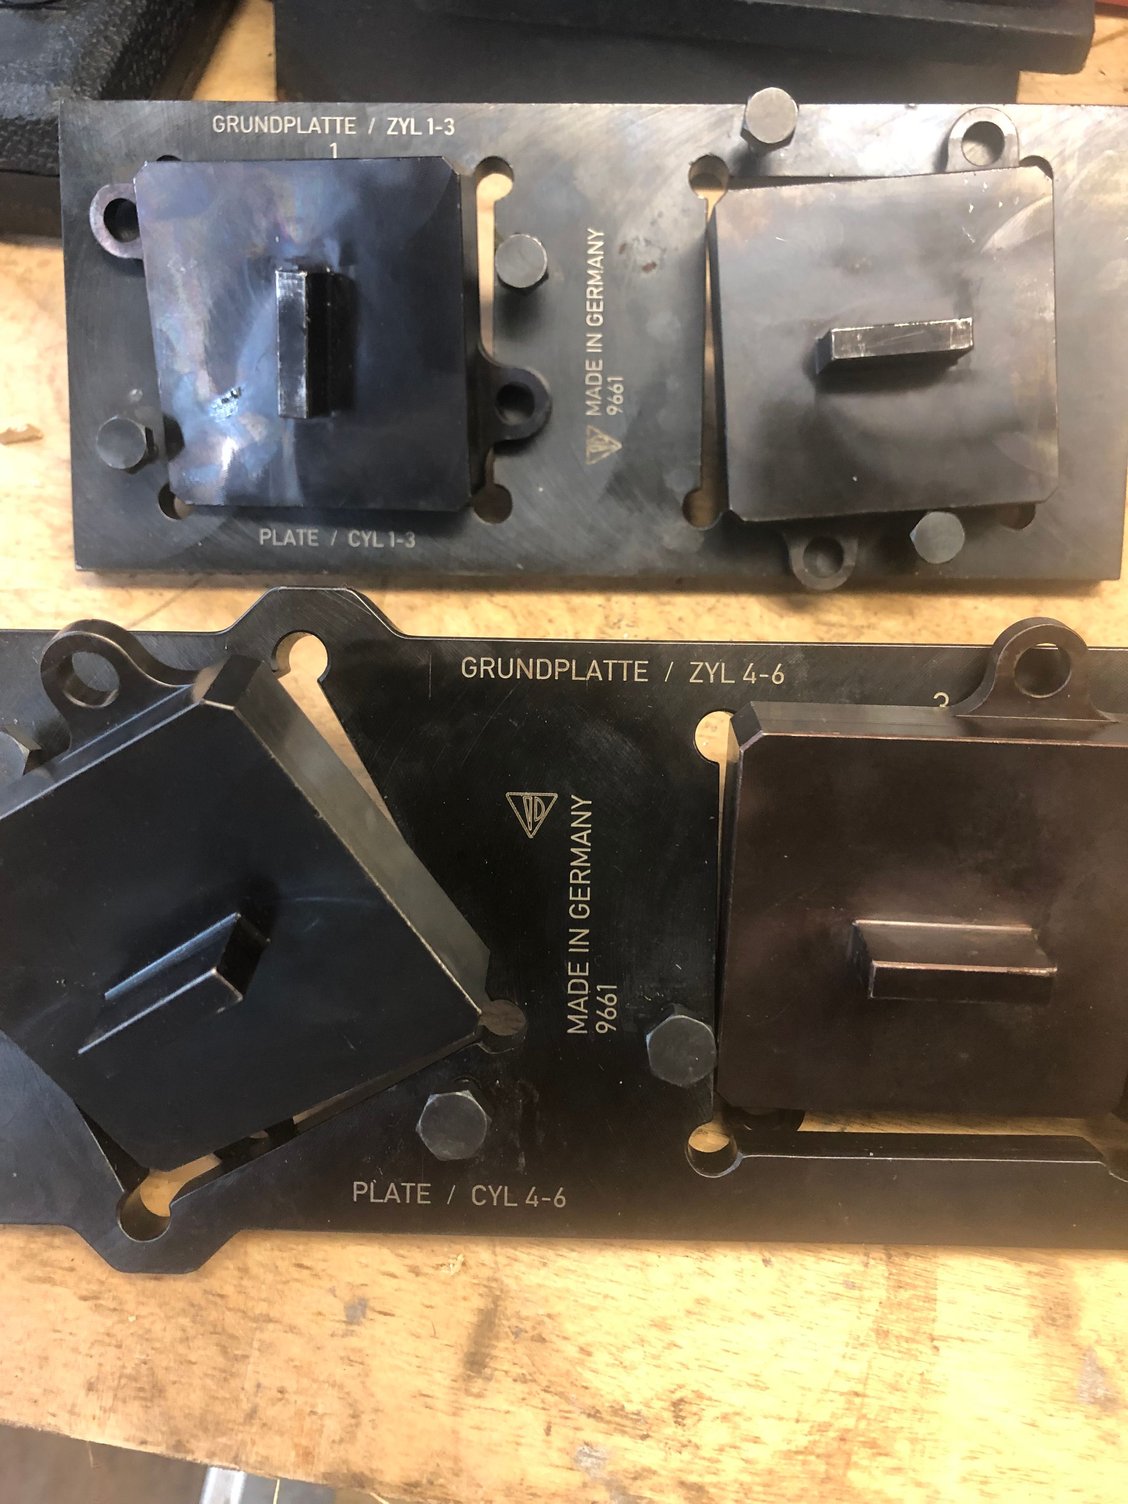
That's their initial position. You then attach the fixtures that hold the plates to the back side of the cam housing with 2 M6 x 20 screws on each bank. Very lightly, screw in the plates (they are marked for intake/exhaust and top) finger tight only. The plates are machined to fit in with little play, so any canting of the plate in the fixture will cause it to hang and not be able to slide into the slot on the end of the cam.
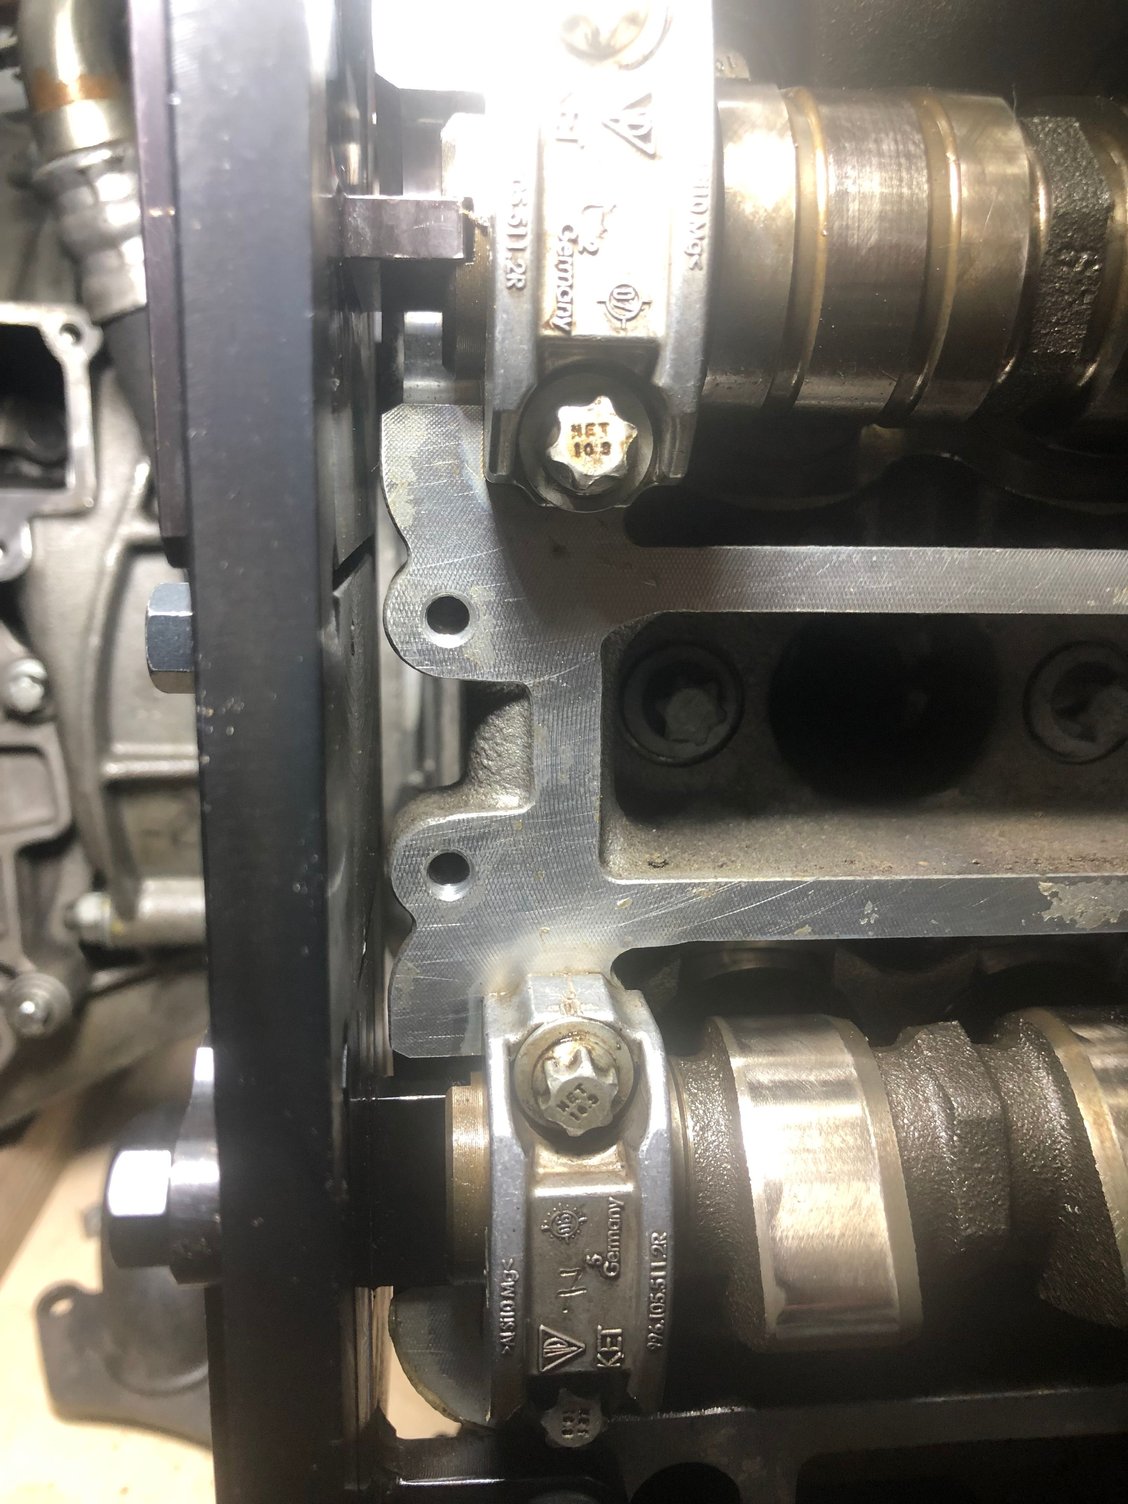
Fixtures on Cam Housing (You can see the slots on the end of the cams that the tabs have to fit into):
Plates mounted in Fixtures:
Starting with 1-3 you use a 30mm open end wrench (at least on the 1-3 side, on 4-6 the turbo forced me to use an adjustable wrench) with the hex shape built into the cam to rotate it into the metal protrusion on the plates for both the exhaust and intake. Once they have slid in (which is the most tedious part of the whole task and is more of an art than science) you screw them down the rest of the way on the fixture and tighten both cam bolts to their initial torque (they are torque to yield bolts and you don't want to set them all the way yet). Once 1-3 cam bolts are tightened, remove the plates on that side, rotate the crank 360 degrees and do the same to 4-6. Then remove the plates, rotate the crank again and check each side one after the other. I was so paranoid, that I must have done this 4 times. By the last one, the tabs were sliding into the slots fairly easily.
What you have to align and slide in:
It's a little late, so I will wait until tomorrow to torque the bolts down and get the cam covers on, but another big part of the process is out of the way, and thanks to my buddies at Porsche, without costing me more than a two trips to the dealer. (I gave the SM a gift card, which he then turned over to the tech who works on my vehicles there, so that should be some good karma going forward). I will return the tool tomorrow AM and finish the cam work as well.
I have a busy weekend reffing (summer tourney running a ton of games at a few different rinks) but I will be able to get some more done by the end of the weekend. I am so far behind with a unforeseen problem that set me back almost 3 months, that I really want to get this back on the road as soon as I can (done correctly though).
Ed
Last edited by lliejk; 07-19-2019 at 12:49 AM.
Reason: Added Pictures
Nice work Ed. That is so generous of the opc to let you borrow the timing plates. its a massively overpriced tool at 4k. I nearly managed to buy a set but the seller screwed me over at the last minute and sold it to someone local. Just wish someone would copy them and start selling the copies, its not difficult engineering. Looks like yours is coming on well. Have you got to sealing the heat exchanger manifold yet? Would like to see that as I know I will be doing mine to fit the new elbows under it (sharkwerks or mine are new oem in fact)
Last edited by theanalyst; 07-19-2019 at 08:53 AM.
I left the center rear housing attached (was able to get the elbows off with a little creativity) so I won't be much help there but 07silver had good advice.
I left the center rear housing attached (was able to get the elbows off with a little creativity) so I won't be much help there but 07silver had good advice.
Ed
May leave it on, but then Ive ordered the RTV now,,,, so would be a waste to not redo it lol
Last edited by theanalyst; 07-19-2019 at 05:04 PM.
Yeah, especially if you are talking about the price. I am sure if I did some research I would have found non Porsche equivalents for the grease and RTV, but I wanted absolutely zero excuses (other than my shoddy mechanics skills) coming into play with the results.
This is my second engine out, the first was a completely different deal, an Audi AAN 20v I5 Turbo that I built ready to have the turbo and ECU upgraded (it was already running a Stage 2 map), but I did none of the valve train or block work, just everything else (cooling, exhaust, ignition system, suspension, etc). I think I will wait on the hard corps engine stuff.
I am really looking forward to cranking through the rest. The cam pinning, followed by the coolant pinning were my most worrisome tasks, and other than the cam timing, they were fairly straightforward.
I think I have everything now (including the exhaust, upwards of $6k in total) so it should just be a matter of paying attention to detail and following the WM (and anything else I can get my hands on).
Obviously the comments on the post are very helpful. Hopefully everything I am doing makes sense and is following proper procedure for entire process.
Like I said, I am busy this weekend (on a break from reffing a triple) but those cam covers are going on for sure, as well as some cooling re-assembly. The only things I am not replacing are that $500 oil line from the tank to the block and the Cyl 1-3 turbo coolant (I think) line that is currently NLA.
Correct, part number is 997 106 075 75. No one has it (at least that I found).
Ed
What I have done before is cut off the metal crimp part and remove the rubber hose. Go to the part store and find a coolant hose that is the same size or close(make sure the close is smaller not bigger) and just clamp both ends. This way the hose is new I have seen a good amount of those hoses split.

 07-17-2019, 10:32 AM

 thanks


 so if I have to do it I will buy the copy set from the us).