When you click on links to various merchants on this site and make a purchase, this can result in this site earning a commission. Affiliate programs and affiliations include, but are not limited to, the eBay Partner Network.
We sold the two available Rev2 button sets just now. So we're out of stock again for a few weeks. I guess we better get going on that next batch! If you;d like a set, give us a call or a PM. We'll reserve a set for you.
We sold the two available Rev2 button sets just now. So we're out of stock again for a few weeks. I guess we better get going on that next batch! If you;d like a set, give us a call or a PM. We'll reserve a set for you.
I thought I'd see a link to instructions how to remove old buttons but I can't find now. New ones on the way so I need to get hot. Can someone please point me in the right direction?
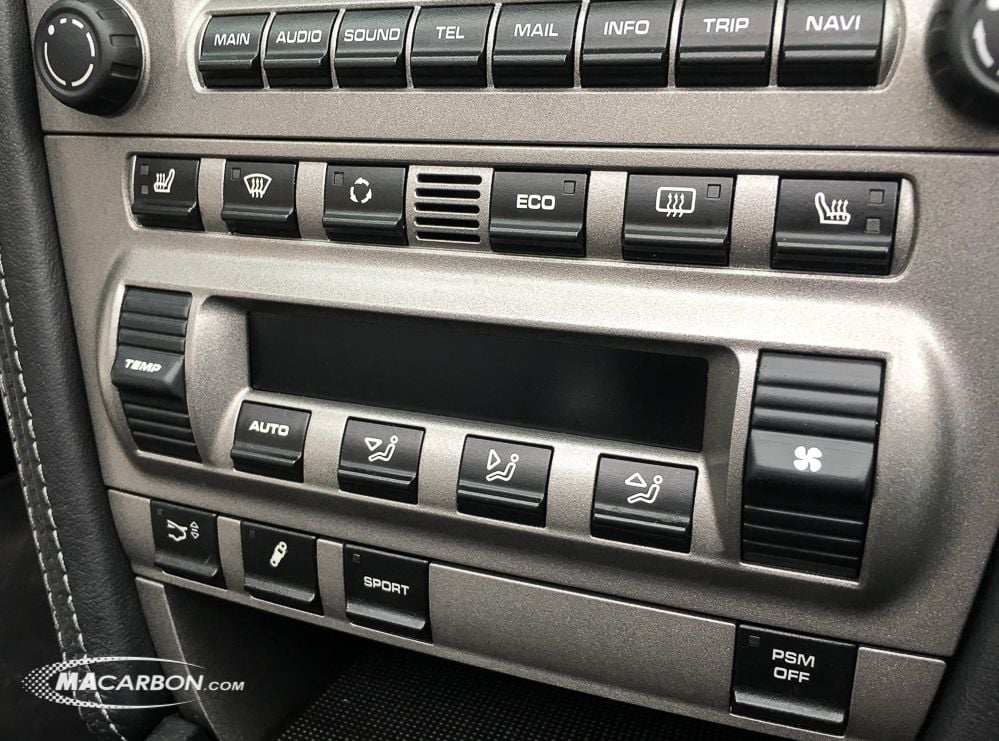
We had a local customer come in this week for us to install his refinished buttons. We too the opportunity to make a complete install guide. This covers the complete process including how to remove the unit from the car. Install time is about an hour and a half. I always recommend disconnecting the battery when working with any of the electronics modules. Its probably not really necessary in this case but better to be safe than sorry.
3 of the 4 of the latest production run (Batch 3) are sold. Five of the six core sets from batch 2 are still out. So once those are back, including the ones from Jmorski, we'll get batch four going. We've been trolling eBay to pick up a few more sets but we already vacuumed up most of the low hanging (read inexpensive!) fruit.
Cores are tough. Too few and the wait is too long. Too many and in the end the product did't produce any economic benefit! Right now we have nine sets, which seems about right.
We had a local customer come in this week for us to install his refinished buttons. We too the opportunity to make a complete install guide. This covers the complete process including how to remove the unit from the car. Install time is about an hour and a half. I always recommend disconnecting the battery when working with any of the electronics modules. Its probably not really necessary in this case but better to be safe than sorry.
Just installed MACarbon buttons. Great product. Regarding the installation procedure and instructions:
1. I have BOSE system in an 07 C2S but there was no base speaker thing to take out as the instructions would have you believe. Simply find the torx screw hidden in the carpet. Then unscrew the side panels.
2. We didn't have to entirely remove the side panels to get the controller out, which was a good thing as we couldn't get the top clip to release even after prying a lot. Instead, we were able to rotate them up enough, while attached, to press in the clips holding both sides of the unit. It came out and the electrical connector disconnect easily.
3. I think it is step 18 in the otherwise very helpful instructions that calls for a T7 driver for the 4 corner and 8 circuit board screws. I thought I had a good set of torx tools but I didn't. My sets only went down to T10. Quick trip to Harbor Freight. Then, it was NOT T7, instead T6. So, make sure you have a T6.
4. Then, it is obvious how to use the picks to spread the holders on either side of the buttons. However, while they are spread we struggled with what to pry and push to have the old button come out. Finally, we pushed down on the cylindrical, vertical pins, bottom one first, and the button popped out. It took us 3 hands. The cylindrical pins go back in only one way and the new buttons popped right in. Make sure the "Temp" and "Fan blade" graphics are on the up side.
5. Then the LCD related layers. We had to go to another on-line source to figure out how the LCD panel and related parts went back in as the white plastic, black plastic, etc., got out of order. The black panel goes back into the assembly first. It's what you see when everything is together and working. Then the thin white plastic layer goes on top of that. Then the big piece that holds it all in, The little rubber vertical rectangle slides in on the top right side. Then the large rubber piece covers it all. Then the green circuit circuit board goes on top. The LCD's are on the circuit board. They shine through the white plastic piece and the resultant white light then shines through the black window, which is what you see.
If you are like me, do what I wish I had done better -- be very observance how it was together as you take it apart.
All in all, it was easy to do, even for me, and it looks 100% better. Great job, MACarbon!
Good tips. I hade the same problem with the lcd layers. Luckily I was doing toggles in both my 997s at the same time so took the other one apart more diligently so I'd know how to put both back together.
The Bose amp in the passenger footwell is only in Cabs. In coupes the main amp is against the front wall in the frunk and the amp for the subwoofer is inside the subwoofer enclosure in the back.
Thanks jfort for the feedback. I have updated the guide to reflect your feedback. The T6 is the right screwdriver. My T7 fit OK since its seen some mileage but those screws are T6s. For removing the buttons, I've blown up the removal photo a little more and added some arrows. I also added a photo of the layout for the LCD. Hopefully this helps. For the side panels, I've added a note about rotating them. But I prefer to take them out. It also helps with cleaning when you put everything back together.
We have Batch 3 coming in tomorrow. Three of the four sets are sold. If anyone is ready to move forward, please order through the site or call us at the shop. +1.65.489.4415. I don't expect batch 4 to be done for another 4-6 weeks as the Batch 2 cores have been a little slow coming back.
Here is the link for ordering: https://macarbon.com/index.php?optio...=47&Itemid=658
Hey guys if you want to you can paint these yourself, if you sand of the old paint then just use vinyl letters to mask of the temp word and a fan shaped sticker, spray them with plasitidip and remove the stickers they come out perfectly
Finn, you are a better painter than I am. I tried the plastidip and found 1) the vinyl letters tend to lift the surrounding plastidip when you try to remove them, 2) the plastidip has a courser texture and a bit less gloss than the factory coating and in my case at least, wasn't a perfect match, and 3) wasn't very durable. I'm sure yours turned out great, but I didn't think it was that easy. And wasn't satisfied with what my skill level was able to,produce.


 12-22-2017, 09:31 PM