
has anyone done led upgrade from RotTec?
 04-01-2011, 12:27 AM
#31
Poseur
Rennlist Member
Rennlist Member
I didn't go to the effort to secure things. I suppose I should have, but I didn't have any issues with it before.
What I do like now is that that black socket/plug fits a lot more securely than it did before. As you know, they are bayonet fittings, but when that black plug is in the fog light receiver it simply didn't twist enough to lock on. Now it does.
In the future, RotTec needs to solve these issues with good photos and perhaps better labeling on their kits. I think we wound up as their prototype guys proof-fitting things.
 04-01-2011, 12:52 AM
#32
Rennlist Member
I didn't have any issue with it before either, but there was a clip that attached the wiring to the rear of the light assembly. That clip is not on the new light assembly so I think the wires end up being lose in there.
I agree, better labeling and instructions are key. There have got to be several users that are still hooked up incorrectly and receiving error messages on their dash.
I'm looking forward to a front DRL setup from them.
I agree, better labeling and instructions are key. There have got to be several users that are still hooked up incorrectly and receiving error messages on their dash.
I'm looking forward to a front DRL setup from them.
04-01-2011, 05:24 AM
#33
Rennlist Member
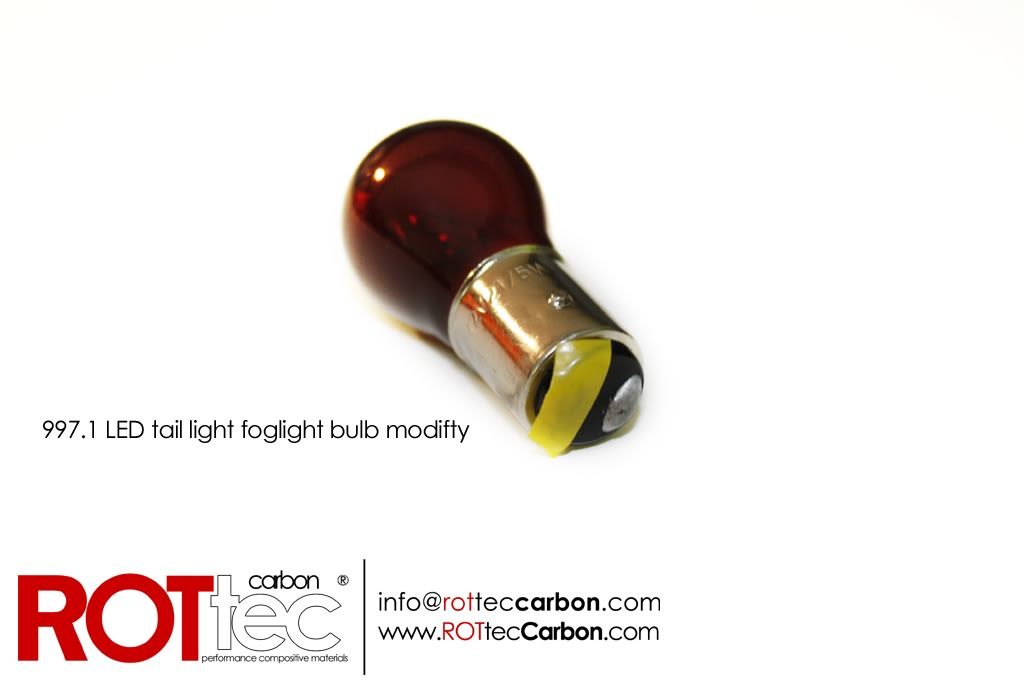
Even though I still had everything hooked up correctly, my rear fog was still on (on both sides) even without me turning it on. That's when I decided to switch the tape from one contact on the red bulb to the other and then the rear fog was off normally but could be turned on.
This is the picture that is wrong (at least for me):
Also, I did not tape up the wires, but as far as I can tell I have no rattle. Perhaps one of these days I will, just to be sure.
I have a comment on the condensation. Note that in the back of the cluster there are some small flexible tubes, which allow the light to breath. These are facing down, and thus after a power wash, if water builds up on the area where the lights sits in, it is likely after a spirited run for the water to evaporate and go into these little tubes. I believe if people that have issues turn them facing the side, rather than the floor, it could improve the situation...

Good luck everyone!
04-01-2011, 09:49 AM
#34
Rennlist Member

I agree the first photo was wrong but after looking at the diagram of the bulb placement in the OEM lights (in the owner's manual) and then comparing that to the back of the new fixture I was able to figure it out...but only after putting my glasses on - each of the sockets on the new light is labeled in the plastic backing...but as i said, I needed glasses to see it clearly. These lights look great!!
04-01-2011, 01:45 PM
#35
Poseur
Rennlist Member
Rennlist Member
Thanks for the venting tip. If I continue to have an issue I will try a new position for them, and try again. Although they would add to cost of the unit, Gore makes some very nice one way membrane vents which I used to use on electronic gear. I recognize that with the LEDs in there things can get a little hot, and a suitable provision for venting is needed.

Last edited by Edgy01; 10-12-2011 at 03:41 AM.
04-01-2011, 02:23 PM
#36
Rennlist Member
Thanks for the venting tip. If I continue to have an issue I will try a new position for them, and try again. Although they would add to cost of the unit, Gore makes some very nice one way membrane vents which I used to use on electronic gear. I recognize that with the LEDs in there things can get a little hot, and a suitable provision for venting is needed.

04-01-2011, 06:07 PM
#37
Poseur
Rennlist Member
Rennlist Member
Once I finally got the proper instructions, I am pleased with the outcome. The unit seems to fit well within the space of the older unit. When all is said and done, it is remarkable that Porsche didn't simply come up with this solution, but had to have a solution that entailed replacing the rear bumper cover. That's Detroit thinking at its finest. There was no obvious reason when the footprint could remain the same--other than marketing. The minimal marketing posture of Porsche decades ago was what brought me to Porsche. You could go years without any physical change to the external appearance of a Porsche. And then they discovered marketing, and facelifts, and the rest of the crap.
04-01-2011, 06:13 PM
#38
Rennlist Member
Once I finally got the proper instructions, I am pleased with the outcome. The unit seems to fit well within the space of the older unit. When all is said and done, it is remarkable that Porsche didn't simply come up with this solution, but had to have a solution that entailed replacing the rear bumper cover. That's Detroit thinking at its finest. There was no obvious reason when the footprint could remain the same--other than marketing. The minimal marketing posture of Porsche decades ago was what brought me to Porsche. You could go years without any physical change to the external appearance of a Porsche. And then they discovered marketing, and facelifts, and the rest of the crap.
04-01-2011, 10:37 PM
#40
Rennlist Member
06-24-2011, 01:31 AM
#42
Rennlist Member
Just for reference for others that may come across this thread, there is another alternative ( Dectane ) that IMHO is a better route and cheaper (cost me ~$610.00 USD to my door).
Here is link from 6speed where this topic has spread like a brush fire and the 6speed guys (including myself) cleaned out suppliers inventory in a week!
http://www.6speedonline.com/forums/9...s-dectane.html
Now one of the supplier is talking with manufacture to see if they can come up with cost effective DRL LED solution as they did to taillights.
06-25-2011, 04:34 PM
#43
Just for reference for others that may come across this thread, there is another alternative ( Dectane ) that IMHO is a better route and cheaper (cost me ~$610.00 USD to my door).
Here is link from 6speed where this topic has spread like a brush fire and the 6speed guys (including myself) cleaned out suppliers inventory in a week!
http://www.6speedonline.com/forums/9...s-dectane.html
Now one of the supplier is talking with manufacture to see if they can come up with cost effective DRL LED solution as they did to taillights.
Here is link from 6speed where this topic has spread like a brush fire and the 6speed guys (including myself) cleaned out suppliers inventory in a week!
http://www.6speedonline.com/forums/9...s-dectane.html
Now one of the supplier is talking with manufacture to see if they can come up with cost effective DRL LED solution as they did to taillights.
Before:

After:
 06-25-2011, 06:09 PM
#44
Burning Brakes
Agreed with the above 2 posters. Quality is @ OEM level and brightness is the same as 997.2 OEM Lights, at a price that is significantly cheaper than what has been offered thus far. A true plug and play as Ynot mentioned.