

has anyone done led upgrade from RotTec?

 03-07-2011, 02:33 PM
#17
Rennlist Member
 03-07-2011, 08:12 PM
#19
Rennlist Member
Did a short writeup with pics at the Turbo forum HERE
My experience was also very positive. Just washed the car a couple of days ago and the weather turned bad, so I havent checked for condensation.
If I may point out, the lights have little tubes to "breath" and dry up in case moisture does enter, and these tubes are U shaped and point downwards. So perhaps they are picking up moisture that seeps under the light when washed...
03-07-2011, 08:18 PM
#20
Poseur
Rennlist Member
Rennlist Member
The only problem with the OEM red tails is that all you're getting for your big bucks are red looking lenses. With the RotTec job you get fully redesigned LED integrated lights.
Last edited by Edgy01; 03-07-2011 at 10:10 PM.
03-07-2011, 08:20 PM
#21
Rennlist Member
Oh to answer the original question... install is not 15 minutes, as I expected, its more like 45 minutes or an hour doing it for the first time.
Its one screw that holds the light cluster in place. just be careful prying that light out, I almost broke a corner off. Gently pull towards you, not push out.
As far as the connections go, the only counter intuitive bit is that the first of the series of bulbs in the factory light is the fog, which goes last in the LED assembly, while the last is the break light which goes first in the LED assembly. Makes a mess of the wires but it works. And you have to get a red dipolic (2 filaments) bulb to replace the clear fog.
03-08-2011, 10:48 AM
#22
Rennlist Member

Oh to answer the original question... install is not 15 minutes, as I expected, its more like 45 minutes or an hour doing it for the first time.
Its one screw that holds the light cluster in place. just be careful prying that light out, I almost broke a corner off. Gently pull towards you, not push out.
As far as the connections go, the only counter intuitive bit is that the first of the series of bulbs in the factory light is the fog, which goes last in the LED assembly, while the last is the break light which goes first in the LED assembly. Makes a mess of the wires but it works. And you have to get a red dipolic (2 filaments) bulb to replace the clear fog.
Its one screw that holds the light cluster in place. just be careful prying that light out, I almost broke a corner off. Gently pull towards you, not push out.
As far as the connections go, the only counter intuitive bit is that the first of the series of bulbs in the factory light is the fog, which goes last in the LED assembly, while the last is the break light which goes first in the LED assembly. Makes a mess of the wires but it works. And you have to get a red dipolic (2 filaments) bulb to replace the clear fog.


 03-11-2011, 03:19 PM
#25
Poseur
Rennlist Member
Rennlist Member
Just don't select the rear fogs until they get you set up with a set of special bulbs for that application. If you do get any codes, disconnect your battery for a couple of minutes, reconnect, and then drive about a half mile to clear everything up.
03-31-2011, 10:05 PM
#26
Poseur
Rennlist Member
Rennlist Member
Finally got my rear red lamps from the folks (Ray) at RotTec. Needed some help from a fellow Rennlister who helped me through correcting a problem--original instructions were incorrect.
I now have working LEDs in the rear, as well as a properly functioning rear fog light--no codes. As you can see in this first shot, the rear fog light is on (typically only on the driver's side in the USA--two in the UK).
I now have working LEDs in the rear, as well as a properly functioning rear fog light--no codes. As you can see in this first shot, the rear fog light is on (typically only on the driver's side in the USA--two in the UK).
03-31-2011, 11:13 PM
#27
Rennlist Member
I found the instructions to be incorrect as well.
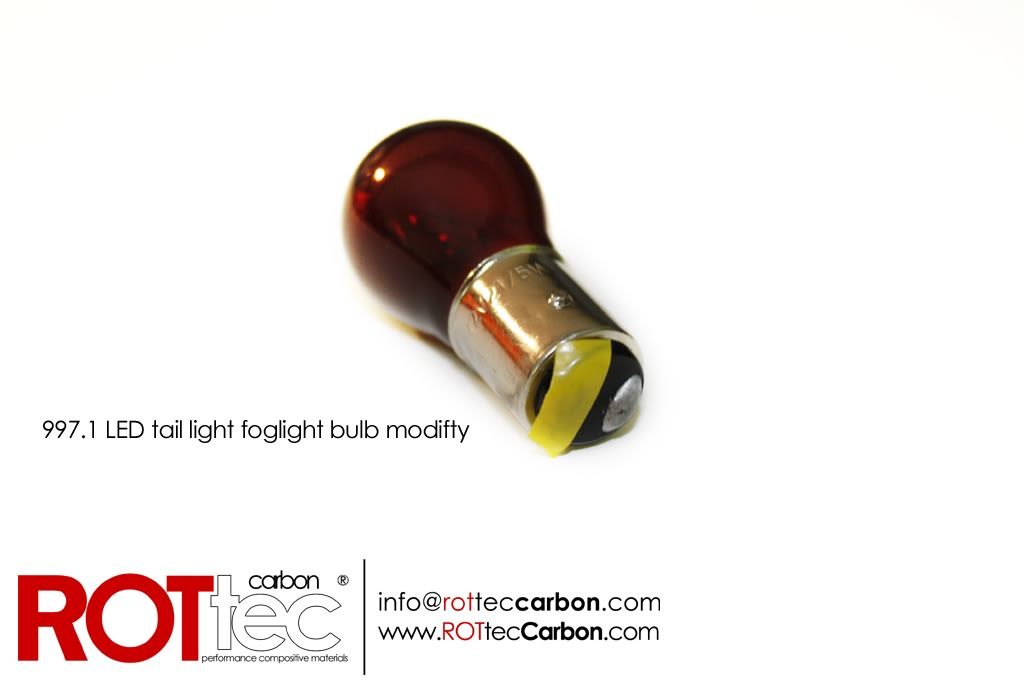
The picture of the bulb that they provided had the wrong contact taped. Once I swapped the tape to the other side, everything seems to work great with no error codes.
Dan, is that the problem that you had?
The picture of the bulb that they provided had the wrong contact taped. Once I swapped the tape to the other side, everything seems to work great with no error codes.
Dan, is that the problem that you had?
03-31-2011, 11:25 PM
#28
Poseur
Rennlist Member
Rennlist Member
The problem that I had was with their first set of instructions. (I had never learned that there was a second set!).
When I compared my install to their first instructions, it was a match. When the red bulbs arrived to go into the fog light holder my first clue was that they had one terminal taped off--but the socket was a one terminal socket!
With the aid of Jeff on Rennlist he sent me a photo and from Ray mentioning a "white socket" IO figured it out.
BTW, I also used some silicon spray on all the rubber seals just to insure a better fit to keep moisture out.
(1) their wrong instructions
(2) what I did to comply
(3) how it really should go
04-01-2011, 12:11 AM
#29
Rennlist Member
I ran into some of those issues but after awhile of not being able to get things right I began searching on 6speed and finally found a post that described the change that then became the second set of instructions.
Even though I still had everything hooked up correctly, my rear fog was still on (on both sides) even without me turning it on. That's when I decided to switch the tape from one contact on the red bulb to the other and then the rear fog was off normally but could be turned on.
Good idea on the silicon spray.
This is the picture that is wrong (at least for me):
04-01-2011, 12:15 AM
#30
Rennlist Member
Dan - did you do anything to tape up the wires inside before fully installing the new lamp assemblys?
I'm noticing a rattle on the right rear side when I shut the passenger door. I'm wondering if some of the wires are rattling around.
I'm noticing a rattle on the right rear side when I shut the passenger door. I'm wondering if some of the wires are rattling around.