When you click on links to various merchants on this site and make a purchase, this can result in this site earning a commission. Affiliate programs and affiliations include, but are not limited to, the eBay Partner Network.
Just wanted to add I used loctite 243 on the cam cover bolts. I used a 4 point stand and added one more arm to it to reduce the stress on the engine case.
Did you use new bolts? They're micro encapsulated aren't they? Is the loctite necessary or more of a "safety net"? Also, 46 bolts total (23/side)?
Thanks again, you're turning out to be a valuable resource! I appreciate it
I've gotten a little closer over the last two nights, but not quite there yet. I've had to cut almost every nut off of the exhaust system - I haven't even tried the header bolts yet - any recommendations for these are appreciated. Two of the long bolts that hold the mufflers to the stand off brackets broke off and are seized in the brackets...I've been letting them soak and have tried applying heat, but no luck yet. I also got all the bolts (6 per side) out of the intake plenum. The plenum is loose but still being held by a few wires and hoses... probably another hour or two before I get everything off the block...
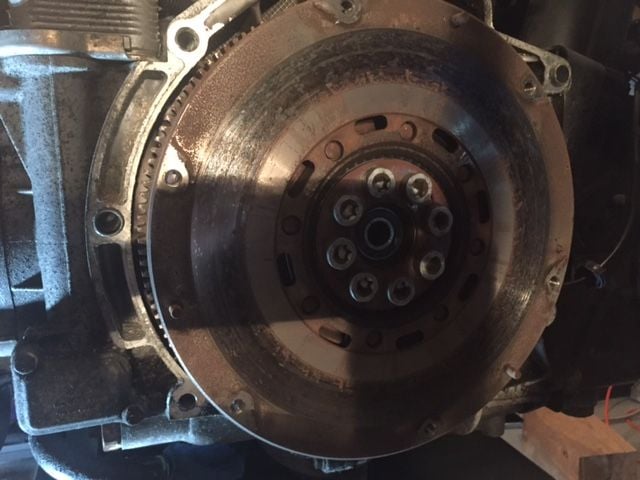
I'm also thinking about taking the clutch off and checking the thickness of the pressure plate "while I'm in here"... anything special to watch out for? Flying springs etc...?
10-4 ! Will do - I already "cracked" all the bolts, so no problems there...I wish I could say the same about the exhaust - Holy crap! What a pain in the butt. Patience is a virtue with this part of the job...
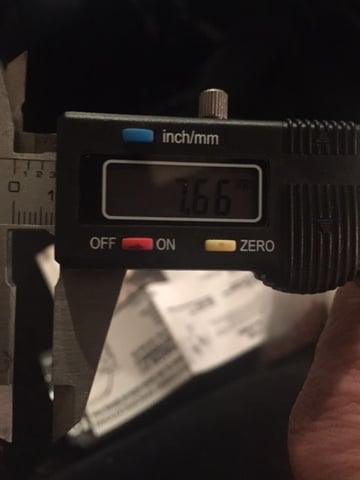
got the clutch off and got the bolts loose on the muffler hangers yesterday (only had an hour...). I was pleasantly surprised by the clutch and flywheel. The flywheel shows virtually no wear whatsoever - really just shiny where the pressure plate contacts, no ridge at all. The pressure plate measure 7.66 mm - is that close to new spec.? Does anyone have that number/measurement?
AFAIK there is no call out for the pressure plate thickness.
My factory references give a clutch disc measurement to determine if the disc is worn out.
For my Turbo one measures the distance from the disc surface to the top of the disc rivet, the flanged side of the rivet. The new dimension is 1.7mm. The clutch disc is considered worn out when the distance gets to less than 0.3mm.
Sorry, "clutch disk" is what I meant... I didn't measure depth to the rivet - I measured total thickness (both sides) I'll measure that depth today. Judging by what I looked at I'm sure there's way more than .3mm - how much, I'm not sure.
Thanks
On the exhaust bolts, Use a 1/4 or 3/8 impact with twin hammer and no more than 35ft/lbs torque but high impacts per minute 2k-3k. The hammering vibration is more effective at loosening rusted corroded bolts than a steady pull by hand. I have seen many of these broken off , so many that there is a jig made for drilling and retaping them.
Thanks for the suggestion! All the exhaust components have now been removed. Sorry - no pictures, I forgot my phone last night...All the bolts came out of the heads with no problems. Many of the others broke, but were removed fairly easily. The only ones that are still seized are the ones in the muffler support "isolators" - where a long M8 bolt runs through a sleeve in the isolator. The nuts snapped off as soon as I tried to turn them. I sourced a pair of isolators on ebay for $65 each, so if I have to destroy mine I will - if not I'll re-sell the ones I bought.
Sorry, "clutch disk" is what I meant... I didn't measure depth to the rivet - I measured total thickness (both sides) I'll measure that depth today. Judging by what I looked at I'm sure there's way more than .3mm - how much, I'm not sure.
Thanks
The spec is the minimum distance between the head of the rivet (the star burst side, not the smooth side) and the top of the disc is > 0.3mm. New is about 1.9mm
The Cam cover bolts are full thread Machine bolts. There is no shoulder. I have noticed this apparently sloppy specification for fasteners elsewhere on the engine.(Rod & Head Bolts for example !).
My (OCD?) objection for the cam cover bolts is that the full length threads provide a perfect capillary pathway for oil all the way to the head of the bolt, where it may drip,drip,....
A case could be made to apply a smidgen of thread sealer(not Locker!) under the head of each cam cover bolt ?
There is one bolt on the Cam cover (you will find it !) that is rather difficult to access. I replaced it with an Allen/internal socket head bolt +washer of the same spec. Easier to remove now.
BTW , how would you feel about switching to stainless steel fasteners for the entire exhaust system and studs for the headers?
I'm not sure if I've ordered my cam cover bolts yet... I've ordered so much stuff I can't keep track of it all. Fortunately nothing has been too expensive... yet... The header bolts didn't give me any problems at all. I'll probably stick with bolts this time around. I do think stainless steel hardware for the rest of the exhaust system may be in order in addition to liberal amounts of anti- seize - had whoever worked on this thing last time done it I would have fine (it's got fabspeed maxflow's on it so I know they're not original).
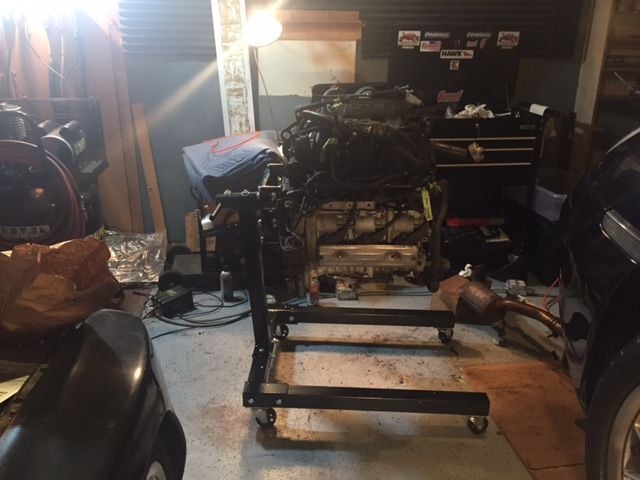
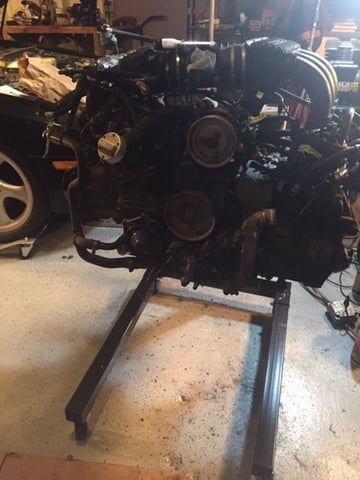
Quick update... I finally got the engine on an engine stand (had to get a different one as the first one I got with a "T" base wouldn't fit under the hydraulic table that the engine was on...).

 04-26-2017, 02:07 PM


 Thanks again, you're turning out to be a valuable resource! I appreciate it