


Identify convertible top part.

Thread Starter
Racer
Joined: Oct 2012
Posts: 263
Likes: 1
From: London Ontario
I need this "drive link" as I think my is gone. Is there a part number for that?
8 just says locking device. Not sure if it includes the link.
I can't open my back lid and I think this cable is seized. If it wasn't seized I could just use emergency top opening sequence.
8 just says locking device. Not sure if it includes the link.
I can't open my back lid and I think this cable is seized. If it wasn't seized I could just use emergency top opening sequence.
Three Wheelin'

Joined: Apr 2010
Posts: 1,708
Likes: 78
From: Delaware, USA
I think part#8 includes the entire cable. However, I think you might want to figure out if it's part #4 (which actually moves Part #8.
Read my saga with part #4 here:
https://rennlist.com/forums/996-foru...more-pics.html
Read my saga with part #4 here:
https://rennlist.com/forums/996-foru...more-pics.html
Rennlist Member
Joined: May 2008
Posts: 5,544
Likes: 108
From: Northern NJ
Read this thread for some ideas. Around post #16 he pulls the clamshell drive out and finds a bad cable.
https://rennlist.com/forums/996-foru...more-pics.html
https://rennlist.com/forums/996-foru...more-pics.html
Thread Starter
Racer
Joined: Oct 2012
Posts: 263
Likes: 1
From: London Ontario
Read this thread for some ideas. Around post #16 he pulls the clamshell drive out and finds a bad cable.
https://rennlist.com/forums/996-foru...more-pics.html
https://rennlist.com/forums/996-foru...more-pics.html
"The cable is a plastic-coated metal braid. The metal is twisted and bunched up, which has caused the plastic to peel. Overall, the cable is slightly too short now due to the bunching, plus it's too fat to fit smoothly inside the sheath."
But I can't access any of it since I can't open my back lid... unless I go in blind from the back and try feeling for parts... I want to find the price of the part before I cut it to see if that frees it up. once its free and gets to the end the motor will take over and move the lid up...
Three Wheelin'
Joined: Apr 2010
Posts: 1,708
Likes: 78
From: Delaware, USA
The cable that drives the hook in your photo is different than the one that failed on me. Mine was the larger cable that actually moves the clamshell, although they are driven by the same motor. If it seems to be binding, you may have the same issue I had.
I would not suggest cutting that cable. Instead, I would resort to "emergency manual" operation of the clamshell per the owner's manual.
I would not suggest cutting that cable. Instead, I would resort to "emergency manual" operation of the clamshell per the owner's manual.
Three Wheelin'
Joined: Apr 2010
Posts: 1,708
Likes: 78
From: Delaware, USA
Another way to remove the clamshell:
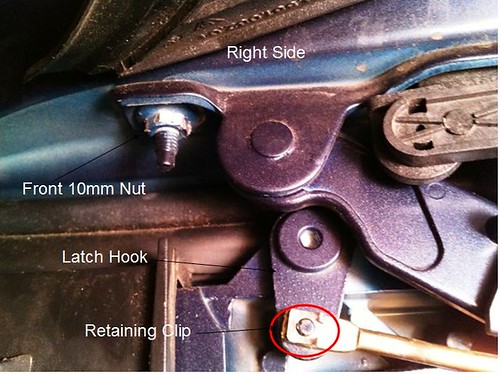
1. Disconnect the actuator arms or cables on 3 "latch hooks"
-one is in your photo. Disconnect the cable from the hook, or unbolt the latch.
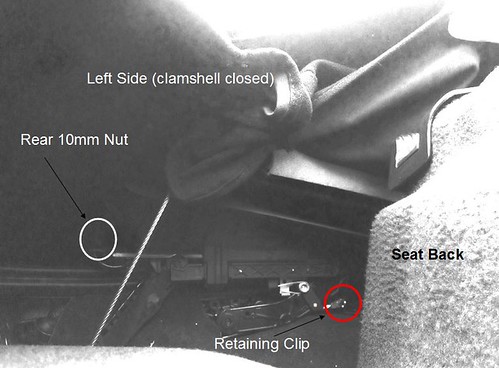
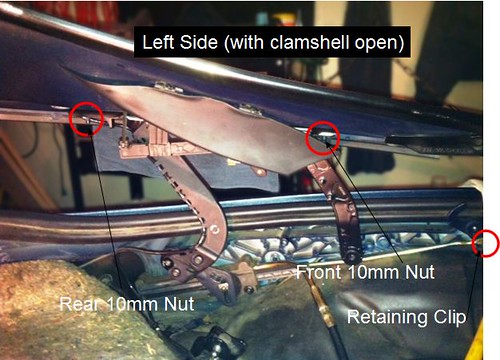
-The other two are on the left and right side. There is a small retaining clip that holds the metal "arm" onto the hook. Remove the retaining clip, and the latch will swing free.
2. Then, you need to unbolt the hinges. There are only four 10mm nuts that hold the clamshell to the hinges. The 10mm nuts are on short studs welded to the underside of the clamshell.
Then, the clamshell will lift free. (with a helper). Also, watch out for the cable that goes to the 3rd brake light.
These are all accessible by reaching into the back, although it's awkward. I just confirmed that I can access these on my car with the top in place, but I know exactly where to reach.
More pics of this entire setup (the clamshell hinge arms) can be found here:
http://www.renntech.org/forums/topic...e-replacement/
and here:
http://www.renntech.org/forums/tutor...e-replacement/
I'd recommend reading all of this to help understand how it all goes together.
1. Disconnect the actuator arms or cables on 3 "latch hooks"
-one is in your photo. Disconnect the cable from the hook, or unbolt the latch.
-The other two are on the left and right side. There is a small retaining clip that holds the metal "arm" onto the hook. Remove the retaining clip, and the latch will swing free.
2. Then, you need to unbolt the hinges. There are only four 10mm nuts that hold the clamshell to the hinges. The 10mm nuts are on short studs welded to the underside of the clamshell.
Then, the clamshell will lift free. (with a helper). Also, watch out for the cable that goes to the 3rd brake light.
These are all accessible by reaching into the back, although it's awkward. I just confirmed that I can access these on my car with the top in place, but I know exactly where to reach.
More pics of this entire setup (the clamshell hinge arms) can be found here:
http://www.renntech.org/forums/topic...e-replacement/
and here:
http://www.renntech.org/forums/tutor...e-replacement/
I'd recommend reading all of this to help understand how it all goes together.
Last edited by frisbee91; May 12, 2014 at 04:26 PM. Reason: Added photos and clarification
Thread Starter
Racer
Joined: Oct 2012
Posts: 263
Likes: 1
From: London Ontario
Another way to remove the clamshell:
1. Disconnect the actuator arms or cables on 3 "latch hooks"
-one is in your photo. Disconnect the cable from the hook, or unbolt the latch.
-The other two are on the left and right side. There is a small retaining clip that holds the metal "arm" onto the hook. Remove the retaining clip, and the latch will swing free.
2. Then, you need to unbolt the hinges. There are only four 10mm nuts that hold the clamshell to the hinges. The 10mm nuts are on short studs welded to the underside of the clamshell.
Then, the clamshell will lift free. (with a helper). Also, watch out for the cable that goes to the 3rd brake light.
These are all accessible by reaching into the back, although it's awkward. I just confirmed that I can access these on my car with the top in place, but I know exactly where to reach.
More pics of this entire setup (the clamshell hinge arms) can be found here:
http://www.renntech.org/forums/topic...e-replacement/
and here:
http://www.renntech.org/forums/tutor...e-replacement/
I'd recommend reading all of this to help understand how it all goes together.
1.so my nest step is grease. see how that work.
2. if not disconnect the cable from the motor and see if I need that mechanism at all, I guess its nice it holds the top deck but do I really need it???
3. get new drive link and re install all. hope that solves my problem
Trending Topics
Three Wheelin'
Joined: Apr 2010
Posts: 1,708
Likes: 78
From: Delaware, USA
... I have about 20 to 25% failure rate today. ...
1.so my nest step is grease. see how that work.
2. if not disconnect the cable from the motor and see if I need that mechanism at all, I guess its nice it holds the top deck but do I really need it???
3. get new drive link and re install all. hope that solves my problem
1.so my nest step is grease. see how that work.
2. if not disconnect the cable from the motor and see if I need that mechanism at all, I guess its nice it holds the top deck but do I really need it???
3. get new drive link and re install all. hope that solves my problem
I think all 3 latches are needed to secure the clamshell. Otherwise, excess stress will be put on the hinge arms, and they may eventually break.
Rennlist Stories
The Best Porsche Posts for Porsche Enthusiasts

Talos Takes Your 991 Porsche 911 GT3 to the Next Level for a Cool $1.13 Million
Verdad Gallardo
9 Vehicles Porsche Helped Engineer that Aren't Porsches
Verdad Gallardo
9 Features and Characteristics That Only Porsche People Understand
Verdad Gallardo
I've Written 500 Rennlist Articles: Here's How Porsche Has Changed Along the Way
Joe Kucinski
10 Most Unnecessary Porsches Ever Built (And Why We Love Them)
Verdad Gallardo
Porsche 911 GT3 S/C vs 718 Spyder RS: 10 Categories, One Winner
Joe Kucinski
This Builder Is Turning Heads With Its Slantnose 911 Creation
Verdad Gallardo
Porsche 911 GT3 Artisan Edition Pays Homage to Japanese Culture
Verdad Gallardo
Porsche Reveals Coupe Variant of the Electric Cayenne With a Fresh Look
Verdad Gallardo
Thread Starter
Racer
Joined: Oct 2012
Posts: 263
Likes: 1
From: London Ontario
If it's not working consistently, there is a problem. Better to find it when you have the time, rather than getting caught in a rainstorm and have the top inoperable.
I think all 3 latches are needed to secure the clamshell. Otherwise, excess stress will be put on the hinge arms, and they may eventually break.
I think all 3 latches are needed to secure the clamshell. Otherwise, excess stress will be put on the hinge arms, and they may eventually break.
So I decided to remove the link to isolate the problem. I detached it from the driving mechanism hoping for 100% openings.
After 2 days I still have 10~15% fail rate.
 , I found the top makes weird noises on the right side like something is cracking there. (it always did that). I found that If I push down on the lid I will hear this cracking and my chance of the top opening increase... maybe
I wish there was a precise diagram of the top opening/closing sequence. There are simple ones but the top is so much more complicated. At some steps you have 2 or 3 things happening at the same time.
The other problem I found my "centering lock" at the top broke and that's why the roof is not closing to the end. I guess the piece have to be down and when it reaches the windows it will move up and stop thehydraulic motor.
can't find the part number or the price for it though
I think i need the whole latching mechanism. http://www.jimellisporscheparts.com/...=0&modelYear=0
so 2 problems now. next step. ????
1. find the latching thingy. hopefully just the plastic take the mechanism apart and replace that part.
2. keep troubleshooting back, something must be rubbing against something else.. maybe greasing the joint will help.
Burning Brakes

Joined: Jun 2013
Posts: 972
Likes: 23
From: USA
You are correct regarding the "centering lock". It is only available as a complete mechanism. They are available on ebay but are still rather expensive. I had the same problem but I was able to fix the plastic lever in the centering lock that activates a micro switch that lets the top know that it is at the windshield and the "hook" can be deployed. The centering lock may be repairable. I was able to fix it and discussed the issue in this thread here:
https://rennlist.com/forums/996-foru...h-plastic.html
I considered taking the plastic-latch lever thing out of the mechanism but was not sure it is really possible. Also as far as I know the plastic latch is not available as a part on its own...
https://rennlist.com/forums/996-foru...h-plastic.html
I considered taking the plastic-latch lever thing out of the mechanism but was not sure it is really possible. Also as far as I know the plastic latch is not available as a part on its own...
Last edited by sjg1138; May 15, 2014 at 03:49 PM.
Three Wheelin'
Joined: Apr 2010
Posts: 1,708
Likes: 78
From: Delaware, USA
...The other problem I found my "centering lock" at the top broke and that's why the roof is not closing to the end. I guess the piece have to be down and when it reaches the windows it will move up and stop thehydraulic motor.
can't find the part number or the price for it though I think i need the whole latching mechanism.
http://www.jimellisporscheparts.com/...=0&modelYear=0
1. find the latching thingy. hopefully just the plastic take the mechanism apart and replace that part.
2. keep troubleshooting back, something must be rubbing against something else.. maybe greasing the joint will help.
can't find the part number or the price for it though
I think i need the whole latching mechanism. http://www.jimellisporscheparts.com/...=0&modelYear=0
1. find the latching thingy. hopefully just the plastic take the mechanism apart and replace that part.
2. keep troubleshooting back, something must be rubbing against something else.. maybe greasing the joint will help.
Regarding the clamshell lid in the back... based on your description, the first thing I would check is the operation of the sliders that move the lid and the latches. The easiest way to do that is find this bracket and make sure it's aligned properly with the lid closed:

The brackets are at the rear corners of the car, under the clamshell lid. Check both sides. Read Post #17 in the previously mentioned thread for details.
Also, post some pictures and/or videos of your problem so we can understand it better. Best of luck

Thread Starter
Racer
Joined: Oct 2012
Posts: 263
Likes: 1
From: London Ontario
I'm not 100% clear on what your other problem with the "latching thingy" is. Maybe just the black plastic trim cover on the front latching hook? (part #12 in your link.) This can be replaced without removing the front latching mechanism (p/n 996.561.787.00.01C). (link1, link2)
Regarding the clamshell lid in the back... based on your description, the first thing I would check is the operation of the sliders that move the lid and the latches. The easiest way to do that is find this bracket and make sure it's aligned properly with the lid closed:
The brackets are at the rear corners of the car, under the clamshell lid. Check both sides. Read Post #17 in the previously mentioned thread for details.
Also, post some pictures and/or videos of your problem so we can understand it better. Best of luck
... That was going to be my H&B coils money... I think I will keep closing it manually or try gluing the old one back together if I can find the pieces.As fas a video go knowing my luck when I try to film it going bad it will work perfect.
I will see if I can get something going on the weekend.
Burning Brakes
Joined: Jun 2013
Posts: 972
Likes: 23
From: USA
Those are the same prices I was seeing for the complete latch assembly. If you dont have the broken plastic latch bit, you might be able to make one somehow with a clever use of epoxy and nails or something...
Thread Starter
Racer
Joined: Oct 2012
Posts: 263
Likes: 1
From: London Ontario
I need to see how the piece fits that broke off.. i can't visualize it from the pictures. but I think I am still missing a piece from the other side.
I tried getting video of top not opening. it worked 10/10.
Thread Starter
Racer
Joined: Oct 2012
Posts: 263
Likes: 1
From: London Ontario
So,
I has some time to play around today. So might as well update might findings.
Back Lid issue, not opening
I am still experiencing about 10-20% failure date. Some dates worse than others, sometimes the top will open after a ride. Sometimes I have to press on the right side top lid to get it "loose"
Today I did some troubleshooting. I figured it has be something to do with the top lid so I took it off to see how it behaves without out and to better compare both sides.
So after taking it off it worked perfectly. No problems tried maybe 30 times. No difference between the sides everything is aligned properly as far as I could tell. I retached the back lidr and realized there is about 1cm or 3/8" of play on the screws to move the spoiler back and forth. So at first I installed it just with pushing the screws to the front as far as possible. Seemed to be doing the usual cracking etc (but still opening). So I moved it back on the right side by few mm and it seemed to be less cracking maybe none. So I hope that is the solution for that. As I can't figure anything else.
The hydraluic liquid level is low but I don't think that could be related. But never know.
youtube cracking:
youtube not opening.. you can hear at 0.03 -0.04 when the mechanism tries opening the lid and is cracking and then it gives up.
Top part. (windshield side)
So the issue with the top not closing it the little black piece that broke, Seems like common problem. That will solve most of the not closing problems. As it will fix the timing of the top closing etc.
So I took it off today to see if I can glue it and if that will help.
I realized that even if I glue it together it won't stay down. There is a spring there that is all screwed up and I don't know how to place it properly. I think the mechanism might work even without gluing if I get the spring in properly.
Does anyone have a picture how the spring should go? Or some helpfull advice. I check the other thread but the angle of the picture does not help me
You can see in the picture how my spring is all out, I tried putting it in various positions but none of it worked.