
Engine Rebuild Part 3 (the finale)

Thread Starter
Three Wheelin'
Joined: May 2010
Posts: 1,851
Likes: 9
From: Nor Cal
I can breathe a sigh of relief since the "hard part" is over and the short block is basically complete. I can honestly say I've really enjoyed completing the short block and hope to do it again sometime. I could probably do it in much less time on the next go-around. I get a great sense of satisfaction by seeing something completed (correctly) and by my own hands. This is certainly no exception.
That being said, the first time you do something you always need to stop the instant you sense anything is wrong, identify the problem, back up, ask questions, and do it again even if it means a big delay. Example in this build, backwards wrist pin clips. Doh!
At this point though, I'm much more confident with the rest of the work since I just did the heads a few months ago. I still intend to read through the manual for step by step and follow careful notes and procedure gained during the first time around last summer. And so the assembly continues...
More cleaning of the sump plate, careful application of drei bond bead, then torqued to the engine. LNE spin on oil filter adapter installed. LNE mag drain plug.

FMS installed, RMS installed. For the RMS, I re-worked Kyle's tool that I used before, adding screws to draw it in instead of beating on the thing with a hammer. It worked great.

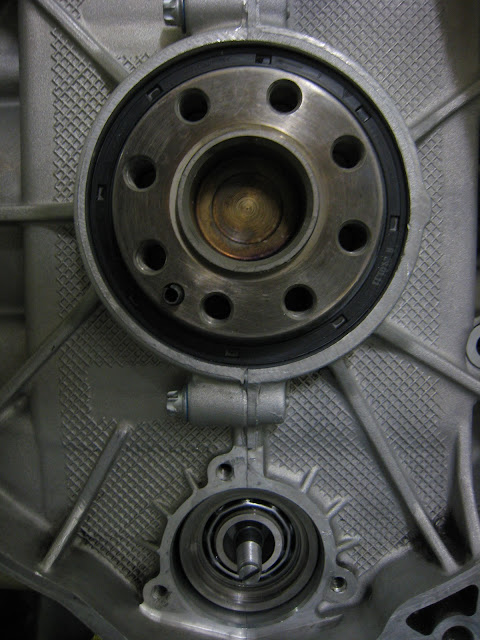
IMS tube with it's new LNE bearing (already installed while it was on the bench). A hollowed out 12 point deep socket with the sides ground down allows the use of a crows foot and inch pound torque wrench to tighten to factory spec. A TINY amount of green loctite this time for the center support stud. A little flange sealant on the perimeter seal and under the fresh micro-encapsulated flange bolts.


ARP head studs (re-usable) will allow me to pull the heads again without replacing the stock bolts. They are carefully cleaned and lubed up with ARP moly prior to installation. Anyone besides me use these before?

A final cleaning and inspection of the case, head, and gasket surface, they must be perfectly clean. The heads were also given several hours of "once over time" for cleaning and inspection. As you can see the heads were decked, .002" removed to get them flat and mirror-like. And remove the rubber band and sprocket, let the chain drape down in the case and fish it out later after the head is installed. Then add the sprocket later.

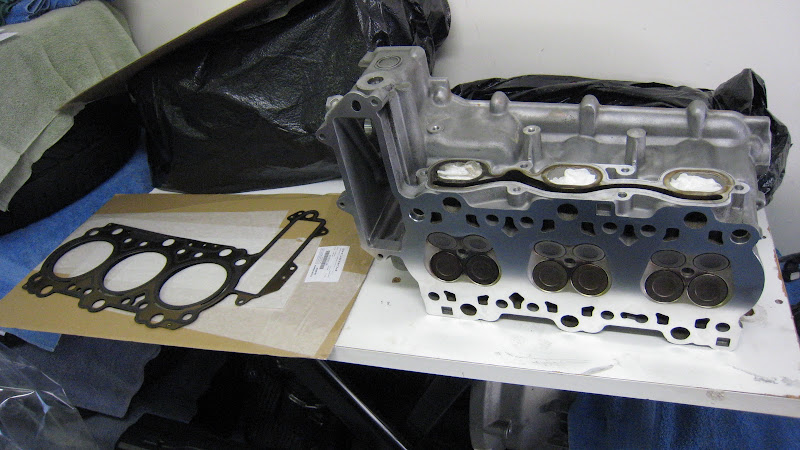
The 3.8L head gasket from the 997 requires some modification on the 3.4L case. One of the perimeter chain box bolts requires a hole to be carefully made in the head gasket.

Once the head is set in place, the head studs, washers, and nuts are installed per ARP specfications.


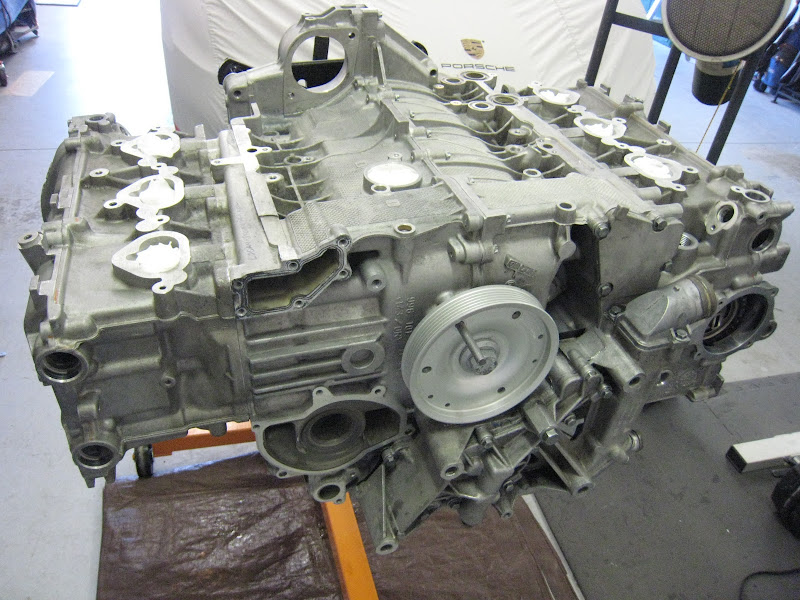
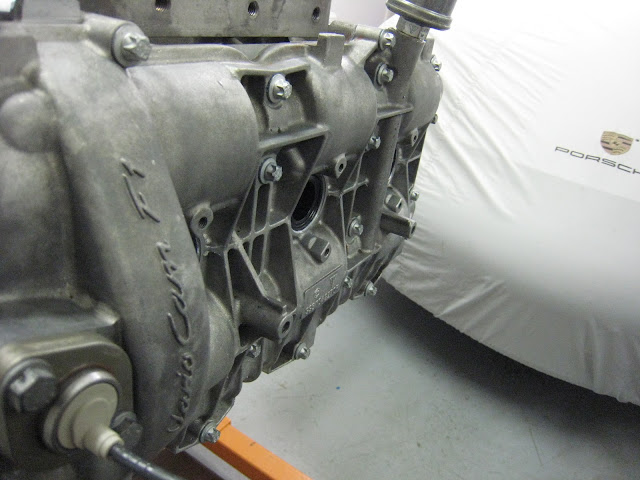
The case flipped around and the other head bolted on. The long block is nearly ready to set the cams. (Note, the cam covers are just fitted loose, without sealant and just a couple bolts at this time while the engine sits overnight).
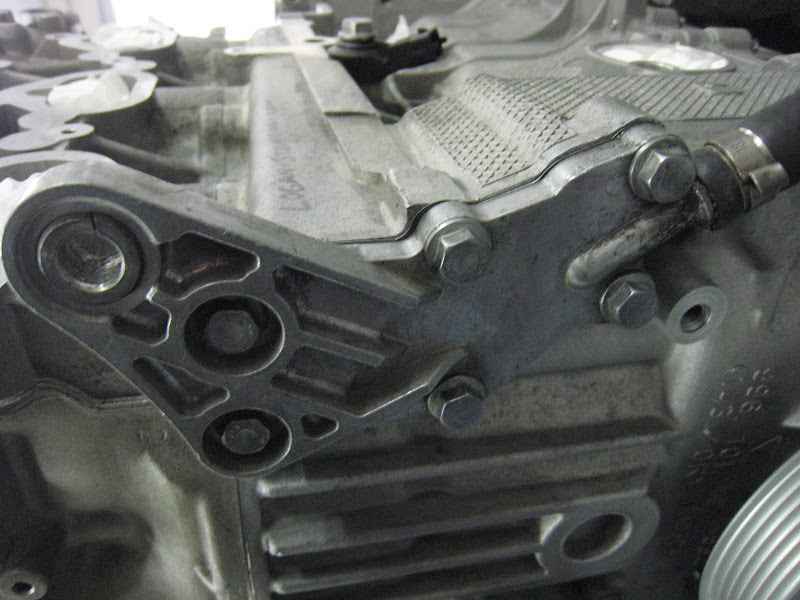
BE SURE to install the 4-6 bank "additional" long case/bearing carrier bolt BEFORE you bolt on the 4-6 head. Ask me how I know this ($35 later for a new head gasket). The bank 1 bolts can be installed after the head is attached. Otherwise for bank 2, you'll have to remove the head AGAIN in order to install this bolt. The three "additional" long case bolts should not be fastened or tightened UNTIL you torque down the heads, so just install them without threading them and then screw and torque these down later.

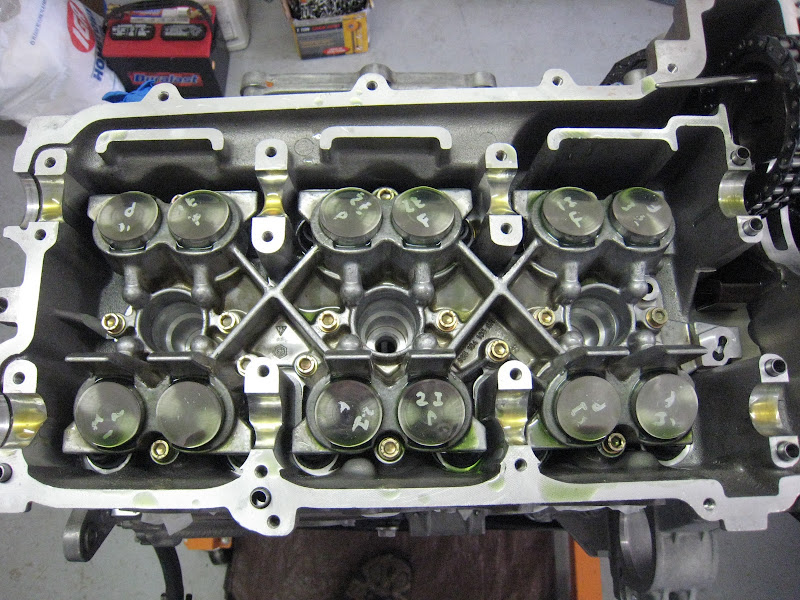
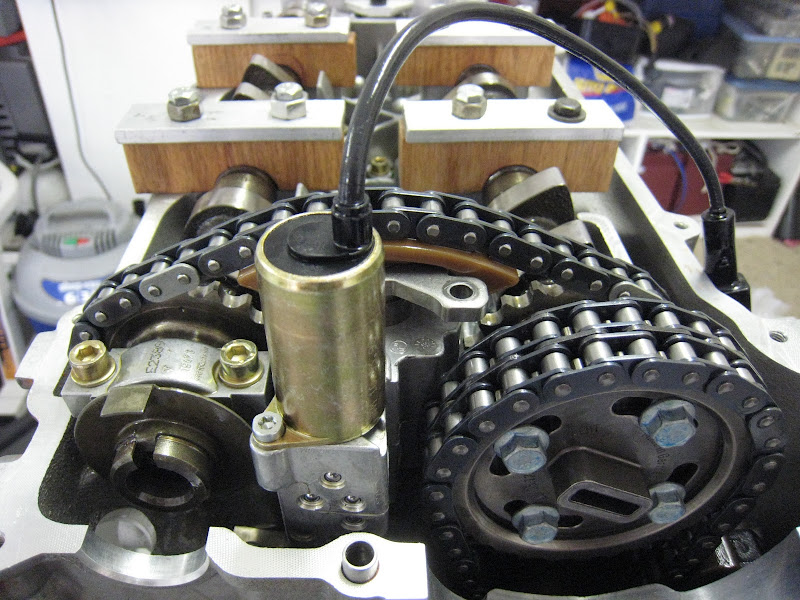
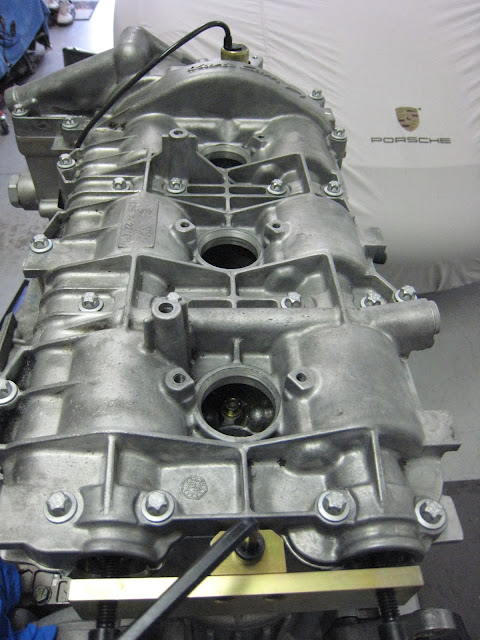
Preparing to set the cams. The lifter carrier is cleaned, inspected, and then bolted down to factory spec with new hardware (no loctite). The lifters have been soaking in break in oil overnight. They are carefully installed and then the tops given a healty dose of start up lube. The cam towers are also given some start up lube. Ready to drop in the cams.
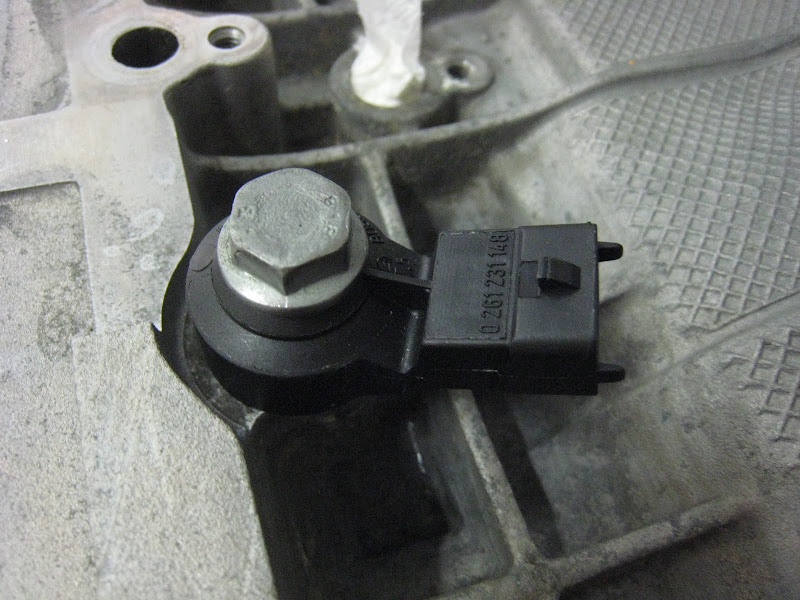
A new variocam actuator and solenoid for bank 1, new ramps, and a chain with only 1000 miles on it. The cams are allocated using the colored links on the chain, which must line up with the dots on the gears. The journals were carefully cleaned before a healthy dose of start up lube. The completed and allocated cam assembly will be dropped into the heads.

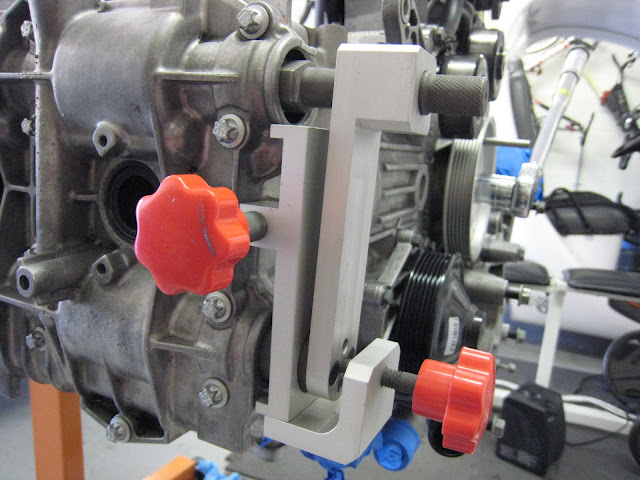
This picture illustrates the cam allocation for bank 1. The two colored links on the chain line up with the dots beneath them on the sprockets. The fine tuning of timing will happen later, once both heads are complete and the chain tensioners are pumped with oil and installed. Note the special tool to compress the actuator, which does not get released until the variocam assembly is torqued as well as cam bearing caps and additional hold down tools are installed.

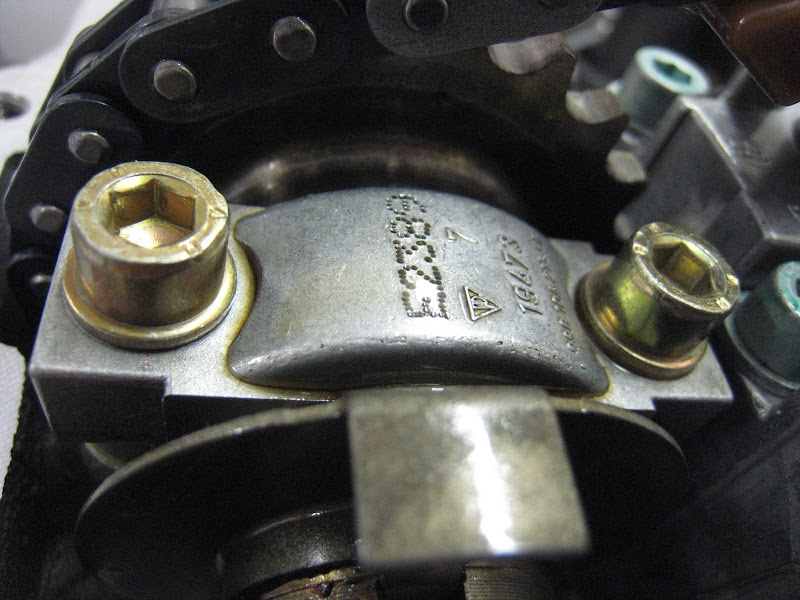
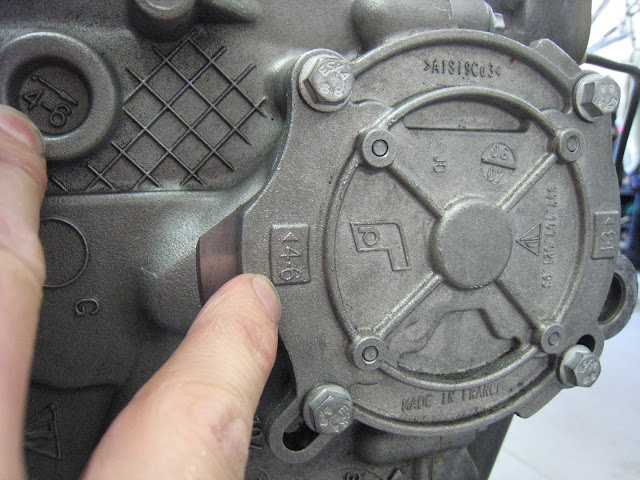
Cam lock and hold down tools installed, cam bearing caps installed. Note the serial number of the cam bearing caps MUST match the numbers stamped onto the head and cam covers. During tear down, I like to put these in marked zip lock bags so I don't screw them up, but I also like to inspect the numbers while they are installed. Also make note of where the einlass and auspuff caps go.
Once all of the hardware is bolted down and the actuator/chain tensoined, the cam lock tool remains in place until the cam cover is bolted down.

After more cleaning, a tiny bead of drei bond is applied to the cam cover in the designated positions, and the cam cover bearings are lubed.
The cam cover is then set in place and bolted down with brand new micro encapsualted bolts in the prescribed sequence and torque value. Then the hold down tool is released. Rinse, wash, rotate the engine 360 degrees, lock at TDC again, and then repeat for bank 2 to complete cam allocation. (fine tuning of the timing will occur later).
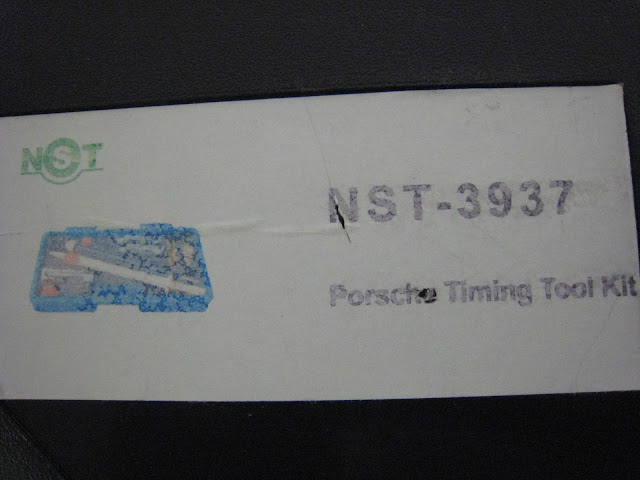
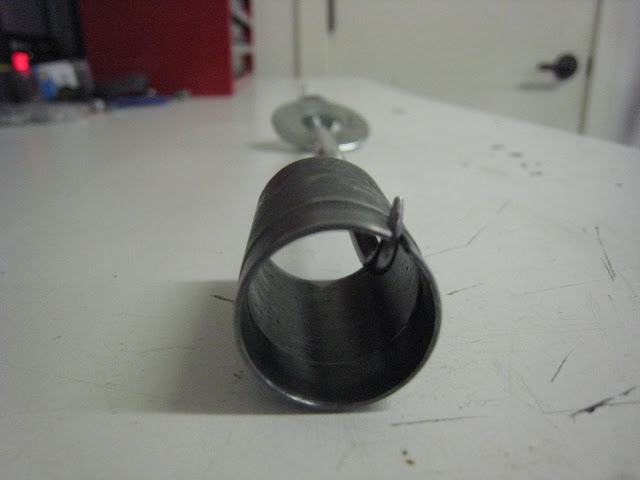
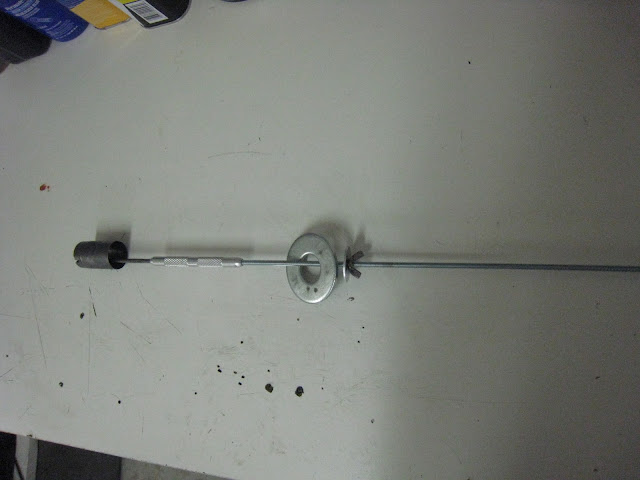
Time to set the timing. The first time I did this I used a ruler and the unbolt, rotate crank, rebolt, re-check method. One the engine was in the car, I adjusted timing several more times. I got pretty good at "guessing" how far to turn the crankshaft to add or subtract 3 degrees at a time. This time, I invested in some tools. I have to say this is a pretty low quality tool kit. If I were building more engines I would want better tools. The cam hold down tools do not match the cam towers and could damage the camshafts, therefore I used the tools I made on my own. The alignment tool is bent and therefore used my own method to align the rods and pistons. The wrist pin clip insertion tool is not long enough, and I had to improvise a hook on a long threaded rod to extract it after clip insertion (this actually worked pretty well). The timing tool had the slotted piece installed backwards when it shipped, but after that it worked fine. The cam lock tools are fine, but I used a standard bolt instead of the ones with the hand screws, since they interfere when removing the cam covers. Here is the tool kit I bought followed by the wrist pin clip insertion tool extraction tool (which I think is somewhat innovative because it takes the stress out of aligning the hook/tang to the piston and once you are done just yank out the clip tool).

I digress. Timing here we come. Having a very firm grasp on how this works, this was a breeze and I have to say the factory tool is great. It really takes the guess work out of the timing. Basically lock the camshaft at TDC, with the notch on the flywheel side of bank 1 intake cam facing out.

Next, install the timing tool. The small segment on the exhaust cam should be pointing to the cam cover. The slotted end of the timing tool fits in here and is tightened down into the slot with a screw. The tool itself bolts onto the same place where the cam hold down tool does. Then, with the sprocket unbolted from the camshaft, the arm which is attached to the exhaust cam swings either way until the top piece slides perfectly into the intake cam hole bore. At this point the timing is perfect and you can tighten the cam sprocket down to 7.5 ft lbs for now (final torque later). Of course, all THREE chain tensioners have been pumped full of oil and already installed just prior to setting the timing. I like to rotate the engine a couple times as well prior to starting.
Once you've got 1-3 (bank 1) set, rotate the engine 360 degrees and lock at TDC again. You can see now that the notch on the intake cam on the pulley side points inwards (as does the notch on the bank 1 intake cam flywheel side).


Now, fit the timing tool again, loosen the cam sproket bolts off a little bit, and then rotate the exhaust cam one way or another until the top slides in. Here you can see the allocation I made before installing the cam cover is not perfect and the top part of the tool that is supposed to slide into the intake cam bore is off, requiring some rotation of the tool's arm that is attached to the exhaust cam.

After rotatating that arm, I can easily slide the tool into the bore and then you know the timing is correct (oh did I mention with these crappy tools the top piece was also installed backwards?) Tighten the cam sprocket down to 7.5 ft lbs.

Now this is just me being ****, but I like to rotate the engine another 4 times, each time validating the timing is correct (each time installing the tool). Once I'm happy it is as good as I can get it, I remove each of the cam sprocket bolts, 1 by 1, apply a little blue loctite and torque to factory spec (this is the same way insight laid it out on the 986forum DIY). At this point you're ready to bolt on the oil scavenge pumps. These are new, along with the orings and new micro-encap bolts (the holes go through into the heads). Don't forget to orient the pumps correctly.

Spark tubes, various sensors, water plates, LNE 160 degree thermostat, new water pump, etc are bolted on.

And bolting on more ancillaries. AOS, oil heater, SAI, filler tube, dipstick, hydraulic pump, etc. etc. etc.
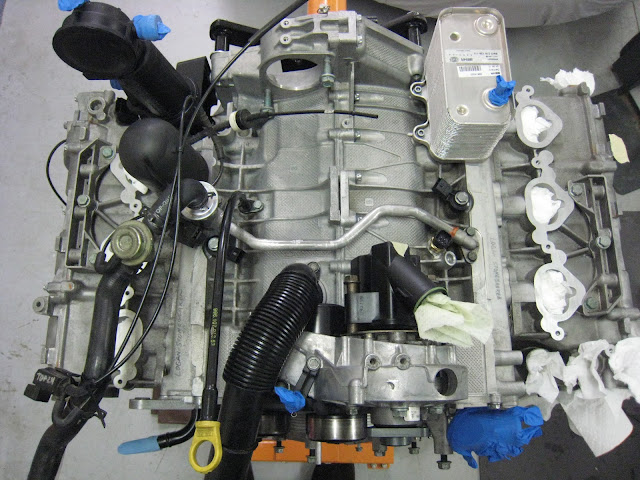
Cleaning the instake plenums, new throttle body oring, new brake booster cap orings.


After I finish the wiring, intake, and a few other misc things tomorrow or Saturday I should be able to get this piece of work bolted up to the car. First firing might happen Saturday, or after the Super Bowl. Maybe Monday. Crossing my fingers.
That being said, the first time you do something you always need to stop the instant you sense anything is wrong, identify the problem, back up, ask questions, and do it again even if it means a big delay. Example in this build, backwards wrist pin clips. Doh!
At this point though, I'm much more confident with the rest of the work since I just did the heads a few months ago. I still intend to read through the manual for step by step and follow careful notes and procedure gained during the first time around last summer. And so the assembly continues...
More cleaning of the sump plate, careful application of drei bond bead, then torqued to the engine. LNE spin on oil filter adapter installed. LNE mag drain plug.
FMS installed, RMS installed. For the RMS, I re-worked Kyle's tool that I used before, adding screws to draw it in instead of beating on the thing with a hammer. It worked great.
IMS tube with it's new LNE bearing (already installed while it was on the bench). A hollowed out 12 point deep socket with the sides ground down allows the use of a crows foot and inch pound torque wrench to tighten to factory spec. A TINY amount of green loctite this time for the center support stud. A little flange sealant on the perimeter seal and under the fresh micro-encapsulated flange bolts.
ARP head studs (re-usable) will allow me to pull the heads again without replacing the stock bolts. They are carefully cleaned and lubed up with ARP moly prior to installation. Anyone besides me use these before?
A final cleaning and inspection of the case, head, and gasket surface, they must be perfectly clean. The heads were also given several hours of "once over time" for cleaning and inspection. As you can see the heads were decked, .002" removed to get them flat and mirror-like. And remove the rubber band and sprocket, let the chain drape down in the case and fish it out later after the head is installed. Then add the sprocket later.
The 3.8L head gasket from the 997 requires some modification on the 3.4L case. One of the perimeter chain box bolts requires a hole to be carefully made in the head gasket.
Once the head is set in place, the head studs, washers, and nuts are installed per ARP specfications.
The case flipped around and the other head bolted on. The long block is nearly ready to set the cams. (Note, the cam covers are just fitted loose, without sealant and just a couple bolts at this time while the engine sits overnight).
BE SURE to install the 4-6 bank "additional" long case/bearing carrier bolt BEFORE you bolt on the 4-6 head. Ask me how I know this ($35 later for a new head gasket).
The bank 1 bolts can be installed after the head is attached. Otherwise for bank 2, you'll have to remove the head AGAIN in order to install this bolt. The three "additional" long case bolts should not be fastened or tightened UNTIL you torque down the heads, so just install them without threading them and then screw and torque these down later.Preparing to set the cams. The lifter carrier is cleaned, inspected, and then bolted down to factory spec with new hardware (no loctite). The lifters have been soaking in break in oil overnight. They are carefully installed and then the tops given a healty dose of start up lube. The cam towers are also given some start up lube. Ready to drop in the cams.
A new variocam actuator and solenoid for bank 1, new ramps, and a chain with only 1000 miles on it. The cams are allocated using the colored links on the chain, which must line up with the dots on the gears. The journals were carefully cleaned before a healthy dose of start up lube. The completed and allocated cam assembly will be dropped into the heads.
This picture illustrates the cam allocation for bank 1. The two colored links on the chain line up with the dots beneath them on the sprockets. The fine tuning of timing will happen later, once both heads are complete and the chain tensioners are pumped with oil and installed. Note the special tool to compress the actuator, which does not get released until the variocam assembly is torqued as well as cam bearing caps and additional hold down tools are installed.
Cam lock and hold down tools installed, cam bearing caps installed. Note the serial number of the cam bearing caps MUST match the numbers stamped onto the head and cam covers. During tear down, I like to put these in marked zip lock bags so I don't screw them up, but I also like to inspect the numbers while they are installed. Also make note of where the einlass and auspuff caps go.
Once all of the hardware is bolted down and the actuator/chain tensoined, the cam lock tool remains in place until the cam cover is bolted down.
After more cleaning, a tiny bead of drei bond is applied to the cam cover in the designated positions, and the cam cover bearings are lubed.
The cam cover is then set in place and bolted down with brand new micro encapsualted bolts in the prescribed sequence and torque value. Then the hold down tool is released. Rinse, wash, rotate the engine 360 degrees, lock at TDC again, and then repeat for bank 2 to complete cam allocation. (fine tuning of the timing will occur later).
Time to set the timing. The first time I did this I used a ruler and the unbolt, rotate crank, rebolt, re-check method. One the engine was in the car, I adjusted timing several more times. I got pretty good at "guessing" how far to turn the crankshaft to add or subtract 3 degrees at a time. This time, I invested in some tools. I have to say this is a pretty low quality tool kit. If I were building more engines I would want better tools. The cam hold down tools do not match the cam towers and could damage the camshafts, therefore I used the tools I made on my own. The alignment tool is bent and therefore used my own method to align the rods and pistons. The wrist pin clip insertion tool is not long enough, and I had to improvise a hook on a long threaded rod to extract it after clip insertion (this actually worked pretty well). The timing tool had the slotted piece installed backwards when it shipped, but after that it worked fine. The cam lock tools are fine, but I used a standard bolt instead of the ones with the hand screws, since they interfere when removing the cam covers. Here is the tool kit I bought followed by the wrist pin clip insertion tool extraction tool (which I think is somewhat innovative because it takes the stress out of aligning the hook/tang to the piston and once you are done just yank out the clip tool).
I digress. Timing here we come. Having a very firm grasp on how this works, this was a breeze and I have to say the factory tool is great. It really takes the guess work out of the timing. Basically lock the camshaft at TDC, with the notch on the flywheel side of bank 1 intake cam facing out.
Next, install the timing tool. The small segment on the exhaust cam should be pointing to the cam cover. The slotted end of the timing tool fits in here and is tightened down into the slot with a screw. The tool itself bolts onto the same place where the cam hold down tool does. Then, with the sprocket unbolted from the camshaft, the arm which is attached to the exhaust cam swings either way until the top piece slides perfectly into the intake cam hole bore. At this point the timing is perfect and you can tighten the cam sprocket down to 7.5 ft lbs for now (final torque later). Of course, all THREE chain tensioners have been pumped full of oil and already installed just prior to setting the timing. I like to rotate the engine a couple times as well prior to starting.
Once you've got 1-3 (bank 1) set, rotate the engine 360 degrees and lock at TDC again. You can see now that the notch on the intake cam on the pulley side points inwards (as does the notch on the bank 1 intake cam flywheel side).
Now, fit the timing tool again, loosen the cam sproket bolts off a little bit, and then rotate the exhaust cam one way or another until the top slides in. Here you can see the allocation I made before installing the cam cover is not perfect and the top part of the tool that is supposed to slide into the intake cam bore is off, requiring some rotation of the tool's arm that is attached to the exhaust cam.
After rotatating that arm, I can easily slide the tool into the bore and then you know the timing is correct (oh did I mention with these crappy tools the top piece was also installed backwards?) Tighten the cam sprocket down to 7.5 ft lbs.
Now this is just me being ****, but I like to rotate the engine another 4 times, each time validating the timing is correct (each time installing the tool). Once I'm happy it is as good as I can get it, I remove each of the cam sprocket bolts, 1 by 1, apply a little blue loctite and torque to factory spec (this is the same way insight laid it out on the 986forum DIY). At this point you're ready to bolt on the oil scavenge pumps. These are new, along with the orings and new micro-encap bolts (the holes go through into the heads). Don't forget to orient the pumps correctly.
Spark tubes, various sensors, water plates, LNE 160 degree thermostat, new water pump, etc are bolted on.
And bolting on more ancillaries. AOS, oil heater, SAI, filler tube, dipstick, hydraulic pump, etc. etc. etc.
Cleaning the instake plenums, new throttle body oring, new brake booster cap orings.
After I finish the wiring, intake, and a few other misc things tomorrow or Saturday I should be able to get this piece of work bolted up to the car. First firing might happen Saturday, or after the Super Bowl. Maybe Monday. Crossing my fingers.
Drifting
Joined: Sep 2005
Posts: 2,528
Likes: 180
From: Glenview, IL
That new tensioner looks familiar! I also bought a set of those tools for future use, kind of a just in case. Sorry to hear they are not quite perfect. But it looks like the timing tool works well.
Did you know that the head gaskets in the 3.6 and later in the 3.8 were changed from the earlier 3.4 in the way the cooling passages were made. In the earlier versions the opening in the the gaskets for the cooling passages were of different sizes to vary the flow to different areas of the engine to better control the heat. When Porsche went to the 3.6 they made them all the same size. I read somewhere that this has contributed to hot spots and may be some scoring of cylinder heads. I forget where I read this, but if you look at the 3.4 gaskets there is a left Iand right version due to the sizing of the holes and in the 3.6/3.8 the left and right are the same as the holes for the cooling passages are all the same size,
Glad to see you are back online for the project.
Thread Starter
Three Wheelin'
Joined: May 2010
Posts: 1,851
Likes: 9
From: Nor Cal
I asked about this, and was told that Nikasil along with the JE pistons and 160 degree thermostat is all that is needed to tackle this problem for "street use", and no other mods necessary for the larger head gasket (although the chain box bolt hole was a small surprise but no big deal). If this was a race car on the other hand... keeping the oil cool might need the help of a deeper sump, accusump, dual tandem scavenge pumps, and an externally plumbed oil cooler to replace the stock oil heater.
And yes, I'm sure the new actuator will work out fine, even though it is old stock. I ohmed out the solenoid and it is fine. There was a nice coating of oil on the actuator while in storage so I'm sure it's OK. Thanks again!


Thread Starter
Three Wheelin'
Joined: May 2010
Posts: 1,851
Likes: 9
From: Nor Cal
Added intake riser with fuel rails & injectors, wiring, generator, starter, hydraulic lines, brackets, cam caps, etc, etc.
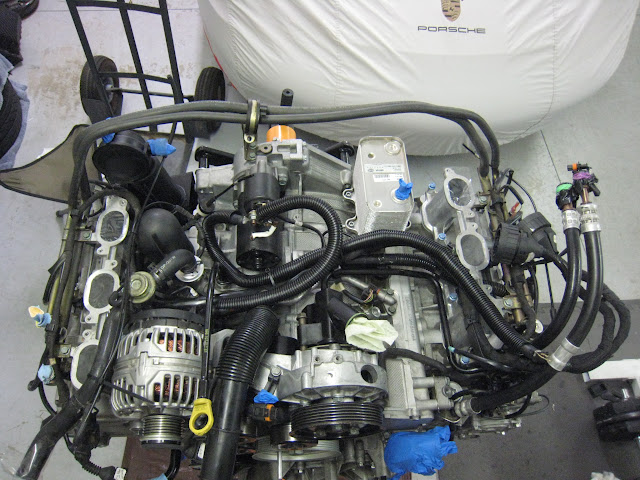

Intake minus the t-plenum and throttle body. Those go on after the air con. Engine carrier, tubes and hoses.

Enough to get it down off the stand onto the dolly.

Flywheel, pressure plate and clutch attached. Transmission attached.
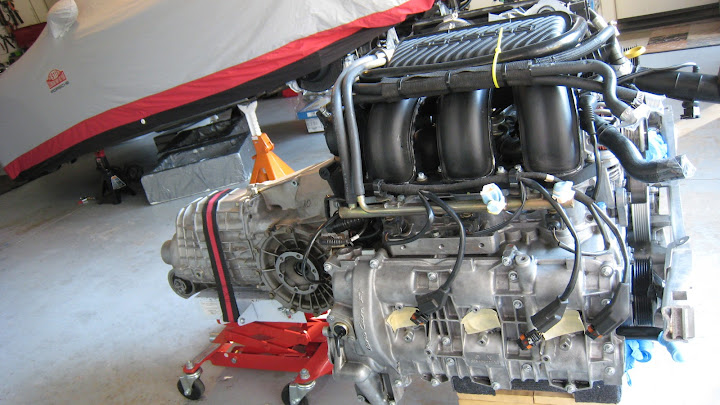
At this point it's ready for the headers and cats before bolting the engine to the car and possibly first firing (hopefully tomorrow).
Intake minus the t-plenum and throttle body. Those go on after the air con. Engine carrier, tubes and hoses.
Enough to get it down off the stand onto the dolly.
Flywheel, pressure plate and clutch attached. Transmission attached.
At this point it's ready for the headers and cats before bolting the engine to the car and possibly first firing (hopefully tomorrow).

Thread Starter
Three Wheelin'
Joined: May 2010
Posts: 1,851
Likes: 9
From: Nor Cal
Short update. A few final things completed before raising the engine and mounting it. All electrical, water, hydraulic, and fuel connections completed.
Adding fluids, priming engine with oil, installing spark plugs and coils, mufflers, and perhaps first firing tomorrow.


Adding fluids, priming engine with oil, installing spark plugs and coils, mufflers, and perhaps first firing tomorrow.

 Just kidding...
Rennlist Member

Joined: Jan 2008
Posts: 764
Likes: 48
From: Las Vegas, Nevada

Instructor
Joined: Jul 2010
Posts: 190
Likes: 2
From: Delta, BC
I check your thread for updates twice a day! Can't wait for you to fire it up and enjoy the fruits of your labor. Your thread has been terrific and will be used as a reference by many who follow in your footsteps. Thanks for taking the time and making the effort to share with us!
