
Build Thread: '99 C2 996 LS1 Swap
 02-22-2020, 07:55 PM
#91
Rennlist Member
Thread Starter
Ducktail is a great idea .With some creative throttle body plumbing might be able to keep the trunk latch .A few comments on the wiring �.The A/C signal from the climate control to the DME is a 12 volt very weak pwm signal .I had to build a booster to trigger the gm ecm for ac .Don't know if you will need a VSS signal but if you do and it has to look like a gm signal a 1 meg pullup resistor and 1uf capacitor will work .The Porsche engine harness is really not needed .The water temp connector and the purge valve connector are .The ac system can be functional without the dme using the climate control module .and running thru the gm ecm .Took some time to figure it out but finally got it ..
Not a duck tail (though they're nice, they won't give you more room in the engine bay. This is the "Tea Tray" - they were used on the 930 Turbo's to house the inter-cooler.
https://video.search.yahoo.com/searc...66&action=view
https://video.search.yahoo.com/searc...66&action=view
haha I bet you would!
 03-16-2020, 07:01 PM
#92
Rennlist Member
Thread Starter
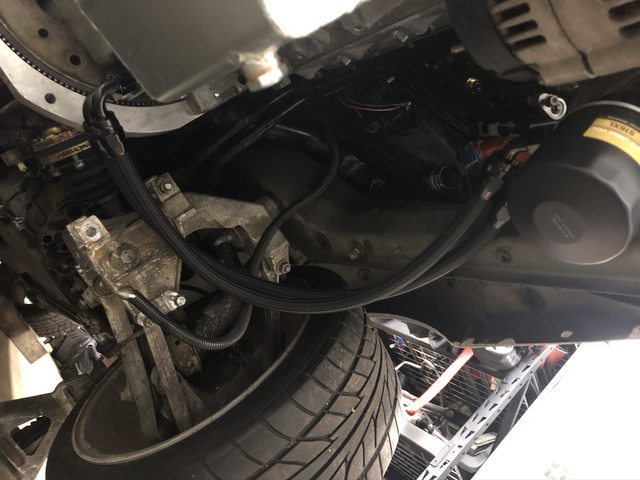
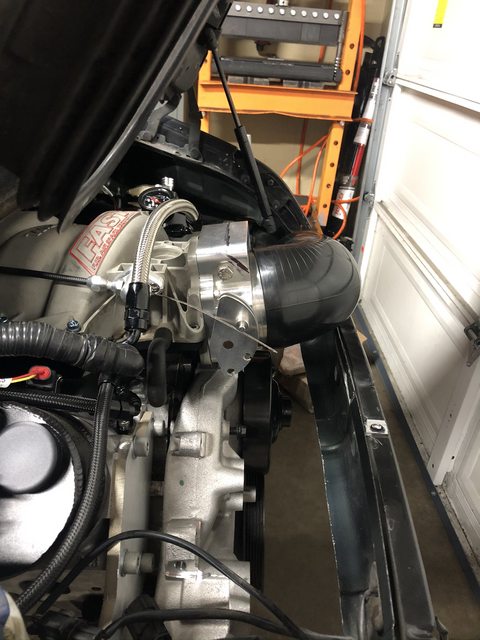
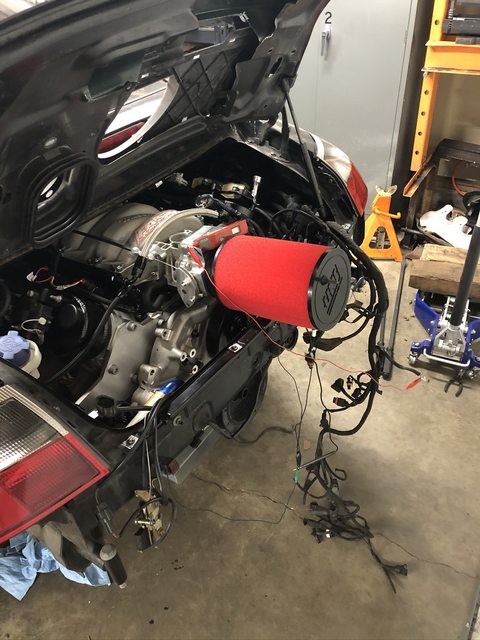
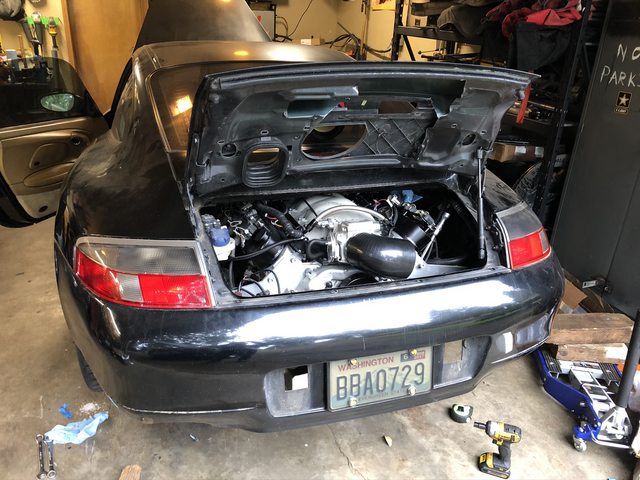
Whew. Been plowing through the little stuff on the 996 LS1 swap. Had to drop the engine and route all the wiring, clean up some little stuff, and adapt the Porsche vacuum and vent lines to barbs. It takes a while to get all that wrapped up but the end product is well worth it. I don't want to worry about lines coming off during a track day or autocross event after I get everything tidied up.
Conversion fittings, � to 7/8 and � to �; a few other brass fittings for vent lines and vacuum:
Hot tip – buy the 7/8 180 degree silicone hose adapter, cut the ends off, and use the ends for your 7/8 to � conversion. Of course, you’ll have to find the barbed reducers that don’t exist for some reason….which is why I had to make them! The heater lines on the Porsche are over .800, these 7/8 silicone tubes slip over due to the size differences. Clamp over the hard lines, push in adapters, run your lines to the water pump, done.
Had to swap the straight 12an fitting for a 45 and also swap the straight 10an to NPT for a 45. Everything clears and runs perfectly through the engine bay now.
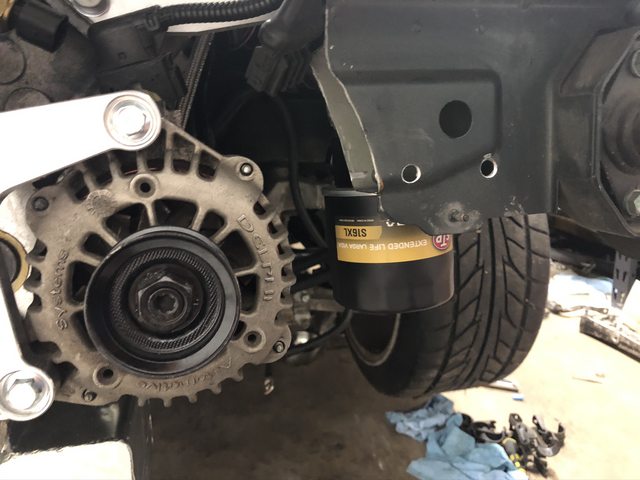
Also mounted the remote oil filter and lines, tucked up tight to the body next to the alternator. Temporary filter since I’ll run some cheap synthetic oil and filter for the first 500 miles then swap to Amsoil.
I still have the Fast 92 on there, it was confirmed the black and gray are the same but the 102 is a bit longer and will never fit. I am going to have to get a bit more creative to make this 92 fit. It's staying!
Chop chop. Someone's crying as they're seeing this...
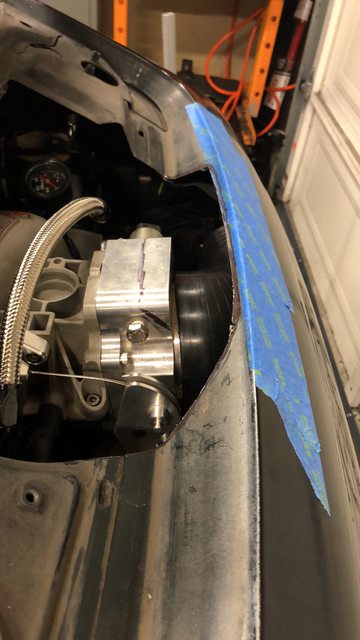
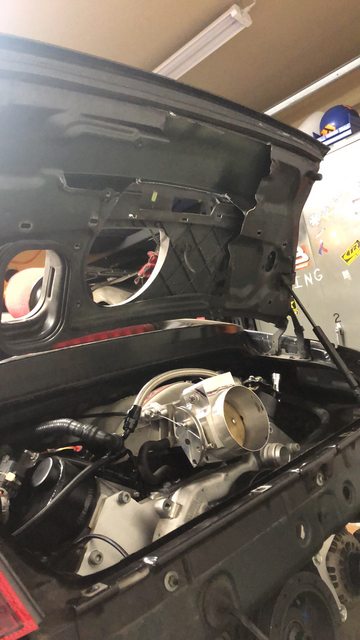
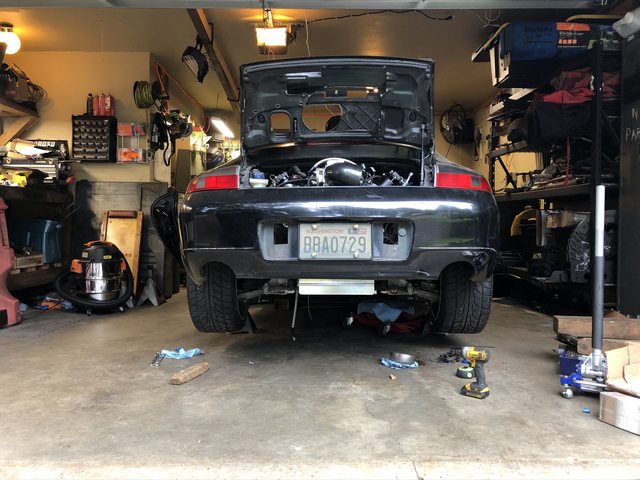
Had to cut out more trunk for ease of working on the new powerplant. Much better. I’ll move the latch to a better position too.
A lot more updates coming...
Conversion fittings, � to 7/8 and � to �; a few other brass fittings for vent lines and vacuum:
Hot tip – buy the 7/8 180 degree silicone hose adapter, cut the ends off, and use the ends for your 7/8 to � conversion. Of course, you’ll have to find the barbed reducers that don’t exist for some reason….which is why I had to make them! The heater lines on the Porsche are over .800, these 7/8 silicone tubes slip over due to the size differences. Clamp over the hard lines, push in adapters, run your lines to the water pump, done.
Had to swap the straight 12an fitting for a 45 and also swap the straight 10an to NPT for a 45. Everything clears and runs perfectly through the engine bay now.
Also mounted the remote oil filter and lines, tucked up tight to the body next to the alternator. Temporary filter since I’ll run some cheap synthetic oil and filter for the first 500 miles then swap to Amsoil.
I still have the Fast 92 on there, it was confirmed the black and gray are the same but the 102 is a bit longer and will never fit. I am going to have to get a bit more creative to make this 92 fit. It's staying!
Chop chop. Someone's crying as they're seeing this...
Had to cut out more trunk for ease of working on the new powerplant. Much better. I’ll move the latch to a better position too.
A lot more updates coming...
03-16-2020, 07:02 PM
#93
Rennlist Member
Thread Starter
I had to figure out the wiring for the NSS bypass or Park Switch. The Tiptronic switch was in good shape so I yanked it off the Tip for a quick diagnostic and found the last two pins in the top row can be jumped to simulate "in park" so there's a super fancy paperclip jumping the connector under the car right now.  If anyone needs a picture of this, let me know.
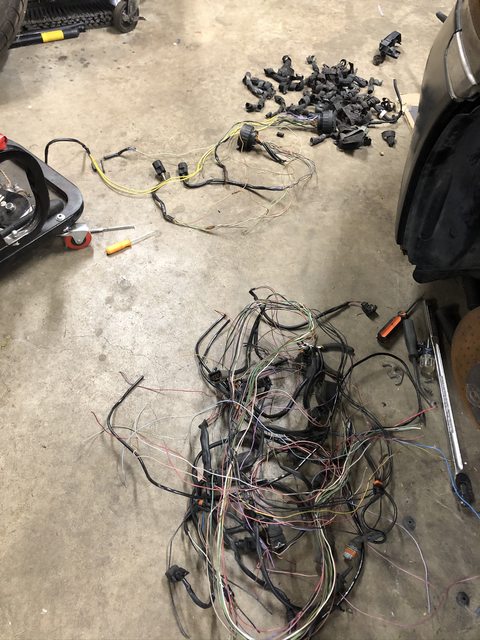
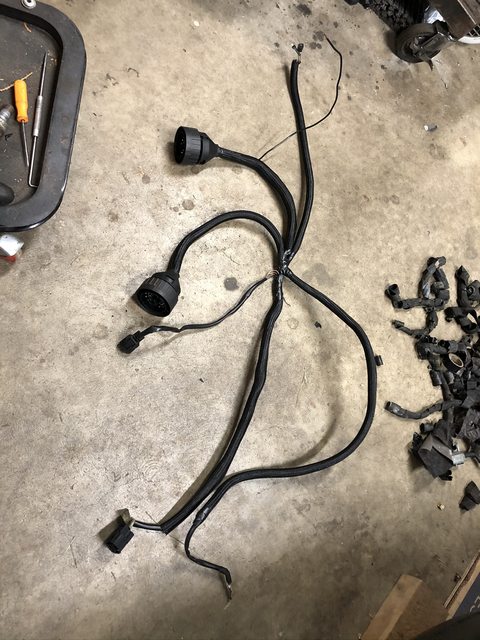
As for the rest of the wiring, I have the original M96 engine wiring harness. I kept this as some of the wires were cut/broken/rough and it needed to be replaced for the most part. I thinned out the harness (cue more crying) and wrapped and finished it to make it look as factory as possible. It matches the Holley Terminator X harness so everything looks great! I have to extend a few sensor wires and the starter wiring for final fitment but otherwise it's a great way to clean up the engine bay and keep it looking OEM.
Mess
Finished product
I also made a nice little bracket to repurpose the positive terminal lug for the engine bay from the original Porsche harness. It’s a high quality piece so I wanted to put it back in. I mounted it upside down to keep it out of the way of dipstick.
Bracket holding said terminal:
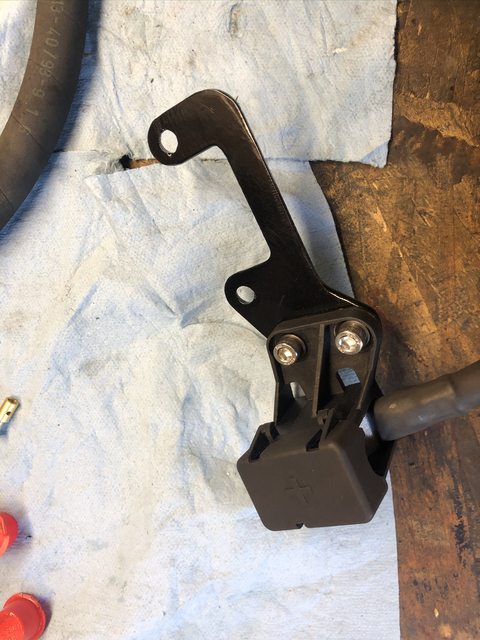
Hard to see, but it mounts under the coil pack. It can also mount over it.

FYI, if you use a Terminator X, you will love it AND you'll need to buy an 4 pin alternator wiring harness to excite the alternator. This should plug into the power plug on the Terminator X harness, IIRC. Here's a link:
https://www.holley.com/products/acce.../parts/197-400
The Terminator X was very easy to setup. I'm a little bummed I can't see the GM oil pressure sensor but perhaps I'm not seeing it in the software yet. Maybe I can see it on my laptop, we'll see. It's a breeze to get it going though and I am happy to ditch the Porsche Tiptronic DME. I am going to keep the Porsche M96 DME as I believe it runs the ABS system and also runs a few systems through it such as the starter. I'm sure I could bypass it but won't until I know what systems are totally affected.
If anyone needs a picture of this, let me know.As for the rest of the wiring, I have the original M96 engine wiring harness. I kept this as some of the wires were cut/broken/rough and it needed to be replaced for the most part. I thinned out the harness (cue more crying) and wrapped and finished it to make it look as factory as possible. It matches the Holley Terminator X harness so everything looks great! I have to extend a few sensor wires and the starter wiring for final fitment but otherwise it's a great way to clean up the engine bay and keep it looking OEM.
Mess
Finished product
I also made a nice little bracket to repurpose the positive terminal lug for the engine bay from the original Porsche harness. It’s a high quality piece so I wanted to put it back in. I mounted it upside down to keep it out of the way of dipstick.
Bracket holding said terminal:
Hard to see, but it mounts under the coil pack. It can also mount over it.
FYI, if you use a Terminator X, you will love it AND you'll need to buy an 4 pin alternator wiring harness to excite the alternator. This should plug into the power plug on the Terminator X harness, IIRC. Here's a link:
https://www.holley.com/products/acce.../parts/197-400
The Terminator X was very easy to setup. I'm a little bummed I can't see the GM oil pressure sensor but perhaps I'm not seeing it in the software yet. Maybe I can see it on my laptop, we'll see. It's a breeze to get it going though and I am happy to ditch the Porsche Tiptronic DME. I am going to keep the Porsche M96 DME as I believe it runs the ABS system and also runs a few systems through it such as the starter. I'm sure I could bypass it but won't until I know what systems are totally affected.
03-16-2020, 07:10 PM
#94
Rennlist Member
Thread Starter
The 180 degree headers have been ordered. I should see the first set in about 3 weeks. I threw on the bumper to measure for exhaust outlets, muffler placement, etc.. I think the Spintech mufflers should sound pretty good!
Maybe I should paint or coat the pan after all…
I threw in a new AGM Oreilly's battery and it CRANKS! No fuel pressure but it turns over great. I need to verify a few things, such as oil pressure and fuel pump operation before firing. I have some freebie LS truck exhaust manifolds on there for now.
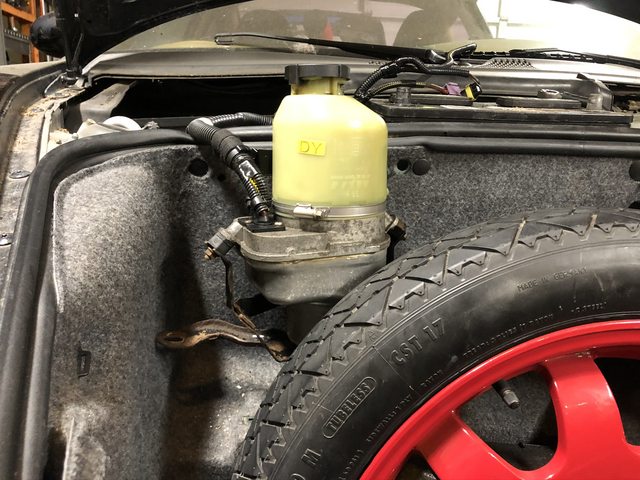
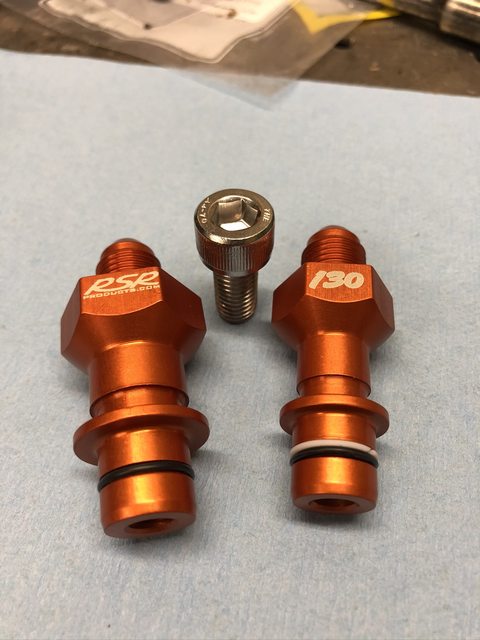
Nearing the end of the electric steering conversion. I used RSR fittings since I didn't have time to make my own. They're a nice set for only $90. I also bought new Porsche O-rings made from organic unicorn toenails for too much money. I'm using PTFE 6AN lines and fittings (5/16 ID) for pressure with 6AN rubber hoses for return (3/8 ID). I have bought some nice bulkhead fittings and will run the lines near the brake master and pass through the firewall. Easy peezy.
Placement of the new pump. Way too tall. Bracket not really usable. I don’t want to drill down into the area it’s sitting on, that’s the fuel tank. More on how I mount this later on!
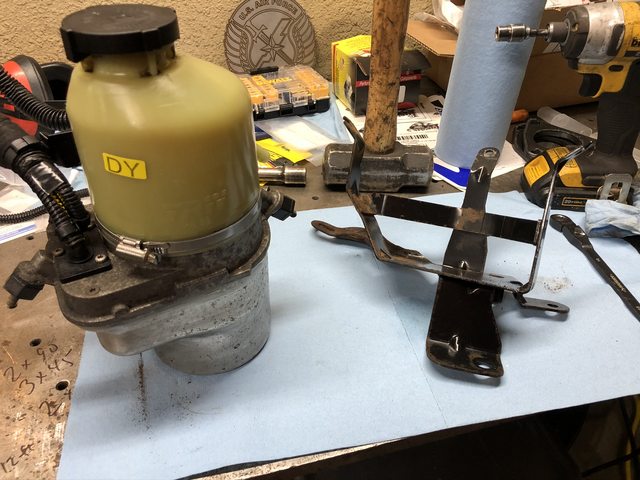
New bracket I drew up:

Cut on the Langmuir baby plasma cnc and bent:

I drew up this bracket. It needs a couple tweaks but came out great for a first draft. These TRW pumps are from a Vauxhall Astra and is the same pump as the Porsche GT3 cup pumps....but costs 1/10 of the price. As soon as I feel like sitting on my side for another 3 hours putting in the bolt on the rack that holds the fittings, I'll have this wrapped up.
Mega extension to reach said bolt, which stripped, but I got it out:
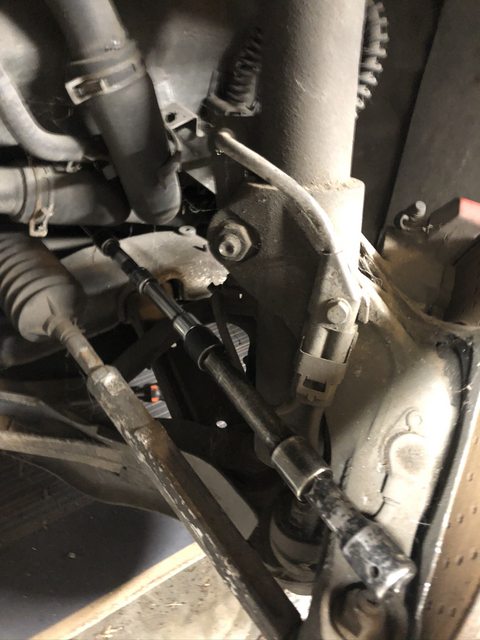
RSR Fittings and new SS bolt: Rebel S Racing (RSR) Steering Rack Fittings for elec. Pump – John James Racing
To do list is much shorter now:
Find lack of fuel pressure culprit and fix
Shift cables were wrong end type for transaxle end; too large, need earlier smaller versions or convert to heims
Fill and bleed coolant
Fill and bleed brakes
Bleed clutch
Tweak throttle cable; Only opens 75%
Mount Terminator ECU
Run Terminator lines permanently and route through interior
Reassemble interior
Tweak clutch pedal; it’s slightly out of position
Fab intake tube and tap for MAT sensor
Fab/buy PCV catch can
Hookup Porsche oil pressure sensor; extend wiring harness
Extend starter wire
Rework starter to alternator positive cable; route in cleaner fashion
Add 1 more block to chassis ground
Clean up wiring routes through car
Reassemble rest of the rear end of the car; crossmembers, sway bar, bumper, etc.
Final cut/fit of engine lid area
Test Drive!
Maybe I should paint or coat the pan after all…
I threw in a new AGM Oreilly's battery and it CRANKS! No fuel pressure but it turns over great. I need to verify a few things, such as oil pressure and fuel pump operation before firing. I have some freebie LS truck exhaust manifolds on there for now.
Nearing the end of the electric steering conversion. I used RSR fittings since I didn't have time to make my own. They're a nice set for only $90. I also bought new Porsche O-rings made from organic unicorn toenails for too much money. I'm using PTFE 6AN lines and fittings (5/16 ID) for pressure with 6AN rubber hoses for return (3/8 ID). I have bought some nice bulkhead fittings and will run the lines near the brake master and pass through the firewall. Easy peezy.
Placement of the new pump. Way too tall. Bracket not really usable. I don’t want to drill down into the area it’s sitting on, that’s the fuel tank. More on how I mount this later on!
New bracket I drew up:
Cut on the Langmuir baby plasma cnc and bent:
I drew up this bracket. It needs a couple tweaks but came out great for a first draft. These TRW pumps are from a Vauxhall Astra and is the same pump as the Porsche GT3 cup pumps....but costs 1/10 of the price. As soon as I feel like sitting on my side for another 3 hours putting in the bolt on the rack that holds the fittings, I'll have this wrapped up.
Mega extension to reach said bolt, which stripped, but I got it out:
RSR Fittings and new SS bolt: Rebel S Racing (RSR) Steering Rack Fittings for elec. Pump – John James Racing
To do list is much shorter now:
Find lack of fuel pressure culprit and fix
Shift cables were wrong end type for transaxle end; too large, need earlier smaller versions or convert to heims
Fill and bleed coolant
Fill and bleed brakes
Bleed clutch
Tweak throttle cable; Only opens 75%
Mount Terminator ECU
Run Terminator lines permanently and route through interior
Reassemble interior
Tweak clutch pedal; it’s slightly out of position
Fab intake tube and tap for MAT sensor
Fab/buy PCV catch can
Hookup Porsche oil pressure sensor; extend wiring harness
Extend starter wire
Rework starter to alternator positive cable; route in cleaner fashion
Add 1 more block to chassis ground
Clean up wiring routes through car
Reassemble rest of the rear end of the car; crossmembers, sway bar, bumper, etc.
Final cut/fit of engine lid area
Test Drive!

 03-17-2020, 10:35 AM
#97
Rennlist Member
Nice build! It sure is handy to be a machinist and have a shop at the ready when doing a project like this - the time and $ savings must be massive. I can't wait to see/hear this baby go 
05-15-2020, 08:58 PM
#99
Rennlist Member
Thread Starter
Forgot to update this. Been a while!
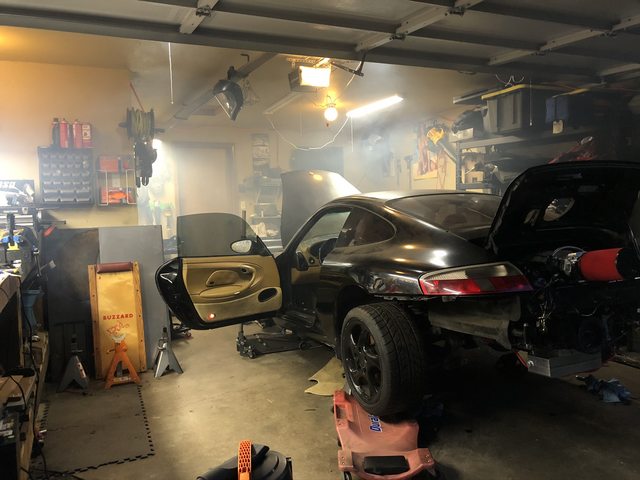
Car starts and runs. Have to jump the fuel pump relay to get the pump to operate. Holds 58psi no problem. I need to find the correct wire in the loom to supply with 12v switched for relay to click over with the key. I have the starter wire ran and everything works as it should. Had to hookup a Holley 5v alternator trigger wire to the GM alt so it would charge the battery. New AGM battery from Oreilly's has been awesome for sitting then starting suddenly after weeks.
COVID shut down most of the midwest so the shop that was building the headers took a hit and had to close its doors for a while. They started cutting and bending tube this week so I should see the first set of headers in a couple weeks at most. I'm beyond stoked because I didn't think it would happen during this crazy pandemic nonsense where we think small business will survive 4 months of quarantine.
I will NOT be using SpinTech mufflers. I stumbled across an outdated webpage called Dr. Gas. The mufflers looked very similar to SpinTech but have some differences. I call them up and speak to the owner and original designer of the "Boom Tubes" and the SpinTech design. Evidently, he came up with that design and SpinTech and NASCAR ripped it off after the intellectual property rights expired, which I believe is 5 years. He now has a new shop setup in Utah and I'll be sourcing my mufflers through him. They should sound amazing and give the perfect tone. They're essentially built for this type of exhaust and scavenging specifically.
I had to redesign the exhaust headers a few times to meet all the bend criteria and fitment requirements. The exhaust now has expanded joints underneath that are offset so the headers are now a left and a right side. At this time, not using springs or other means to hold the halves together but that may change after the first prototype. I have a few people that will be running this exhaust in the 996 or 997 LS swap so I will have the headers, mufflers, and even clamps and mounts designed and ready for a bolt in LS swap exhaust system for Porsche 996 and 997 cars. Pretty neat.
Anyway, that's what I'm waiting on. I made a booty fab exhaust but refuse to drive it. It's annoyingly loud. I still need to bleed the clutch system and figure out why my clutch pedal spring seems to be backwards. I also need to bleed the cooling system. The electric steering is pretty much set up and ready for final painting, wiring, and final tightening and bleeding. It's basically there, just needs a little more finishing, but I'm waiting for the exhaust and I need to finish the backhalf of my TJ before continuing.
Smoked myself out of the garage upon startup but it was a fantastic feeling-
The following 4 users liked this post by gtxracer:
05-15-2020, 09:12 PM
#100
Rennlist Member
Forgot to update this. Been a while!
Car starts and runs. Have to jump the fuel pump relay to get the pump to operate. Holds 58psi no problem. I need to find the correct wire in the loom to supply with 12v switched for relay to click over with the key. I have the starter wire ran and everything works as it should. Had to hookup a Holley 5v alternator trigger wire to the GM alt so it would charge the battery. New AGM battery from Oreilly's has been awesome for sitting then starting suddenly after weeks.
COVID shut down most of the midwest so the shop that was building the headers took a hit and had to close its doors for a while. They started cutting and bending tube this week so I should see the first set of headers in a couple weeks at most. I'm beyond stoked because I didn't think it would happen during this crazy pandemic nonsense where we think small business will survive 4 months of quarantine.
I will NOT be using SpinTech mufflers. I stumbled across an outdated webpage called Dr. Gas. The mufflers looked very similar to SpinTech but have some differences. I call them up and speak to the owner and original designer of the "Boom Tubes" and the SpinTech design. Evidently, he came up with that design and SpinTech and NASCAR ripped it off after the intellectual property rights expired, which I believe is 5 years. He now has a new shop setup in Utah and I'll be sourcing my mufflers through him. They should sound amazing and give the perfect tone. They're essentially built for this type of exhaust and scavenging specifically.
I had to redesign the exhaust headers a few times to meet all the bend criteria and fitment requirements. The exhaust now has expanded joints underneath that are offset so the headers are now a left and a right side. At this time, not using springs or other means to hold the halves together but that may change after the first prototype. I have a few people that will be running this exhaust in the 996 or 997 LS swap so I will have the headers, mufflers, and even clamps and mounts designed and ready for a bolt in LS swap exhaust system for Porsche 996 and 997 cars. Pretty neat.
Anyway, that's what I'm waiting on. I made a booty fab exhaust but refuse to drive it. It's annoyingly loud. I still need to bleed the clutch system and figure out why my clutch pedal spring seems to be backwards. I also need to bleed the cooling system. The electric steering is pretty much set up and ready for final painting, wiring, and final tightening and bleeding. It's basically there, just needs a little more finishing, but I'm waiting for the exhaust and I need to finish the backhalf of my TJ before continuing.
Smoked myself out of the garage upon startup but it was a fantastic feeling-

The following users liked this post:
TexSquirrel (05-15-2020)
05-15-2020, 10:09 PM
#101
Burning Brakes
Super cool. Im hoping to start back on my build in about a month.
That brown interior with black looks sharp.
I haven't read every post so forgive me for asking if it was said but is the motor stock or did u build it up any?
That brown interior with black looks sharp.
I haven't read every post so forgive me for asking if it was said but is the motor stock or did u build it up any?
05-16-2020, 09:43 PM
#103

The ls uses 12v+ to trigger the fuel pump and 996 uses a negative trigger. You must give the 996 relay a constant + and wire the positive in, I believe it�s a yellow white wire in the rear harness for the 996.
The following users liked this post:
Ponchobroke (02-14-2021)