Build Thread: '99 C2 996 LS1 Swap
 12-06-2019, 10:28 PM
#61

Yes, early LS1. Needs LS6 PCV update which I have. Corvette spacing ICT alternator bracket, yup. Early LS1 AC compressor, idler, tensioner, and bracket - all ebay specials. Alternator is same between truck/camaro/corvette and only the bracket mounting depths change. I used a truck alternator.
Dampener is LS3 factory dampener, ACDelco 12560115
Water pump is Corvette LS3 ACDelco 251-728
WP Tensioner is ACDelco 12569301
Smaller oil pressure sensor is 12616646 Oil Pressure Sensor Switch D1846A
GM Performance Parts 12498544 Head Gaskets
ARP water pump bolts, head bolts, etc.
Canton front sump pan and studs
GM GTO oil pan pickup
LS3 injectors
Holley 534-210 LS Hi-Flow EFI Fuel Rail
Corvette fuel regulator
6AN everything for fuel
20AN everything for coolant
12AN everything for heater hoses
FAST 92mm intake
92mm DBC throttle body
LS6 PCV conversion
ported Melling high flow oil pump
Tick Performance SNS cam, 7.4" pushrods, double springs
243 heads, stock for now (will port later)
Terminator X engine management, wideband O2
I think that's the total LS1 build thus far...lots of parts were "nice to have" and not a necessity. Car intake is required. Corvette accessories required if you don't want to cut into the latch area. Still need to work out the throttle cable modification. Power steering will go away for now until I feel like installing an electric pump in the front trunk. Still a few parts to order for coolant tank conversion to run it back into the main coolant lines. I am about to chop the coolant hard lines and weld on the 20AN fittings. I'll be plumbing the fuel system and remaining coolant and heater hoses in the next two weeks. After that it's just fitting the LS1 in place, connecting hoses and running the power to the Terminator X and all the small things that go with that phase. Hoping to crank it over before the new year but depends on how quickly I can fab a temporary exhaust.
Awesome! Thank you.
Stuttgart muscle sells a pedal kit to easily convert to dbw, https://stuttgartmuscle.com/products...or-pedal-mount
i guess you need a different tb then...
I ask Stuttgart about ps pump he said the following:
" Electric power steering in the front is the easiest solution. I recommend an Opel Astra H power steering pump, it is the same as the Porsche Motorsports pump, but much cheaper. We plan on selling brackets soon."
Maybe it's the same pump.
Can you pass inspection with the TerminatorX?
Or you don't have that problem where you live?
 12-07-2019, 08:14 PM
#62
Rennlist Member
Thread Starter
Awesome! Thank you.
Stuttgart muscle sells a pedal kit to easily convert to dbw, https://stuttgartmuscle.com/products...or-pedal-mount
i guess you need a different tb then...
I ask Stuttgart about ps pump he said the following:
" Electric power steering in the front is the easiest solution. I recommend an Opel Astra H power steering pump, it is the same as the Porsche Motorsports pump, but much cheaper. We plan on selling brackets soon."
Maybe it's the same pump.
Can you pass inspection with the TerminatorX?
Or you don't have that problem where you live?
There�s a few electric pumps that will work with these conversions. MR2, Mini Cooper, GT3 cup, etc.
I don�t have inspections to worry about but the LS3 erod package takes care of that for people that need more substantial emissions equipment.
12-12-2019, 04:46 PM
#64
Rennlist Member
Thread Starter

I'm glad you're enjoying the info
 I'm hoping to help people with understanding how easy these swaps can be.
 For the record - there is NO REASON to use Renegade Hybrids kits. I highly recommend using Stuttgart Muscle or Eric at A&E Machining for your adapter, clutch, etc. and Stuttgart Muscle again for all other pieces and info. I don't personally like how he accomplished the cooling system as I'm not a fan of brass for oiling and cooling applications but to each his own.
I have a ton of parts in my shop and I'm trying to wrap up the 180 degree header design ASAP so I can have the tubes quoted for CNC bending. Fuel and cooling system including heater hoses should be wrapped up by next weekend.
12-13-2019, 12:13 AM
#65
Just saw your PM Sam, I responded
I'm glad you're enjoying the info I'm hoping to help people with understanding how easy these swaps can be.
For the record - there is NO REASON to use Renegade Hybrids kits. I highly recommend using Stuttgart Muscle or Eric at A&E Machining for your adapter, clutch, etc. and Stuttgart Muscle again for all other pieces and info. I don't personally like how he accomplished the cooling system as I'm not a fan of brass for oiling and cooling applications but to each his own.
I have a ton of parts in my shop and I'm trying to wrap up the 180 degree header design ASAP so I can have the tubes quoted for CNC bending. Fuel and cooling system including heater hoses should be wrapped up by next weekend.
I'm glad you're enjoying the info
I'm hoping to help people with understanding how easy these swaps can be.For the record - there is NO REASON to use Renegade Hybrids kits. I highly recommend using Stuttgart Muscle or Eric at A&E Machining for your adapter, clutch, etc. and Stuttgart Muscle again for all other pieces and info. I don't personally like how he accomplished the cooling system as I'm not a fan of brass for oiling and cooling applications but to each his own.
I have a ton of parts in my shop and I'm trying to wrap up the 180 degree header design ASAP so I can have the tubes quoted for CNC bending. Fuel and cooling system including heater hoses should be wrapped up by next weekend.
Will this make the LS sound like a Ferrari? (That would be great).
12-26-2019, 07:38 PM
#66
Rennlist Member
Thread Starter
180 degree headers are nearly finished with design, waiting for quotes and doing a few more checks with the actual car and LS1 to ensure fitment. Under-pan tube connection will either be a flange or a spring retainer setup. Leaning toward spring retainers for space limitations and easy of removal.


The following users liked this post:
george_west (12-26-2019)
12-26-2019, 07:39 PM
#67
Rennlist Member
Thread Starter
It's a lot to explain - google 180 degree headers and start reading. 180 degrees refers to crankshaft spacing per cylinder. Most engines, like the LS, are 90 degrees apart to minimize vibrations. This exhaust changes the pulses to 180 degree apart, hence the name.
12-27-2019, 12:12 AM
#70
Awesome!
So if I get this right?
On a normal exhaust you get:
1-8-7-2-6-5-4-3
L-R-L-R-R-L-R-L
So cylinder 2 and 6 or not 180 apart.
You cross over cylinder 3,4,5,6:
1-8-7-2-6-5-4-3
L-R-L-R-L-R-L-R
So if I get this right?
On a normal exhaust you get:
1-8-7-2-6-5-4-3
L-R-L-R-R-L-R-L
So cylinder 2 and 6 or not 180 apart.
You cross over cylinder 3,4,5,6:
1-8-7-2-6-5-4-3
L-R-L-R-L-R-L-R
12-27-2019, 04:33 PM
#71
Rennlist Member
Thread Starter
Thank you everyone.
Yes, somewhat equal length tubes. Still working on making them all within 1".
Yes, crossover 3456 to other bank.
Yes, somewhat equal length tubes. Still working on making them all within 1".
Yes, crossover 3456 to other bank.
01-13-2020, 03:17 PM
#72
Rennlist Member
Thread Starter
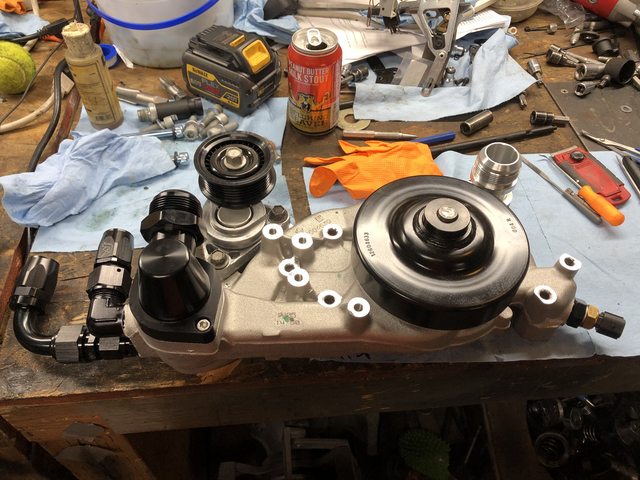
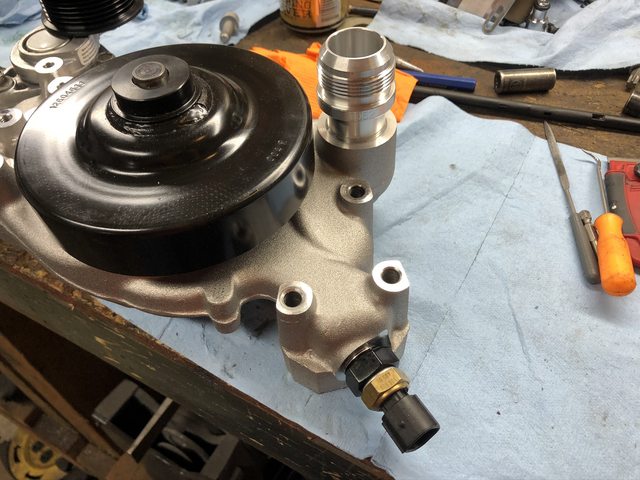
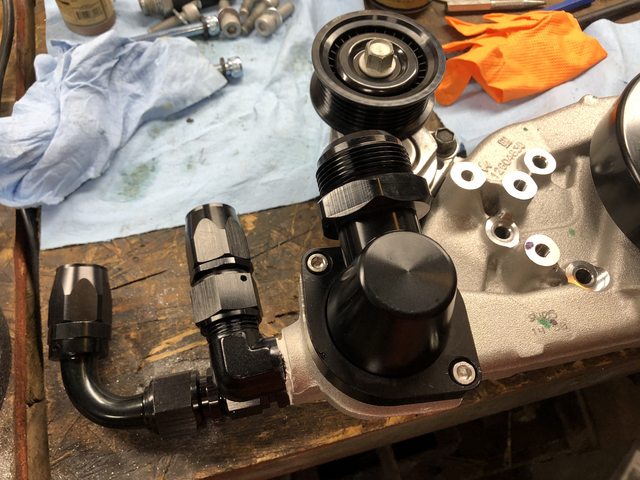
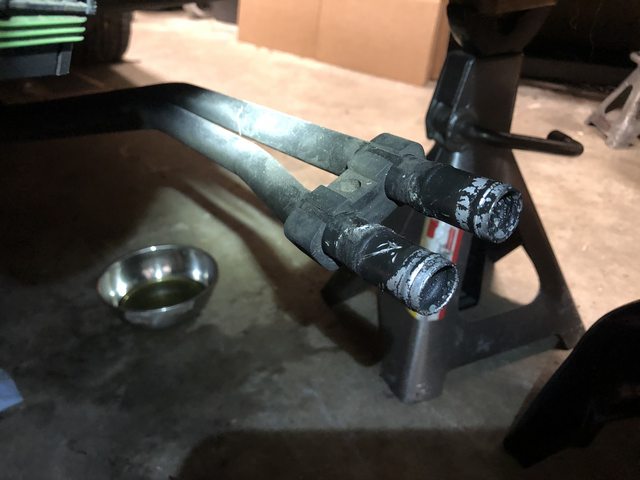
The last update on had on the car itself involved mounting the water pump. To finish it out, I mounted a 20AN swivel for the water neck and converted both heater hoses to 12AN for simplicity. Some people cap these and route lines over the 996 coolant tubes but I am not a fan of that method. To each his own.
I also removed the stamped tube with a couple smacks with a deadblow and pressed in a 20AN male piece from CBM Motorsports. Very nice piece, as is the 20AN swivel (amazon special). In the pics, the 20AN CBM piece is not pressed in yet, I had to take .010" off the diameter and I also used 609 Loctite meant for press fits for a good final seal and peace of mind. I also used ARP hardware as the pump has to come off any time the engine needs dropped since the motor mount plates attach to the heads and the WP is in the way of two bolts.
I also took a M16 to 1/8 NPT adapter and drilled and tapped the NPT side to M14 for the sensors. I believe the pitch is 1.5, but I can't recall exactly. I used the port on the side of the water pump for this adapter. This is for the Porsche coolant sensor. I retained all Porsche sensors and all GM sensors and will run both redundantly. I am still working on the 996 oil level/temp sensor, that's the last one to be used. I believe I can swap out the looooong 996 dual use temp/level sensor for the same sensor used on the coolant as the plugs are the same.
All the AN fittings are not necessary if you want more of a budget coolant setup. I just don't like spring clamps and some of the other methods. It's all preference.
Some pics of the water pump:
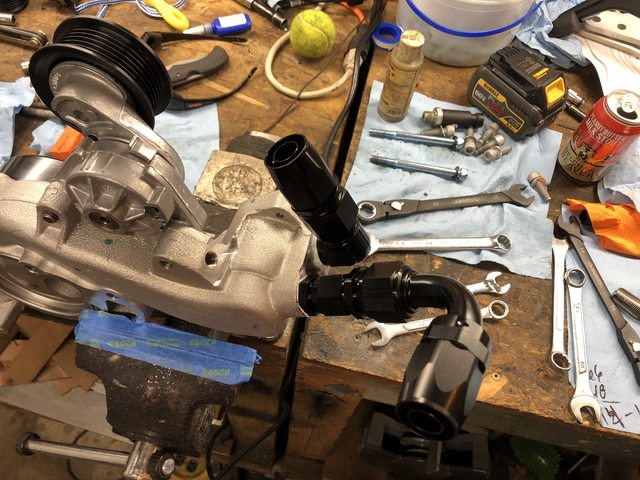
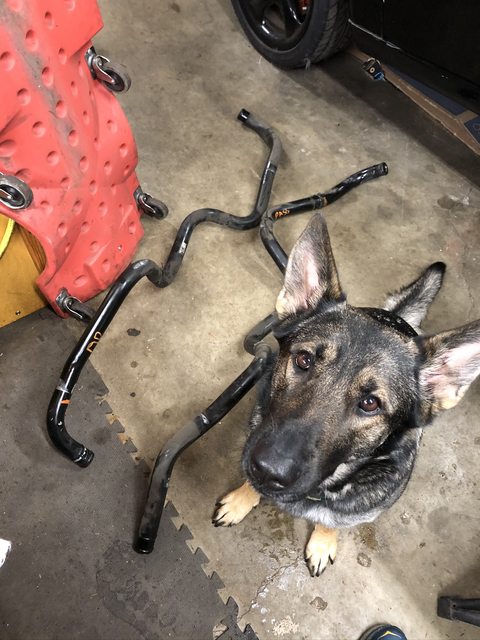
The heater hoses attach underneath the car to these 7/8" lines. More on how I'm converting these later, I am still getting those fittings made. They're designed and ready for lathe work but I haven't gotten to it yet.
Left side coolant line, or driver's side and where I cut it for the AN20 fitting (orange mark)

Right side or driver's side cut mark, just before it bent. I am using a 45 degree fitting on this side so I wanted it tight to the body. Again, this is preference, and a simple bead roller and some typical coolant hoses could be made to work here - but will look gross to me haha! Again, preference.

Every single line has a redundancy of clamps holding them in place under the car. Never seen so many line clamps but they are very well done. I yanked the lines out and cut them. I am hoping to weld them this week so I can finish out the last part of the build!
The pup wouldn't move so here's my GSD in all her glory. Love this dog!
I also removed the stamped tube with a couple smacks with a deadblow and pressed in a 20AN male piece from CBM Motorsports. Very nice piece, as is the 20AN swivel (amazon special). In the pics, the 20AN CBM piece is not pressed in yet, I had to take .010" off the diameter and I also used 609 Loctite meant for press fits for a good final seal and peace of mind. I also used ARP hardware as the pump has to come off any time the engine needs dropped since the motor mount plates attach to the heads and the WP is in the way of two bolts.
I also took a M16 to 1/8 NPT adapter and drilled and tapped the NPT side to M14 for the sensors. I believe the pitch is 1.5, but I can't recall exactly. I used the port on the side of the water pump for this adapter. This is for the Porsche coolant sensor. I retained all Porsche sensors and all GM sensors and will run both redundantly. I am still working on the 996 oil level/temp sensor, that's the last one to be used. I believe I can swap out the looooong 996 dual use temp/level sensor for the same sensor used on the coolant as the plugs are the same.
All the AN fittings are not necessary if you want more of a budget coolant setup. I just don't like spring clamps and some of the other methods. It's all preference.
Some pics of the water pump:
The heater hoses attach underneath the car to these 7/8" lines. More on how I'm converting these later, I am still getting those fittings made. They're designed and ready for lathe work but I haven't gotten to it yet.
Left side coolant line, or driver's side and where I cut it for the AN20 fitting (orange mark)
Right side or driver's side cut mark, just before it bent. I am using a 45 degree fitting on this side so I wanted it tight to the body. Again, this is preference, and a simple bead roller and some typical coolant hoses could be made to work here - but will look gross to me haha! Again, preference.
Every single line has a redundancy of clamps holding them in place under the car. Never seen so many line clamps but they are very well done. I yanked the lines out and cut them. I am hoping to weld them this week so I can finish out the last part of the build!
The pup wouldn't move so here's my GSD in all her glory. Love this dog!
01-13-2020, 03:26 PM
#73
Very nice!
What is your thoughts about rubber vs AN and steel braided hoses? After doing a bunch of AN and steel braided I started to appreciate the simplicity of rubber hoses.
I know that some sensors doesn't work with fuel/oil, they will degrade or something over time. Also the ohm range for the oil and coolant might differ. How is the porsche oil temp being used? There is no gauge for it?
01-13-2020, 03:38 PM
#74
Advanced
My GSD is 7 now, and is the most calm, obedient dog ever. My friends bring their puppies over in hopes that she will rub off on their behavior! Great build brother! Good to see that Jeep lifestyle come over to the Porsche world. It's crazy how many ideas from all my jeeps have steered me in my mods on a totally different vehicle platform.
 01-13-2020, 03:38 PM
#75
Rennlist Member
Thread Starter
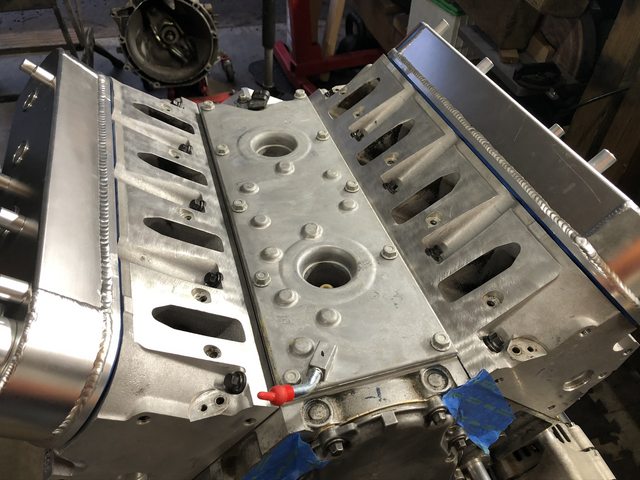
The LS1 still need the LS6 PCV update. This is about $100 and well worth it. Much better system, especially with aftermarket valve covers. I still need a catch can but overall this is much better. In order to convert an early LS1, you have to knock down one of the bosses inside the valley.
I had to mask the entire valley and it took a while. This mostly worked! haha
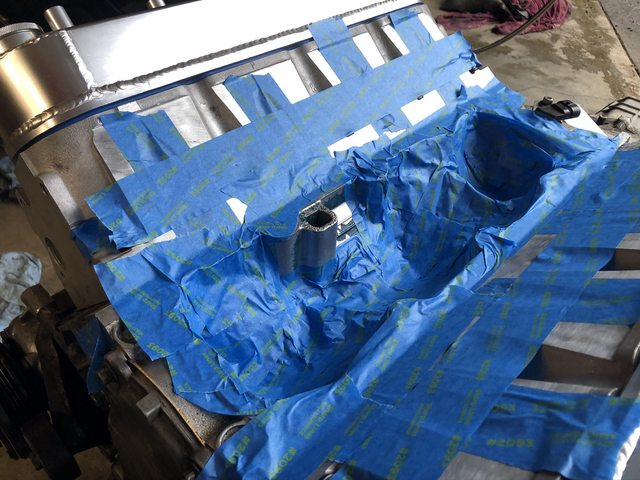

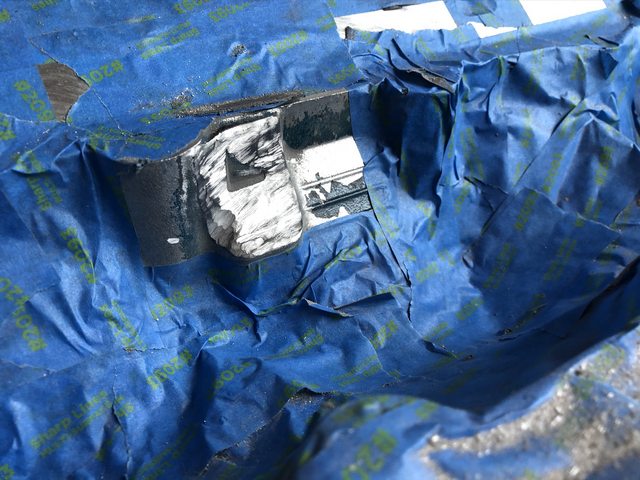
Done. LS6 PCV on an early LS1.
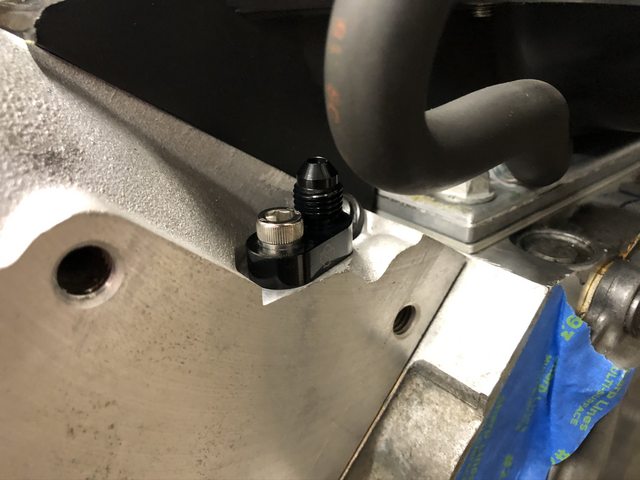
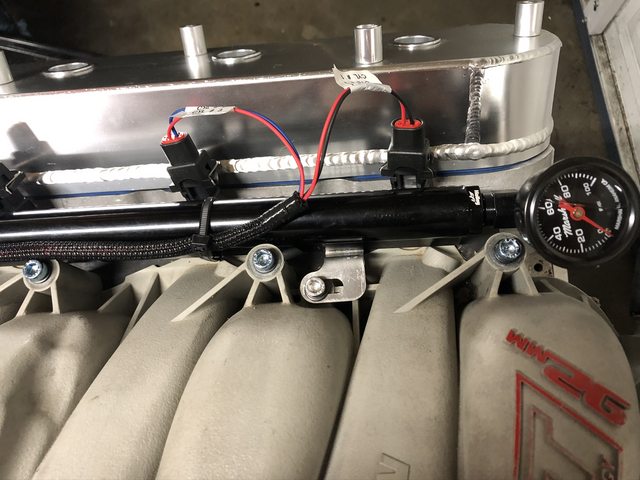
Unfortunately, this also meant the LS1 steam port lines would not work now. They were already smashed slightly with the Fast 92 intake. So, more AN lines! I bought this kit off eBay specifically for the Fast intakes and it worked well. I think the accessories on my LS1 are worth more than the LS1 itself...
Link: https://www.ebay.com/itm/FAST-102-92...K/132107718315
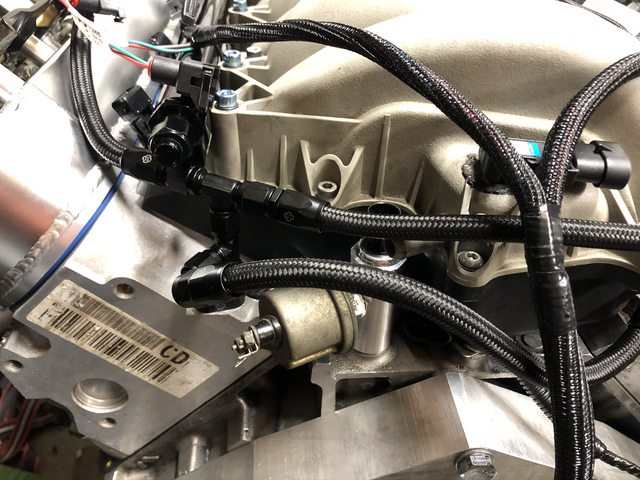
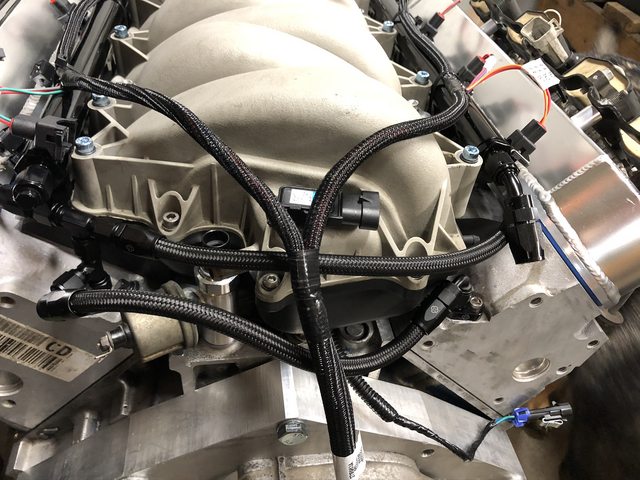
In these pics you'll also see I made some aluminum fuel rail brackets to hold the LS3 injectors to the Holley rail and Fast intake. These did not exist until I designed them and it was a pain to make it work. Holley claimed the brackets were LS3 to Fast compatible but that is not true at all. Oh well.
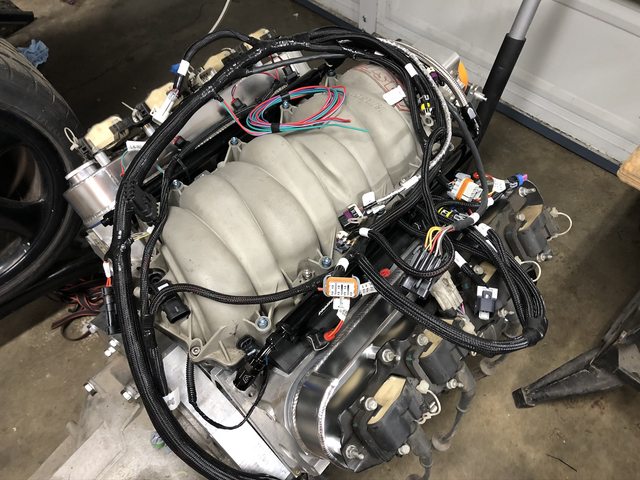
You'll also see the Holley Terminator X fuel injector harness since I started wiring. I also final plumbed the rest of the fuel system on the engine with the crossover tubes, fuel pressure gauge, and some other goodies. I am using a Lokar LS1 bracket and cable, more on that later. I used all new hardware too since I was missing bolts.
I had to mask the entire valley and it took a while. This mostly worked! haha
Done. LS6 PCV on an early LS1.
Unfortunately, this also meant the LS1 steam port lines would not work now. They were already smashed slightly with the Fast 92 intake. So, more AN lines! I bought this kit off eBay specifically for the Fast intakes and it worked well. I think the accessories on my LS1 are worth more than the LS1 itself...
Link: https://www.ebay.com/itm/FAST-102-92...K/132107718315
In these pics you'll also see I made some aluminum fuel rail brackets to hold the LS3 injectors to the Holley rail and Fast intake. These did not exist until I designed them and it was a pain to make it work. Holley claimed the brackets were LS3 to Fast compatible but that is not true at all. Oh well.
You'll also see the Holley Terminator X fuel injector harness since I started wiring. I also final plumbed the rest of the fuel system on the engine with the crossover tubes, fuel pressure gauge, and some other goodies. I am using a Lokar LS1 bracket and cable, more on that later. I used all new hardware too since I was missing bolts.