Build Thread: '99 C2 996 LS1 Swap
 01-13-2020, 03:42 PM
#76
Rennlist Member
Thread Starter
Very nice!
What is your thoughts about rubber vs AN and steel braided hoses? After doing a bunch of AN and steel braided I started to appreciate the simplicity of rubber hoses.
I know that some sensors doesn't work with fuel/oil, they will degrade or something over time. Also the ohm range for the oil and coolant might differ. How is the porsche oil temp being used? There is no gauge for it?
My GSD is 7 now, and is the most calm, obedient dog ever. My friends bring their puppies over in hopes that she will rub off on their behavior! Great build brother! Good to see that Jeep lifestyle come over to the Porsche world. It's crazy how many ideas from all my jeeps have steered me in my mods on a totally different vehicle platform.
 01-13-2020, 04:06 PM
#77
Rennlist Member
Thread Starter
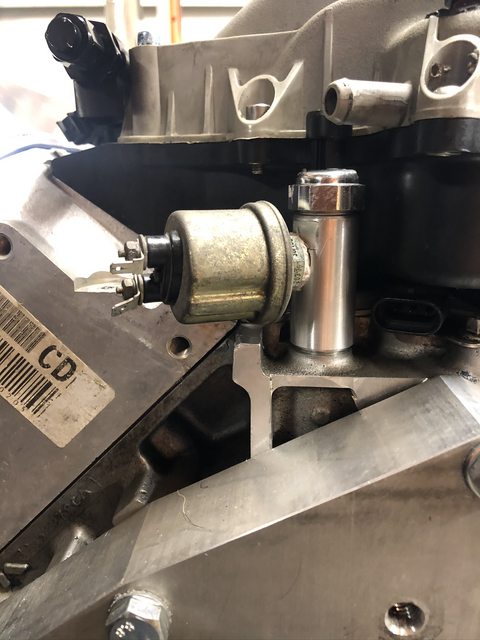
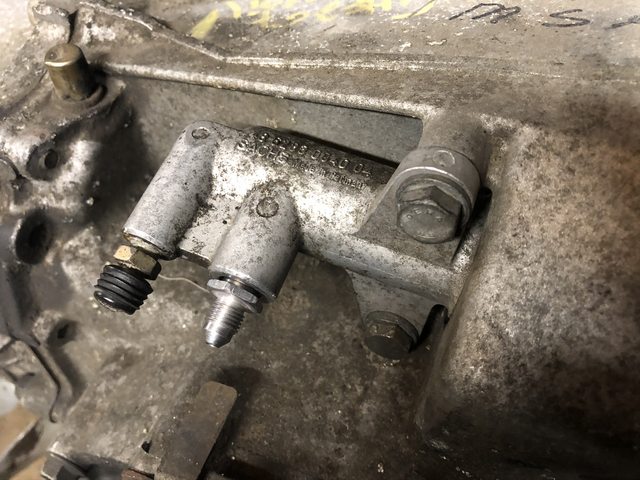
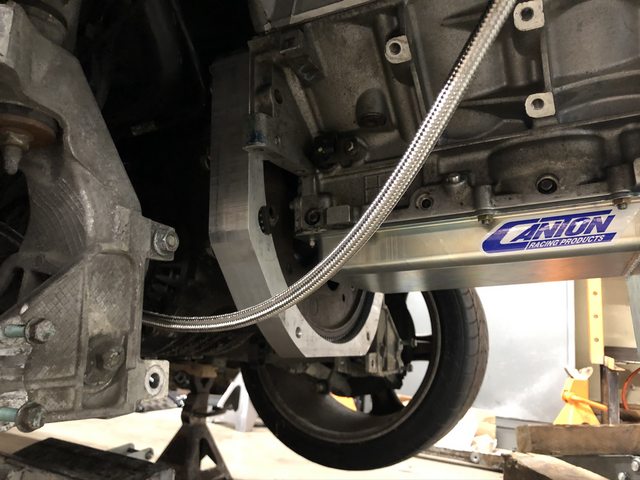
I mounted a short version of the LS oil pressure sensor to a tower I got off ebay. The sensor is part number 12616646 and has the same M16x1.5 thread as the tall unit. The 996 sensor is M14x1.5 so I had to drill and tap in the side of the tower.
Tower link: https://www.ebay.com/itm/29336551218...m=293365512189
Sensor Link:
Onto the Tiptronic to manual conversion...
Here's the fittings I designed to convert the entire system to 3AN. I still need to make 2 more fittings, but they're in the hopper now for lathe work. I'm using 3AN braided PTFE line from Pegasus.
Clutch master to 3AN:
I grabbed a used brake master cylinder from a 6MT car off ebay for $30 and yanked off the reservoir. Did the same to the master cylinder that was still in the car after sucking out the brake fluid to avoid a mess. The difference in reservoirs is the 6MT has this port drilled with a push to connect fitting for 8mm (or 5/16") push-in style plastic line. I bought the line off ebay for cheap and designed a new version with 3AN on the side. I'll take more pics of these fittings later on.
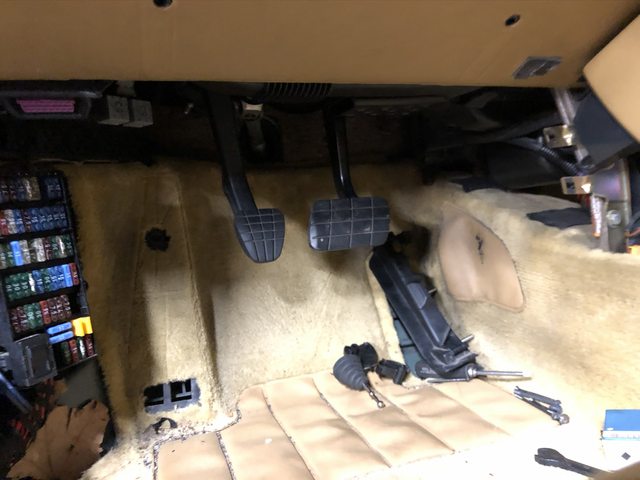
Added the clutch pedal. This was kind of a pain in the ***. You do NOT need to take the dash apart, don't let the Porsche gurus lie to you! hah!
There's a bolt that holds in the brake pedal. You'll need to remove the 10mm nut on one side and then turn the head head of the bolt CCW because there are threads right after the hex head that hold in the other side of the assembly. No idea why they did this but it's suuuuuper fun laying upside down for a while to do this. Everything bolts up easily. You'll need M6 bolts for the master cylinder to mount (2 at 40mm long) and some M6 nuts (4 with flange) for the pedal to finish mounting. I bought the pedal off ebay for pretty cheap with the master attached.
Next is the fuel system. No matter what 996 you have, you'll want to read this page and the DIY no cutting required FAQ listed there:
https://stuttgartmuscle.com/pages/fuel-system
Since mine is a return style, I followed this guide (listed in above link):
https://cdn.shopify.com/s/files/1/00...999-2001.pdf?1
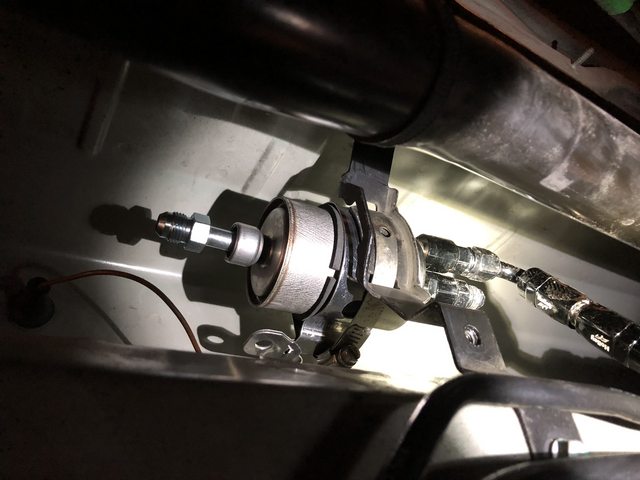
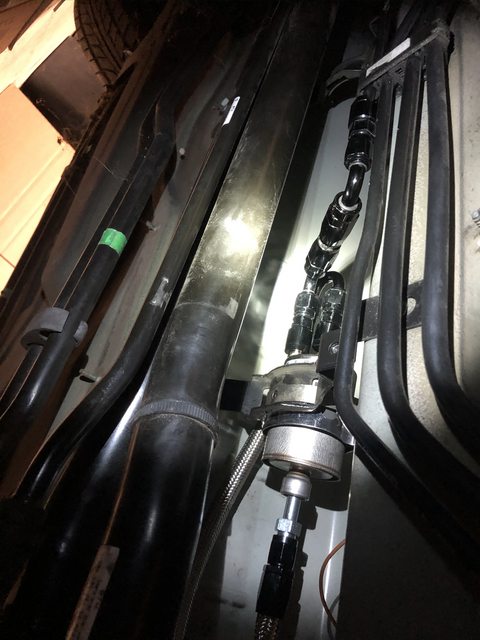
996 fuel filter vs Corvette filter and regulator combo.
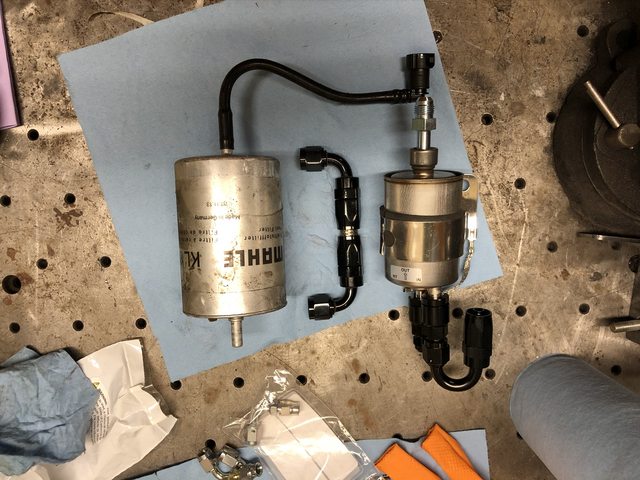
Sorry for the picture quality, I have about 14" to work with including my body under the car and it's a challenge to get a good pic of this whole setup. Easy to do though! Man, I need a lift....
Corvette regulator/filter takes place of the 996 filter
Tower link: https://www.ebay.com/itm/29336551218...m=293365512189
Sensor Link:
Onto the Tiptronic to manual conversion...
Here's the fittings I designed to convert the entire system to 3AN. I still need to make 2 more fittings, but they're in the hopper now for lathe work. I'm using 3AN braided PTFE line from Pegasus.
Clutch master to 3AN:
I grabbed a used brake master cylinder from a 6MT car off ebay for $30 and yanked off the reservoir. Did the same to the master cylinder that was still in the car after sucking out the brake fluid to avoid a mess. The difference in reservoirs is the 6MT has this port drilled with a push to connect fitting for 8mm (or 5/16") push-in style plastic line. I bought the line off ebay for cheap and designed a new version with 3AN on the side. I'll take more pics of these fittings later on.
Added the clutch pedal. This was kind of a pain in the ***. You do NOT need to take the dash apart, don't let the Porsche gurus lie to you! hah!
There's a bolt that holds in the brake pedal. You'll need to remove the 10mm nut on one side and then turn the head head of the bolt CCW because there are threads right after the hex head that hold in the other side of the assembly. No idea why they did this but it's suuuuuper fun laying upside down for a while to do this. Everything bolts up easily. You'll need M6 bolts for the master cylinder to mount (2 at 40mm long) and some M6 nuts (4 with flange) for the pedal to finish mounting. I bought the pedal off ebay for pretty cheap with the master attached.
Next is the fuel system. No matter what 996 you have, you'll want to read this page and the DIY no cutting required FAQ listed there:
https://stuttgartmuscle.com/pages/fuel-system
Since mine is a return style, I followed this guide (listed in above link):
https://cdn.shopify.com/s/files/1/00...999-2001.pdf?1
996 fuel filter vs Corvette filter and regulator combo.
Sorry for the picture quality, I have about 14" to work with including my body under the car and it's a challenge to get a good pic of this whole setup. Easy to do though! Man, I need a lift....
Corvette regulator/filter takes place of the 996 filter
01-13-2020, 04:07 PM
#78
Rennlist Member
Thread Starter
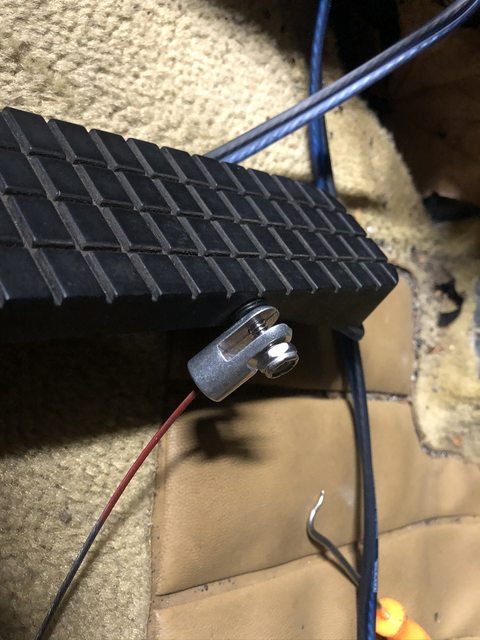
As for the throttle pedal, since I'm DBC I'm reusing the 996 pedal BUT I'm not using this funky cantilever deal for the actual cable that runs to the throttle body. There's a TPS sensor that runs off another cable so that must stay. I believe it also helps run the cruise control, so I'll want that.

I'm using the Lokar LS1 throttle cable mount and 120" throttle cable. Links below-
This cable kit is for a Ford, you just take off the carb linkage and add a cable end. Easy.
Brackets for intake:
I'm mounting the clevis end to the 996 pedal using a single shear bolt that I'll likely epoxy into place. More info on this when I finalize it, but that's the plan. Orange mark is where the bolt should be. The throw on the 92mm DBC throttle body is about 1.8" so the travel at the pedal needs to be between 1.8 and 2.0 inches BUT I want it to bottom out at the same time I reach WOT to make sure I am not putting the cable into too much tension.
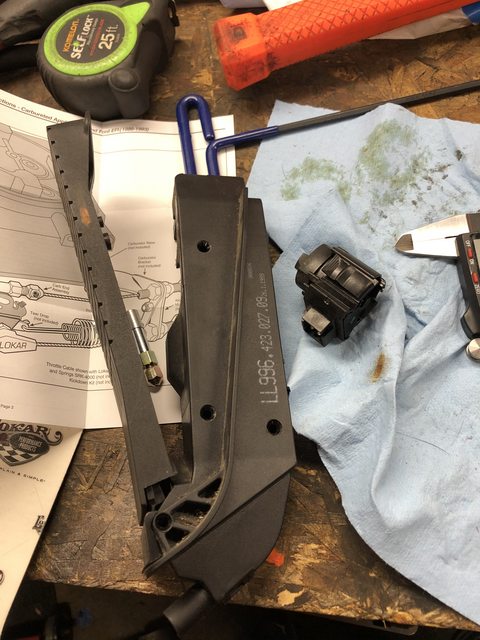
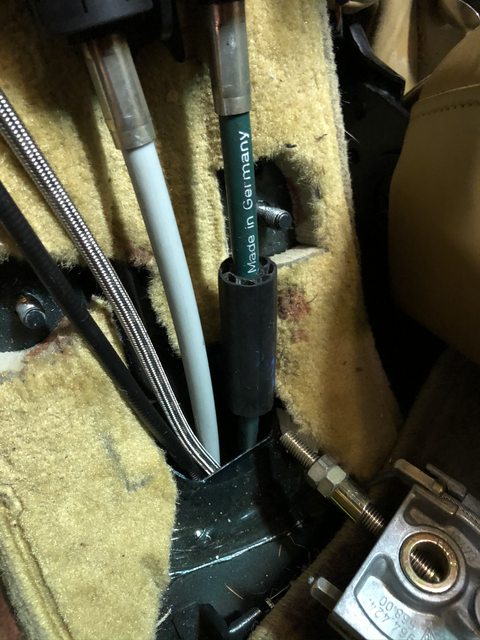
I'm shoving both the braided clutch line and throttle cable through the same pass-through hole as the transaxle shift cable and e-brake cable. It's getting crowded but I have a plan to make it all fit nice and snug.
I believe this gets the thread up to date - hoping to have another next weekend. Thanks to all that watch the progress!
I'm using the Lokar LS1 throttle cable mount and 120" throttle cable. Links below-
This cable kit is for a Ford, you just take off the carb linkage and add a cable end. Easy.
Brackets for intake:
I'm mounting the clevis end to the 996 pedal using a single shear bolt that I'll likely epoxy into place. More info on this when I finalize it, but that's the plan. Orange mark is where the bolt should be. The throw on the 92mm DBC throttle body is about 1.8" so the travel at the pedal needs to be between 1.8 and 2.0 inches BUT I want it to bottom out at the same time I reach WOT to make sure I am not putting the cable into too much tension.
I'm shoving both the braided clutch line and throttle cable through the same pass-through hole as the transaxle shift cable and e-brake cable. It's getting crowded but I have a plan to make it all fit nice and snug.
I believe this gets the thread up to date - hoping to have another next weekend. Thanks to all that watch the progress!
01-13-2020, 04:22 PM
#79

Thank you! Rubber degrades over time. I'll never use unshield fuel hose, but I think coolant hoses are fine within reason. I still want them shielded on a car like this, just preference. Porsche temp sensor for oil is also the level sensor on these cars. I believe it's just a dash feature. Oil temp is a gauge itself, IIRC. The coolant temp sensor is the same, on a gauge, IIRC. I will do more research on the sensors but not necessary to start and drive right now.
That's good to hear! My GSD is just over 2 and finally calming down. She's a sweetheart but still very hyper. Thanks for the kind words - I am surprised at how many Jeep-centric behaviors have been useful on this build. I certainly am appreciative of the ground clearance on a Jeep right now!
That's good to hear! My GSD is just over 2 and finally calming down. She's a sweetheart but still very hyper. Thanks for the kind words - I am surprised at how many Jeep-centric behaviors have been useful on this build. I certainly am appreciative of the ground clearance on a Jeep right now!
 Save you some trouble.
EDIT:
I think the oil temp is only used for Variocam operation.
Last edited by turbogrill; 01-13-2020 at 06:23 PM.
01-13-2020, 09:03 PM
#80

Great progress and your attention to the details is first class . I started with the corvette fuel filter/ regulator and had ended up replacing it with a fuel pressure regulator . The issue was the corvette regulator was holding 70 psi .In fact tried 3 different filter/regulators all the same result .My hypothesis is that the Porsche fuel return has a checkvalve that was creating some backpressure .Maybe my situation is unique but something to check as you get farther along .
 01-14-2020, 09:07 PM
#82
Rennlist Member
Thread Starter
Great progress and your attention to the details is first class . I started with the corvette fuel filter/ regulator and had ended up replacing it with a fuel pressure regulator . The issue was the corvette regulator was holding 70 psi .In fact tried 3 different filter/regulators all the same result .My hypothesis is that the Porsche fuel return has a checkvalve that was creating some backpressure .Maybe my situation is unique but something to check as you get farther along .
I'll have to look at the gauge closely to check for this issue! Thanks for the heads up.
01-14-2020, 11:38 PM
#83
Instructor
Great idea with the oil pressure switch. I am going to do virtually the same thing. I am assuming you are using the factory cluster? Have you sorted out where your electrical connections will tie in? From my understanding the lines are green and red and green and white. Haven’t had time to find the best location to get those two wires.
02-20-2020, 06:39 PM
#84
Rennlist Member
Thread Starter
Great idea with the oil pressure switch. I am going to do virtually the same thing. I am assuming you are using the factory cluster? Have you sorted out where your electrical connections will tie in? From my understanding the lines are green and red and green and white. Haven�t had time to find the best location to get those two wires.
Posting another update in a few min...
02-20-2020, 07:05 PM
#85
Rennlist Member
Thread Starter
Finally more updates. Been very busy but can focus on the 996 again now.
Welded the coolant tubes to the 20an bungs. I haven't welded aluminum in a couple years so I used the TIG at work. Ugly, but sealed and good to go.
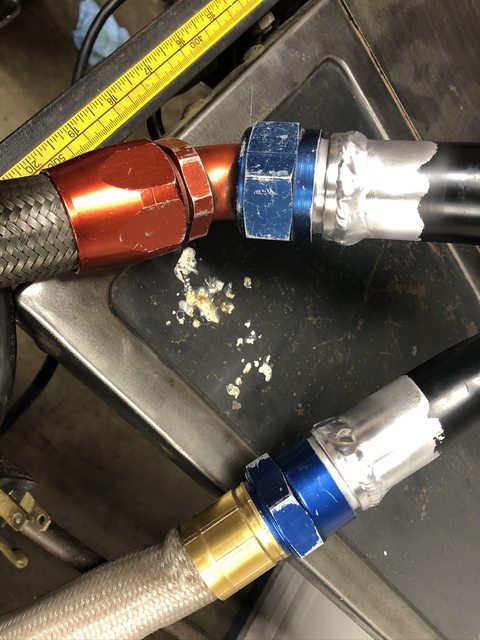
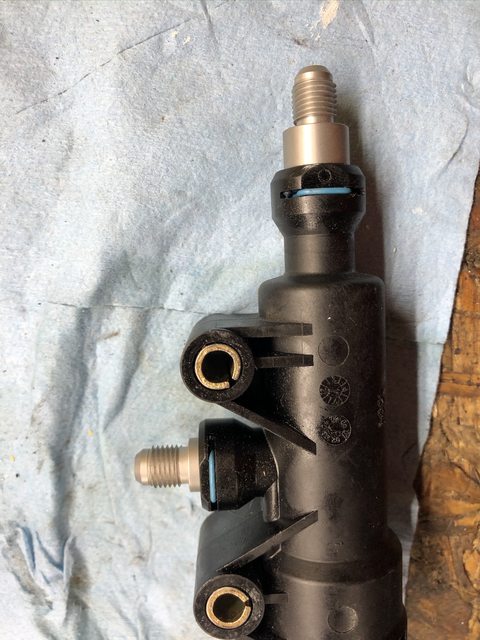
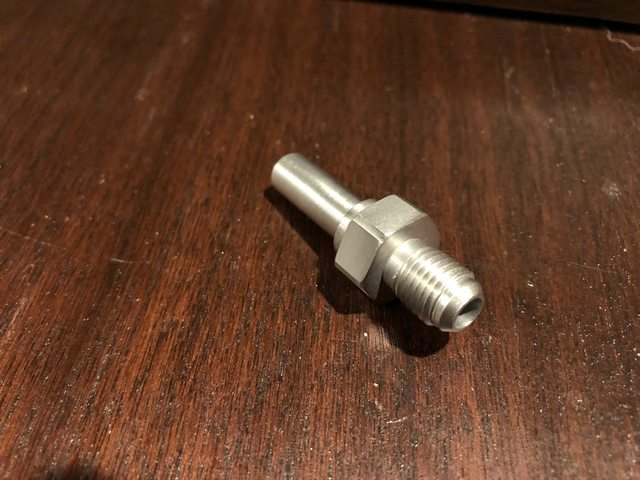
I mentioned swapping the brake master cylinder reservoir and this fitting is the key. Instead of using a separate reservoir, I wanted to tie into the factory Porsche reservoir and share the fluid. It's a push to connect type fitting, 8mm diameter and .800" long IIRC. I designed this 3AN conversion fitting and asked one of my guys to turn it on the lathe. They take only about 90 min to make one and I take....not 90 minutes. Maybe 9 hours? Hah!
17-4 SS and worked beautifully
Plumbed with SS braided PTFE hose and fittings from Pegasus Racing. Also used a bulkhead fitting to pass it through the firewall. I'll grab more pics of all the clutch work but essentially the clutch master is remote from the reservoir and is mounted with the fluid input exposed through the second firewall where the pedals are mounted.

This is another fitting from Pegasus Racing. It's designed for the fuel systems and brake systems but it's the same flare as the other systems. I had to ask one of my machinists to turn back the hex because it wouldn't seat the flare in stock length. M12x1.0 thread for this, into the factory 996 clutch slave cylinder.
Link to fitting: https://www.pegasusautoracing.com/pr...asp?RecID=5935
The plan for the throttle cable...this is nearly complete. I drilled, tapped, and epoxied this 10-32 1.5" long set screw into the pedal for a single shear mount. More on this later when I wrap it up.
Last, but most importantly, I mounted the LS1 for the first time in the 996. Big milestone considering all the work that had to be done just to get it here. Converting the car to 6MT was the hardest part to figure out but I believe we're there. I'm sure I'll be chasing a few of the Porsche chimes and electrical errors for a little while but I can start driving it as soon as I route a few more lines and get the electrics configured. I need to finish up a few details with the fuel lines, final cut the clutch line length, route all of these lines to their final placement in the engine bay, then drop the motor and send off a few of these aluminum pieces to anodizing while I cut back a few more pieces of body panels. Right now, the water pump just barely won't squeeze in there. I also need to drop the pan, install the ICT double bolt oil pickup clamp, and inspect the bottom end one last time. I am also hoping to order the exhaust headers in the next two weeks once I design the 996 engine bay in CAD and verify all the fitment. I'll also design the muffler hangers and finish the remaining exhaust components very soon too.
Quick note: The FAST 92 intake tilts UP more than a LS6 or other GM intake. Therefore I have to cut into the trunk/spoiler. The actuated wing will be disabled until I can figure out another method to mount the motor and lines.
Anyway, the LS1 is mounted!
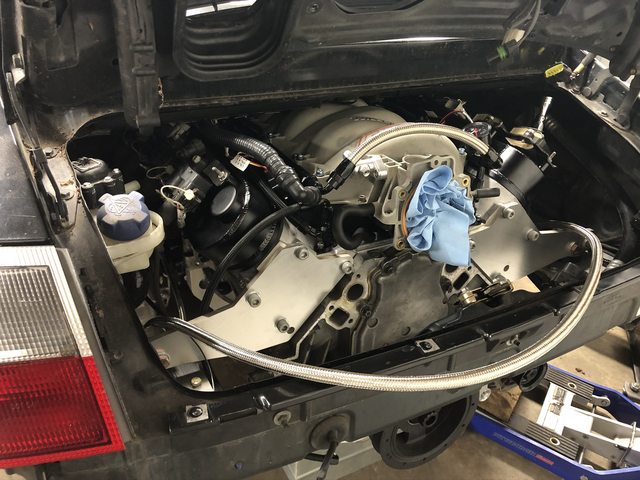
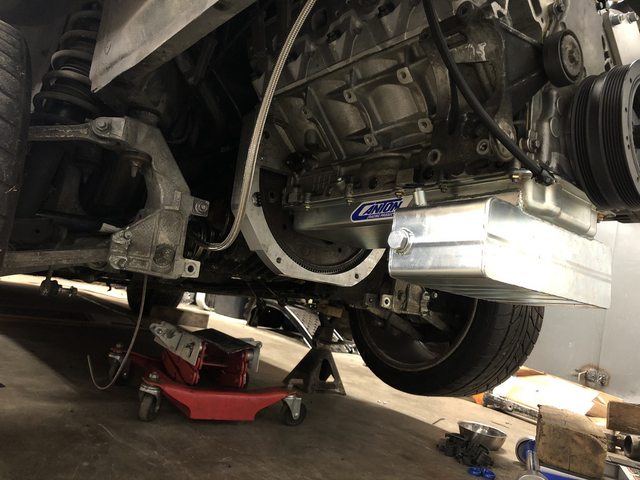
Close fitment, the OEM crossmember will go right behind the adapter...
Welded the coolant tubes to the 20an bungs. I haven't welded aluminum in a couple years so I used the TIG at work. Ugly, but sealed and good to go.
I mentioned swapping the brake master cylinder reservoir and this fitting is the key. Instead of using a separate reservoir, I wanted to tie into the factory Porsche reservoir and share the fluid. It's a push to connect type fitting, 8mm diameter and .800" long IIRC. I designed this 3AN conversion fitting and asked one of my guys to turn it on the lathe. They take only about 90 min to make one and I take....not 90 minutes. Maybe 9 hours? Hah!
17-4 SS and worked beautifully
Plumbed with SS braided PTFE hose and fittings from Pegasus Racing. Also used a bulkhead fitting to pass it through the firewall. I'll grab more pics of all the clutch work but essentially the clutch master is remote from the reservoir and is mounted with the fluid input exposed through the second firewall where the pedals are mounted.
This is another fitting from Pegasus Racing. It's designed for the fuel systems and brake systems but it's the same flare as the other systems. I had to ask one of my machinists to turn back the hex because it wouldn't seat the flare in stock length. M12x1.0 thread for this, into the factory 996 clutch slave cylinder.
Link to fitting: https://www.pegasusautoracing.com/pr...asp?RecID=5935
The plan for the throttle cable...this is nearly complete. I drilled, tapped, and epoxied this 10-32 1.5" long set screw into the pedal for a single shear mount. More on this later when I wrap it up.
Last, but most importantly, I mounted the LS1 for the first time in the 996. Big milestone considering all the work that had to be done just to get it here. Converting the car to 6MT was the hardest part to figure out but I believe we're there. I'm sure I'll be chasing a few of the Porsche chimes and electrical errors for a little while but I can start driving it as soon as I route a few more lines and get the electrics configured. I need to finish up a few details with the fuel lines, final cut the clutch line length, route all of these lines to their final placement in the engine bay, then drop the motor and send off a few of these aluminum pieces to anodizing while I cut back a few more pieces of body panels. Right now, the water pump just barely won't squeeze in there. I also need to drop the pan, install the ICT double bolt oil pickup clamp, and inspect the bottom end one last time. I am also hoping to order the exhaust headers in the next two weeks once I design the 996 engine bay in CAD and verify all the fitment. I'll also design the muffler hangers and finish the remaining exhaust components very soon too.
Quick note: The FAST 92 intake tilts UP more than a LS6 or other GM intake. Therefore I have to cut into the trunk/spoiler. The actuated wing will be disabled until I can figure out another method to mount the motor and lines.
Anyway, the LS1 is mounted!
Close fitment, the OEM crossmember will go right behind the adapter...
The following 2 users liked this post by gtxracer:
escimo (02-20-2020),
SoundnSpeed (02-20-2020)
02-21-2020, 10:42 AM
#86
Rennlist Member
"Quick note: The FAST 92 intake tilts UP more than a LS6 or other GM intake. Therefore I have to cut into the trunk/spoiler. The actuated wing will be disabled until I can figure out another method to mount the motor and lines."
Great build! As long as you're doing all this why not fabricate an engine lid in the style of the old "Tea Tray" or Whale-tail ? They stuffed some huge intercoolers under those things - I'm sure something similar would give you plenty of room for your intake.
Good luck !
Great build! As long as you're doing all this why not fabricate an engine lid in the style of the old "Tea Tray" or Whale-tail ? They stuffed some huge intercoolers under those things - I'm sure something similar would give you plenty of room for your intake.
Good luck !
02-21-2020, 06:25 PM
#87
Rennlist Member
Thread Starter
"Quick note: The FAST 92 intake tilts UP more than a LS6 or other GM intake. Therefore I have to cut into the trunk/spoiler. The actuated wing will be disabled until I can figure out another method to mount the motor and lines."
Great build! As long as you're doing all this why not fabricate an engine lid in the style of the old "Tea Tray" or Whale-tail ? They stuffed some huge intercoolers under those things - I'm sure something similar would give you plenty of room for your intake.
Good luck !
Great build! As long as you're doing all this why not fabricate an engine lid in the style of the old "Tea Tray" or Whale-tail ? They stuffed some huge intercoolers under those things - I'm sure something similar would give you plenty of room for your intake.
Good luck !
02-21-2020, 06:50 PM
#88
Ducktail is a great idea .With some creative throttle body plumbing might be able to keep the trunk latch .A few comments on the wiring ….The A/C signal from the climate control to the DME is a 12 volt very weak pwm signal .I had to build a booster to trigger the gm ecm for ac .Don't know if you will need a VSS signal but if you do and it has to look like a gm signal a 1 meg pullup resistor and 1uf capacitor will work .The Porsche engine harness is really not needed .The water temp connector and the purge valve connector are .The ac system can be functional without the dme using the climate control module .and running thru the gm ecm .Took some time to figure it out but finally got it ..
02-21-2020, 06:53 PM
#89
Rennlist Member
Not a duck tail (though they're nice, they won't give you more room in the engine bay. This is the "Tea Tray" - they were used on the 930 Turbo's to house the inter-cooler.
https://video.search.yahoo.com/searc...66&action=view
https://video.search.yahoo.com/searc...66&action=view
02-22-2020, 11:34 AM
#90
Rennlist Member

I'll swap you my LS6 for your FAST 92. LOL!!!