When you click on links to various merchants on this site and make a purchase, this can result in this site earning a commission. Affiliate programs and affiliations include, but are not limited to, the eBay Partner Network.
My wife gave me a Porsche Classic Radio Navigation System (PCRNS) from Suncoast for Father's Day (nice wife!). I have a pretty much stock 96' 993 with a CR-210 cassette/am/fm radio and factory Hi-Fi sound system / Nokia amp under the passenger seat. I decided to install the PCRNS system myself as the closest dealer is a 4 hour drive one way and in the northwest corner of Montana there are no stereo installers I would trust to tear into my car. I have never done much work within / under the dash and so this was definitely a learning process. I worked on and off over the course of 3 days to get it all installed. If I had all the following info upfront, I would guess it would have taken me 3 � 4 hours to complete it. I admittedly take my time, so with this info others might be able to complete the installation faster. I spent a fair amount of time over the 3 days researching how to remove the dashboard, ideas of where to place the various PCRNS components and how to run the wires. I've listed some of the threads I referenced for those who want to do a little more research. I'd like to pass on thanks to Makemann for his help in helping sort through the wire routing as this was the most troublesome part of the install. I ended up going a different route than he did, but his input was a definite help.
The four components I installed were the radio itself, the media box, GPS antenna and phone microphone. If you have a Blaupunkt amp or want SiriusXM, you have to buy optional equipment to install along with the basic PCRNS system. I have neither of these and so didn't have to worry about them. The installation manual provides instructions for installing the PCRNS radio along with suggested placement locations of the media box, GPS antenna and phone microphone depending on your car model (e.g. 914, 993, 928, etc.). There are no instructions about how to run the wires to these suggested locations which is the heart of this tome.
The first step was to disconnect the battery. This turned into it's own little project since as I pulled and twisted on the negative battery cable the entire negative battery post pulled out of the battery. Since the battery was almost 15 years old (I installed an Optima Orange Top when I bought the car) I didn't have too much to complain about. However, it did result in several trips to the auto parts store to special order a new battery and replace the negative battery cable when I couldn't get the corroded battery post out of the old battery cable. Always something!
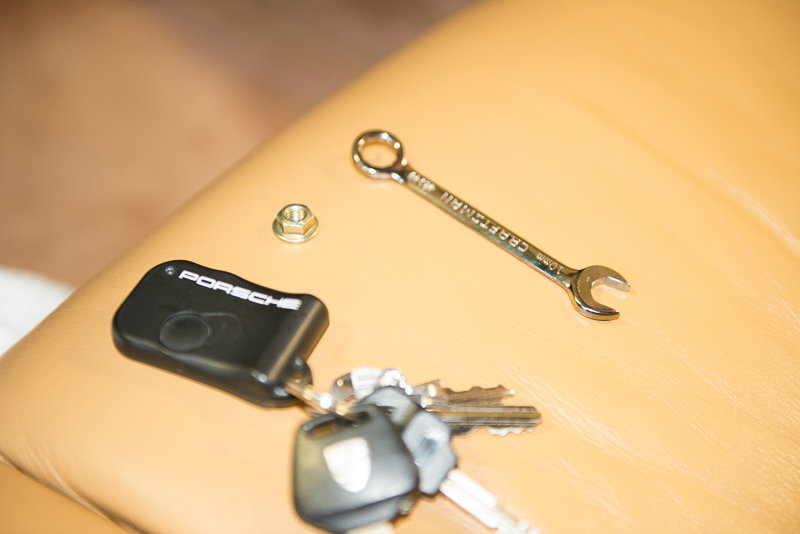
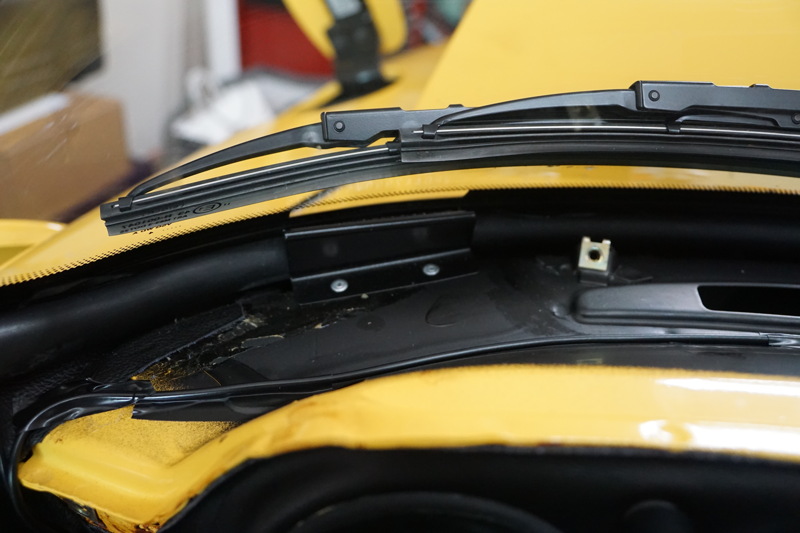
The CR-210 radio uses a single DIN mounting system. The PCRNS kit comes with keys that work with the PCRNS radio, but they will not work with the CR-210 radio. There are a number of YouTube videos showing you how to use a nail file and other improvised tools to remove a radio that uses a single DIN mounting system. I decided to spend ~$8 on Amazon and get a set of keys that allow removal of the radio and the environmental control unit (ECU). I have no connection with this seller, but for $8 the tools were reasonable and did the job with no issues.
1. Put a towel, cloth or tape on the dash below the radio to protect the dash.
2. Remove the detachable display of the CR-210.
3. In the lower left and right corners of the radio will be the slots to insert the DIN-1 removal keys.
4. I found lightly squeezing the keys towards each other prevented the keys from sliding out when pulling on the radio to remove it.
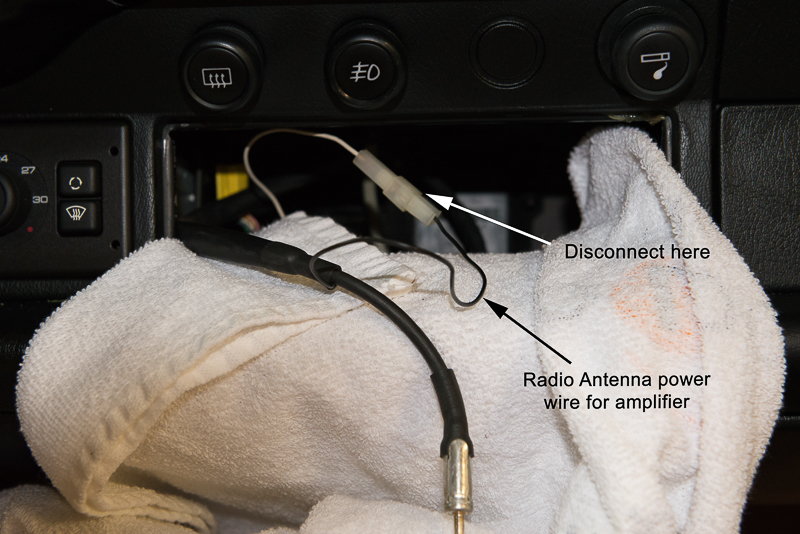
5. Disconnect the wires/connectors from the back of the radio. There should be three: the radio antenna cable, a yellow connector and a black connector. Note the position of these connectors on the radio as they will go back into identical locations on the PCRNS radio. Also, my radio antenna cable had a slip-on 90 degree angle connector. I had to remove this (it slides right off) for the cable to fit into the PCRNS radio.
6. There is a single wire that comes off the black connector and connects with another wire that runs along with the radio antenna cable. This provides power to the antenna amplifier. You need to disconnect this power wire.
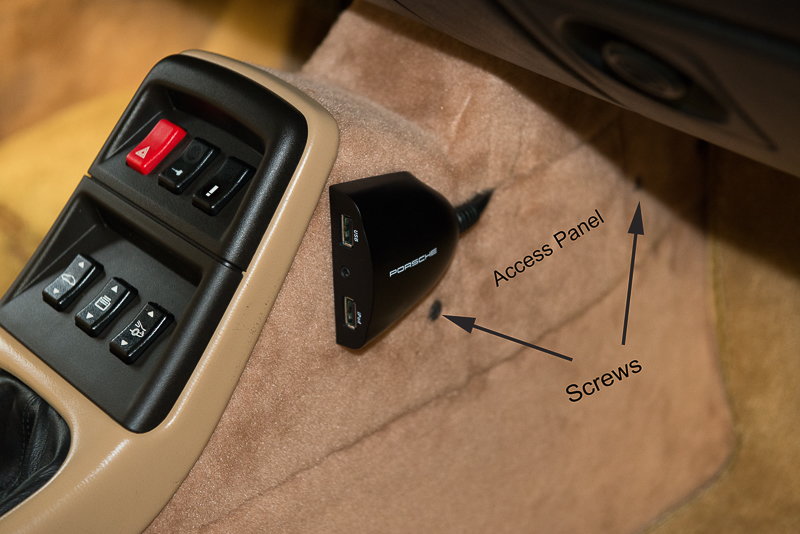
I decided to install the media box on the passenger side of the center console sidewall. There is an existing access panel here that allows easy threading of the media box cable into the center console and up to the radio. Remove the two screws holding the access panel and pull the panel out.
There is an opening almost immediately above this panel that you feed the cable up to behind the radio. I stored the excess cable in the center console. You can also run the cable all the way forward to the fire wall and then up to the radio, but I found the cable tended to hang down into the passenger foot well and so I chose to use the other route. The media box is held in place on the sidewall with velcro provided in the PCRNS kit. While it is visible it provides easy access and with the Porsche logo it almost looks like it was intended to be mounted there. Others have put it in the ashtray (requires removing the insert and drilling a hole in the back of the ashtray), in the glove box (requires drilling a hole in the back of the glove box), under the dashboard between the ashtray and the glove box or on the center console just below the ashtray (ashtray will not open all the way with the media box here).
I'm going to go a little out of order here and describe where I put the phone microphone and GPS antenna since the routing of the cables into the dashboard is pretty simple. The fun begins trying to get the cables beneath the dashboard to the back of the radio.
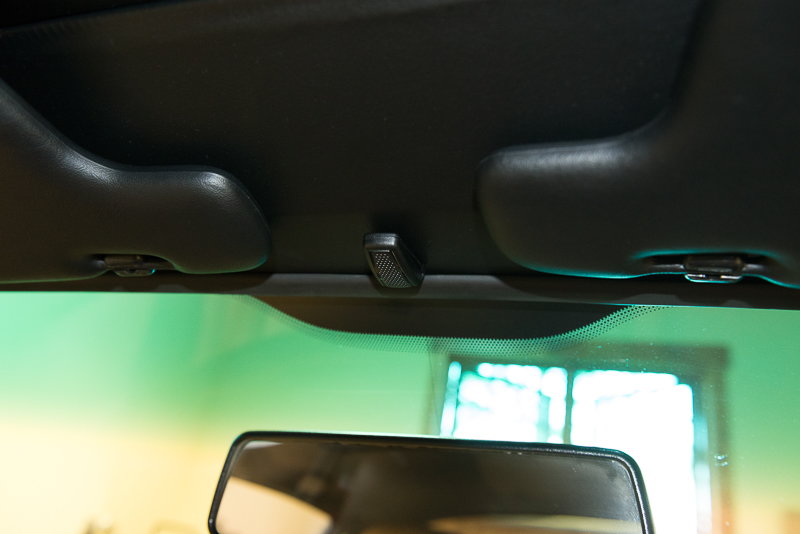
The installation manual suggests installing the phone microphone in the region of the sun visor. I choose to mount it in between the two sun visors just above the mirror so that it would be centrally located for both the driver and passenger.
Others have installed it on the driver side a-pillar. The microphone has a piece of double sided sticky tape on it and sticks to the headliner. I simply lifted the rubber seal around the windshield and tucked the wire behind it. I ran the wire along the top of the windshield over to the passenger side a-pillar and down the a-pillar to the top of the dashboard. There is a spot about an inch in front of the a-pillar where the cable for the windshield radio antenna drops down into the dashboard and I ran the microphone cable down the same hole.
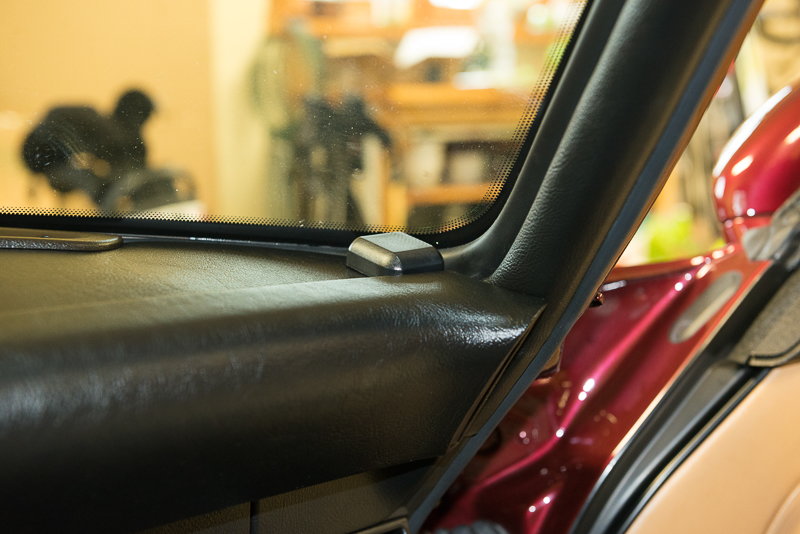
The installation manual suggests the GPS antenna be placed on the front dashboard or on the parcel shelf under the rear window. I choose to place it on the front dashboard for the simple reason it was the easiest. I didn't want to figure out how to run the cable under all the trim to come out on the rear parcel shelf. Also, it appears unless you drill a hole in the rear parcel shelf trim panel you will have a foot or more of the antenna cable showing on the parcel shelf and I didn't like that. So I put it in the corner where the a-pillar and dashboard meet on the passengers side. The cable drops into the same hole the radio antenna and phone microphone cables go into.
Now the fun begins. For those who may not know (me included when I started this) the dashboard is separated into an upper portion and lower portion with solid sheet metal between the two halves. The upper portion houses the defrost ducting to the windshield and the ducting for the central A/C vent. The cables feed into this upper half from the hole near the a-pillar. The radio resides in the lower half. After several hours of standing on my head and jamming my hands into every nook and cranny I could find I decided to actually �ask for directions� and see what I could find on-line.
In short, I came up with 4 potential paths to get the cables from the upper dashboard to the lower dashboard (if anyone knows of any others, please speak up): 1) Out into the trunk and then back through the firewall to the lower dashboard; 2) Drill a hole between the upper and lower dashboard sections; 3) Route the cables down the door frame and into the lower dashboard by going behind the A/C vent; 4) Utilizing the hole the radio antenna runs through from the upper to lower dashboard.
I choose not to utilize option #1 because everything I could find seemed to indicate I would either have to remove some components in the trunk to access existing holes in the firewall or I would have to drill a new hole on the driver's side and then route the cables up to the radio. I wanted to avoid drilling unless I really needed to.
In reality, option #2 is probably the quickest. The difficulty is getting a drill into position to drill the hole because the windshield gets in the way. The one place I found that might work was through an existing cutout in the dashboard structure just to the right of the clock down through the sheetmetal just behind the rear window defrost switch just above the radio slot. If you had a compact drill I think the angle would work to allow you to drill a hole here without interference with the windshield. You would need to be careful to not hit the defroster switch or any of its wiring. However, once the hole was drilled it would be easy to route the phone microphone and GPS cables to the radio. Again, I didn't want to drill if I didn't have to.
Several people have utilized option #3 for this installation and other installations (radar detectors). The previous links provide more details and pictures. You end up with a very short section of cable visible along the door frame which unless you know to look for it, it will never be seen. You will have to at least loosen one side of the dashboard (not sure if you have to remove the whole thing) along with removing the A/C vent.
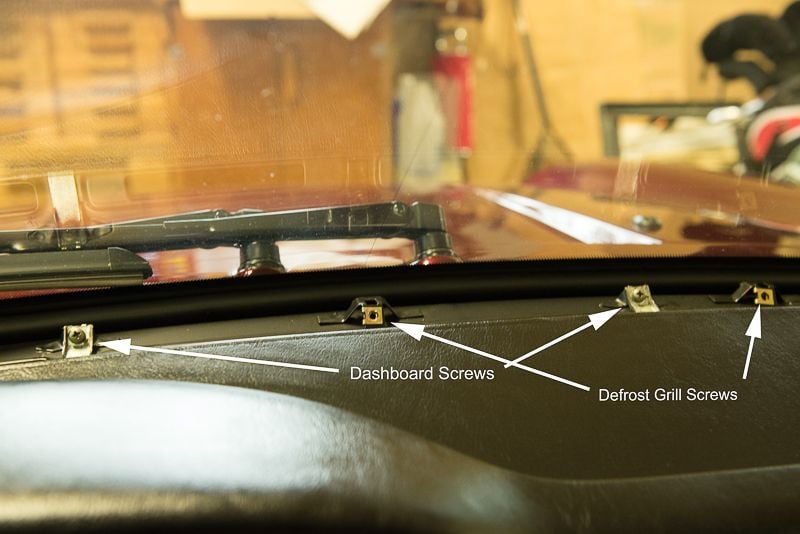
I choose to pursue option #4 because it provided the �cleanest� installation. The first step is to remove the dashboard. This requires first removing the defrost grill at the base of the windshield. There are 5 phillips screws to remove and the grill easily lifts out. (Note: in my case the screws at each end of the vent were longer in length than the three screws in the middle of the vent.) Once the defroster vent is removed you will see two screws that help hold the dashboard in place. Remove these screws.
Next, at each end of the dash are plastic caps. Use a trim tool or a flat blade screw driver with tape on the blade to gently prior the caps out.
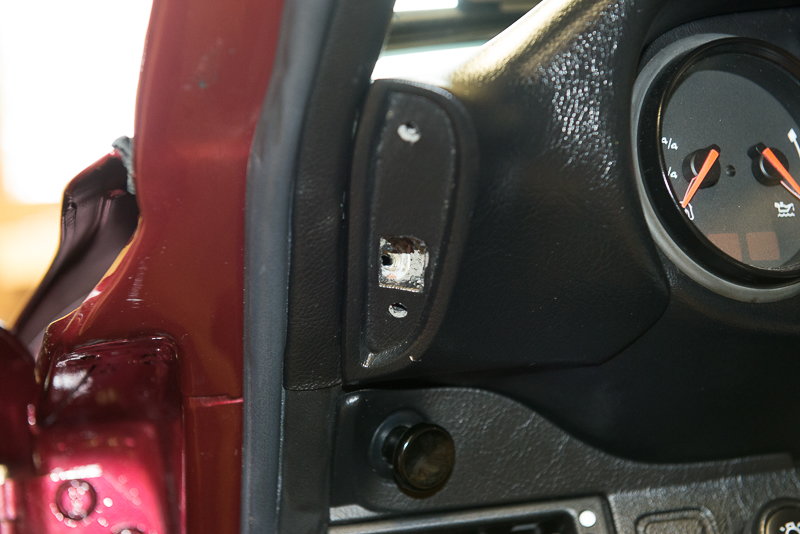
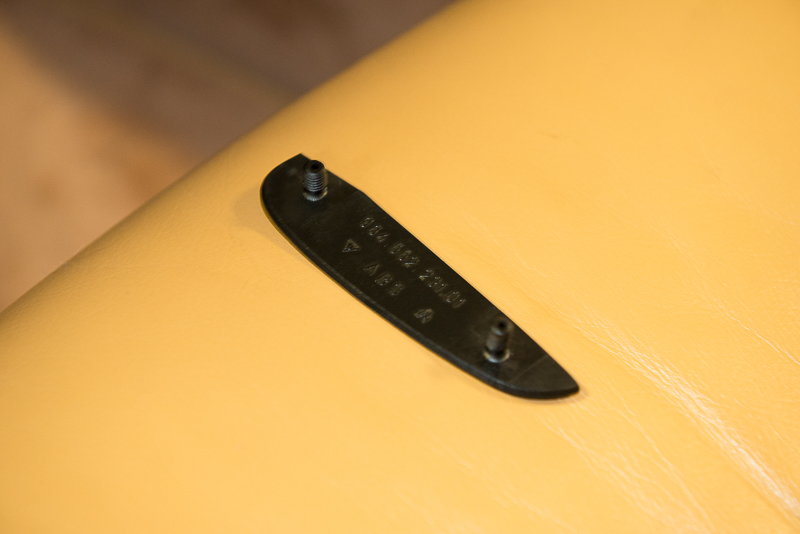
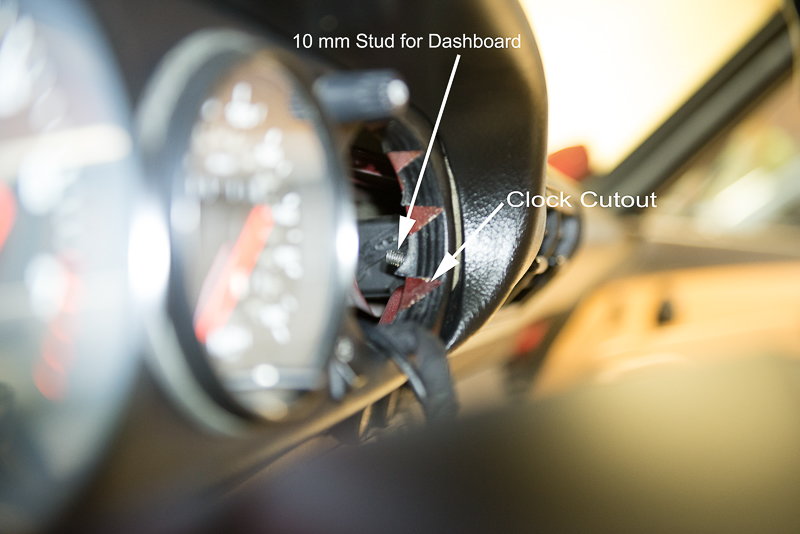
Once the caps are off you will see a single phillps screw in each end of the dash. Remove these screws. The last thing holding the dash in place is a 10 mm nut. Unfortunately, it is on the backside of the dash just to the right of the clock and the clock has to be removed to access the nut.
To remove the clock use a trim tool or flat blade screw driver with tape on the blade and gently pry the clock out. It is held in place via a friction fit. Start prying under the rubber ring that surrounds the clock, not the metal rim of the clock itself. Work your way around the clock. When you get it out a 1/4� or so you should be able to use your hands to work it out the rest of the way. The 10 mm nut will be mid-height of the clock and about 1� to the right.
You will need a small 10 mm wrench to loosen the nut and then use your fingers to remove it.
Once this nut is off you should be able to pull the dashboard out until the nut post clears the dashboard structure and then lift the dashboard up and out. The central A/C duct diverter will come out with the dashboard. You don't have to remove it separately. This would be a good time to treat the dashboard with Armor All or equivalent.
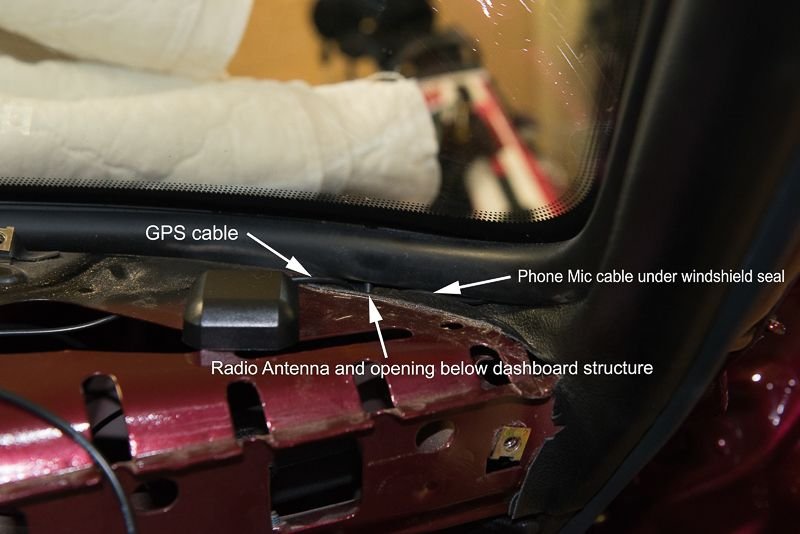
With the dashboard off you will see where the cable for the windshield antenna feeds into the dashboard structure on the passenger side just below the windshield near the a-pillar. This is where I fed the phone microphone and GPS antenna cables.
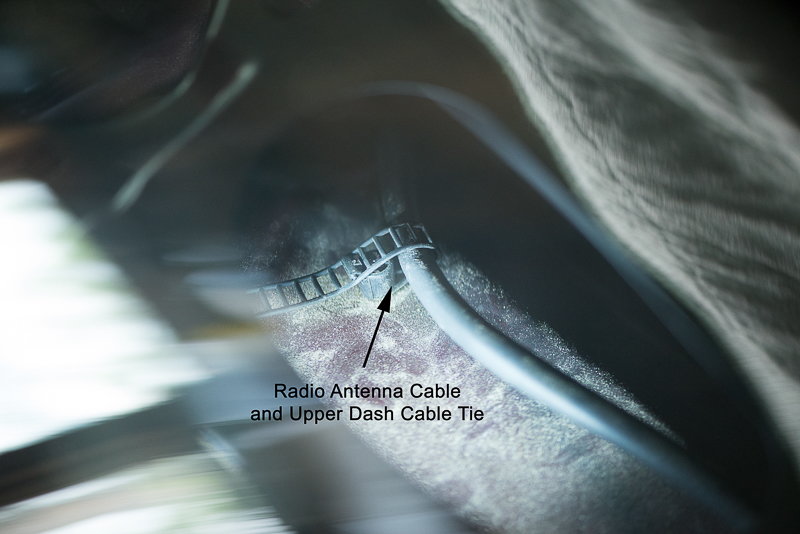
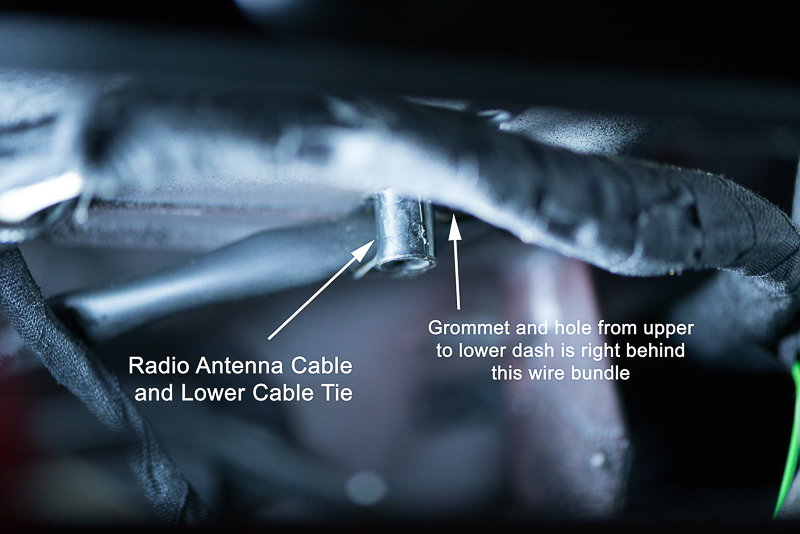
The windshield antenna feeds into a small amplifier bolted to the dashboard structure here. If you follow the antenna cable out of the amplifier it will lead to a spot between the central A/C duct and the defroster duct where it penetrates the sheetmetal into the lower dashboard just to the right and behind the radio. You will not be able to see this hole from the top, but if you look in the radio opening below you should see where the cable comes through. In my case, there was a cable tie on both the upper and lower dash structures holding the antenna cable in place.
There is also a rubber grommet in the hole that is sized for the antenna cable and not much else. The connectors on the phone microphone and GPS antenna are roughly a 1/4� to 3/8� in diameter and it was obvious there was no way they were going to go through the hole with the antenna cable in place. I was able to use a set of 45 degree needle nose pliers to undo the upper cable tie. The lower cable tie was a different type and I had to use a flat blade screw driver and pliers to pry the cable tie off it's mounting post. If you pry carefully you should be able to get the cable tie off without destroying it and I was able to reuse it. Once the cable ties are removed from the antenna cable you should be able to feed it back up into the upper section of the dash. I then pried the rubber grommet out of the hole so that I could use a sharp knife and increase the size of the opening to accommodate the extra wires. This is a picture of the grommet prior to enlarging the hole.
To feed the various cables back through the hole I fed an extra long zip tie from the bottom up and then taped the cable to the zip tie and pulled it through. Once I had all three cables pulled. I put the grommet back in place. I found the easiest way to get it in was to use a screwing motion as opposed to trying to push it back into the hole. I had a fair amount of excess wire leftover from the phone microphone and the GPS antenna and I decided to zip tie it to the structure of the upper dash as opposed to pulling it all through and trying to figure out where to stash it under the dash. I then reused the upper and lower cable ties to secure all the cables.
The final piece before connecting everything is to install the installation frame that holds the radio in place. The installation instructions explain the process so I won't repeat it here. With the frame in place you can then reconnect all the old and new cables to the back of the radio. Remember to also reconnect the power wire for the antenna amplifier. Once I had everything reconnected I reconnected the battery and turned the ignition on to make sure it looked like the radio was going to work and I hadn't screwed anything else up. Amazingly, it all worked the first time.
The kit comes with a metal post and rubber foot you are supposed to mount to the back of the radio to act as a spacer to protect the radio connections. Thanks to some advice from Makemann I didn't attempt this as the radio will stick out from the dash if you do. With the extra cables and the radio antenna coming straight into the back of the radio (remember I had to remove the 90 degree fitting for it to fit) pushing the radio back all the way into the slot requires some finessing of the cables. As I pushed the radio in with my right hand I had to reach underneath the dash and grab the various cables and maneuver then out of the way of the back of the radio to make it all fit. The last 1/2� or so to get the radio flush required a moderate amount of force to get the radio to lock into the installation frame.
Just reverse the above steps to put the dashboard and defroster grill back on.
I haven't played with the system extensively, but the hands free phone works well. No issues connecting with my iPhone or downloading my address book. Bluetooth connection with the iPhone for music also works well. The GPS nav system looks like it will work well. When I first turned the system on, I was in my garage and the GPS antenna only had line of sight to the sky through a western facing window. However, it had no problem accurately placing my location on the map.
Overall, I'm very happy with the system. It is great that it simply plugs into the existing wiring with no modification required. Hopefully, with the info above the installation will go quicker and smoother for everyone who decides to install this on their own. Best of Luck!
~ The Eagle ~
---------------------
'96 Polar Silver/Black C4S, manual, litronics, LED's in the positioning lights, alu/leather shifter & handbrake,
silver face gauges with alu rings, hardback sport seats, full leather interior, motor sound airbox, stainless door sills,
valve caps Porsche crested brushed alloy, front protection bar, with split rear grill and layered with Meguiar's NXT Tech Wax
__________________
'92 Carrera 2 (Sold)
'89 Carrera 3.2 (Sold)
Awesome write-up. I used option 4 as well for routing the wire. One question, why did you mount the GPS antenna above the dash pad? I stuck mine onto the air vent under the dash smack in the middle and have had no issues.
Awesome write-up. I used option 4 as well for routing the wire. One question, why did you mount the GPS antenna above the dash pad? I stuck mine onto the air vent under the dash smack in the middle and have had no issues.
I wasn't sure how well the antenna would work under the dash and decided to leave it on top. If you aren't having any problems, then I guess that will be another weekend project to move it under the dash.
+993 .. Many thanks. Your vivid detailed R&R radio tutorial efforts will serve many .... !! Sports car ownership,,, its a slippery slope . . . . Nice Fathers day gift !
When I put in my Conti radio a month ago, it really helped to remove the glove compartment and the passenger seat, then I could lay on my back and move the cables behind the radio around so it would slide back in.
Also, when you have the radio out, you might want to make my quick wiring mod that lets you use the fog light switch without having the headlights on, nice in general or for using fogs as DRLs- details here:
I wasn't sure how well the antenna would work under the dash and decided to leave it on top. If you aren't having any problems, then I guess that will be another weekend project to move it under the dash.
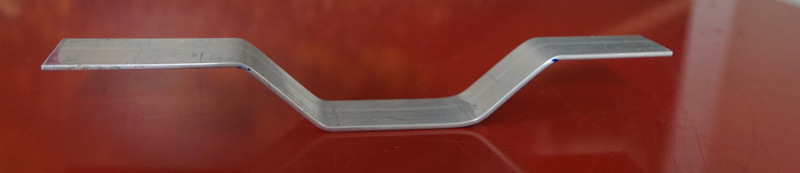
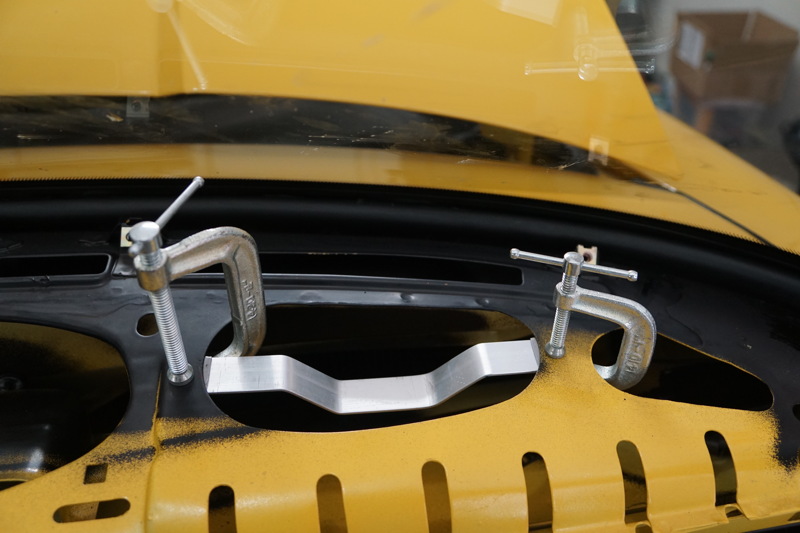
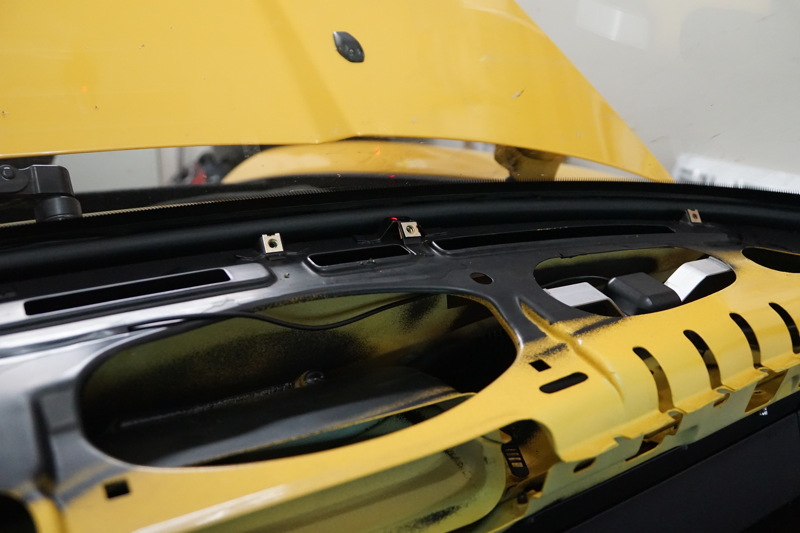
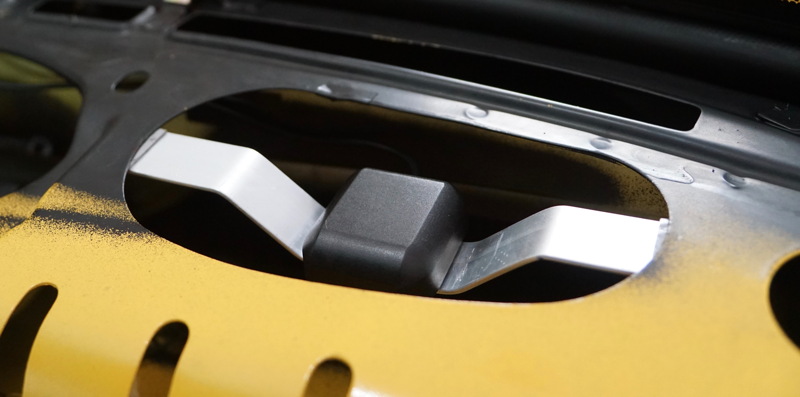
Many thanks to Bret and makemann for the outstanding posts. Did the install this past weekend. Ended up opting for method #3 for routing the GPS antenna wire, and made an aluminum bracket to support the antenna just under the dash pad; the goal was to have as little "shadowing" of the antenna by the sheet metal as possible:
We attached the bracket to the dash cutout to the right of the center vent with 3M outdoor rated double-sided tape,
as well as attaching the antenna to the bracket (magnet of course won't stick to aluminum):
On my dash pad, there were metal reinforcement plates embedded in the foam... the location we chose for the GPS antenna avoids the metal plates. YMMV.
Routed the wire over the top of the dash, secured with tape at intervals, to reach the driver side of dash, and ran the antenna wire down and through the left A/C vent. Less direct than method #4, but I didn't want to mess with the factory FM antenna wire grommet. The GPS wire is more than long enough. I chose to avoid the right side A/C vent because of the airbag... just didn't want to get in there where there is a warning label.
Oh, one more thing... some of the instructions for removing the dash pad suggest pulling the clock out to get access to the nut holding the dash pad center. I found that once I removed the center vent (held in by 2 spring clips at the top) that it was easy to reach the nut from that side.
Thanks again to everyone who posted info and pics on disassembly... what a great forum this is!
Also, when you have the radio out, you might want to make my quick wiring mod that lets you use the fog light switch without having the headlights on, nice in general or for using fogs as DRLs- details here:
Centerpunch - did the fog light switch mod today and it works great. Thanks for the info.
One note to anyone doing both the radio install and the fog light wiring mod at the same time, do the fog light mod BEFORE you install the installation bracket for the radio. The bracket is roughly 2" deep and it makes access to the defroster / fog light switches very challenging.
Originally Posted by schnell
Many thanks to Bret and makemann for the outstanding posts. Did the install this past weekend. Ended up opting for method #3 for routing the GPS antenna wire, and made an aluminum bracket to support the antenna just under the dash pad; the goal was to have as little "shadowing" of the antenna by the sheet metal as possible:
Thanks again to everyone who posted info and pics on disassembly... what a great forum this is!
Schnell - Just curious how your GPS reception is with your bracket mounted antenna under the dash? I pulled my dash today and tried placing the antenna in several different places to include the location you chose, but without the support bracket. Every place I tried, some not under the metal support pieces in the dash, took a minute or more for the GPS signal to lock on. And, once the signal was acquired the position was erratic changing every couple of seconds. I decided to just leave the antenna in the far right corner on top of the dash as it acquires within 10 seconds and is rock solid with no position changes. But, if your bracket mod works out well . . . . as they say the third time is a charm.
Schnell - Just curious how your GPS reception is with your bracket mounted antenna under the dash? I pulled my dash today and tried placing the antenna in several different places to include the location you chose, but without the support bracket. Every place I tried, some not under the metal support pieces in the dash, took a minute or more for the GPS signal to lock on. And, once the signal was acquired the position was erratic changing every couple of seconds. I decided to just leave the antenna in the far right corner on top of the dash as it acquires within 10 seconds and is rock solid with no position changes. But, if your bracket mod works out well . . . . as they say the third time is a charm.
Reception is great, no problems, signal seems stable. First boot up of the system did take a minute to lock on, but be aware that GPS receivers store your last location and use that to speed up the signal lock process for subsequent acquisitions. If the system has been off for a significant amount of time, it may take a minute to get enough satellites...a factor for cars only driven every few weeks.
The Porsche system compares well to the factory system in my Jeep and to our recent model Garmin portable (used for rental cars). The Garmin in particular takes a minute to acquire satellites the first time it is used on a trip in a new city, but then boots fast.
I will confess that the first time I fired the system up I overlooked the fact that I was in my garage with a room overhead...not a great place for GPS reception!

 06-26-2016, 02:50 AM