
Door check (welding) repair - need insight quickly
 10-31-2013, 01:41 PM
#1
Rennlist Member
Thread Starter
Sort of running into an issue with the door check repair on my 993. Initially, the shop quoted a figure and said they would be buying the 'repair kit' for this issue, so i assumed that meant this was specific to the welds that let go, within the jamb, and cause this issue. turns out today, after talking directly with the tech, that the welding part wasn't even consider earlier and they were just going to replace the door check mechanism itself which has apparently 'stretched' and deformed.
now, with the welding of the mount in the door jamb included, the repair has doubled. the cost isn't the concern, though. the body shop that they had estimate this repair says that they have to remove the driver's fender and the front bumper to gain access to weld the mount to the inner jamb. i really don't want to remove these body panels, for this repair, if it's not necessary - all original panels, fender never removed.
i'm hoping some of you have been through this repair and can tell me what the process was for repairing the mount for the door check. the tech at the shop feels there should be sufficient access do to it without removal of panels, but they don't perform this level of work/fabrication.
hoping for some insight here. thanks!!
 10-31-2013, 01:47 PM
#2

Maybe you should post the initial quote, and the now pricing for the repair...Replacing the door check unit is not that big a deal, a well done weld repair is significantly more involved and includes paint...
Use your search function, there have been many previous posts on exactly the same topic and tactic being used by the shop you are dealing with.
This is why written repair estimates should always be requested/required, prior to start of work, right?
Use your search function, there have been many previous posts on exactly the same topic and tactic being used by the shop you are dealing with.
This is why written repair estimates should always be requested/required, prior to start of work, right?
10-31-2013, 02:14 PM
#3
Rennlist Member

Join Date: May 2001
Location: Boston, MA
Posts: 146
Likes: 0
Received 0 Likes
on
0 Posts
I understand there are two ways to correct the problem.
The first (more expensive) way is consistent with your shop's description.
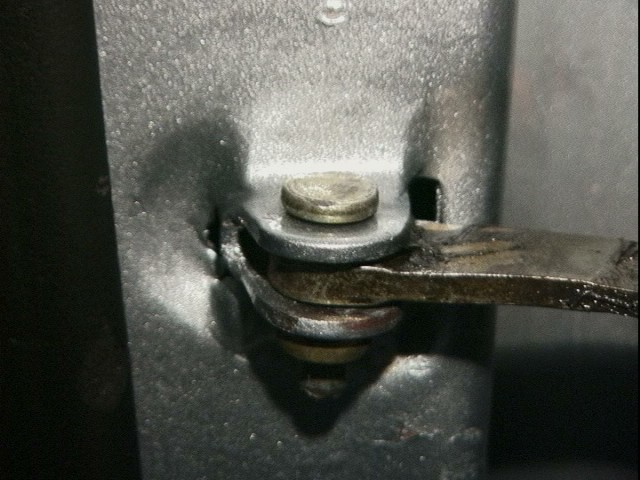
The second (less expensive) way is to tack weld the stop from the door side and refinish as time, budget, and materials allow. You can refinish with touch-up paint if the welder is any good, for example. It doesn't look great but it is only visible when the door is open and you bother to look at it.
The first (more expensive) way is consistent with your shop's description.
The second (less expensive) way is to tack weld the stop from the door side and refinish as time, budget, and materials allow. You can refinish with touch-up paint if the welder is any good, for example. It doesn't look great but it is only visible when the door is open and you bother to look at it.
10-31-2013, 02:22 PM
#4
Rennlist Member
Thread Starter
i've been searching the topic (before and after the post) and the choices are becoming clearer. as tim said, the 'preferred' repair does go along with the body shop's suggestions on the panel removal and proper repair from within the A pillar. my early impressions were that this repair was not as 'involved' as this and reasonably straight forward. looks like i'll bite the bullet and get it done right.
i would also like to perform the trimming mod on the door check rubbers before the install and will have to speak to the shop about that. seems hard to tell exactly how much to remove when we're talking about such a thin amount. too much and i imagine the door will act as if it has no detents at all.
i would also like to perform the trimming mod on the door check rubbers before the install and will have to speak to the shop about that. seems hard to tell exactly how much to remove when we're talking about such a thin amount. too much and i imagine the door will act as if it has no detents at all.
10-31-2013, 02:50 PM
#5
As far as I'm aware mine was done by removing the door, a window cut in the pillar allowing access to the detached spot welds. Stitch back after strengthening the attachment, sand down and paint
Last edited by Endoman; 08-16-2014 at 07:56 PM.
10-31-2013, 03:11 PM
#6
Addict
Lifetime Rennlist
Member
Lifetime Rennlist
Member
I did the door check strap modifications described here:
http://www.pcarworkshop.com/index.ph...r_Check_Straps
If you overshoot when trimming the rubber tensioners (as I did on the first one), then the detents will be very slight, almost nonexistent. I started over with a new check strap, and got the results I wanted--about half the detent strength of a stock check strap.
Bottom line, IMHO this is a desirable modification, easy to do, just be careful to slice the rubber about as thin as possible.
Sorry for the slight OT, but this modification may save someone from having an expensive repair later on.
Trending Topics

 10-31-2013, 04:17 PM
#9
RL Community Team
Rennlist Member
Rennlist Member
N! No! No! My shop purchased a new section of the A pillar with the strap mount in it and cut and replaced the section with the mount. No fender off, why break the sealed up body seams? Others have fixed the part from behind the carpet in the foot well.
Find someone else who does not want to take your car apart!
Better job less labor lower cost!
Andy
Find someone else who does not want to take your car apart!
Better job less labor lower cost!
Andy
10-31-2013, 04:29 PM
#10
Instructor
I hope it doesn't look like mine. Mine was repaired by the previous owner and only welded on the outside instead of doing it correctly. I will be cutting out this area, welding the bracket back in properly and patching it with a piece cut out of a wreck.
There is plenty of information and pictures out there of others that have done it properly.
good luck
There is plenty of information and pictures out there of others that have done it properly.
good luck
10-31-2013, 04:31 PM
#11
Rennlist Member
this...if the part attached to the body of the car(behind the fender) is at all still attached...then just a small weld top and bottom, and touch up, and your done.
Tight working space yes, a real PITA, yes. shouldn't be more than a couple of hundred bucks if it's still attached.
Tight working space yes, a real PITA, yes. shouldn't be more than a couple of hundred bucks if it's still attached.
10-31-2013, 05:28 PM
#13
Addict
Lifetime Rennlist
Member
Lifetime Rennlist
Member
The silver painted repair above is from my Targa - my local body guy did this. It's been about 7 or 8 years now since the repair, its holding fine on both sides ....
I would go this way if possible, if not, then you have to dig in from the back.
cheers,
Mike
I would go this way if possible, if not, then you have to dig in from the back.
cheers,
Mike
10-31-2013, 06:26 PM
#14
Rennlist Member
Thread Starter
this was exactly my initial reaction/concern. i did not want the body seams broken unnecessarily. i plan on looking into this a bit further - really just taking more time on my decision - and foregoing the repair at this moment. i want it repaired for the long term and to equally take aesthetics into account.
10-31-2013, 08:59 PM
#15
Addict
Rennlist
Site Sponsor
Rennlist
Site Sponsor
Endoman is correct, the best way to repair this fault is to knock out the door hinge pins and remove the door, window the back of the pillar, weld up the bracket from the inside, weld back in the window, dress and paint the pillar. Door refits in original place and you can't see where it has been painted. Job done.
Yes, we did this fix on his car.....
Yes, we did this fix on his car.....