Installation thread for KONI FSD suspension - UPDATE #1
 01-02-2013, 12:25 AM
#31
Rennlist Member

 01-02-2013, 11:17 AM
#32
RL Community Team
Rennlist Member
Rennlist Member
Here is a little food for thought on how to set the ride height with non-adjustable rear struts...
Once the non-adjustable rear struts and replacement springs are installed lower the car and measure the rear ride height from the specified bolts on the cross member. Then take the difference between this measured height and the USA standard (157mm) height in the shop manual and subtract it from the standard height specified for the USA front (174mm) and use the resulting value to adjust the spring purch setting on the front struts. This all assumes that the calculated front height value is at or above the front ROW lowered height specification (144mm). By doing this you should preserve the relative front to back stance of the vehicle to its original factory settings and ensure that the car can be aligned to the factory values.
Andy :-)
01-02-2013, 05:12 PM
#33
Rennlist Member
Thread Starter
THX to everyone for the advice:
Few questions:
For front drop link replacement - any reason to not use OEM (street car, not tracked)

Also, for wheel-well cleaning:
Any suggestion for a good aluminum cleaner/polish for control arms?
Touch up paint for wheel well scuffs?

Few questions:
For front drop link replacement - any reason to not use OEM (street car, not tracked)
Also, for wheel-well cleaning:
Any suggestion for a good aluminum cleaner/polish for control arms?
Touch up paint for wheel well scuffs?
01-02-2013, 06:48 PM
#34
Rennlist Member
You could start by removing any Cosmoline off those components. Xenit Cleaner & Remover works extremely well, followed by a water-based degreaser such as Facto AT-30 (down side is it must be ordered - a few Rennlisters have so far).
You mean those tire rub marks that according to the experts, doesn't happen.
If you want to go all out, W�rth makes an underbody coating in various colors and it comes in a spray can. Hold a piece of Bristol board with a hole cut out, about an inch off the surface and give it a few quick shots. Finish off with a spray can in your body color.
01-02-2013, 07:08 PM
#35
Pro
I'm in the middle of this too - Koni FSD's and M030 springs & ARBs on my '96 C4, which has 100+ miles and was ready for some serious refurb. Thus I'm experiencing a severe case of "while you're in there"-itis and found the following needed replacing and/or servicing:
...snip
...snip
Thanks crw for the updates, watching along.
01-02-2013, 08:59 PM
#36
Rennlist Member
Dan, Koni used to have a notice on their web site regarding something about not lowering more than 1.5 inches (I think I have that number right). They no longer state that for some reason.
01-02-2013, 10:16 PM
#37

to clean and control arms i used a drill with a wire brush to get the majority of it off, stuff is on there and thick. Brake Cleaner is your friend after using the wire brush to get the left on bits, helps dissolve it and use a nylon brush
rob
rob
01-02-2013, 11:00 PM
#38
Rennlist Member
01-03-2013, 05:08 PM
#40
Rennlist Member
Thread Starter
Next step, while awiting new drop links for the front I have moved on to the rear suspension.
I removed the tranmission tray. My engine tray was missing. I kind of like the idea of having one to keep the crud off the engine. Does anyone have one the want to sell?

I removed the drop links from the rear sway bar (easy with a 15mm socket and a 16 mm wrench)


I have remove the 13 mm bolts attaching the sway bar also:
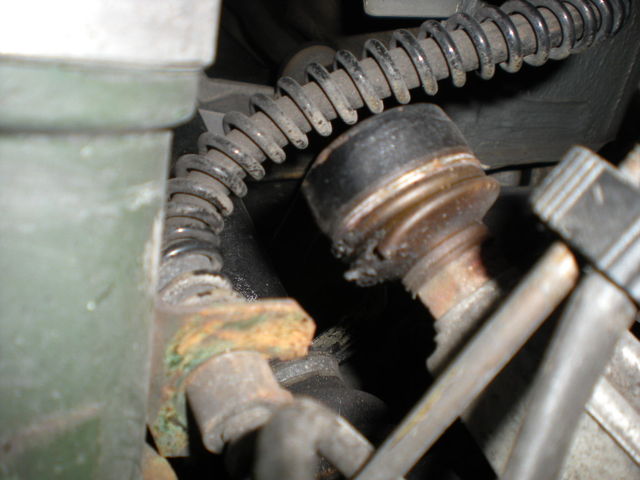
I have encountered a problem while trying to remove the bolts that attaches the suspension arm that connects to the lower part of the rear shock.
There is a 19mm eccentric bolt (toward the rear of the car) and a 18mm nut toward the front of the car.
I can get a 18 mm box wrench on the bolt, but it is so tight and with limited space under the car I can not budge it with my 18 mm box wrench.
Suggestions:
1. Penetrating oil?
2. Deep 18 mm sockeck with breaker bar or impact gun (heat exchanger may prevent this. Need a tip here.
Would it be OK and easier to leave this connection alone and just disassemble the connectio to the bottom of the shock to get the rear shock out?


I removed the tranmission tray. My engine tray was missing. I kind of like the idea of having one to keep the crud off the engine. Does anyone have one the want to sell?
I removed the drop links from the rear sway bar (easy with a 15mm socket and a 16 mm wrench)
I have remove the 13 mm bolts attaching the sway bar also:
I have encountered a problem while trying to remove the bolts that attaches the suspension arm that connects to the lower part of the rear shock.
There is a 19mm eccentric bolt (toward the rear of the car) and a 18mm nut toward the front of the car.
I can get a 18 mm box wrench on the bolt, but it is so tight and with limited space under the car I can not budge it with my 18 mm box wrench.
Suggestions:
1. Penetrating oil?
2. Deep 18 mm sockeck with breaker bar or impact gun (heat exchanger may prevent this. Need a tip here.
Would it be OK and easier to leave this connection alone and just disassemble the connectio to the bottom of the shock to get the rear shock out?
Last edited by crw; 01-03-2013 at 05:28 PM.
01-03-2013, 06:58 PM
#41

It is the nut that you need to rotate while holding the bolt steady. You have probably realized that already. You will need to raise the engine slightly for the bolt to be removed. Be patient when putting the bolt back. It is one of those jobs that can take 15 secs or ages. For me it was the latter. Sorry if this has already been covered in this thread but I have little time at the moment to read all the posts. Will certainly catch up with it latter.
Acetone with ATF fluid (50/50) worked brilliantly as a penetrating lubricant when I removed all my suspension components. It was much better than any thing coming out of an aerosol.
Acetone with ATF fluid (50/50) worked brilliantly as a penetrating lubricant when I removed all my suspension components. It was much better than any thing coming out of an aerosol.
01-03-2013, 07:12 PM
#42

"I removed the tranmission tray. My engine tray was missing. I kind of like the idea of having one to keep the crud off the engine. Does anyone have one they want to sell?"
Your 993, last of the air cooled 911's, runs hotter and is further stressed by making more HP than all previous iterations. Heat breaks down and adds wear to engine components; therefore, cooling is of paramount importance. Engine trays tend to restrict the amount of cool air that can get to the engine.
If you have hot summers, or have stop and go traffic, you may want to leave the engine tray off. This helps further regulate the hot spots. Lots of 993 owners are aware of this and remove the cover/tray for this very reason.
Are you sure you still want to purchase one? "
"
Your 993, last of the air cooled 911's, runs hotter and is further stressed by making more HP than all previous iterations. Heat breaks down and adds wear to engine components; therefore, cooling is of paramount importance. Engine trays tend to restrict the amount of cool air that can get to the engine.
If you have hot summers, or have stop and go traffic, you may want to leave the engine tray off. This helps further regulate the hot spots. Lots of 993 owners are aware of this and remove the cover/tray for this very reason.
Are you sure you still want to purchase one?
"
01-03-2013, 07:35 PM
#43
Rennlist Member
Thread Starter
As far are "raising the engine slightly;"
Jack under appropriate point will do the job?
Or, do I need to loosen some things in the eengine bay 1st.
I'll pick up a deep 18mm impact socket tommorrow which, coupled with some penetrating oil, should do the trick - hopefully.
Jack under appropriate point will do the job?
Or, do I need to loosen some things in the eengine bay 1st.
I'll pick up a deep 18mm impact socket tommorrow which, coupled with some penetrating oil, should do the trick - hopefully.
01-03-2013, 11:07 PM
#44
Nordschleife Master

https://rennlist.com/forums/964-foru...bar-links.html
If the joints still have grease in them, and it aren't super contaminated to the point of killing the joint, then you should be able to wash out all the old grease w/ some solvent, repack with new grease, then replace the boots for a very small fraction of the price of new links.
01-04-2013, 09:29 AM
#45
You will need to slacken the engine mounts with a jack under the centre of the crankcase. An ice hockey puck on the jack to protect the engine works well. Slacken off the M12 lock nuts from underneath to the end of the thread. You will need to knock out the round access plates and use a long extension bar. Remove the M8 bolts from the top. Lube them if they are tight. Not a great place to be drilling out broken bolts!
You may need to tilt the engine a little to get the clearance to remove the bolt.
Have fun.
You may need to tilt the engine a little to get the clearance to remove the bolt.
Have fun.