

Max Jax arrived!!
 05-22-2012, 10:11 PM
#16
Rennlist Member
Those are nice, but I still rate them on a par with my Bendpak mid-rise lift. Both have pros and cons, but Either way, it is so nice having a lift. I had to remove my wheels for finishing Sunday afternoon-so nice to have the car off the ground in a minute or two.
 05-22-2012, 10:25 PM
#17
Addict
Rennlist Member
Rennlist Member
I measured mine (back of base to back of base) and they are 131.75" apart. I can get the car balanced 40/60 on the lift both frontwards & backwards. But as I said earlier, the arms are pretty much maxed out. It also works well with my wife's Mini and my daughter's 944.
Also, FWIW, I made plugs to use when the post is out with plastic cap things and rubber corks.
Also, FWIW, I made plugs to use when the post is out with plastic cap things and rubber corks.
05-22-2012, 11:02 PM
#18
Racer
Thread Starter
Join Date: Apr 2011
Location: Alexandria Ont.
Posts: 437
Likes: 0
Received 0 Likes
on
0 Posts
Thanks for the information Bob, I appreciate it! I've pretty much decided to go the 130" separation route, and I'll use the concrete epoxy for the anchors. Whats another 72hrs?
I notice in the installation instructions it mentions a 30A breaker protected, solo use outlet...? Am I going to have to run a dedicated power line for the power pack?
My 115v air compressor only runs thru a 20amp breaker, I'd be surprised if I need a slow burn 30A breaker for the lift?
What are you guys doing? Dedicated 30A outlet?
Oh, and Bob, I'm thinking I'm going to cut the heads off of another 10 bolts the same as the anchor bolts, cut a slot in the end and use them as a 'flush' install for the anchor holes...but your idea might be quicker, push in, pull out! I like it.
Jim
05-23-2012, 10:28 AM
#19
Pro
Join Date: Sep 2009
Location: Ottawa,Ontario
Posts: 658
Likes: 0
Received 0 Likes
on
0 Posts
I notice in the installation instructions it mentions a 30A breaker protected, solo use outlet...? Am I going to have to run a dedicated power line for the power pack?
My 115v air compressor only runs thru a 20amp breaker, I'd be surprised if I need a slow burn 30A breaker for the lift?
What are you guys doing? Dedicated 30A outlet?
Jim
My 115v air compressor only runs thru a 20amp breaker, I'd be surprised if I need a slow burn 30A breaker for the lift?
What are you guys doing? Dedicated 30A outlet?
Jim
06-08-2012, 01:25 PM
#20
Racer
Thread Starter
Join Date: Apr 2011
Location: Alexandria Ont.
Posts: 437
Likes: 0
Received 0 Likes
on
0 Posts
Well I guess a little update might be in order, for the benefit of those who might be considering the same installation.
Be prepared for some challenges with regards to the concrete anchors...I have 6" of 4000psi concrete and figured no problem. Well see the pics....problems, oh yea.
One of the 'rear' holes...after following the instructions to the letter...

The 'sacrificial' bolt/nut/washer combo just kept turning and when I tried to torque it out/up it came. Pounded it down in and tried again, same deal.

Some of them didn't come up flush as the instructions say they should...and still didn't 'set', just keep turning. I assume the 'flanges' or 'wings' didn't open enough to stop the outer column from turning and so the 'wedge' was never drawn up into the base.

Many frustrating hours of moving the columns in and out of place, torquing and pounding...not sure where to go from here. Maybe just take out a second mortgage and have the concrete guy come and fill my shop with fine dust while he cuts out a couple of new 2'x4' sections and 're-pours' new bases for the columns. Argggggggggggg.
Watch your local Craigslist, hahaha
Jim
Be prepared for some challenges with regards to the concrete anchors...I have 6" of 4000psi concrete and figured no problem. Well see the pics....problems, oh yea.
One of the 'rear' holes...after following the instructions to the letter...
The 'sacrificial' bolt/nut/washer combo just kept turning and when I tried to torque it out/up it came. Pounded it down in and tried again, same deal.
Some of them didn't come up flush as the instructions say they should...and still didn't 'set', just keep turning. I assume the 'flanges' or 'wings' didn't open enough to stop the outer column from turning and so the 'wedge' was never drawn up into the base.
Many frustrating hours of moving the columns in and out of place, torquing and pounding...not sure where to go from here. Maybe just take out a second mortgage and have the concrete guy come and fill my shop with fine dust while he cuts out a couple of new 2'x4' sections and 're-pours' new bases for the columns. Argggggggggggg.
Watch your local Craigslist, hahaha
Jim
06-08-2012, 03:12 PM
#21
Addict
Lifetime Rennlist
Member
Lifetime Rennlist
Member
When I did my two post full sized lift, I tossed the cheap anchors that came with the unit and went down to Hilti and bought some high strength anchors - those suckers grabbed the concrete and take the torque spec no problem.
I would phone around and see if you can get some better anchors.
Oh, and good anchors do not need epoxy. "-)
cheers,
Mike
I would phone around and see if you can get some better anchors.
Oh, and good anchors do not need epoxy. "-)
cheers,
Mike
06-08-2012, 03:52 PM
#22
Racer
Thread Starter
Join Date: Apr 2011
Location: Alexandria Ont.
Posts: 437
Likes: 0
Received 0 Likes
on
0 Posts
Been doing the 'looking around' part Mike but you probably went with the 'permenent' installation, no? Meaning the attachment is to an anchored bolt...as opposed to an anchor that accepts a bolt. Seems there is a lot less choice for the latter...
And I agree with your assessment of the included anchors, not impressed!
Jim
And I agree with your assessment of the included anchors, not impressed!
Jim
06-08-2012, 06:35 PM
#24
Racer
Thread Starter
Join Date: Apr 2011
Location: Alexandria Ont.
Posts: 437
Likes: 0
Received 0 Likes
on
0 Posts
Got a concrete contractor coming over for an 'evaluation'. If I decide to go with the 'cut and re-pour' method then I'll make a steel template for the anchor points and set the suckers in the new pour.
That'll hold the pr_cks...
Jim
That'll hold the pr_cks...
Jim
06-08-2012, 07:21 PM
#25
Rennlist Member
Sorry to hear about your install troubles. We made a plywood template from the baseplate, tapcon'd it to the slab and then drilled. Ripping out the concrete seems a little extreme. Try filling the errant holes with Hydro or non-shrinking grout and maybe shift the whole set up a few inches. That stuff is stronger than the concrete.
I have a second set of anchors on one side at 130" for the pickup. I'm pretty happy with everything except some shipping damage. They made good on everything so I can't complain.
I have a second set of anchors on one side at 130" for the pickup. I'm pretty happy with everything except some shipping damage. They made good on everything so I can't complain.
07-09-2012, 08:45 PM
#26
Racer
Thread Starter
Join Date: Apr 2011
Location: Alexandria Ont.
Posts: 437
Likes: 0
Received 0 Likes
on
0 Posts
Update time...been on vacation with the p-car, great trip 2,500 miles later and all is well. Well...nothing a replacement AC compressor won't cure, I hope.
But anyway that is another thread, for another day. My new 'chemical anchors' arrived before I left on the trip but no time to bother with them at the time. Home now and just came in from installing them. Tomorrow morning will tell the tale. The 'cure' time listed for the epoxy at 70f is 35 minutes but I'm not tempting fate, overnite should be plenty!
I pounded the useless ( at least in my case with what turns out to be 8200psi concrete, all I did was shine up the holes trying to get the sleeve to catch and pull the wedge up...), anchors that came with the MaxJax thru the holes and then filled the bottom of the cavity with styrofoam, used a stiff nylon brush to clean out any dust and debris, blew them clean with compressed air. 3 times each, then 3 more times for good measure.
The 'gel time' is only 7 minutes so had to have everything ready before breaking the seal on the first tube of epoxy. Filled each hole one at a time and as per the instructions turned the anchor as it went in, even pulled them out and put MORE epoxy in before driving them home just below the surface.
The cleaned holes, ready for epoxy and new anchors...

Anchors in, hoping for a 'cure', haha

This is what the anchors look like...I even bought new Grade 8 bolts and washers.
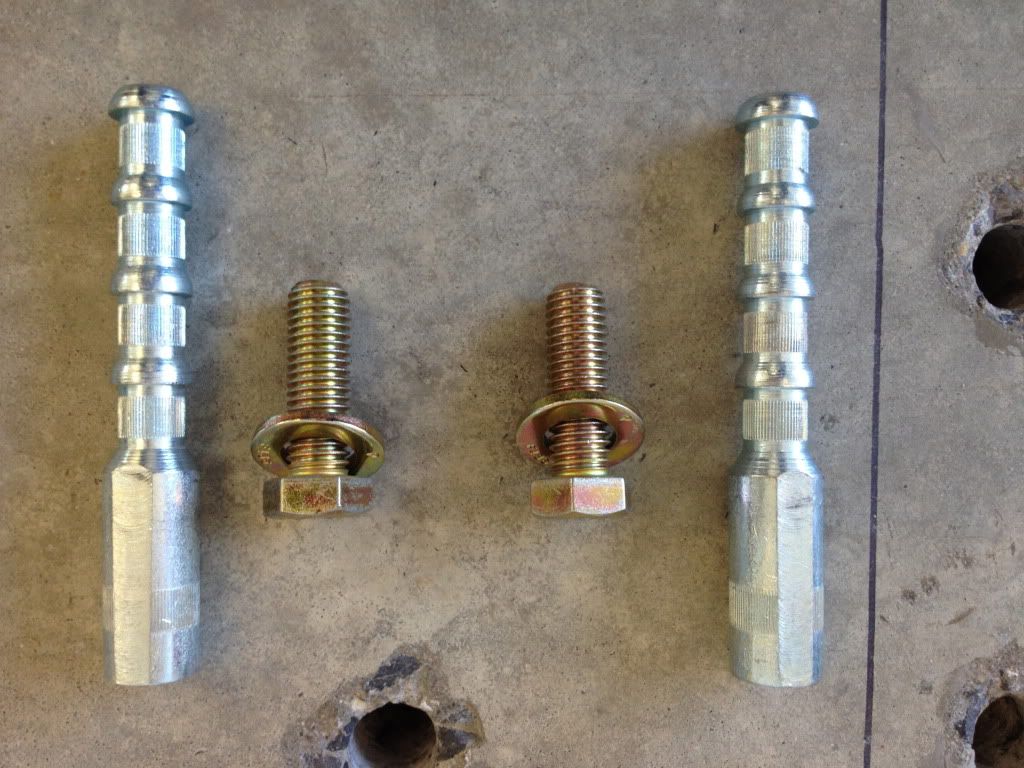
This is the product info for the anchors...

And this is the epoxy, 2 tubes came with the kit, plus the 10 anchors.

So I hope to have a picture of the magnetic level on the back of the column showing perfectly level, with the Honda CRV hoisted in the air tomorrow this time!
Jim
But anyway that is another thread, for another day. My new 'chemical anchors' arrived before I left on the trip but no time to bother with them at the time. Home now and just came in from installing them. Tomorrow morning will tell the tale. The 'cure' time listed for the epoxy at 70f is 35 minutes but I'm not tempting fate, overnite should be plenty!
I pounded the useless ( at least in my case with what turns out to be 8200psi concrete, all I did was shine up the holes trying to get the sleeve to catch and pull the wedge up...), anchors that came with the MaxJax thru the holes and then filled the bottom of the cavity with styrofoam, used a stiff nylon brush to clean out any dust and debris, blew them clean with compressed air. 3 times each, then 3 more times for good measure.
The 'gel time' is only 7 minutes so had to have everything ready before breaking the seal on the first tube of epoxy. Filled each hole one at a time and as per the instructions turned the anchor as it went in, even pulled them out and put MORE epoxy in before driving them home just below the surface.
The cleaned holes, ready for epoxy and new anchors...
Anchors in, hoping for a 'cure', haha
This is what the anchors look like...I even bought new Grade 8 bolts and washers.
This is the product info for the anchors...
And this is the epoxy, 2 tubes came with the kit, plus the 10 anchors.
So I hope to have a picture of the magnetic level on the back of the column showing perfectly level, with the Honda CRV hoisted in the air tomorrow this time!
Jim
07-09-2012, 08:53 PM
#27
Pro
Join Date: Sep 2009
Location: Ottawa,Ontario
Posts: 658
Likes: 0
Received 0 Likes
on
0 Posts
Jim, that should do the trick - hope it all works out for you. I used a "sacrificial vehicle" to test it out before I put the 993 on it the first time too. It's been over 1 1/2 years now and it's performed flawlessly.
07-10-2012, 11:51 AM
#29
Now this seems a bit overkill in installation, right? I mean, my old Dodge Ram Diesel weighed close to twice my 993 coupe... meaning the same amount of pressure in each spot of the four tires on the Dodge was equal to what those jacks are putting on the concrete, +/- what ever the lift weighs...
Are we worried about the thickness of the garage floor, the installation of the inserts or the concentrated pressure or density due to the lift only having two platform spots?
Are we worried about the thickness of the garage floor, the installation of the inserts or the concentrated pressure or density due to the lift only having two platform spots?
07-10-2012, 01:26 PM
#30
Rennlist Member
No such thing as overkill when it comes to safety. I never backed off a bit on safety and checks when flying. I'm still here; many of my fellow flying friends are not.
Wait till you see my installation. It'll most likely be overkill to you, but not to me when I am under the car.
Wait till you see my installation. It'll most likely be overkill to you, but not to me when I am under the car.