Car Lift Modifications for the Ultimate 993 Lift
 03-08-2012, 06:13 PM
#1
Instructor
Thread Starter
I recently fulfilled a long-time wish and added a 2-post car lift to my garage. It’s the coolest thing in the world to have one and I now look for excuses to raise up my 993 and replace a rusty screw or something. If any of the great Unwashed Masses ask why I installed it I tell them I just felt like spending thousands of dollars to save 40 bucks on an oil change. Several worried wives have quietly grabbed their husbands arms in a silent threat firmly communicating “Don’t even think about it.”
I have a lowered 993 Turbo and when I had the local dealer do a PPI they had a hard time getting it on their lift. Later I had some fluids changed at a very experienced independent and watched their drill for lifting a low car: Shuffle the car in, jack it up at the sides and/or the rear as necessary to get the arms to clear as they swing in and put hockey pucks or big bearings on the pads so that it holds the car high enough that the side plastic panels don’t hit the lift arms, then carefully lower the jack and make sure everything is okay before raising.
Being the sort of person that will go to great lengths to make something better without much regard to practicality I had to find a better way. And I did. Now, whenever I tell about one of my eccentric projects some people feel compelled to brag that they can do it in a much cheaper way using baling wire and items they found abandoned in a dollar store. That’s okay; we can still be friends, but it’s not me. This isn’t an easy or quick project, but it was well worth it to me.
My goal was to be able to easily and directly use my lift with the lowest cars possible with no fuss – just drive in and lift the damn thing. The 993 has a relatively short distance between the lifting points and this is the cause of needing to shuffle the car or position it precisely. The arms on my lift were long and I was limited as to how far apart I could mount the posts due to the size of my garage. As installed, I could reach the lifting points only if the car was exactly placed and I removed the pads on the arms and if the planets were lined up correctly. But then I still had the problem that the pads were too high to get under the car and, even if I could get them under, the outer lift arms would crush the plastic unless I jacked up the car and used some sort of spacer. I looked at all the common car lifts and none of them had the correct combination to work well in my situation.
One thing to note is that, if you’re going to modify a car lift, you need to be sure you know what you’re doing and don’t kill yourself because that would be very embarrassing. That said, car lifts are not exactly complex and don’t use exotic alloys and they’re not even very precise.
Here’s what I did, after drawing it all out to make sure it would work:
1) I shortened the outer lift arms by 3”. This made up for not being able to space the posts far apart. It meant I could reach the 993 lift points if the car was just in the ballpark, no exact positioning required. I also angled the ends of the arms because this gave more room and cleared the plastic panels so there was no contact. Some lifts come with this feature, but mine did not.
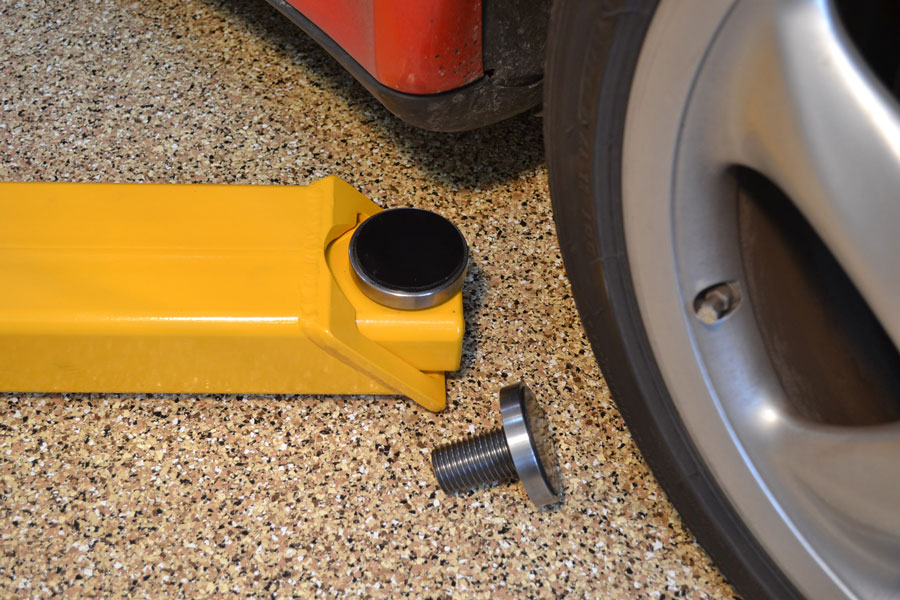
2) I made some special end plates for the outer arms and welded them on the ends. These plates are as strong as the originals, but milled precisely (the originals were an ugly stamping). This resulted in a very low pad height, less than 3.5” with the pad and under 3” without it. This will easily get under just about anything. I put a radius in the top shaped like the lift pad so I could retract the inner arms as far as possible even with the pad in place.
3) I also cut the inner arms 3” shorter. This way the total leverage and therefore the force the inner arms exert on the outer arms remains the same and the lift has the same capacity. In fact, since the arms cannot stick out as far as they could originally relative to the posts, the total stress possible on the lift will be less than before. Note that while the arms are now perfect for a 993, they are still more than long enough to lift my Avalanche, which is all I’ll ever need.
4) My lift didn’t have a threaded adjustment for the lift pads. It was available but in an insert that raised the total height and could be used with trucks, but not low cars. So I welded a solid steel insert in the end of the inner arms. Then I lined up with the pad hole in the arms and drilled through the insert to make it the same diameter as the original hole. Then I tapped it (the hole was 1 1/8” and I tapped it to 1 Ľ). Now I had a hole in the arm that still fit the normal pads and truck adaptors, but it was also threaded for a custom pad that I made. After the arms were finished I had them powder coated, which was a vast improvement over the easily-scratched paint of the original. The paint shop owner has a Boxster and when I offered to lift his car anytime he refused to charge me.
5) I turned and threaded some custom pads on the lathe. They are a bit smaller than the proverbial hockey puck for easier positioning while still having plenty of contact. On the top I put polyurethane. It’s super tough and barely shows a mark even after the car sits on it for a few days.
Now I can easily drive in and quickly position the arms. I screw the pads up close to or contacting the lift points. That way I can make sure they’re contacting where they should and the car lifts level. I love it!
I have a lowered 993 Turbo and when I had the local dealer do a PPI they had a hard time getting it on their lift. Later I had some fluids changed at a very experienced independent and watched their drill for lifting a low car: Shuffle the car in, jack it up at the sides and/or the rear as necessary to get the arms to clear as they swing in and put hockey pucks or big bearings on the pads so that it holds the car high enough that the side plastic panels don’t hit the lift arms, then carefully lower the jack and make sure everything is okay before raising.
Being the sort of person that will go to great lengths to make something better without much regard to practicality I had to find a better way. And I did. Now, whenever I tell about one of my eccentric projects some people feel compelled to brag that they can do it in a much cheaper way using baling wire and items they found abandoned in a dollar store. That’s okay; we can still be friends, but it’s not me. This isn’t an easy or quick project, but it was well worth it to me.
My goal was to be able to easily and directly use my lift with the lowest cars possible with no fuss – just drive in and lift the damn thing. The 993 has a relatively short distance between the lifting points and this is the cause of needing to shuffle the car or position it precisely. The arms on my lift were long and I was limited as to how far apart I could mount the posts due to the size of my garage. As installed, I could reach the lifting points only if the car was exactly placed and I removed the pads on the arms and if the planets were lined up correctly. But then I still had the problem that the pads were too high to get under the car and, even if I could get them under, the outer lift arms would crush the plastic unless I jacked up the car and used some sort of spacer. I looked at all the common car lifts and none of them had the correct combination to work well in my situation.
One thing to note is that, if you’re going to modify a car lift, you need to be sure you know what you’re doing and don’t kill yourself because that would be very embarrassing. That said, car lifts are not exactly complex and don’t use exotic alloys and they’re not even very precise.
Here’s what I did, after drawing it all out to make sure it would work:
1) I shortened the outer lift arms by 3”. This made up for not being able to space the posts far apart. It meant I could reach the 993 lift points if the car was just in the ballpark, no exact positioning required. I also angled the ends of the arms because this gave more room and cleared the plastic panels so there was no contact. Some lifts come with this feature, but mine did not.
2) I made some special end plates for the outer arms and welded them on the ends. These plates are as strong as the originals, but milled precisely (the originals were an ugly stamping). This resulted in a very low pad height, less than 3.5” with the pad and under 3” without it. This will easily get under just about anything. I put a radius in the top shaped like the lift pad so I could retract the inner arms as far as possible even with the pad in place.
3) I also cut the inner arms 3” shorter. This way the total leverage and therefore the force the inner arms exert on the outer arms remains the same and the lift has the same capacity. In fact, since the arms cannot stick out as far as they could originally relative to the posts, the total stress possible on the lift will be less than before. Note that while the arms are now perfect for a 993, they are still more than long enough to lift my Avalanche, which is all I’ll ever need.
4) My lift didn’t have a threaded adjustment for the lift pads. It was available but in an insert that raised the total height and could be used with trucks, but not low cars. So I welded a solid steel insert in the end of the inner arms. Then I lined up with the pad hole in the arms and drilled through the insert to make it the same diameter as the original hole. Then I tapped it (the hole was 1 1/8” and I tapped it to 1 Ľ). Now I had a hole in the arm that still fit the normal pads and truck adaptors, but it was also threaded for a custom pad that I made. After the arms were finished I had them powder coated, which was a vast improvement over the easily-scratched paint of the original. The paint shop owner has a Boxster and when I offered to lift his car anytime he refused to charge me.
5) I turned and threaded some custom pads on the lathe. They are a bit smaller than the proverbial hockey puck for easier positioning while still having plenty of contact. On the top I put polyurethane. It’s super tough and barely shows a mark even after the car sits on it for a few days.
Now I can easily drive in and quickly position the arms. I screw the pads up close to or contacting the lift points. That way I can make sure they’re contacting where they should and the car lifts level. I love it!

 03-08-2012, 07:50 PM
#3
Instructor
Thread Starter
I bought a Mohawk System 1. They are much more expensive than the Asian lifts, but I happened to find a demo unit and was able to save quite a bit. If I hadn't found that I probably would have gotten a Rotary or Challenger. Bendpak is good, too, for the money. The Mohawk is very heavy duty and is short as it doesn't need a top or a floor plate to run a cable and this fit better in my garage. It has two-stage lift arms. I originally thought three-stage would be better, but they end up being higher because you've got the inner arm inside of two others. It turned out the two-stage had some advantages in my situation.
The following users liked this post:
M. Schneider (10-12-2020)
Trending Topics
03-08-2012, 09:18 PM
#9
Advanced

Join Date: Mar 2004
Location: Greer, SC
Posts: 98
Likes: 0
Received 0 Likes
on
0 Posts
Nice job. I've got a Rotary to be installed in a few weeks and will have normal post spacing but have been giving thought to Porsche friendly pads. May I ask where you got the polyurethane covers? They look so perfectly suited. Thanks, Ken
03-08-2012, 10:00 PM
#10
Instructor
Thread Starter
As an alternative if you don't have a lathe, I once did this: Get something round that is the correct size and clamp it over the polyurethane (probably best to do one piece at a time). I used a big C clamp and clamped it on a piece of wood. Then use this as a guide while you cut around it with a very sharp X-Acto knife. You can do a very good job this way, too.
03-08-2012, 11:10 PM
#11
Addict
Lifetime Rennlist
Member
Lifetime Rennlist
Member
Pretty nice.
I am a bit more of a "hacker I guess - I have a Greg Smith 9000lb lift, and the arms were too long to fit a 993 if I mounted it as advised, so I widened the space between the towers by 14", and welded on extensions to the threaded adjustment rods for the cables.
I also machined pads for the arms that have a raised section that goes into the holes of the jacking pads on the body - therefore having a very nice positive lock with the car.
However, my lift is not as clean as yours - but I have guys coming over almost every weekend hacking on 993's, its it gets its fair share of abuse... LOL!
Cheers,
Mike
03-09-2012, 12:26 AM
#13
Drifting
03-09-2012, 11:52 AM
#14
Instructor
Thread Starter
Pretty nice.
I am a bit more of a "hacker I guess - I have a Greg Smith 9000lb lift, and the arms were too long to fit a 993 if I mounted it as advised, so I widened the space between the towers by 14", and welded on extensions to the threaded adjustment rods for the cables.
Cheers,
Mike
I am a bit more of a "hacker I guess - I have a Greg Smith 9000lb lift, and the arms were too long to fit a 993 if I mounted it as advised, so I widened the space between the towers by 14", and welded on extensions to the threaded adjustment rods for the cables.
Cheers,
Mike
Thanks! It's nice to find a place where I can be in my element!
