

993 RS Steering Wheel Installed - wiring photos
 11-27-2011 | 07:49 PM
#1
Thread Starter
Burning Brakes
Joined: Feb 2005
Posts: 899
Likes: 84
Took a few pictures while installing a new 993RS steering wheel this weekend. While I was able to find plenty of threads & general info about the wheel/hub, the wiring bits weren't documented so well & lead to a few surprises.. hopefully these help someone else.
The clockspring connectors are interchangeable between 993 / 996 / 986 Boxster. Ordering the wheel from Carnewal gets you the wheel/hub (duh), horn contact plug/pin, & the 2.8ohm resistor.
Part#'s:
Wheel + Hub assembly: 993-347-084-80-8YR
Horn switch contact: 964-652-104-00
Airbag connectors: tbd
Pin for turn signal switch connector: 999.652.639.22 (Identified by Cupcar here -> https://rennlist.com/forums/9314265-post1.html)
Before we begin, some disclaimers are necessary due to the sensitive subject matter of defeating a supplemental restraint system:
1) By opening this post, you agree to hold the author (me!) completely non-liable for any consequences you incur (or do not incur) as a result of this post.
2) You fully understand the implications and bear the burden of removing an airbag from a vehicle, should you choose to & will not look to blame someone else (especially me) for an undesirable consequence of your actions.
3) You read this on the internet. If something goes wrong, think of how stupid you'll sound when you proclaim to your spouse, significant other, parol officer, parents etc.. 'but I read it on the internet'. Say it out loud now, in the presence of another human to convince yourself how silly this excuse sounds.
4) Your car wants you to die & will try to kill you whenever it gets an opportunity to do so. It is dangerous by nature. Do not assume that because you've named it & have 'love' for it that this isn't true. You're the frog to Porsche's scorpion here..
Disconnect the battery, wait for good measure, then remove steering wheel (covered elsewhere, here's a good link -> https://rennlist.com/forums/8877053-post1.html):

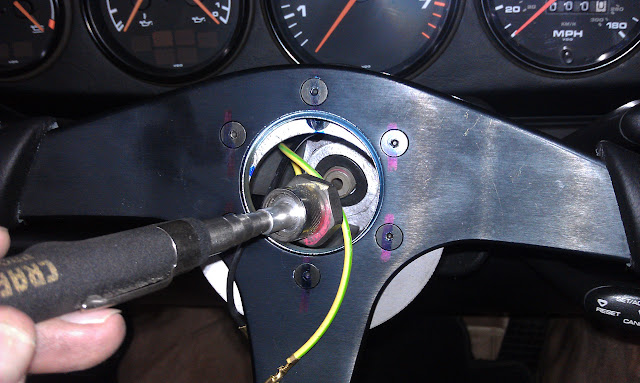
Loosen this 8mm bolt to free the switch assembly:

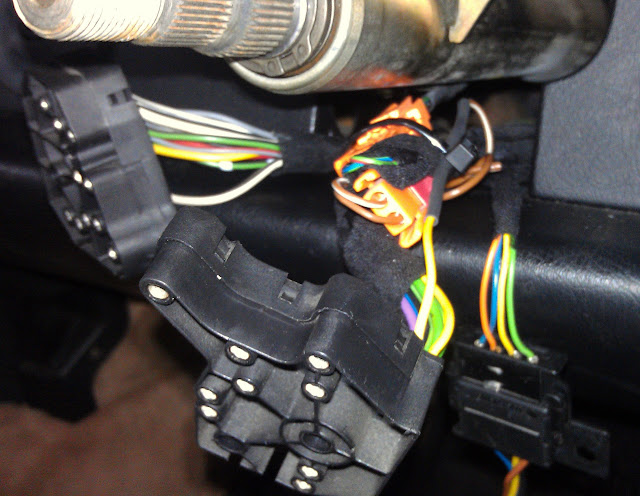
Wiring bundle happily tied back for ~15yrs:

Taking a closer look, later cars (9*6) will have one orange, one red connector - they are interchangeable:

p/n 964.652.104.00

Presses in from the front:

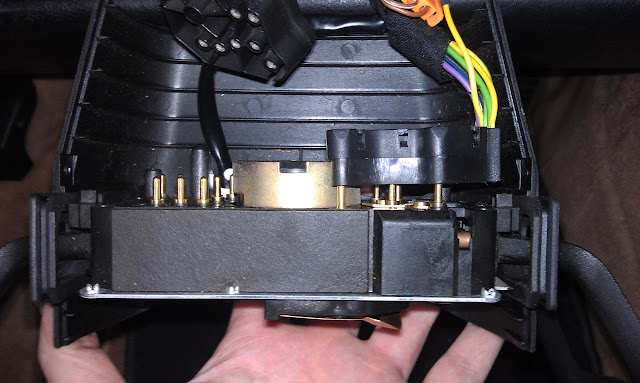
& pokes through the switch..

adding another pin (#71) to the rear:

Problem is that this pin isn't populated in the mating connector since the horn circuit is carried through the clockspring in airbag equipped cars (photo upside down, look at the upper left cavity in the connector):
 [/IMG]
Opening the connector & viewing from the backside:

Goals -
1) populate Pin71 (Horn circuit) & provide connection to horn circuit in 'OEM-like' manner. ** P/N for Pin 71 is 999.652.639.22 **
2) Fool airbag diagnostics to prevent fault code / warning light.
Rules -
1) do no harm - no cutting of underdash harness or hokey wiring that can fail, short, or cause future headaches.
Solutions -
1) obtain mating connectors from Porsche salvage yard (Oklahoma Foreign was accommodating & helpful)
2) obtain 2.8ohm resistor to mimic airbag
3) make jumper harnesses as below:
Parts:

Airbag control module diagnostic foolery:

Horn wiring jumper harness (brown-only wire is the original ground, don't have the correct tools to de-pin these yet so it will wait as is):
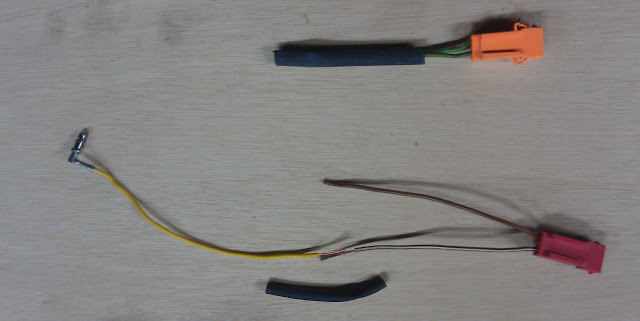
Soldered & heat shrinked (use a glob of liquid electrical tape underneath heatshrink to keep moisture out):

Pin71 again - if you'd rather be 'creative', splice Pin71 to the brown wire w/ white stripe via any means possible. You've been warned though..

Populated into connector:

From the mating side:

plugged in (brown-only wire is the original ground, don't have the correct tools to de-pin these yet so it will wait as is):

Loosely secured with zip-tie:
Installation is the reverse of removal:
Column shrouds / trim reattached (replace with 964 parts for improved fit / finish - not pictured)

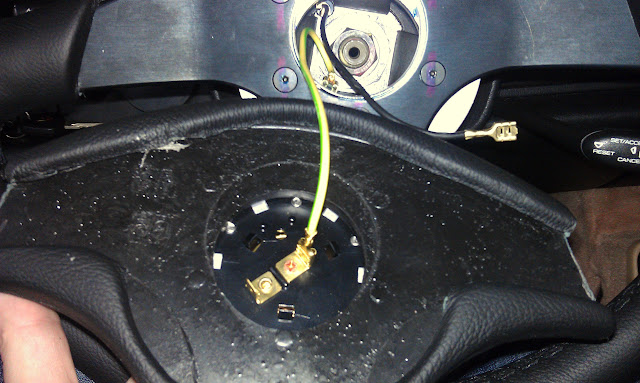
Horn contact rides along slip ring to complete horn circuit (wheel is upside down in photo, black tab must be on left side to install)

Adjust switch assembly to ensure contact to slip ring on hub (gently pull toward you until it touches the back of the wheel / hub), view from top:

Tighten 8mm bolt:

Attach connectors on backside of horn pad:
Test the horn!
(vid goes here)
Behold, a proper 3-spoke wheel:

Order 964 trim pieces to avoid gap w/ 993 steering column trim:

The clockspring connectors are interchangeable between 993 / 996 / 986 Boxster. Ordering the wheel from Carnewal gets you the wheel/hub (duh), horn contact plug/pin, & the 2.8ohm resistor.
Part#'s:
Wheel + Hub assembly: 993-347-084-80-8YR
Horn switch contact: 964-652-104-00
Airbag connectors: tbd
Pin for turn signal switch connector: 999.652.639.22 (Identified by Cupcar here -> https://rennlist.com/forums/9314265-post1.html)
Before we begin, some disclaimers are necessary due to the sensitive subject matter of defeating a supplemental restraint system:
1) By opening this post, you agree to hold the author (me!) completely non-liable for any consequences you incur (or do not incur) as a result of this post.
2) You fully understand the implications and bear the burden of removing an airbag from a vehicle, should you choose to & will not look to blame someone else (especially me) for an undesirable consequence of your actions.
3) You read this on the internet. If something goes wrong, think of how stupid you'll sound when you proclaim to your spouse, significant other, parol officer, parents etc.. 'but I read it on the internet'. Say it out loud now, in the presence of another human to convince yourself how silly this excuse sounds.
4) Your car wants you to die & will try to kill you whenever it gets an opportunity to do so. It is dangerous by nature. Do not assume that because you've named it & have 'love' for it that this isn't true. You're the frog to Porsche's scorpion here..
Disconnect the battery, wait for good measure, then remove steering wheel (covered elsewhere, here's a good link -> https://rennlist.com/forums/8877053-post1.html):
Loosen this 8mm bolt to free the switch assembly:
Wiring bundle happily tied back for ~15yrs:
Taking a closer look, later cars (9*6) will have one orange, one red connector - they are interchangeable:
p/n 964.652.104.00
Presses in from the front:
& pokes through the switch..
adding another pin (#71) to the rear:
Problem is that this pin isn't populated in the mating connector since the horn circuit is carried through the clockspring in airbag equipped cars (photo upside down, look at the upper left cavity in the connector):
[/IMG]Opening the connector & viewing from the backside:
Goals -
1) populate Pin71 (Horn circuit) & provide connection to horn circuit in 'OEM-like' manner. ** P/N for Pin 71 is 999.652.639.22 **
2) Fool airbag diagnostics to prevent fault code / warning light.
Rules -
1) do no harm - no cutting of underdash harness or hokey wiring that can fail, short, or cause future headaches.
Solutions -
1) obtain mating connectors from Porsche salvage yard (Oklahoma Foreign was accommodating & helpful)
2) obtain 2.8ohm resistor to mimic airbag
3) make jumper harnesses as below:
Parts:
Airbag control module diagnostic foolery:
Horn wiring jumper harness (brown-only wire is the original ground, don't have the correct tools to de-pin these yet so it will wait as is):
Soldered & heat shrinked (use a glob of liquid electrical tape underneath heatshrink to keep moisture out):
Pin71 again - if you'd rather be 'creative', splice Pin71 to the brown wire w/ white stripe via any means possible. You've been warned though..
Populated into connector:
From the mating side:
plugged in (brown-only wire is the original ground, don't have the correct tools to de-pin these yet so it will wait as is):
Loosely secured with zip-tie:
Installation is the reverse of removal:
Column shrouds / trim reattached (replace with 964 parts for improved fit / finish - not pictured)
Horn contact rides along slip ring to complete horn circuit (wheel is upside down in photo, black tab must be on left side to install)
Adjust switch assembly to ensure contact to slip ring on hub (gently pull toward you until it touches the back of the wheel / hub), view from top:
Tighten 8mm bolt:
Attach connectors on backside of horn pad:
Test the horn!
(vid goes here)
Behold, a proper 3-spoke wheel:
Order 964 trim pieces to avoid gap w/ 993 steering column trim:
Last edited by ToSi; 05-01-2012 at 07:28 PM. Reason: typos, pin p/n (thanks Cupcar!)
The following 3 users liked this post by ToSi:
11-27-2011 | 11:59 PM
#5
Thread Starter
Burning Brakes
Joined: Feb 2005
Posts: 899
Likes: 84
 11-28-2011 | 11:30 AM
#6
Nordschleife Master
Joined: Dec 2008
Posts: 5,472
Likes: 32
From: In front of you and to the left ...
^^^ I think Porsche also offered a 'hub system' that brought the stock wheels further aft for tall drivers .. and it was probably either Momo or Nardi based as a vendor.

Trending Topics
11-29-2011 | 01:22 PM
#8
Rennlist Member
Joined: Aug 2009
Posts: 560
Likes: 46
From: Plano, TX
When you disconnect the battery is it sufficient to just disconnect the negative terminal or should you disconnect both positive and negative? I know it is a lame question but I will be replacing my wheel in a couple of months.
Last edited by csmab; 11-29-2011 at 10:13 PM.
01-01-2012 | 07:57 PM
#10

Pro
Joined: Oct 2009
Posts: 572
Likes: 6
From: Orange County, CA
Update: I guess the correct question is how do you align the tab with the hub? I have been playing with it for a while. I can't seem to find the sweet spot where the horn will work when I start to turn the steering wheel.
What is the trick???
What is the trick???
01-01-2012 | 08:32 PM
#11
Thread Starter
Burning Brakes
Joined: Feb 2005
Posts: 899
Likes: 84
No tricks, make sure the hub is snug & fully seated. Then pull the switch assembly gently towards the wheel. If the hub is cocked, the tab won't remain in contact w/ the slip ring & you'll have the issue you describe.
Like this:
Like this:
The following users liked this post:
nhlbug (08-04-2021)
01-01-2012 | 11:03 PM
#12
Pro
Joined: Oct 2009
Posts: 572
Likes: 6
From: Orange County, CA
I will continue to play with it. Hooking up the horn has to be one of the most fustrating things i did all week.
Thanks for your post! It really helped me out. If you lived in Orange County I would buy you a beer!
Thanks for your post! It really helped me out. If you lived in Orange County I would buy you a beer!
The following users liked this post:
nhlbug (08-04-2021)