

Dropped the engine over the weekend w/pics
 04-05-2011 | 02:55 PM
#91
Thread Starter
Burning Brakes
Joined: Jul 2007
Posts: 763
Likes: 4
From: San Diego
No, it was mostly a TX/FL car and then a couple years in KC before coming out here. I really don't think it matters where you live...this area gets wet and is dirty always...there is no way for it to get cleaned or flushed out. The crud in mine were certainly damp and I had not washed the car anytime too recently!
04-05-2011 | 03:35 PM
#92
Race Car
Joined: Feb 2005
Posts: 4,682
Likes: 10
From: Johns Creek, GA
No, it was mostly a TX/FL car and then a couple years in KC before coming out here. I really don't think it matters where you live...this area gets wet and is dirty always...there is no way for it to get cleaned or flushed out. The crud in mine were certainly damp and I had not washed the car anytime too recently!
04-05-2011 | 10:39 PM
#95
5th Gear
Joined: Apr 2011
Posts: 5
Likes: 1
I have officially created a profile in order to comment on the three most fantastic posts of this entire thread:
Made my day!!!  Thanks for keepin' it real!! Moose would also like to request some doggy treats, a day or two at the beach every week, and a walk before and after work for the next 6 months. Put a good word in. He'll send your wives flowers if you can make it happen.
Originally Posted by PorscheDoc View Post
Come on Adam, where is the progress? Did you have to spend the weekend with Lana at Tivol's?
Come on Adam, where is the progress? Did you have to spend the weekend with Lana at Tivol's?
Originally Posted by kcwsJim View Post
hmm, what was the name of that jeweler? bet Mark knows...
hmm, what was the name of that jeweler? bet Mark knows...
Originally Posted by Mark Harris View Post
Allegedly Lana is following this post so let's just make it easier for her to make her selection.......
http://www.davidyurman.com
Anything to help a fellow rennlister out
Allegedly Lana is following this post so let's just make it easier for her to make her selection.......
http://www.davidyurman.com
Anything to help a fellow rennlister out
Thanks for keepin' it real!! Moose would also like to request some doggy treats, a day or two at the beach every week, and a walk before and after work for the next 6 months. Put a good word in. He'll send your wives flowers if you can make it happen.
04-05-2011 | 11:24 PM
#97
Addict
Rennlist Member
Rennlist
Site Sponsor
Rennlist Member
Rennlist
Site Sponsor
Joined: Sep 2003
Posts: 8,059
Likes: 11
From: Under Your Car
I have officially created a profile in order to comment on the three most fantastic posts of this entire thread:
Made my day!!! Thanks for keepin' it real!! Moose would also like to request some doggy treats, a day or two at the beach every week, and a walk before and after work for the next 6 months. Put a good word in. He'll send your wives flowers if you can make it happen.
Made my day!!!
Thanks for keepin' it real!! Moose would also like to request some doggy treats, a day or two at the beach every week, and a walk before and after work for the next 6 months. Put a good word in. He'll send your wives flowers if you can make it happen.
04-06-2011 | 11:15 AM
#99
Drifting
Joined: Oct 2007
Posts: 3,346
Likes: 5
From: Oceanside, CA
LANA!
Nice to see you round here... Love your avatar! lol... I'll see you guys on Sat around noon. I have to watch the work in progress while I have a drink... I may hand over a wrench or something, but that's about all I'm going to help.
Nice to see you round here... Love your avatar! lol... I'll see you guys on Sat around noon. I have to watch the work in progress while I have a drink... I may hand over a wrench or something, but that's about all I'm going to help.
04-06-2011 | 05:41 PM
#102
Thread Starter
Burning Brakes
Joined: Jul 2007
Posts: 763
Likes: 4
From: San Diego
 04-06-2011 | 06:05 PM
#103
Thread Starter
Burning Brakes
Joined: Jul 2007
Posts: 763
Likes: 4
From: San Diego
Here is some more progress of some little jobs along the way...
First, the CV boots on one half shaft needed to be replaced. I did the other side last year but didn't have time to do the other side and it was still intact. Sometimes this is an easy job but sometimes it is a royal PITA! Guess which mine was
I got the puller out and was hoping the CV joint would just come off with that; however, as I started to really stress things I had a feeling it wasn't going to be easy. I started to hammer from the backside with a punch and hammer but it is hard to get a good shot at it to do anything more than the puller. I gave it little more with the puller but could start to feel it stipping so I stopped.

I was left with only one option...taking the axle out of the car. With a big breaker bar this is not that big a deal (assuming you have a monster TQ wrench to properly torque the nut when putting it back in); however, with the transmission out of the car there is nothing to stop things from turning. So...the only way to get it off is with a stout impact wrench.

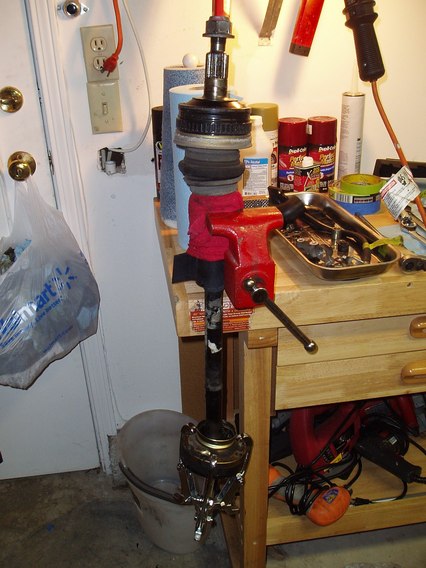
Here is it out of the car and in the vice ready to get pounded. I put some rubber sheeting around the shaft to protect it.
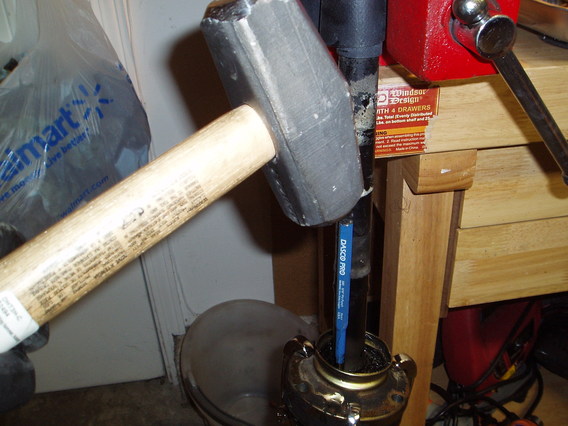
I left the puller on and used a punch and sledge...worked my way around the back of the cv joint. It took some good shots but slowly started to work loose. I would retighten the puller as I made progress. It was really on there!
Success!

Be sure to put the special Porsche factory copper based spline lubricant. It's around $40 for a tube so not cheap but it's all I couldn't find an industry equivilent. Anybody know of one?

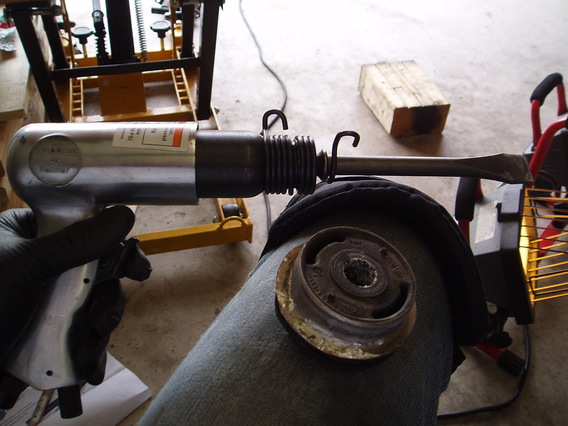
Here is a helpful tip. When you put the clean and repacked cv joint back on the axle you might run into the issue of how to get it past the ring where the circlip goes (unless you are lucky enough to have one that slides right on). You can easily tap the joint back on 90% of the way but when the joint is flush with the shaft you can be stuck if you have to use any real kind of force. Here is the "tool" I came up with a while ago...take a piece of pipe a bit bigger than the axle shaft and then you can bang away all you want. An important note...if you take the cv joint all the way apart be sure that the smooth part of the inner (smaller) race is on the outside...or the side you are hitting with the hammer. It will not go on all the way otherwise. Ask me how I know.....

First, the CV boots on one half shaft needed to be replaced. I did the other side last year but didn't have time to do the other side and it was still intact. Sometimes this is an easy job but sometimes it is a royal PITA! Guess which mine was
I got the puller out and was hoping the CV joint would just come off with that; however, as I started to really stress things I had a feeling it wasn't going to be easy. I started to hammer from the backside with a punch and hammer but it is hard to get a good shot at it to do anything more than the puller. I gave it little more with the puller but could start to feel it stipping so I stopped.
I was left with only one option...taking the axle out of the car. With a big breaker bar this is not that big a deal (assuming you have a monster TQ wrench to properly torque the nut when putting it back in); however, with the transmission out of the car there is nothing to stop things from turning. So...the only way to get it off is with a stout impact wrench.
Here is it out of the car and in the vice ready to get pounded. I put some rubber sheeting around the shaft to protect it.
I left the puller on and used a punch and sledge...worked my way around the back of the cv joint. It took some good shots but slowly started to work loose. I would retighten the puller as I made progress. It was really on there!
Success!
Be sure to put the special Porsche factory copper based spline lubricant. It's around $40 for a tube so not cheap but it's all I couldn't find an industry equivilent. Anybody know of one?
Here is a helpful tip. When you put the clean and repacked cv joint back on the axle you might run into the issue of how to get it past the ring where the circlip goes (unless you are lucky enough to have one that slides right on). You can easily tap the joint back on 90% of the way but when the joint is flush with the shaft you can be stuck if you have to use any real kind of force. Here is the "tool" I came up with a while ago...take a piece of pipe a bit bigger than the axle shaft and then you can bang away all you want. An important note...if you take the cv joint all the way apart be sure that the smooth part of the inner (smaller) race is on the outside...or the side you are hitting with the hammer. It will not go on all the way otherwise. Ask me how I know.....
04-06-2011 | 06:38 PM
#104
Thread Starter
Burning Brakes
Joined: Jul 2007
Posts: 763
Likes: 4
From: San Diego
I got my fuel injectors back from being rebuilt. Sent them to FIC and Jon did a nice job for a very reasonable price ($15/inj.). The best I could find in San Diego was $45/inj., which I almost laughed at the guy. RC in Torrance is very good from what I hear but they charge $24/inj. if I remember right.
Here they are nice and clean with new o-rings, caps and baskets.

This is an example of my organizational method for this entire project. I used many little plastic bags and label them in the order I take things off the car...then I number them. This way I just need to work backwards when I put everything back together. I'll give credit to my friend TJ for this idea as it is working quite well.

Next I worked on finishing up the AWD/2WD conversion. Everything was already ripped out so now I just needed to install the converstion bits. Big thanks to Cgfen for selling me all his bits, including the FD SSK, as he is going back to AWD. This shot shows all the shifter bits converted to the SSK shifter with the stock shifter next to it.

Remember I was saying you needed a BIG torque wrench if you were going to pull the axles out of the car...well, here it is This baby is good for up to 600ft.lbs. I believe. Look close at how big this thing is compared to my stool. Again, thanks go to Cgfen for lending this to me. A couple years ago he and I were talking about finding a big tq wrench and I happen to find a smokin' deal on one and sent it to Cgfen and kjr914 saying "someone has to buy this!" Well, Craig was nice enough to buy it and offer to let us all use it when we needed it. What a guy

Next item to address were the Rennline rear subframe solid bushings. These things are so pretty and perfectly machined I almost didn't want to put them in the car!!! They come packaged in foam and look like man-jewelry. I know Bill Verburg (sp.?) on here mentioned that the early production of these had clearance issues with the body seam. I'm not 100% sure but I think this was fixed by adding some aluminum machined sliver "spacers" similar to the RSR tilt kit, just much smaller. Someone with an early kit can maybe chime in. You can see one at the bottom of the middle stack in this picture.

The air chisel is your friend here folks...you have to get a lip started with hammer and chisel but then you can carefully go at it with this bad boy...made short work of what could have been a very long job.
Here is one installed and ready for final torque. I put green tape on any bolt that needs final torque and these will likely need a couple rounds once the car's full weight is on them and they seat. You have to really double check that you put things on in the correct orientation as the silver aluminum spacer is domes and must be installed correctly per the instructions. I did not do final tightening as I might have to move things around to get the rest of the subrame together when putting the engine back in. An important side note to these...I don't have the empirical data to back this up but I am 95% sure that the ride height changes in the rear by about 3-4mm as the subframe is now lower in relation to the body. I was not planning on having to adjust my ride height so I'll have to see where things sit when the car is on the ground. I'll be able to tell quickly as I have a 1/4 inch lower negative rake at the front fender lip. Either way, I would still do the mod, these combined with the wevo engine mounts will really tighten the back end up. In a perfect world I would also do the Elephant Racing inner sport bushes ($50/bushing) but that adds up to $400 for the rear end and I am already over budget so those will have to wait

Here they are nice and clean with new o-rings, caps and baskets.
This is an example of my organizational method for this entire project. I used many little plastic bags and label them in the order I take things off the car...then I number them. This way I just need to work backwards when I put everything back together. I'll give credit to my friend TJ for this idea as it is working quite well.
Next I worked on finishing up the AWD/2WD conversion. Everything was already ripped out so now I just needed to install the converstion bits. Big thanks to Cgfen for selling me all his bits, including the FD SSK, as he is going back to AWD. This shot shows all the shifter bits converted to the SSK shifter with the stock shifter next to it.
Remember I was saying you needed a BIG torque wrench if you were going to pull the axles out of the car...well, here it is
This baby is good for up to 600ft.lbs. I believe. Look close at how big this thing is compared to my stool. Again, thanks go to Cgfen for lending this to me. A couple years ago he and I were talking about finding a big tq wrench and I happen to find a smokin' deal on one and sent it to Cgfen and kjr914 saying "someone has to buy this!" Well, Craig was nice enough to buy it and offer to let us all use it when we needed it. What a guy Next item to address were the Rennline rear subframe solid bushings. These things are so pretty and perfectly machined I almost didn't want to put them in the car!!! They come packaged in foam and look like man-jewelry. I know Bill Verburg (sp.?) on here mentioned that the early production of these had clearance issues with the body seam. I'm not 100% sure but I think this was fixed by adding some aluminum machined sliver "spacers" similar to the RSR tilt kit, just much smaller. Someone with an early kit can maybe chime in. You can see one at the bottom of the middle stack in this picture.
The air chisel is your friend here folks...you have to get a lip started with hammer and chisel but then you can carefully go at it with this bad boy...made short work of what could have been a very long job.
Here is one installed and ready for final torque. I put green tape on any bolt that needs final torque and these will likely need a couple rounds once the car's full weight is on them and they seat. You have to really double check that you put things on in the correct orientation as the silver aluminum spacer is domes and must be installed correctly per the instructions. I did not do final tightening as I might have to move things around to get the rest of the subrame together when putting the engine back in. An important side note to these...I don't have the empirical data to back this up but I am 95% sure that the ride height changes in the rear by about 3-4mm as the subframe is now lower in relation to the body. I was not planning on having to adjust my ride height so I'll have to see where things sit when the car is on the ground. I'll be able to tell quickly as I have a 1/4 inch lower negative rake at the front fender lip. Either way, I would still do the mod, these combined with the wevo engine mounts will really tighten the back end up. In a perfect world I would also do the Elephant Racing inner sport bushes ($50/bushing) but that adds up to $400 for the rear end and I am already over budget so those will have to wait
Last edited by flatsixforme; 04-06-2011 at 07:03 PM.
