

Aftermarket HID - so many to choose from
 08-29-2009 | 02:18 PM
#16
Rennlist Member
Joined: Oct 2003
Posts: 182
Likes: 52
From: UT
I installed the slim ballasts from EBAY seller FTJ2000 about a year ago. They are great! No 'alterations' needed. This was truly plug & play. I did decide to install a fuse, but this was totally over-protection.
Take a look at this thread for more info... https://rennlist.com/forums/993-foru...rket-hids.html
I selected the 4300k for true white and most lummens. The difference from stock is amazing! No more overdriving the headlights at night. My HIDs are brighter than the stock hi-beams. In fact I don't use the hi-beams any more.... well except for the occasional 'flash' for passing.
08-29-2009 | 03:28 PM
#17
Instructor
Joined: Jun 2009
Posts: 201
Likes: 3
From: Honolulu
How's the beam spead? No blinding on coming cars?
Are there any "hot" spots?
Sorry for all the questions but I've got a buddy that's been wanting to improve the lighting on his car and I suggested the best he could do is use a slightly better bulb like Silverstar.
In my experience I haven't seen an HID retrofit that works well with an OEM halogen set up without having hot spots or blinding on coming cars.
If this kit does indeed work then it'll be a way better upgrade then a "regular" bulb.
thanks!
08-29-2009 | 04:52 PM
#18
Drifting
Joined: Mar 2006
Posts: 2,423
Likes: 33
From: Hannover
I have no issues with blinding other cars. I am not sure what 'hot spots' mean but the kit works. It is a 'night and day' difference. Just do it and you know what hundreds of 993 owners that did the upgrade mean.
08-29-2009 | 05:33 PM
#20
Instructor
Joined: Jun 2009
Posts: 201
Likes: 3
From: Honolulu
However, I have heard of new bulbs that are actually made specifically for each application, like H1 and H4 so maybe these are the new technology.
I'll tell my buddy about it.
Thanks.
08-29-2009 | 05:53 PM
#21
Drifting
Joined: Mar 2009
Posts: 2,394
Likes: 3
From: Seattle
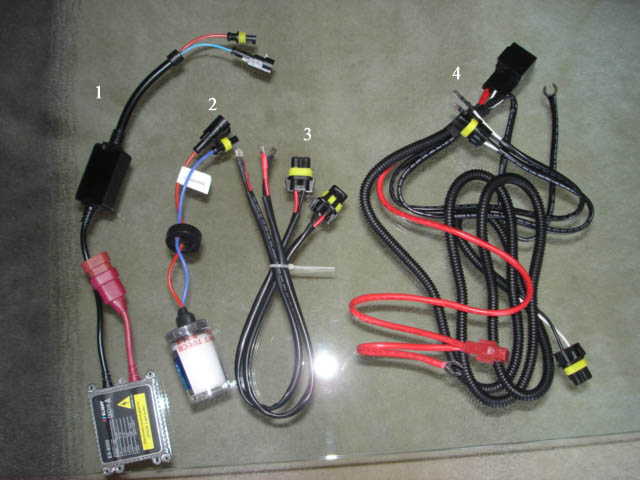
ok, some questions before I tackle this DIY...
I have labelled the different parts 1- 4. please refer to these numbers when helping.
1) you say:
If you put a "bullet connector" on the black HID kit wire (red arrow points to it in the photo below), you can plug the black HID kit wire directly into the brown OEM wire's barrel connector.
Q. which black HID wire are you referring to? 3, the one that has a red and black wire coming out of it? if so, where does the red wire from that cable go and how?
2) do i need that wire labelled #4?
thanks,
sam
Hi Sam,
Using your picture and number labels, here's how things connect together from an electrical perspective:
That's it. The rest is just packaging -- getting everything to fit into the headlight bucket.

-Chris
Using your picture and number labels, here's how things connect together from an electrical perspective:
- The HID bulb's red/blue wires (#2) plugs into the corresponding red/blue wires for the ballast/igniter (#1).
- In your picture, (#3) has two sets of wires, both the same (one for each headlight). One of the sets of wires in (#3) plugs into the red connector for the ballast (#1).
- This leaves only two wires unconnected for the HID kit: the black and red wires in (#3). Here's how they connect:
- The black wire in (#3) gets the bullet connector attached to its end. This is then plugged into the barrel connector on the brown wire from your factory wiring harness. (In electrical terminology, this is the ground wire for the light circuit.)
- The existing spade connector on the red wire in (#3) plugs into the yellow wire from the factory wiring harness. This yellow wire is the one that originally plugged directly onto the end of the old halogen bulb. You just put the spade connector from the red wire right into the factory connector on the yellow wire. (In electrical terminology, the yellow wire is the +12V power source for the light circuit.)
- The wires in (#4) are not used.
That's it. The rest is just packaging -- getting everything to fit into the headlight bucket.
-Chris

http://www.acehardwareoutlet.com/(ue...aspx?SKU=34706
09-11-2009 | 12:17 AM
#22
Advanced
Joined: Jul 2009
Posts: 55
Likes: 0
From: Lafayette, CA
Last edited by rdevany; 09-11-2009 at 12:33 AM.