When you click on links to various merchants on this site and make a purchase, this can result in this site earning a commission. Affiliate programs and affiliations include, but are not limited to, the eBay Partner Network.
Damn, I wish you had posted earlier.
I just spent $17.95 + shipping for the mount from Flat 6.
It attaches to the 10mm bolt on the oil fill neck. Before learning about this mount, I was just gonna be buying a mending bracket from Home Depot for $2.75
Mike, I don’t think that even works for you. I think GT3 guys tuck it in on the right side. (Passenger) like in the instructions.
Yup.
Upon further review I believe you're right.
The instructions show it going over next to the ECU.
But.... I'm gonna see if I can route to the bolt on the oil filler neck as @VegasGT3 did.
Last edited by Diablo Dude; 06-07-2023 at 07:43 PM.
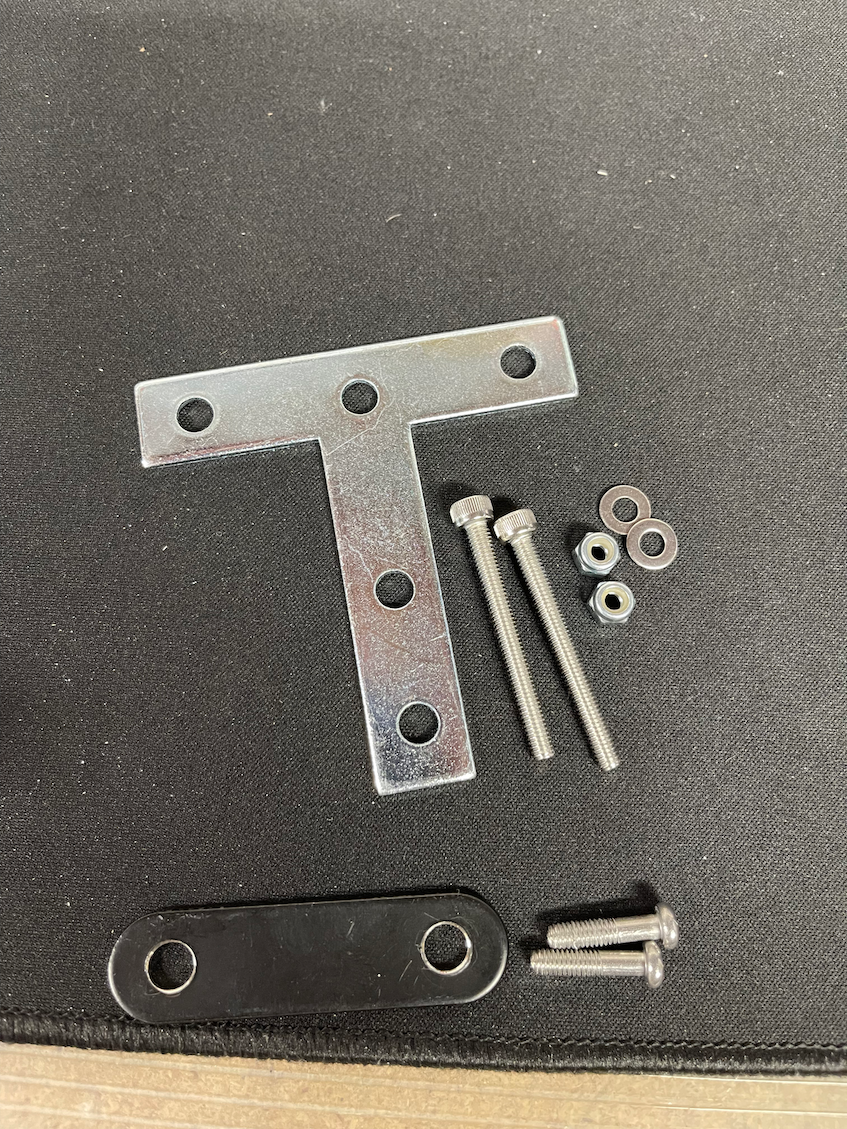
Instructions for those who may find them useful:
Step 1: Remove the two Phillips head screws (they are also M4-0.7 thread pitch) on the right side of the unit
Step 2: Fasten the (2) M4-0.7 x 40 mm screws in its place, and threads will now stick through to the other side (this step screws the entire unit back together already, so no worry of integrity of the unit)
Step 3: Line up the T-plate to find out where you need to drill an additional hole, and drill the hole
Step 4: Line up the T-plate through both holes and use a utility knife to score and remove where the double sided tape over laps
Step 5: Install the T-plate onto the protruding threads from Step 2
Step 6: Add the (2) M4 flat washers and fasten the (2) M4-0.7 nylon insert nuts
Step 7: Hand tighten everything together one final time
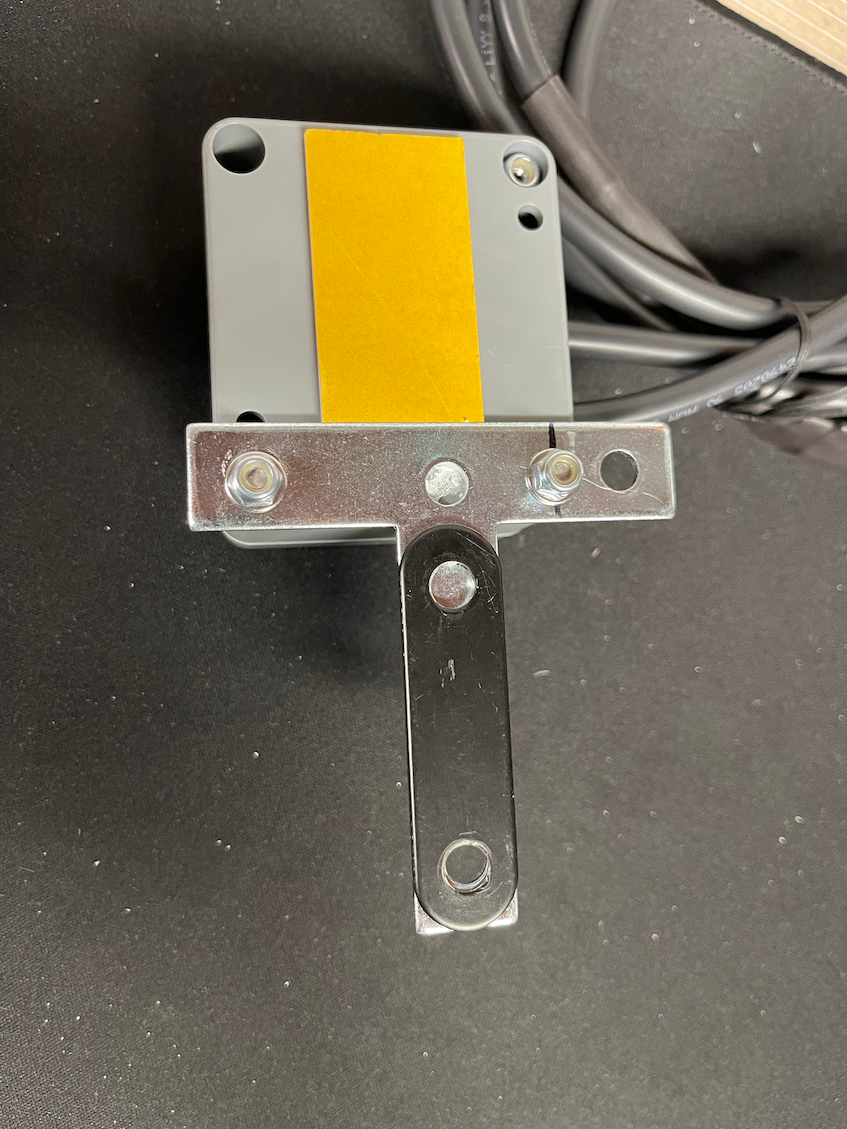
Success.
I'll probably take my small angle grinder and shorten the bracket overhangs tomorrow for a cleaner look. I understand it seems silly to even need to do this for a Porsche mod AND for a part of such a price tag -- but no need to sweat the small things in life.
Arrived with no ears
Additional parts required on top, OE fasteners and Supremepower bracket on bottom.
Installed
Backside: showing how it nearly perfectly lines up with how it would have been with ears + Supremepower bracket
Frontside: showing how it nearly perfectly lines up with how it would have been with ears + Supremepower bracket
Last edited by InTheClouds; 06-07-2023 at 10:13 PM.
Reason: added links for people
I got my earless setup installed after work today. No lift... But it's tight under there! Very straight forward though.
The sound is dramatically different. You not only hear it.... You can feel it. I love the louder turbo spooling whine.
Well, I got the junction box itself set up the same way shrimp money did his (thanks, shrimp money—very easy!). However, I'm running into an issue on the second half of the install lol.
I'm having some problems unplugging the existing valve controller connectors while on the underside of the car. The Flat 6 instruction video makes it look so easy, but in practice I'm finding it quite difficult to disconnect the existing connectors with my hands, given all the surrounding parts. I have medium size hands, so not exactly wielding two Christmas hams here.
Note that I'm not using a lift, which is contributing to the tightness.
Any tips from those of you who have done it before?
Instructions for those who may find them useful:
Step 1: Remove the two Phillips head screws (they are also M4-0.7 thread pitch) on the right side of the unit
Step 2: Fasten the (2) M4-0.7 x 40 mm screws in its place, and threads will now stick through to the other side (this step screws the entire unit back together already, so no worry of integrity of the unit)
Step 3: Line up the T-plate to find out where you need to drill an additional hole, and drill the hole
Step 4: Line up the T-plate through both holes and use a utility knife to score and remove where the double sided tape over laps
Step 5: Install the T-plate onto the protruding threads from Step 2
Step 6: Add the (2) M4 flat washers and fasten the (2) M4-0.7 nylon insert nuts
Step 7: Hand tighten everything together one final time
Success.
I'll probably take my small angle grinder and shorten the bracket overhangs tomorrow for a cleaner look. I understand it seems silly to even need to do this for a Porsche mod AND for a part of such a price tag -- but no need to sweat the small things in life.
Arrived with no ears
Additional parts required on top, OE fasteners and Supremepower bracket on bottom.
Installed
Backside: showing how it nearly perfectly lines up with how it would have been with ears + Supremepower bracket
Frontside: showing how it nearly perfectly lines up with how it would have been with ears + Supremepower bracket
This bracket will look very ugly over time. Better find a stainless steel version.
Well, I got the junction box itself set up the same way shrimp money did his (thanks, shrimp money�very easy!). However, I'm running into an issue on the second half of the install lol.
I'm having some problems unplugging the existing valve controller connectors while on the underside of the car. The Flat 6 instruction video makes it look so easy, but in practice I'm finding it quite difficult to disconnect the existing connectors with my hands, given all the surrounding parts. I have medium size hands, so not exactly wielding two Christmas hams here.
Note that I'm not using a lift, which is contributing to the tightness.
Any tips from those of you who have done it before?
I just did an install on a friends car 20mins ago. I highly suggest getting a long pick tool set. Should be $10. That makes it easy to pull out the gray locking tab on each valve plug.
edit, I had him back the car up on two boards to give an extra 1.5� lift and it was plenty for my fat head.
This bracket will look very ugly over time. Better find a stainless steel version.
Good point. It is zinc plated, not galvanized (so even worse than galv with respect to rust prevention). But i�ll take my chances with it though. Any moisture that may get on it should be quickly evaporated by being in the hot engine bay and all.
Well, I got the junction box itself set up the same way shrimp money did his (thanks, shrimp money—very easy!). However, I'm running into an issue on the second half of the install lol.
I'm having some problems unplugging the existing valve controller connectors while on the underside of the car. The Flat 6 instruction video makes it look so easy, but in practice I'm finding it quite difficult to disconnect the existing connectors with my hands, given all the surrounding parts. I have medium size hands, so not exactly wielding two Christmas hams here.
Note that I'm not using a lift, which is contributing to the tightness.
Any tips from those of you who have done it before?
As Shrimp $ recommends, you will need either a pick or a long thin screw driver to push the gray locking bar up or away from the tab. That just unlocks the tab. The second tip is you still must squeeze the gray tab to open it and remove it even after you unlock it. It is fiddly but you can get it with time and patience. Start with the drivers side which is easier. Once you get it figured out on the drivers side then go to the passenger side which is harder because of less clearance. Best wishes.
Good point. It is zinc plated, not galvanized (so even worse than galv with respect to rust prevention). But i�ll take my chances with it though. Any moisture that may get on it should be quickly evaporated by being in the hot engine bay and all.
Corrosion during driving is your least concern...but the rest of the time when the car is parked. I once installed a rear diffuser using that material (only brackets I had on hand and car needed to be put together for a run) - looked terrible after just a few weeks here in FL.
I received mine today. No ears. I just used the double side tape to the alternator. The zip tie wasn't long enough. I used rhino ramps and it took about 20 minutes. I may redo it and check the zip ties and what not. Ideally I'd like to convert to a bolt on device. I used a very skinny tiny flathead screwdriver from a Kobalt set to manipulate the pass side grey clip, that took longer than everything else.
EDIT: Also, how crucial is the routing? (I am a heart surgeon, I get very concerned about the lie of my bypass grafts, tubes and wires before I close the chest) but I tried to make sure they were fairly taut and the heat shield wires were lined up with heat shields/cats/etc. But on the top side I kind of just folded the excess passenger side under the spoiler actuator and loosely zip tied it to some other wiring so its out of the way of the oil filter. I'd love some input on that.
I received mine today. No ears. I just used the double side tape to the alternator. The zip tie wasn't long enough. I used rhino ramps and it took about 20 minutes. I may redo it and check the zip ties and what not. Ideally I'd like to convert to a bolt on device. I used a very skinny tiny flathead screwdriver from a Kobalt set to manipulate the pass side grey clip, that took longer than everything else.
Recommend you review Shrimp $/2292 installation guide and watch Flat 6 Motorsports video. As Shrimp/22992 recommend, use two, 14 inch zip ties to lash the box down to the alternator cover until you decide on how you want to bolt it on. The tape alone will not hold it. Routing is important. The Shrimp$/22992 guide also shows recommended routing and zip tying of the excess cables..https://rennlist.com/forums/992/1346...ontroller.html
Best wishes.
Good point. It is zinc plated, not galvanized (so even worse than galv with respect to rust prevention). But i�ll take my chances with it though. Any moisture that may get on it should be quickly evaporated by being in the hot engine bay and all.
On a different note: why not just bolting the supplied black bracket to one of the corners? One screw should hold it just fine. Why adding a second bracket?


 06-07-2023, 05:47 PM