adjusting valves on a 3.3 1991 turbo
 02-25-2006, 05:36 PM
#1

i want to adjust the valves myself on my 1991 3.3 turbo does anyone have any instructions for doing this on a turbo i have read up on adjusting the valves ie slight resistance between the valves but have a few questions
1. where do i get the special feeler gauge for measuring the gap
2. do i adjust the valves eg valve 1 at the top pf the engine first and then underneath and what sequence do i adjust them in
3. when tightening the 13mm retaining nut do i need to use anything like loctite and how tight should i do these as my worst nightmare would be the adjusting screw/retaining nut coming loose and goodbye to my engine
 02-25-2006, 05:59 PM
#2
Addict
Rennlist Member
Rennlist
Site Sponsor
Rennlist Member
Rennlist
Site Sponsor
With the questions that you have asked I'd definately purchase a 930 manual or purchase a Bentley manual for a air-cooled 911. I'd also pay a friend or mechanic to show you the ropes for the first time you adjust the valves.. There is to much at risk.
02-25-2006, 06:26 PM
#3
kevin i must sound like a beginner lol i have the carrera 2 bentley mannual i know how to adjust them seems fairly easy from reading the mannual just getting a second opinion i have done a engine conversion in my other car took out the power steering rack out my turbo 2 today to have it reconditioned so i presume the valves cant be to difficult
02-25-2006, 07:16 PM
#4
Nordschleife Master

Originally Posted by 911 2
1. where do i get the special feeler gauge for measuring the gap
Originally Posted by 911 2
2. do i adjust the valves eg valve 1 at the top pf the engine first and then underneath and what sequence do i adjust them in
Originally Posted by 911 2
3. when tightening the 13mm retaining nut do i need to use anything like loctite and how tight should i do these as my worst nightmare would be the adjusting screw/retaining nut coming loose and goodbye to my engine
 02-27-2006, 01:14 PM
#6
Burning Brakes
Join Date: Jun 2001
Location: Stockholm, Sweden
Posts: 1,232
Likes: 0
Received 0 Likes
on
0 Posts
There are kits to buy with gaskets and nuts, the nuts needs to be replaced everytime.
The valve cover nuts are tightened to 10-12Nm if I rember correctly and only tighten more if the cover leaks otherwise they warp.
At www.appbiz.com you can buy silicon based gaskets (never tried them).
Some do a partial engine drop to have better access to the top, some don't just a little bit harder.
Here are some useful links:
http://www.pelicanparts.com/techarti...lve_adjust.htm
http://p-car.com/diy/valvecover/
Good luck!
Trending Topics
02-27-2006, 03:54 PM
#8
Burning Brakes
Join Date: Jun 2001
Location: Stockholm, Sweden
Posts: 1,232
Likes: 0
Received 0 Likes
on
0 Posts
Originally Posted by 911 2
staffab are you referring to the cover nuts and not the nuts on the valves
I am refering to the cover nuts.
03-02-2006, 07:52 PM
#9
im going to do this myself what exactly needs to be removed before i can get clear access to lower and top covers does the exhaust have to be removed im putting the rack back on at the monment so ill have a look at the set up of the car ffrom underneath next week
im going to use the silicon gaskets but dont know where i can get them from the uk any ideas
im going to use the silicon gaskets but dont know where i can get them from the uk any ideas
03-03-2006, 07:39 PM
#10
Burning Brakes
Join Date: Jun 2001
Location: Stockholm, Sweden
Posts: 1,232
Likes: 0
Received 0 Likes
on
0 Posts
it's been a while, not sure I remember everything, but here i goes:
Jack the car up and remove rear wheels.
Right side: I only think you need to remove the muffler and cover plate between lower and upper valve covers.
Left side: remove the wastegate with the exhaust pipe attached and loosen the cover plate, unplug the o2 sensor inside engine compartement, just move the cover plate out of the way, no need to remove it all together (it hangs in the o2 sensor wiring).
Remove the spark plug wiring and tuck it away.
Not sure I remember everything, but it will be very obvious what to remove when you start working on it.
03-04-2006, 08:49 PM
#11
taking the exhaust off on both sides is not going to be easy its going to be seized solid need to get out the blow torch air con pump has to be moved aside
do the cover plates come undone from the bottom or top of the car
do the cover plates come undone from the bottom or top of the car
03-05-2006, 08:05 AM
#12
Burning Brakes
Join Date: Jun 2001
Location: Stockholm, Sweden
Posts: 1,232
Likes: 0
Received 0 Likes
on
0 Posts
I don't think you would need a blow torch, it's not the whole exhaust, just wastegate, wastegate pipe and muffler. I don't have an a/c compressor anymore, but I don't remember having to move it when I had one.
On the left side you only need to undo the four bolts holding the wastegate to the collectorpipe, remove the bottom and top pipes for the wastegate and lift the whole thing off, it's a bit tight but it works. If you still have the airpump plumbing you also need to undo the large nut underneath the rubber hose. On the left side all the bolts for the cover plate is from underneath.
On the right side, remove the clamp between catalytic converter and muffler, undo the two bolts in front of the muffler and the whole muffler is off. The cover plate on the right side has most of the bolt from underneath, I think there are 2 bolts from above.
03-05-2006, 08:33 AM
#13
Burning Brakes
Join Date: Jun 2001
Location: Stockholm, Sweden
Posts: 1,232
Likes: 0
Received 0 Likes
on
0 Posts
Just to be clear, what I mean with cover plate in the post above, is the steel plate protecting the engine from dust, removing it will give you acess to the top valve covers from below.
All the valve adjustment work will be done from below.
All the valve adjustment work will be done from below.
03-05-2006, 06:19 PM
#14
i thought the valves at the top are done from the top are they easily accessible from the bottom do you have any pics of what to remove, are you referring to the left side as the passenger side, the air pump is still plumbed why would i need to do this large nut from uunderneath does it get in the way, am i correct in thinking i dont ned to remove anything from the top eg intercooler etc i just put my new rack on today waiting for the tie rod ends should have arrived two days ago i will then jack up the rear and have a llok at exactly what needs to be removed
03-06-2006, 02:49 AM
#15
Technical Guru
Rennlist Member
Rennlist Member
Originally Posted by 911 2
i thought the valves at the top are done from the top are they easily accessible from the bottom
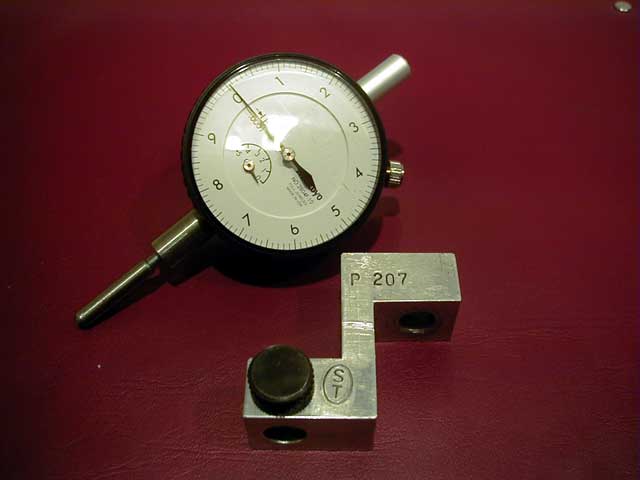
 And if you've never used a feeler gauge before you might want to "check" your work with a dial gauge indicator (second image below). Its definitely not required (and will actually slow you down once you know what your doing) but it will give you a little more confidence and something to compare your measurements against.
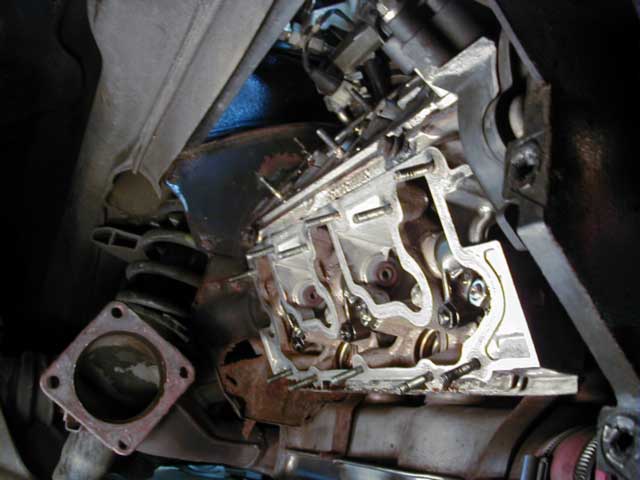
Photo is from my 964RSA but from underneath your 964T the view will be the same.