


Body Restoration

Thread Starter
Rennlist Member

Joined: Jan 2002
Posts: 739
Likes: 90
First hiccup, likely not the last.
This part has gone lost. I am sure I put it in with the rest for plating. The plater is sure they did not lose it.
Funny thing, both sides got lost.
Anyone have a spare (or two)?
This part has gone lost. I am sure I put it in with the rest for plating. The plater is sure they did not lose it.
Funny thing, both sides got lost.
Anyone have a spare (or two)?
Thread Starter
Rennlist Member
Joined: Jan 2002
Posts: 739
Likes: 90
I realise I am going on a tangent there, but figure, I might as well document all that is happening during that body resto work in this thread.
As I mentionned above, 2 small door parts have gone lost. They are the axles of the fulcrum point that move the door lock ****, and the axles of the knurled **** in the door panel at the same time. I took the parts completely apart for plating, but these 2 disappeared along the way. As of now, I suspect I threw the away by mistake.
Anyway, Porsche PET: 320$ the pair. Right. Not happening either.
I have had this small modelist lathe for a long time. It is not very precise, but works OK for aluminum, and I can get close enough tolerances with careful setup. I took some 12mm alloy stock rod that I turned down to 10mm, threaded outside at one end and inside at the other, and cut the relief for the clip, then filed the square end for the turnknob.
The plate I cut out of steel plate, drilled for the rod clips and threaded for the axle. Assembled the 2 with loctite. Not the mechanically strongest, but I realise I never used the ***** to lock the door, with the central locking at the touch of a switch on the center console.
They are not as nice as all the yellow plated parts, but with a lick of paint will be presentable, and they are well hidden anyway.
Thread Starter
Rennlist Member
Joined: Jan 2002
Posts: 739
Likes: 90
Captain, I have contacted my rim guy. He says he can most likely slice and narrow a wheel, but he needs pics. PM me is needed.
Back to questions: does anyone have the details of the wiring for the license plate lights? I know the harness leaves from the lateral hole in the right rear light bucket, but I don't know its correct routing.
Back to questions: does anyone have the details of the wiring for the license plate lights? I know the harness leaves from the lateral hole in the right rear light bucket, but I don't know its correct routing.
Thread Starter
Rennlist Member
Joined: Jan 2002
Posts: 739
Likes: 90
Well after over 2 months, back at it. The long wait was in part planned, in part not, but is not an issue, since I am so busy this summer, I won't be able to assemble it anyway if it were finished tomorrow. So all is fine.
Discoveries:
-The left rear fender was at one time bashed in real good, likely from a rear-ender. It was about 10mm forward of where it should be. No wonder the rear light always fitted badly. All pulled back in line now. There is still a crease, and the plate covered a hole in the fender. Still some work to do, including metal forming.
-There were...... 11 layers of red paint on the rear left fender
-The rear window frame has been repaired in the past, but from overzealous grinding, the sheelmetal has worn through. Not rusted now, only worn so thin it actually disappeared on the edge.
-The right rear fender had a few holes high up, that line up with the foam that is placed in to avoid water splashing up into the C pillar.
-Small rust damage on the sill by the driver door, already repaired, needs to be leaded in.
Otherwise not many surprises. the work should be done by November, with some subtles mods.
Pics below.
Pro

Joined: Apr 2009
Posts: 664
Likes: 24
From: London UK
Good to see you getting stuck into another Resto George, look forward to the following updates.
FYI there is a guy in the UK that does pretty much a full set of replacement tubular steel supports for �130 inc a few not shown in your pics - let me know if you would like his contact details.
FYI there is a guy in the UK that does pretty much a full set of replacement tubular steel supports for �130 inc a few not shown in your pics - let me know if you would like his contact details.
Rennlist Stories
The Best Porsche Posts for Porsche Enthusiasts

9 Features and Characteristics That Only Porsche People Understand
Verdad Gallardo
I've Written 500 Rennlist Articles: Here's How Porsche Has Changed Along the Way
Joe Kucinski
10 Most Unnecessary Porsches Ever Built (And Why We Love Them)
Verdad Gallardo
Porsche 911 GT3 S/C vs 718 Spyder RS: 10 Categories, One Winner
Joe Kucinski
This Builder Is Turning Heads With Its Slantnose 911 Creation
Verdad Gallardo
Porsche 911 GT3 Artisan Edition Pays Homage to Japanese Culture
Verdad Gallardo
Porsche Reveals Coupe Variant of the Electric Cayenne With a Fresh Look
Verdad Gallardo
10 Porsche Colors That Have More Personality Than Most People
Verdad Gallardo
Guntherwerks' Final Speedster Creation Is the Ultimate Porsche Restomod
Verdad Gallardo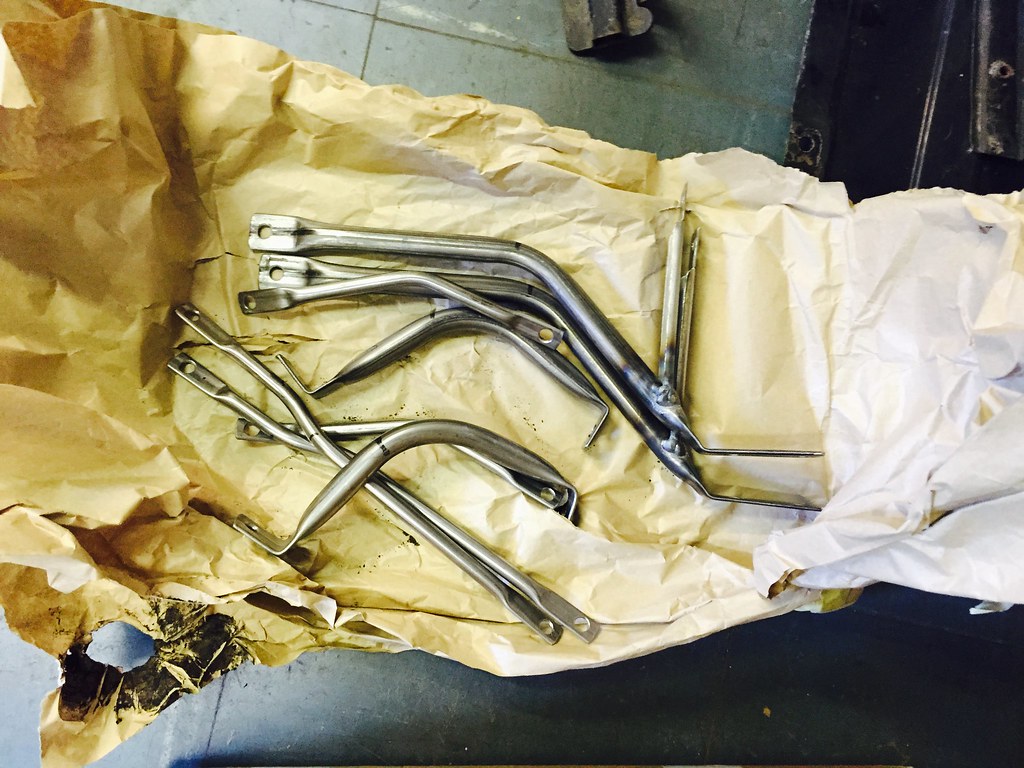
Pro
Joined: Apr 2009
Posts: 664
Likes: 24
From: London UK
He does do alloy ones and he sent me some to compare but tbh the weight dif. was marginal and the steel ones feel a bit more robust.
Rennlist Member
Joined: Oct 2003
Posts: 24,111
Likes: 3,217
From: New Jersey
There is a TSB regarding the supports. They modified both the front and rear to prevent cracking of the body around the rear tail lights. The single bend piece is the old style the newer ones have the extra support.
You want the one on the left if you can have them made that way.
You want the one on the left if you can have them made that way.
Thread Starter
Rennlist Member
Joined: Jan 2002
Posts: 739
Likes: 90
Work is progressing. It is good to see that they are actually straightening the bodywork and using lead (tin) instead of lathering the bondo on and sculpting (which was done abondantly in the car's past).
They kept the nasty left rear fender and rear window frame for last, when they are well in the groove. Me Happy.
They kept the nasty left rear fender and rear window frame for last, when they are well in the groove. Me Happy.