When you click on links to various merchants on this site and make a purchase, this can result in this site earning a commission. Affiliate programs and affiliations include, but are not limited to, the eBay Partner Network.
Last step on the Silver car interior, the seat hinge covers. These are USD 60 each new, so while it would be preferable to have new Black ones, the budget will only allow painted Linen ones right now. Three coats of Porsche Black plastic paint and all sorted.
I�ve been doing quite a few oil changes recently and have a dilemma with torquing the engine drain bolt.
The torque specification is 32ft lbs or 50 Nm. This is too high for my smaller 1/4� torque wrench which would fit in the space between the heat exchanger and drain bolt. The 1/2� torque wrench with a normal 15mm socket is too large to fit in the gap. I looked for a shallow socket but couldn�t find one. There is a spanner type torque wrench available but that is $$$. What are others using to get the correct torque?
Apparently there is a limit to how much grease a CV joint can hold.
Fill the joint but put nothing in the boot! And you can also use 3M Scotch seal 750 between the large end of the dust boot and the sealing flange joint.
Snap-On Torque AdapterFill the joint but put nothing in the boot! And you can also use 3M Scotch seal 750 between the large end of the dust boot and the sealing flange joint.
That's a very nice tool and looks specific to Snap-on. While drain plugs are cheap I still think it's worthwhile doing the torque value correctly.
Noted on the CV joint. I think it might have been you that warned me previously about overdoing the grease
Phase one of the light refurb on the 1990 Silver C4 “Project” car is finished. Phase two and three would be paint and engine, but there is no immediate need and those will be a future owner’s decision.
Items done:
New Battery
Left rear indicator - replaced with better used and reskinned
Right rear indicator - replaced with better used
Centre indicator - replaced with better used
Front indicators - replaced with better used
Rear decal - replaced with better used
Fix odometer
New front badge
New front Bilstein B6 shocks
New rear Bilstein B6 shocks
New H&R sports springs
New rear bump stops
New front strut stop gaskets
New front strut mount
New frunk struts
New engine lid struts
New interior Sliverknit carpet,
New Silverknit door pocket carpet
New front leather seat covers
New rear leather seat back covers
New rear leather seat squabs
New vinyl rear quarter covers
New vinyl door cards
New vinyl B pillar covers
New aluminium door kick plate panels
New plastic seat trim fittings
Used leather 964 steering wheel (excellent condition)
New steering wheel indicator ring
Brand New Hankook tyres
Used 993 seat belts. (Better condition than originals)
Used black door pulls and bin lids (colour won’t wear off)
New driver door seal
New brake pads
New Brake pad sensors
New Brake anti vibe shims
New Keinzle stereo with Bluetooth and Telephone functions
New Kenwood sub woofer
New Rockford Fosgate front speakers
New First function gear ****
Fit rear wiper arm (original broken)
Interior gutted then covered with Dynamat and Dynaliner
New Foam and rubber under rear seat squab
New RS engine mounts
New console cup
New handbrake position sensor
New interior door handles
New ignition rose cover
New door cap covers
New mirror adjust ****
New driver door light switch and cover.
New driver window switch
Fit used 964 cigar lighter (missing)
Replace fan control ***** with better used ones
Remove window tint
Remove after market alarm
New driver door window motor with new OEM Porsche door membrane
New carpet over-mats
Replace spoiler controller with later digital version to fix fault
New spoiler curtain wall
Replace rear fan motor
Replace sunroof seal
Replace 3 CV boots
Powder coat cooling fan and install new hub bearing
Replace alternator with good used one.
Replace alternator and cooling fan belts
Brake fluid change with full 13 point brake bleed with RBF600
Oil and filter change.
New air filter.
Cup 1 Wheels refinished
Replace rattling secondary muffler with good used one
Replace cup pipe with original primary muffler.
New wiper blades
New engine bay decals
Much of the work would not be possible without the knowledge and support from the Rennlist community. Thanks to all that helped
Despite fitting my spare parts in some cases, the purchased parts and upholsterer labour came to USD 16,300. I believe the work done would be completely uneconomic if given to a workshop.
When you put a new part next to an older part, you will want to replace the older part.
The ordering process will test your patience. Parts are delayed, wrong parts are ordered, wrong parts are supplied. Some parts are outrageously priced.
Trades will test your patience e.g. my seat backs sat part finished with an upholsterer for a year.
If you put after market parts on your car and sell the orignals, then to put it bluntly you are a mug. When you sell your car, the buyer will likely want to discount the price by the amount to put it back to original. Try pricing an excellent condition 380mm steering wheel and see what I mean.
Try not to start a lot of tasks and render the car unfinished and undriveable for a long period. At some stage you will wonder whether the project will ever finish. Going for a drive is a great reminder why you are doing this.
As much as I love the 964 C4, having two is non sensical. The Project car will likely be in a new garage sooner rather than later. When it leaves my driveway for the last time I will be proud of every task completed on it, full in the knowledge that I can easily do this again, time permitting.
As a final note, this anecdote about Jobs touched me.
If there is one defining characteristic of Steve Jobs that has run like a thread through his entire career, it is a genuine obsession with the way that things are crafted. Not merely content to set specifications and see that they were met, Jobs frequently went above and beyond to ensure that the products he had a hand in were made in the best way possible.
In the biography of Jobs, Walter Isaacson reveals the likely source of this focus on craftsmanship, Jobs adoptive father, Paul Jobs.
Paul Jobs was a mechanic, good with his hands and intelligent with his work, which largely focused on cars and then constructing metal parts for laser assemblies in Silicon Valley.
“I thought my dad’s sense of design was pretty good,” Jobs told Isaacson, “because he knew how to build anything. If we needed a cabinet, he would build it. When he built our fence, he gave me a hammer so I could work with him.”
Fifty years after the fence was constructed, Jobs showed it to Isaacson, still standing and recalled a lesson about making things of quality that he learned from his father. Touching the boards of inside of the fence, he said that “He loved doing things right. He even cared about the look of the parts you couldn’t see.”
He said that his father refused to use poor wood for the back of cabinets, or to build a fence that wasn’t constructed as well on the back side as it was the front. Jobs likened it to using a piece of plywood on the back of a beautiful chest of drawers. “For you to sleep well at night, the aesthetic, the quality, has to be carried all the way through.”
Final interior task (albeit there is one tweak I'd like to do to a door bin seam if the PPI this week is a fail). The rear seat squabs were glued down using clear construction adhesive and then weighted while they dried.
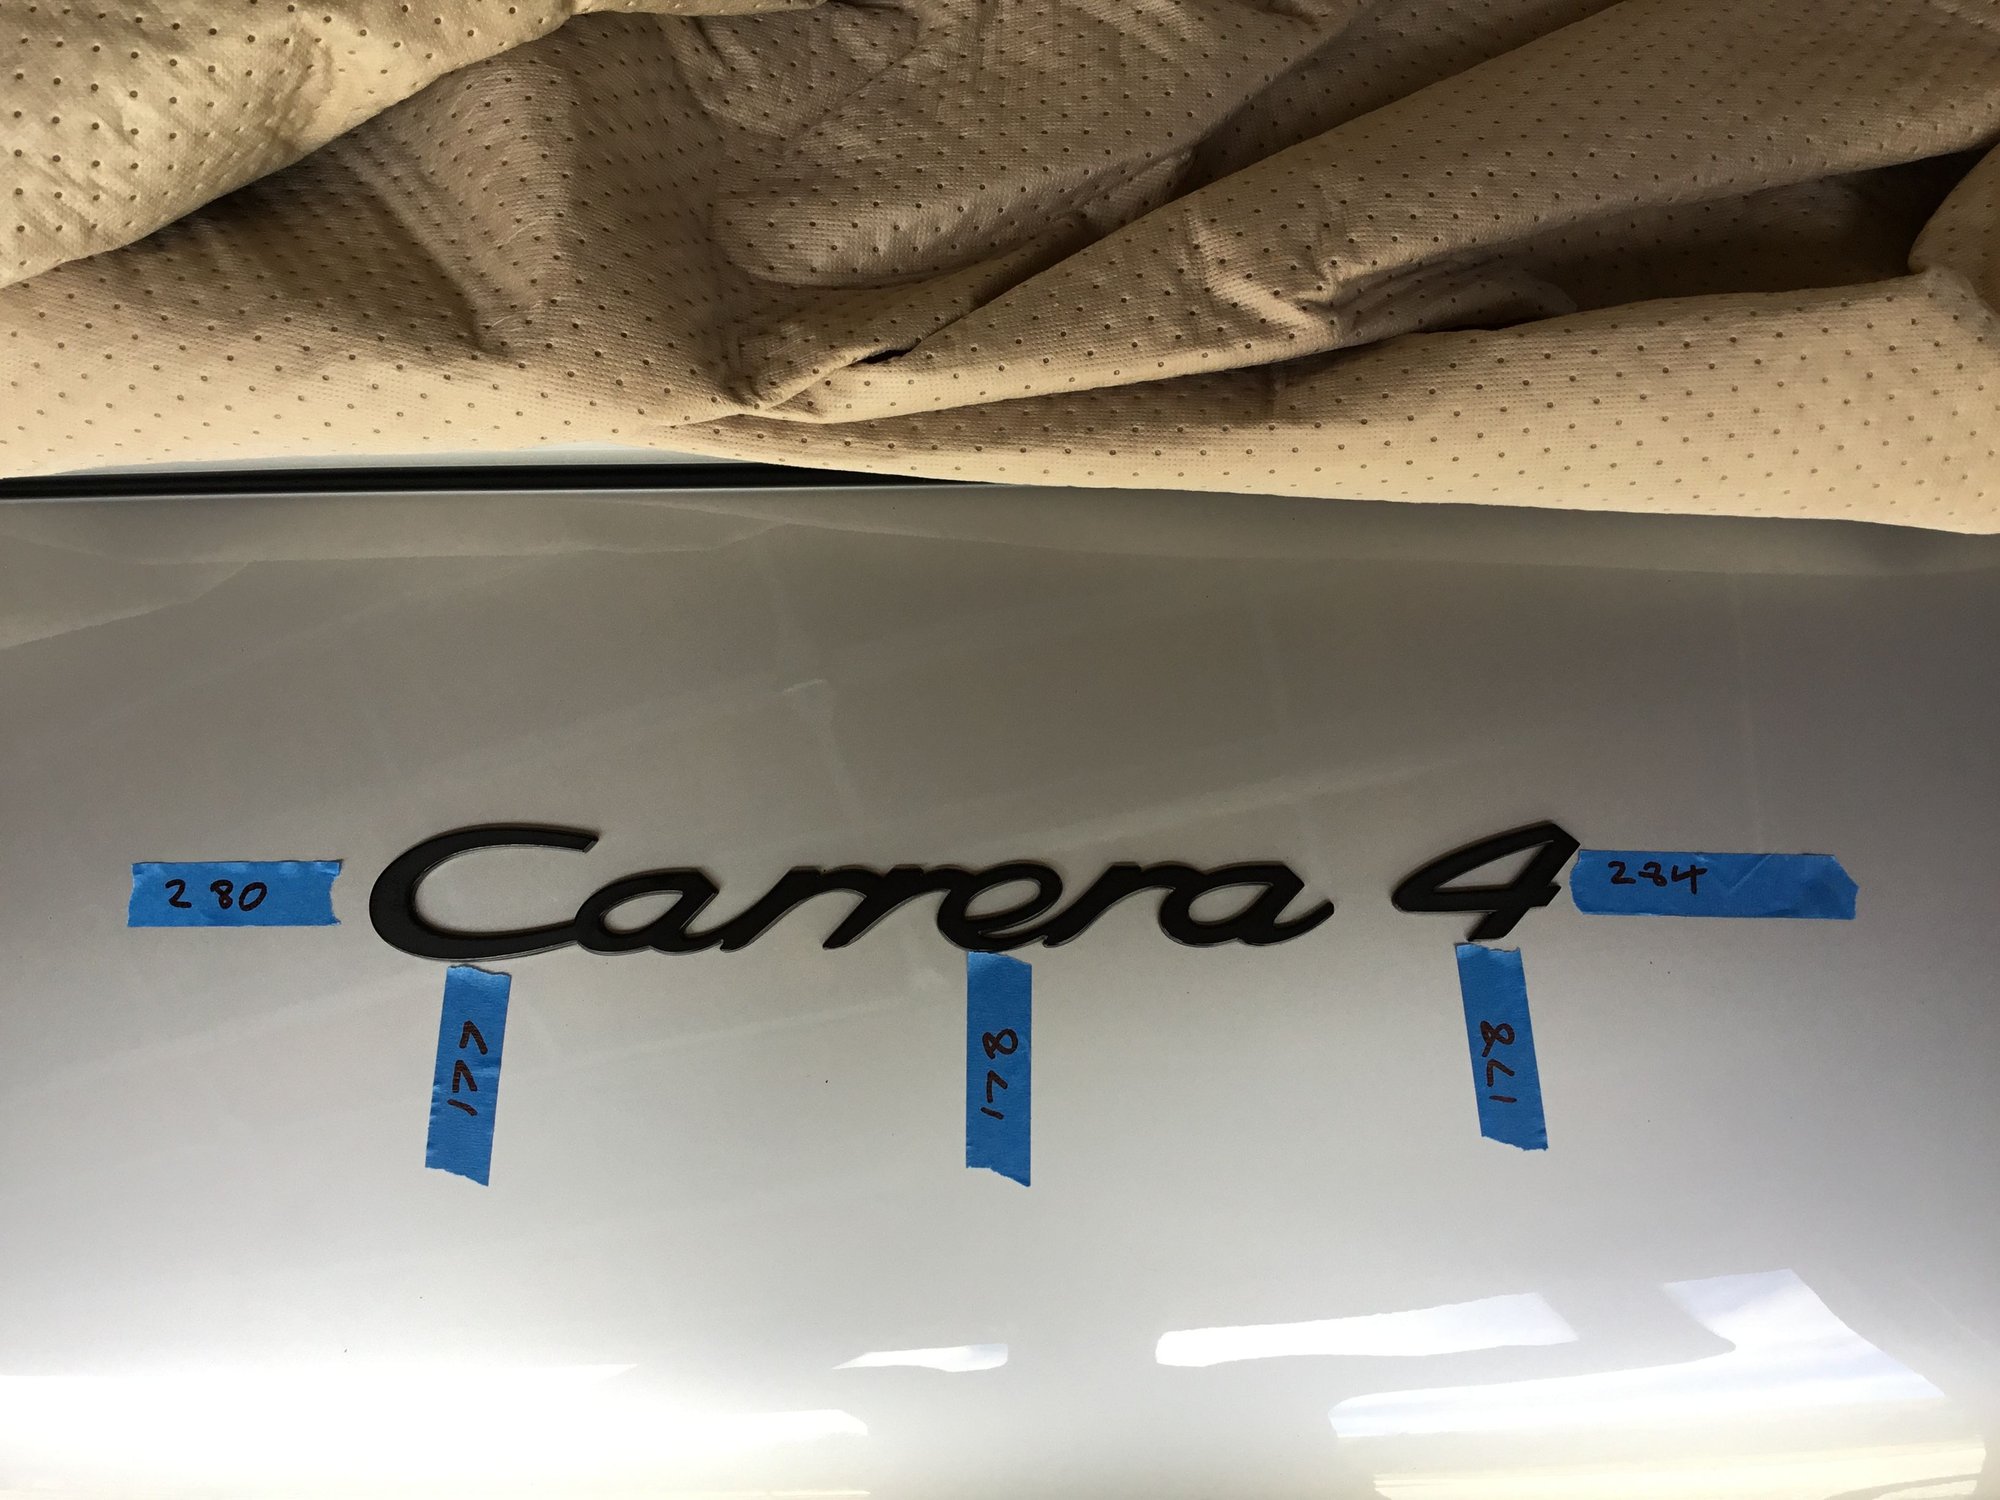
My White C4 had a fugly Techart tail. Its position on the decklid meant that the Carrera 4 badge was positioned lower than normal. Now I have a normal spoiler I want to place the badge in the correct position.
My Silver C4 badge has been replaced and I'm not sure if its position is absolutely correct either.
Can someone please check an absolutely certain original badge position to see if the measurements agree (in mm) with the attached image?
Number plates swapped between cars and visiting a local air cooled owner. '70, '82 and '90 showing clear lineage. The rebuilt engine has 130km on it and so far is completely dry


 01-11-2018, 01:28 AM