When you click on links to various merchants on this site and make a purchase, this can result in this site earning a commission. Affiliate programs and affiliations include, but are not limited to, the eBay Partner Network.
Here is what i remember - you need to use the 901 parts catalog to get the current part numbers for the seals. You should take the windows completely apart and get all the rest of the seals and rebuild them as new and refurb all the metal.
The lower trim- the early trim doesn't fit without modification- so i re-used the 964 trim and ran the pinch welt all the way around and made that work...it was a few years ago and i haven't done mine yet. It's on the docket to be done at some point when i have time...
But for now i have a car going through suspension madness and engine drop madness in my garage - and steering rack madness...
I have a stack of intakes to make for other guys - more intake madness...
And i just bought the cohline oil line tool because I'm sick of buying ****ty oem oil lines for too much money. And I'll just be making my own, and for others with the right materials and tooling.
Good luck w the project - post pics here so we can follow the progress!
Thanks for the response! I made some minimal progress today. Removing the rear quarter glass was pretty straight forward and didn't require a single tool. I started on the outside front of the B-pillar and lifted the seal away from the door seal to crack the glue. I then went inside and tucked the rubber seal along the top under the lip; started toward the front working my way to the back. At this point the window tilted out and a simple lift of the window dismounted the bottom seal. Overall about 10 minutes to remove the windows...removing glue is a completely different story. In the picture below you can see I started backing out the screws for the lower trim before I remembered to take a picture.
My windows won't arrive until next Tuesday and the hardware/seals will likely take about a week so for now the project is on hold. If anyone else is interested in the parts list, I've included what I've ordered below (and will update if any of the parts don't work):
Glad to hear you bought the Cohline tool. I've been debating whether to buy it or send my lines out for refurb.
You know about the cutting and drilling and tapping and the headliner has to come out...which is all windows out...right?
Yes sir. You had a great write up starting around post 670 of this thread. I've gotten through the cutting and drilling for metal removal on the B-pillars; won't cut the receiving slots for the hinges until i receive the windows. Some neanderthal at the factory got a little crazy with the spot welds, but overall it wasn't much of a fight with a drill and cold chisel.
I'm pretty sure it may be possible to install the windows without fully removing the headliner. The front bolts are easy enough to tap by pulling back the leather on the B-pillar:
As for the c-pillar, I believe those holes can be tapped through small holes in the headliner since the jacknuts will be covered by the metal base of the pop-out hinge. I've located the holes without removing the headliner (see faint dimples highlighted in red below).
In the end it doesn't matter since I'm pulling the glass/headliner for a respray anyway, but for the sake of the forum and general knowledge I will try to install the windows without removing the headliner first.
Sounds like you have it all together. Good. I was hoping you wouldn't get half way in and realize this. Feel free to call if you want to go over specifics. If you are in the states, pm me and I'll pass you my cell number.
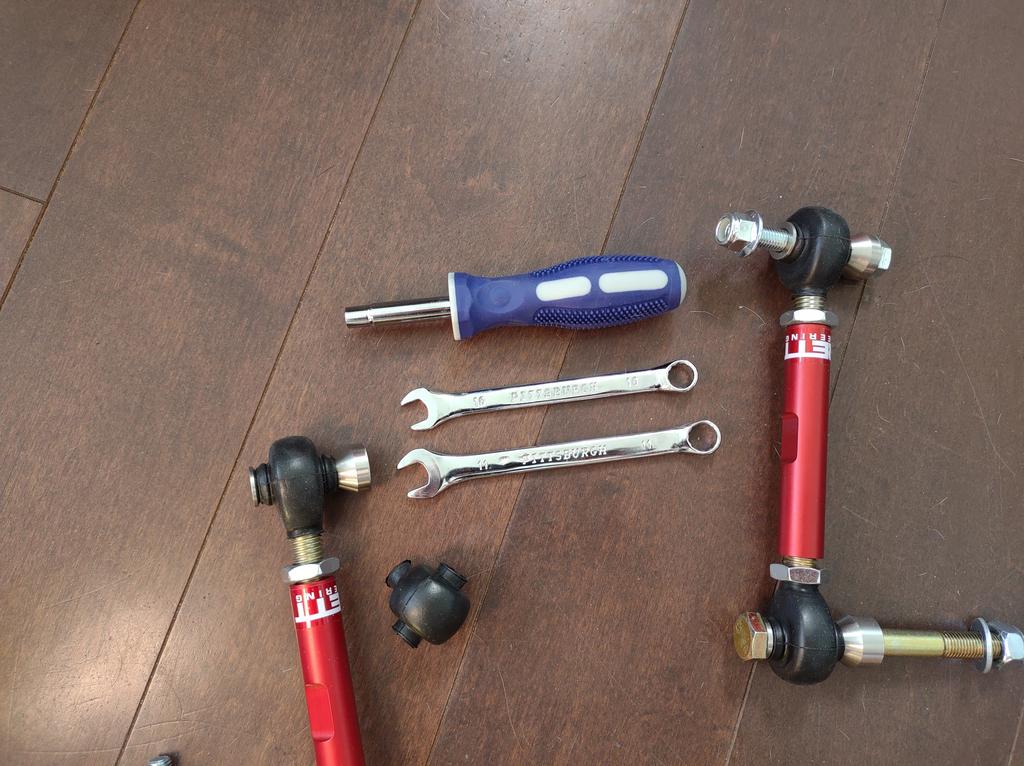
For those who don't have the special tools to install end link boots. Here's a simple way to do it. Takes 10 mins top. I hope someone finds this DIY helpful down the road. No special tools required.
Tools:
2x 10mm spanners(I used 10mm and 11mm),
A screwdriver with a fat handle.
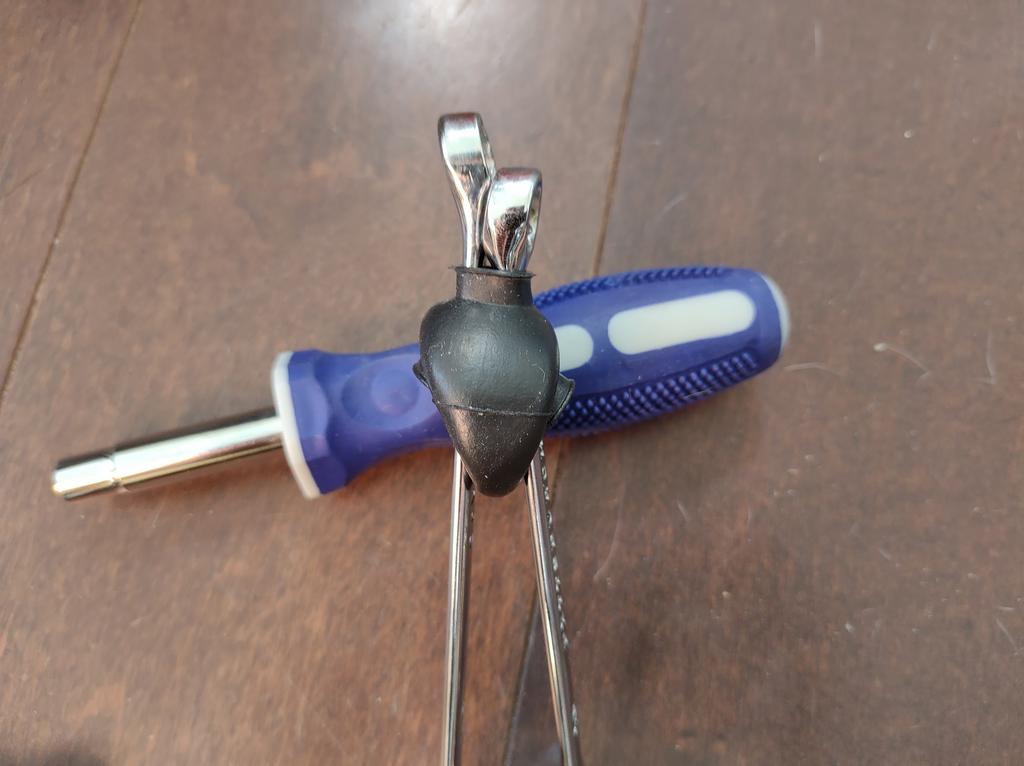
Method.
1. Slot the spanners from side holes through the bottom hole. As in the photo.
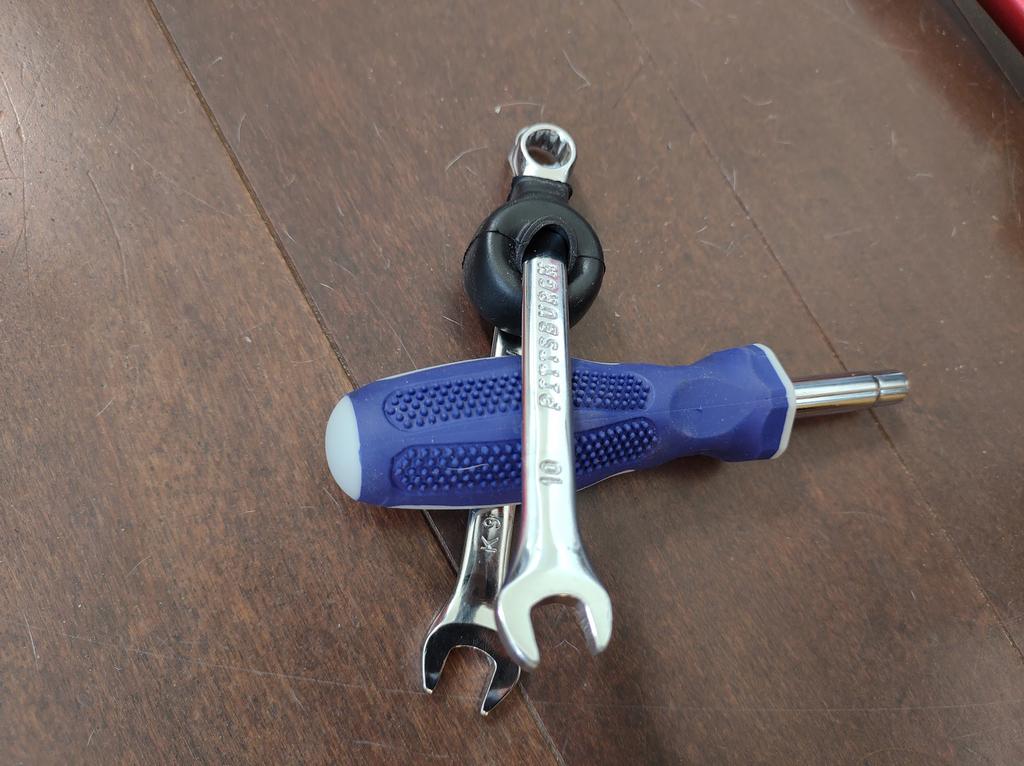
2. place the screwdriver handle between the spanners
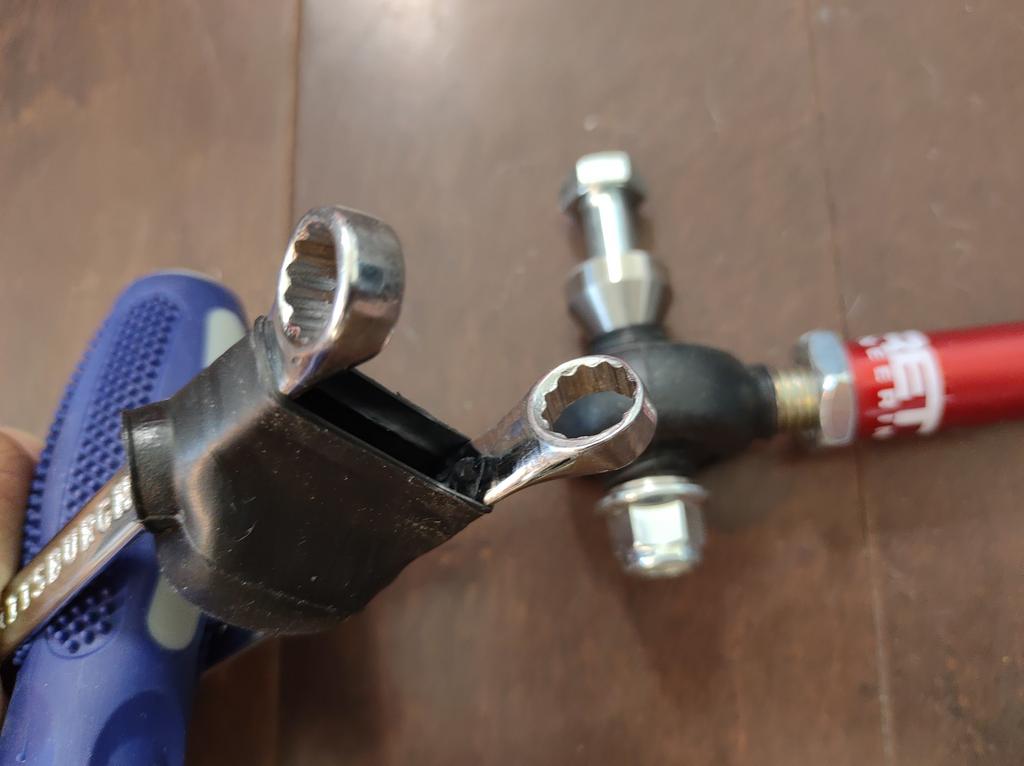
3. squeeze both spanners end together with the screwdriver handle in place. Doesn't require much effort to make the opening big enough for the rod end to go into the boot.
That's it. use some lube if needed. I found hand soap helps to get the spanners out after the rod end went into place
Great thread, First post on Rennlist. I just purchased new cv axles for 92 c2, planned on swapping out full assembly in order to avoid replacing the four cracked boots and dealing with the grease. Ive rented a two foot 1/2 inch breaker bar and 32 mm socket from autozone
and planned on hit hub nut with pb and letting soak this week. I planned on swapping these out myself in the parking lot of my apartment with only basic hand tools. Ive got to have car drivable by monday morning or major neighbor problems will arise. Am I being overly confident that I can swap the cv axle assembly out in two days? Im figuring that if I can't break the two hub nuts loose I can just stop and if I get them loose then its really a matter of six allen heads on the cv side, slide out, grease new assembly with anti seize and reverse install. What am I missing?
Oh and How do I add a picture of my car on my user name?
Last edited by DaviMcK; 11-01-2020 at 11:36 AM.
Reason: addition
I did my axles the first time in a parkinglot in what sounds like the same manner..
I did - actually- buy my 1:3 torque multiplier for that job...so i had that. The job is as easy as you think- so don't sweat it.
First- the 2 foot breaker is a little small. You may need a pipe on that to break the bolt loose. It's only 339 ft lbs of torque when you put it on- but it's been on there a while and so will likely require quite a bit to break it loose.
Second- they "should be allens", but may be xzn bolts. So be mindful and ready to use a different tool. I use a long facom 1/2 drive allen socket. Don't be lightweight when you squeeze the boot to get the alllen on the bolt- you will see when you get there.
Third. Stick a screw driver into the brake rotor to keep the axle from rotating when you crack the bolts.
Fourth- you may need a plastic hammer to tap on the end of the axle to get it out of the hub...
Drop the inner cv first and then pull out and down - easy breasy.
Good luck w the job. I know you said you needed the car for Monday. I'm just seeing this Sunday night- hope it went well if you dove in...
hey Goughary, i'm taking the chance to thank you for this valuable post. It helped me decide to go further with my KW v3 and avoiding the pitfalls you've identified already. Like the 12mm versus 14mm lower bolt on the front.
I've been through another issue which i share here and for which I thank you again for the advice : the set i bought (second hand) was a pre 91 version (despite all my questions), while my 964 is post 91.
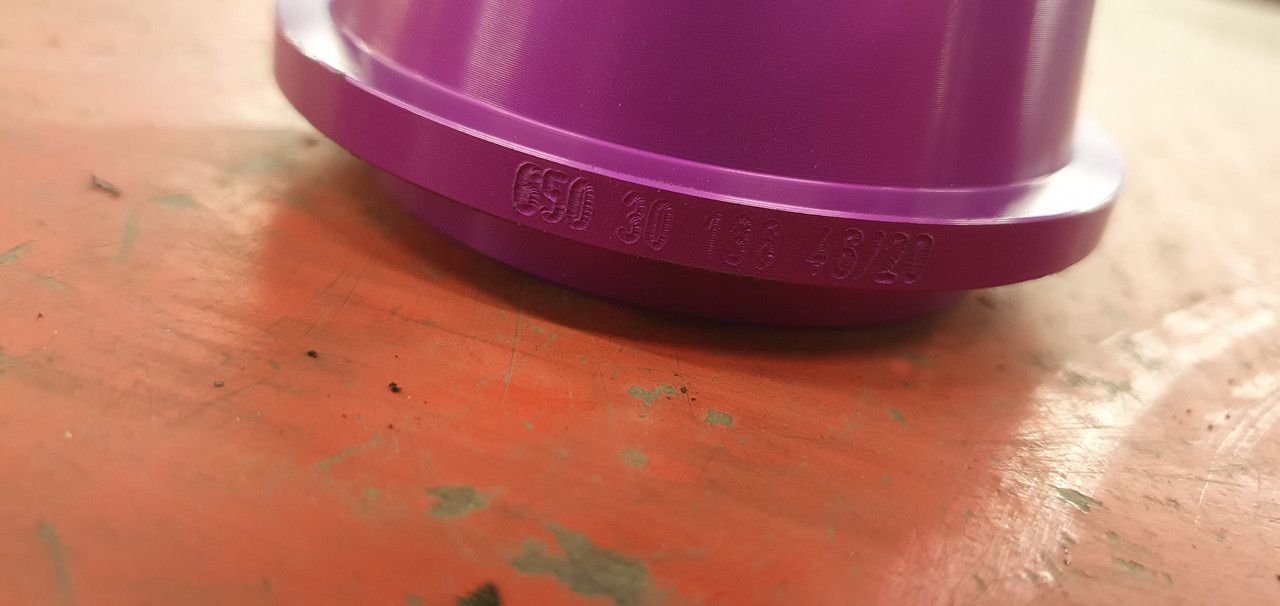
I've finally managed to adapt the rear with a specific part ordered at KW : 65030136. Which will allow to sit the original 964 rear top mount onto the KW. Worked for me at least. Everything is now fitted as it should
That's awesome- do you have any pics of the setup? The adapter?
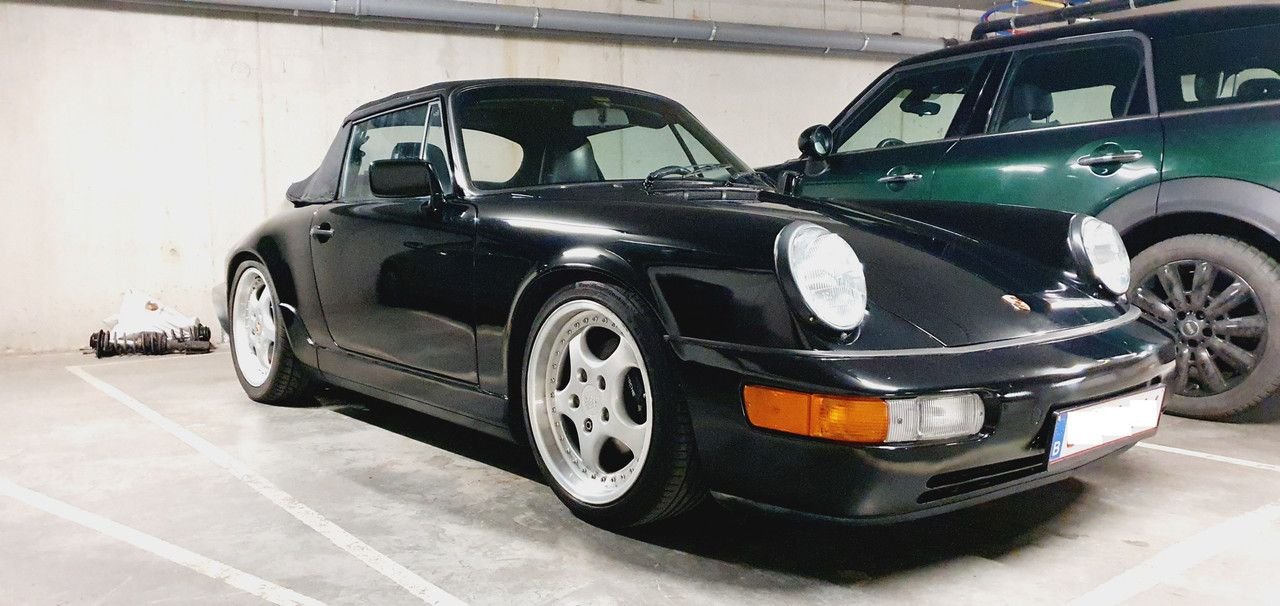
Let's see the car!
What else did you end up doing to the suspension? I have the enso/joe/bigmike/nowGregg Amazon green car (see somewhere in the middle of this thread) finally coming in next week for full suspension madness after all these years!
Yes- we need a better name for that car...but provenance being everything....and that car having brought me many great relationships...
I have the enso/joe/bigmike/nowGregg Amazon green car (see somewhere in the middle of this thread) finally coming in next week for full suspension madness after all these years!
Yes- we need a better name for that car...but provenance being everything....and that car having brought me many great relationships...
Idk....maybe we call it Ejbgmkngrgg?!
Love it.... if there wasn�t salt caked all over the roads I�d drive up just to witness the madness!
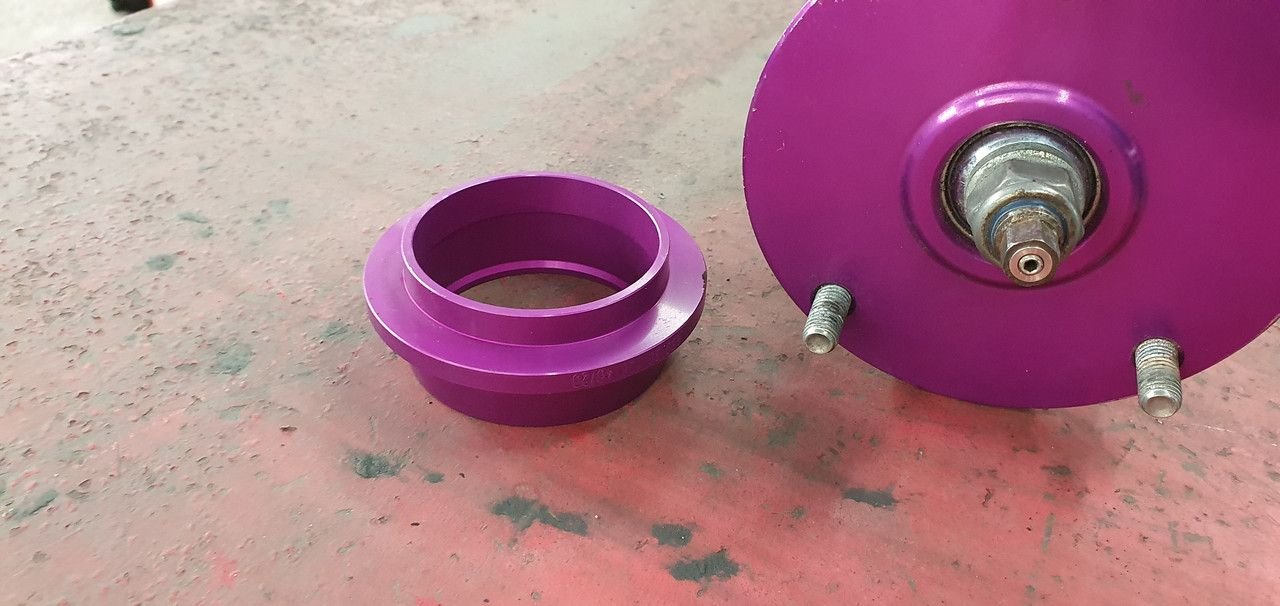
so here is the piece i replaced - as a reminder - it allowed me to fit the pre 91 version of the KW v3 set on a post 91 car, as well as using the standard top mount instead of the unibal version supplied with it.
replacement part from KW left side is the replacement part, right side you can see the supplied top mount for the rear of the 964 pre 91 (the 2 bolt you see won't fit a post 91 car as they are too far apart) coilover as supplied by KW. the purple part in between the top mount and the yellow coil has been removed and replaced by the other one. Top is replaced too for the original porsche one.
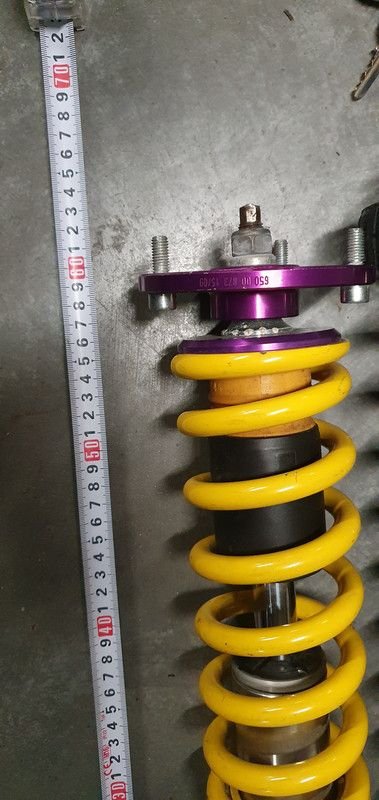
And this is how it looks like once all is mounted and geometry done. I love it. (the look AND the handling which has much improved compared with the boge setup)
Amazing content here, thanks all for contributing! Re: sway bars, I see Goughary choosing H&R. I�m trying to make sense of RS vs Eibach vs H&R. Have MCS 1-ways with 300 / 450 spring rates. Any suggestions or recommendations? Car is a Targa and for weekends and fun roads only.
Thanks to @Goughary for always been there in my 964 ownership journey. All of his knowledge allowed me to save up and prepare for the list I need to do� most of them in this thread!
As to the prior above- I'm a little late in responding - completely missed the sway bar question.
I like my H&R sways. They offer enough adjustment to get things balanced- as do the RS bars.
For a targa- you really have to ask how far down the rabbit hole you want to go. Much like a cab. You can make them handle fantastical well...but, you would need to work on the classis rigidity in order for any real major changes to make sense from a "track/performance" perspective.
So with that said, if it were me- I'd probably keep the oem front bar, add the h&r rear bar, first, then do the suspension and those goodies, and then if i could get the chassis to stop twisting and shaking, then if i wanted real heavy duty handling and i was getting the grip needed to warrant it, I'd go to the front bar as well. Really depends on how you want to drive the car and how you want it to feel. I have a feeling the rear bar alone will make enough difference that you will enjoy- and the added benefit is the car will still feel compliant and "normal" buzzing around town.

 06-17-2020, 11:22 PM