When you click on links to various merchants on this site and make a purchase, this can result in this site earning a commission. Affiliate programs and affiliations include, but are not limited to, the eBay Partner Network.
so a little over a year and about 8k kms since the oil change and 2 years now since the last engine drop
.. but things have changed! Lift in place and garage finished off a few months back so after work today the festivities began ... broke in the garage properly with a engine drop in record time (about 4 hours).
Gladly I have no aircon, heater blower, rear PS pump, cruise control, undertray, heat exchangers or other 'superfluities' ... longest time on a task were the 4 header nuts that seem crazy tucked away until you find the 1-2cm needed to crack them.
Engine out for a clutch ... thanks Steve W! - going with the RS clutch as before as it mates well with the LWFW and handles the 300+ hp better than stock. Thinking of upgrading the Motec M48 to lambda too while 'I'm in there". Changed the Crank Pos sensor to the new 996 type per the supersession .. PITA but much easier with engine out. Also need to do valves and maybe a little more engine bay tidying up - cadmium/zinc/silver coating here and there ... other suggestions welcome
Main tasks after clutch:
1. Need to sort out the harness strap angles ie higher mounting points for anchors.
2. Oily fins .. doesn't seem to be the valve covers or the tubes ... it's not dripping but untidy below .. worth pursuing??
Will update as thing progress ... enjoy the pics!
still dry up top
mystery pic ... the little lever below the vacuum 'thing' behind the intake on the right bank
... is there supposed to be something attached to the lever ie through the little hole in the top of the arm?
thanks Tim .. I got s tired of the carriage house with almost no room to open the doors!
Gave up the driveway and some garden but loving the indoor space and the easy access.
haven't had much time to strip everything but been going through the intake etc.. and cleaning up
the wetness .. not really leaks as it doesn't drop oil seem to be coming from behind the cylinders
looks like mostly 3 & 4 with some also on 6 and i think the airflow then deposits oil on the fins below the other cylinders.
3 is clearly the wettest on left bank
and 4 on the right
also some leak from the old favorites at the back on top - oil pressure sender and breather, which had a tear in the gasket .. maybe from me incorrectly tightening it down a few year back?
Can I use some locktite 574 or other sealer with the breather gasket?
also getting all the intake feet cleaned up, oil inside the intake as usual although I'm no longer overfilling - could it be the breathers? Would much prefer to breath to a catch tank instead and see if that keeps the intake dry. The plenum cleans up well and with some polishing and some nickel plating on the brackets I plan to get the intake looking a little more "cared for" ... it doesn't all have to be performance related
I see a few comments on very similar pics to mine of the the leaks going like this ...
"I would suspect most of the oil is from the through bolts that hold the case together rather than from the bottom of the cylinder mating with the case."
Is there a way to work out if that is the case or not? If I were to just replace the viton o-rings and not remove the heads, could I tell if that had worked w/o reinstalling the engine and running it?
I also found the answer (thanks Randy Webb) to the question re the o-ring lube (DowCoring 111 - like a vaseline for o-rings)
(but not yet re the oil pressure sending unit question .. I imagine as its a paer gasket you can use something - will keep looking)
"An O-ring should seal all by itself - it is designed to do that. You can even run quite a bit of pressure differential. Bottom line - if it doesn't seal with just a bit of lubricant on it, then something is wrong. So, use a new ring of the correct size, and check the bore and the channel. Do not use any sealant or goop etc."
and this via Ricardo
One of the magic things in life is that experience can help you grow.We have learned since the previous post that the best way to seal an engine case is with a series of glue in specific locations. We no longer use 574 to seal case halves.
Case sealing suggestions :
Outer case halves perimeter : Threebond 1194
Bearing web surfaces: Loctite 574
#8 Bearing O-Ring: Threebond 1211 Case Thru Bolts: Dow Corning 55 on Green Viton O-Rings
Flywheel Seal: dry
Front pulley Seal: dry
Intermediate Shaft Cover to Case: o-ring Dow 55, gasket style 574 Oil Breather Cover to Case: Loctite 574
Cylinders to Case: Curil T
Cam Towers to Cylinder Heads: Threebond 1104
Cam Chain Housings to Case: gaskets Loctite 574
Cam Chain Housings to Cam Towers: gasket Loctite 574
Cam Chain Housing Cover to Cam Chain Housing: Gasket Loctite574
Gaskets: Thin coat of Loctite 574
__________________
Henry SchmidtSUPERTEC PERFORMANCEPh: 760-728-3062
Email: supertec1@earthlink.net
ok so the second night went off ok .. left bank (1-3) heads off, pistons out (those circlips take a while!) and barrels & pistons marked and ready for a clean and then off to engineer to get miked up in prep for the head work (993 gaskets).
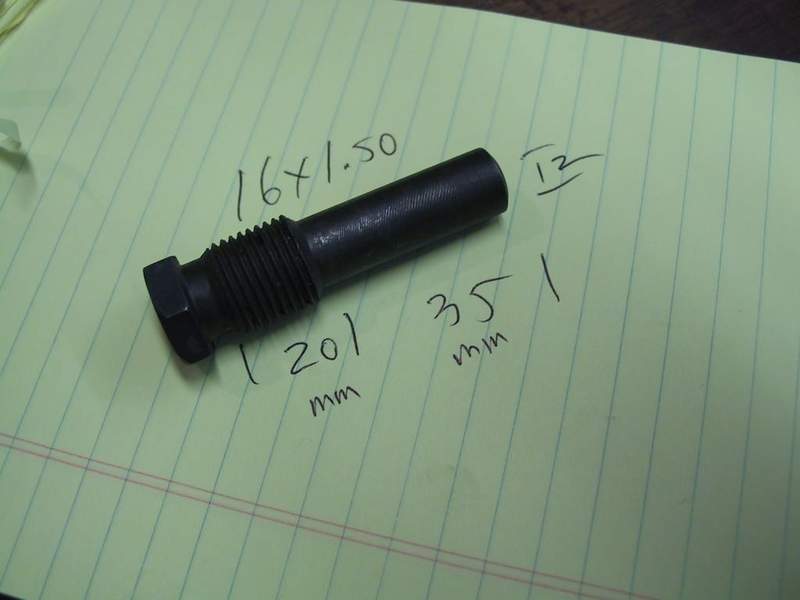
Also made the special bolt for pulley pop-off .. dropped into the local audi service centre and asked to look through their 'rubbish bolts' .. they have 5 big buckets of used stuff and the A4 & A6 CV joint bolts are perfect ... they're 65mm long M16 with 1.5 thread as needed ( Jason Andreas post) so if you make the threadless part 35mm and have 20+ mm of threaded bolt you're fine ... need to grind off or lathe 4mm off the 35mm long bit which is basically the thread and 0.5-.8mm .. luckily a friend nearby let me use the lathe and it worked perfectly.
took about 7 passes on the lathe .. the Audi bolt is tough but once the thread is gone its easy [/url]
also did the cut -away mod to the aircon/carrier bracket so if there is a next time (for me at least) the pulley doesn't hav to come off for the chain covers to be removed.
glad to see my engine carrier still crack-free with the small reinforcing done previously [/url]
plugs all foulded and dark thanks to a map which is far too rich - motec will be reviewed at the end
left bank heads show the blow by clearly ... 993 gaskets will hopefully cure that
first set of pistons and barrels marked for engineer .. the fins are clearly quite fragile so need to gently pry them off with a wooded paddle that spreads the load and go slowly .. was also a bit surprised by the lateral play between piston and barrel - not excessive but I guess its allowing for heat expansion .. ?
JE 993RS sized pistons only 15k old and look super (haven't even wiped them down) .. trying to keep everything in its place
green ring seals on the mahle sleevs look tired
aren't there supposed to be 4 spacer/washers on the left bank chain to cam bolt? hmmm
time for bed .. back and neck and feet taking strain after far too long sitting in a chair watching screens and typing emaills ... left over roof tile membrane comes in handy (absorbs the oil too)
Main lesson for the day ... be more careful with the little bits. I didn't have any circlips pop out and get lost in the engine (lots of cloth used around the piston etc.. but the woodruff key I wasn't so lucky .. can't see it yet or fish it out blind with my magnet probe (which is likely a bit too wide at the end for the task) but hope I can find it once the other heads are off tomorrow some time .. bit of a head banger but basically came from being a little too hasty. Such a small but tough piece of metal in there .. but will find it before anything else happens so won't lose sleep (yet)
.. well got the other heads off and rotated the engine a few times and glad to say the missing/dropped woodruff key came home. Schoolboy error but it's all learning curve.
lighter and lighter
a few shades lighter here too
borrowed this awesome snapon puller kit as the 3 point puller seemed to be risky re hurting the fan
works like a dream
right bank ready to be removed after the chain box is out the way ... took a while to work out how to get the top chain guide out
although the rt bank chain to cam gasket looked deadish flat and had a tear there doesn't seem to be much leak here
the main source is blowby around the heads .. very visible on this side too, especially on all 4 sides of cyl4
the case looks nice and clean inside and none of the surfaces have any gritty residue
some slight edge damage on the chain sprocket on the left side ... normal? replace?
The chain looks good and doesn't flex too much.
cheers T .. I always follow your progress which has been inspiring and full of great ideas!
I need to review your engine bay clean up re the N.L.necessary bits like canister, fuse box & work out how to alter the breather pipes re canister and catch-can rather than sending oil back into the intake.
But for now I have my hands full (and oily).
I've almost completed the strip down of the Rt bank head with just the valve spring compression and removal to go ... I recently did a set of 356 heads so hopefully that wont be much different and the tool I borrowed will fit the bigger heads.
Cam seems to be the stock cam - 964 246 (I expect the other should be 247 ie left) ... no numbers on the round (chain bolt) side as I've seen on the 993 RS cam.
I found the rocker shafts easy to get out except on which needed a tap with a socketed extension.
The small side allen key (long strong one) was easier to turn and never slipped and once the torque was released it went quickly .. also the larger side wasn't really necessary to counter-hold .. obviously needed on the tightening later but easier than I've read. I can see why stripping the head on those allen heads would be a nightmare to rectify - i used new keys. I made sure the bolts were clear and clean so the key located properly all the way in. I found using the keys to crack them worked well and then the ratchet to loosen, but before that I took the strain off the rockers by loosening the valve adjustment screws and backing them out a bit.
I'm hoping the RSR seals (thanks Steve) do the job here as there was some grime and oil in the spaces between the rocker housings although that could also be coming from the head/fan/road etc..
As an aside I've been looking for a way to replace the rotty always-waterlogged asbestos (?) heat proofing below the centre rear light (above the primary muffler - likely as much a cause of the crazing and cracking as the sun is for that plastic part) .. and found this off-cut at the track which looks promising. Neat 3m product .. not very thick but it's bling alone must count for something
Only question now is do I stick it above the ali foil piece (where the original stuff was) or below where its visible and likely to do more heat shielding .. but seriously, any input?
I've also been chasing a ting-ting-tiny bell like noise from the fan .. only developed it recently and obv this points to the bearing in fan or on alt shaft but they look very solid and new .. I may have had my belts a smidge too tight. As suggested in multiple thread I suspected the powder-coating thickness issue ... but there again I couldn't find any scuff marks on the fan tips or in the main housing. Today I spotted this during the second clean on the back inside of the fan. So the issue seems to be between the inside of the fan hub and the alternator itself, not the fan housing. Will sand it down a bit - don't want to unbalance it - but it seems the powdercoat has bubbled and roughened a bit .. or one of the alt bolt retaining tabs maybe got twisted round etc... will replace the fan's small bearing first and review. Alt being sent in for a check too.
Anyone seen that bubbly surface on the fan - weird metal alloy - under or from the powder coating? I think it's common with porous type metals that aren't so easy to clean and over time/with heat the impurities come out ... hopefully a sand will do the trick.


 11-23-2016, 05:01 PM


 [/url]

 [/url]


 .. but seriously, any input?


