
Aussie 964C2 Maintenance Diary (pic heavy!)


 09-26-2011, 10:36 PM
#62
Burning Brakes
Thread Starter
 09-28-2011, 08:46 AM
#63
Three Wheelin'
Impressive diy work, especially the sunroof.
You are very thorough with your pics and descriptions. I thought these cars were relatively simple but it appears they are as or more complex than my similar vintage 944 s2
You are very thorough with your pics and descriptions. I thought these cars were relatively simple but it appears they are as or more complex than my similar vintage 944 s2
10-09-2011, 08:40 AM
#65
Burning Brakes
Thread Starter
Thought I'd try this stuff.

It's a sealant that you apply to your wheels, and some pretty bold claims are made about it. Supposedly it's like a polish which brake dust won't stick to. So the wheel stays cleaner and you just hose off any brake dust when you wash the car. Pretty cool if true.
My wheels are in pretty decent shape and the shape of the cups makes it easy to clean anyway. But...I dunno if my car is typical of the breed or not, but 3 days after washing the car, the wheels are dirty with brake dust and look like they need cleaning again. So if this magical product makes your brake dust just fly off the wheels as you drive, then I'm all for it (no affiliation of course, I paid full price).

First you clean the wheels normally, but some of the wheels had some fine scratches, so I had to do some paint correction first.

I use this stuff, which I think isn't actually abrasive (I think...) but rather it simply digs the dirt out of the scratch so that it isn't so visible.

But it works.

Then spray on the Premium Paint Cleaner. Now this is pretty evil chemical stuff, with a hell of a pong and it must be pretty strong because the instructions come with a warning not to use it on Mitsubishis (really!). So I apply it with the garage door up, and wipe off with the supplied green microfibre cloth.

Then you apply the actual nanolex sealant, using the supplied foam pad. The instructions say to use it very sparingly so you just dribble a few drops on a corner of the pad and smear it as thinly as possible all over the wheel.

Rather amusingly, the (rather stern) instructions also warn you that the sealant has to be buffed off with the BLUE supplied microfibre cloth within a few minutes of application. Otherwise, it'll bond with the paint and only an abrasive cutting compound will remove it
Righto
And we're done.

So here are some closeups. Before, with just regular cleaning.

After the Premium Paint Cleaner spray.

And after the sealant.

The pictures above don't really show the difference very well, but as a polish, it does what it says on the tin, and the wheel does noticeably become shinier as you buff off the sealant. It's kinda a plasticky looking glossiness though, so I am not so sure if it would look so good on the body of the car, compared to a nice carnauba polish which will look warmer. But it sure is reflective.

Then again, applying conventional polish to the wheels will make it shinier anyway. I'm more interested in whether it keeps the brake dust at bay. Will report back with results at the end of the week
It's a sealant that you apply to your wheels, and some pretty bold claims are made about it. Supposedly it's like a polish which brake dust won't stick to. So the wheel stays cleaner and you just hose off any brake dust when you wash the car. Pretty cool if true.
My wheels are in pretty decent shape and the shape of the cups makes it easy to clean anyway. But...I dunno if my car is typical of the breed or not, but 3 days after washing the car, the wheels are dirty with brake dust and look like they need cleaning again. So if this magical product makes your brake dust just fly off the wheels as you drive, then I'm all for it
(no affiliation of course, I paid full price).First you clean the wheels normally, but some of the wheels had some fine scratches, so I had to do some paint correction first.
I use this stuff, which I think isn't actually abrasive (I think...) but rather it simply digs the dirt out of the scratch so that it isn't so visible.
But it works.
Then spray on the Premium Paint Cleaner. Now this is pretty evil chemical stuff, with a hell of a pong and it must be pretty strong because the instructions come with a warning not to use it on Mitsubishis (really!). So I apply it with the garage door up, and wipe off with the supplied green microfibre cloth.
Then you apply the actual nanolex sealant, using the supplied foam pad. The instructions say to use it very sparingly so you just dribble a few drops on a corner of the pad and smear it as thinly as possible all over the wheel.
Rather amusingly, the (rather stern) instructions also warn you that the sealant has to be buffed off with the BLUE supplied microfibre cloth within a few minutes of application. Otherwise, it'll bond with the paint and only an abrasive cutting compound will remove it
Righto
And we're done.
So here are some closeups. Before, with just regular cleaning.
After the Premium Paint Cleaner spray.
And after the sealant.
The pictures above don't really show the difference very well, but as a polish, it does what it says on the tin, and the wheel does noticeably become shinier as you buff off the sealant. It's kinda a plasticky looking glossiness though, so I am not so sure if it would look so good on the body of the car, compared to a nice carnauba polish which will look warmer. But it sure is reflective.
Then again, applying conventional polish to the wheels will make it shinier anyway. I'm more interested in whether it keeps the brake dust at bay. Will report back with results at the end of the week
10-15-2011, 11:44 AM
#67
I think a standard 4 pin relay will plug into the stock relay socket (I'm not 100% sure, but looking at the stock relay right now it might work).....
In the stock relay, this ground is the 85 & 85c wires that go back to the CCU (yellow wires in my diagram). So in other words, the stock relay is wired up a little backwards in that what normally goes to earth, actually goes to the CCU first and then to earth. My concern with letting the coil current go to the CCU, is because if you look at the wiring diagram, you will see that there are 2 resistors right next to the 85 & 85c terminals inside the relay. I get the feeling that maybe they are there to reduce the current that goes back to the CCU, and if we just let the coil wire earth thru the CCU without any limiting resistor, maybe we will fry something in the CCU Hence the decision to make a new wire going to a body ground is the safer one
In the stock relay, this ground is the 85 & 85c wires that go back to the CCU (yellow wires in my diagram). So in other words, the stock relay is wired up a little backwards in that what normally goes to earth, actually goes to the CCU first and then to earth. My concern with letting the coil current go to the CCU, is because if you look at the wiring diagram, you will see that there are 2 resistors right next to the 85 & 85c terminals inside the relay. I get the feeling that maybe they are there to reduce the current that goes back to the CCU, and if we just let the coil wire earth thru the CCU without any limiting resistor, maybe we will fry something in the CCU
Hence the decision to make a new wire going to a body ground is the safer one Baba,
I did this mod yesterday and it works great!

I confirm a standard 4 pin relay fits perfectly in the stock socket.
There is one thing, though, that might be improved: the hammer keeps giving foult codes due to missing blower. Could be interesting if we could fool it...
I thought we could connect a 77 ohm (this is what I measured in the old relay) resistor from pin 87 of the new relay to the WT/BK and WT/BL (85 and 85c of the old relay) cables. Do you think it could work?
ciao
Anto
10-15-2011, 11:46 PM
#68
Burning Brakes
Thread Starter
I took apart the melted old relay and you can see the 2 little resistors here:
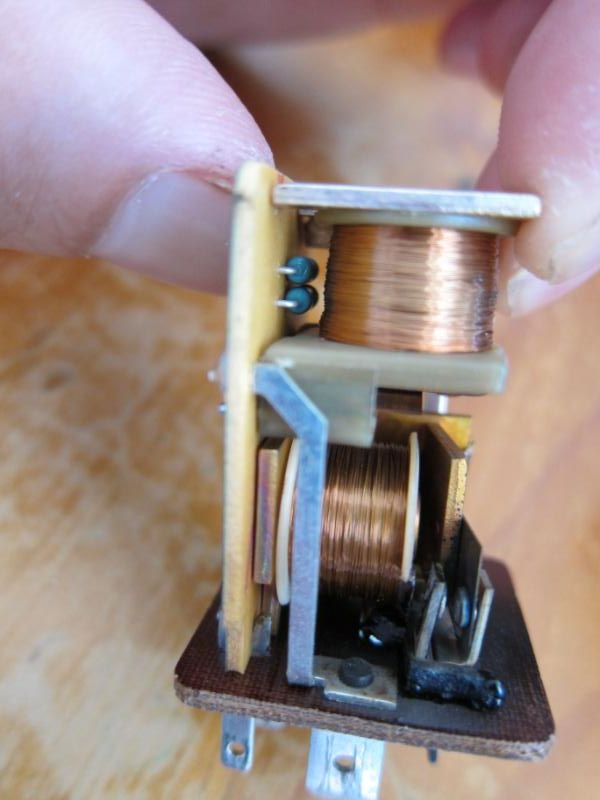
And yes they are 75-ish Ohm when you measure it.
Well, I suppose that in theory... ...if you hooked a 75ohm resistor in line with a wire going from 87 to 85 & 85c pins, it should exactly replicate what happens with the stock wiring and blower in place.
So it should work...you may incur the wrath of the "If It Ain't Broke Gods" though
And yes they are 75-ish Ohm when you measure it.
Well, I suppose that in theory...
...if you hooked a 75ohm resistor in line with a wire going from 87 to 85 & 85c pins, it should exactly replicate what happens with the stock wiring and blower in place. So it should work...you may incur the wrath of the "If It Ain't Broke Gods" though
10-16-2011, 12:07 AM
#69
Burning Brakes
Thread Starter
Time to report!
After a week of commuting, the wheels have a healthy coating of brake dust.

I'd say maybe it's a little less black than usual, but as you can see it's definitely dirty enough to notice.

And does it just rinse off? Well aaaaalmost If you focus on the finger smudge in the bottom of the wheel it's almost all gone but no cigar.
Definitely no cigar

That said, it is noticeably more silky ans easier to wash, with the brake dust coming off on the first wipe of the sponge.

So I guess it's fairest to say that if you're the kind of person who religiously washes their car every weekend, then you probably don't have much to gain from this product...but if you don't have to time to regularly clean your car, and scrubbing the wheels is a chore, then this might make life a lot easier.
After a week of commuting, the wheels have a healthy coating of brake dust.
I'd say maybe it's a little less black than usual, but as you can see it's definitely dirty enough to notice.
And does it just rinse off? Well aaaaalmost
If you focus on the finger smudge in the bottom of the wheel it's almost all gone but no cigar.Definitely no cigar
That said, it is noticeably more silky ans easier to wash, with the brake dust coming off on the first wipe of the sponge.
So I guess it's fairest to say that if you're the kind of person who religiously washes their car every weekend, then you probably don't have much to gain from this product...but if you don't have to time to regularly clean your car, and scrubbing the wheels is a chore, then this might make life a lot easier.
Last edited by Babalouie; 11-05-2011 at 04:30 AM.
10-16-2011, 02:24 AM
#70
Racer
Join Date: Sep 2006
Location: Auckland NZ & Newcastle AU
Posts: 437
Likes: 0
Received 1 Like
on
1 Post
Hey Babalouie,
I was watching the vid waiting for a once over of the beastie!
Anyway, on to an unrelated matter...
There's a decal on the underside of my rear deck-lid that has shrunk and wrinkled over time, prob with the engine heat. It's specific to the Aussie market cars, and has the part number 964.006.107.06. Do you have the same sticker? I know that you have a friend in the local P-car industry, was wondering if you could check with him if replacement stickers are available?
No urgency, and only if you don't mind.
Regards,
Pete
10-16-2011, 09:17 PM
#71
Burning Brakes
Thread Starter
There's a decal on the underside of my rear deck-lid that has shrunk and wrinkled over time, prob with the engine heat. It's specific to the Aussie market cars, and has the part number 964.006.107.06. Do you have the same sticker? I know that you have a friend in the local P-car industry, was wondering if you could check with him if replacement stickers are available?
10-17-2011, 04:40 AM
#73
Racer
Join Date: Feb 2005
Location: Sweden
Posts: 382
Likes: 0
Received 0 Likes
on
0 Posts
If you make a simple drawing with the dimensions and take a photo of it I'm sure an advertisingshop could print/make you a new one. Would probably cost more that what is reasonable tho but you never know.
10-17-2011, 05:17 PM
#74
I took apart the melted old relay and you can see the 2 little resistors here:
And yes they are 75-ish Ohm when you measure it.
Well, I suppose that in theory... ...if you hooked a 75ohm resistor in line with a wire going from 87 to 85 & 85c pins, it should exactly replicate what happens with the stock wiring and blower in place.
So it should work...you may incur the wrath of the "If It Ain't Broke Gods" though
And yes they are 75-ish Ohm when you measure it.
Well, I suppose that in theory...
...if you hooked a 75ohm resistor in line with a wire going from 87 to 85 & 85c pins, it should exactly replicate what happens with the stock wiring and blower in place. So it should work...you may incur the wrath of the "If It Ain't Broke Gods" though

Assuming the standard cabling (and relay), how can the CCU read a missing fan? I don't understand where it gets the signal from...
 10-17-2011, 07:58 PM
#75
Burning Brakes
Thread Starter
Maybe it's a residual fault code. Ie, you need to reset the fault codes, and then try again?
But you're right, the only other thing I can think of is the downtube temp sensor, maybe the ccu throws a code is that is unplugged too.
But you're right, the only other thing I can think of is the downtube temp sensor, maybe the ccu throws a code is that is unplugged too.