
Aussie 964C2 Maintenance Diary (pic heavy!)

 03-12-2012, 10:26 AM
#139
Burning Brakes
Thread Starter

A few months ago, I (and a couple of other aussie RLers) bought some Perfect Power strut braces as part of the forum group buy.
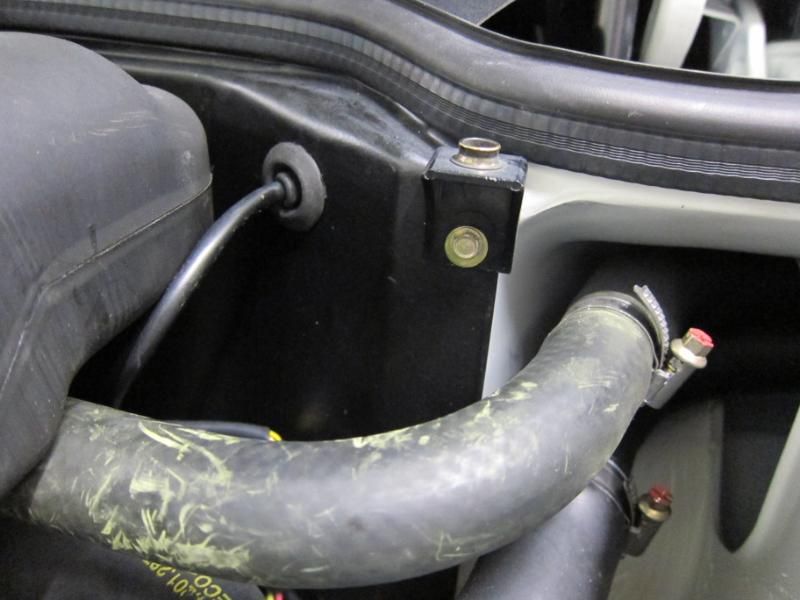
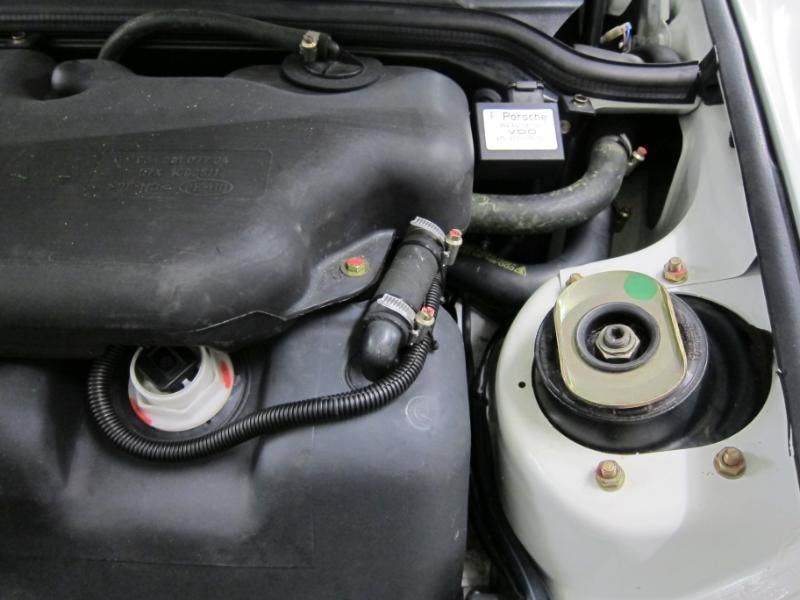
But when I received the strut braces, it turned out that the bar fouled the fuel tank sender unit.
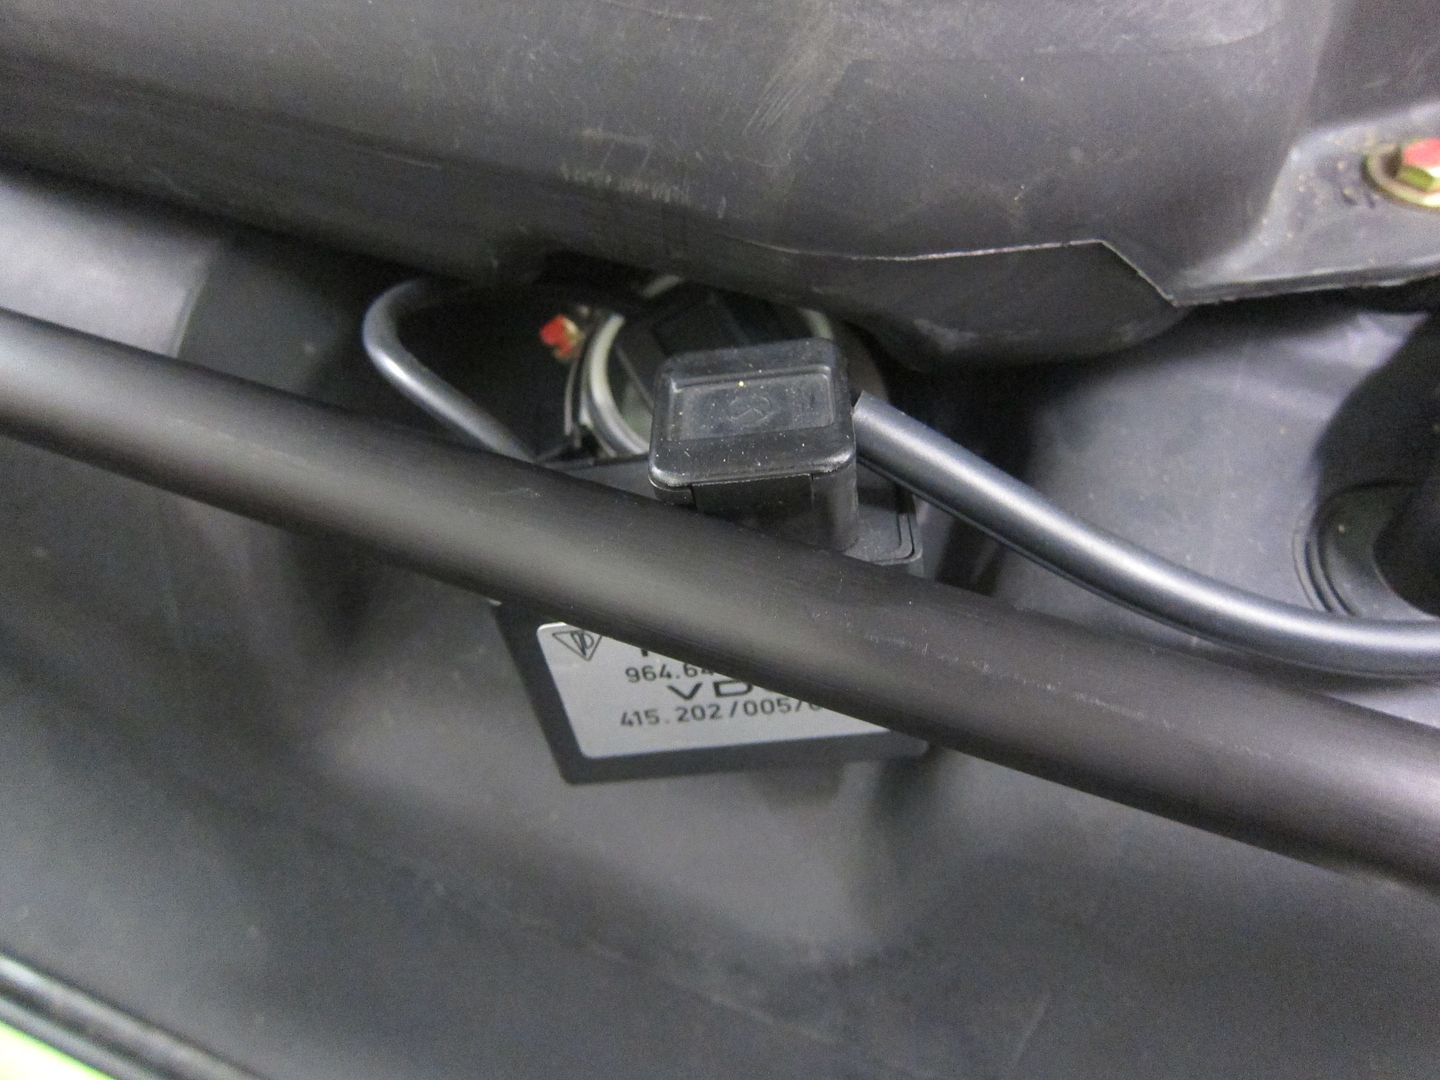
There was just no way that the bar could be tightened down with that sender unit in place.
This isn't a problem on US market cars, where the sender unit is on the other side of the tank, just in front of the fuse box. The Perfect Power instructions say that you should loosen the fitting on the sender unit and rotate it out of the way, but on a RHD car, this isn't possible because the sender is on the other side, and there is this bulky expansion tank in the way.
But the Perfect Power bar is a gorgeous bit of billet. Very nicely made and expensive-feeling.
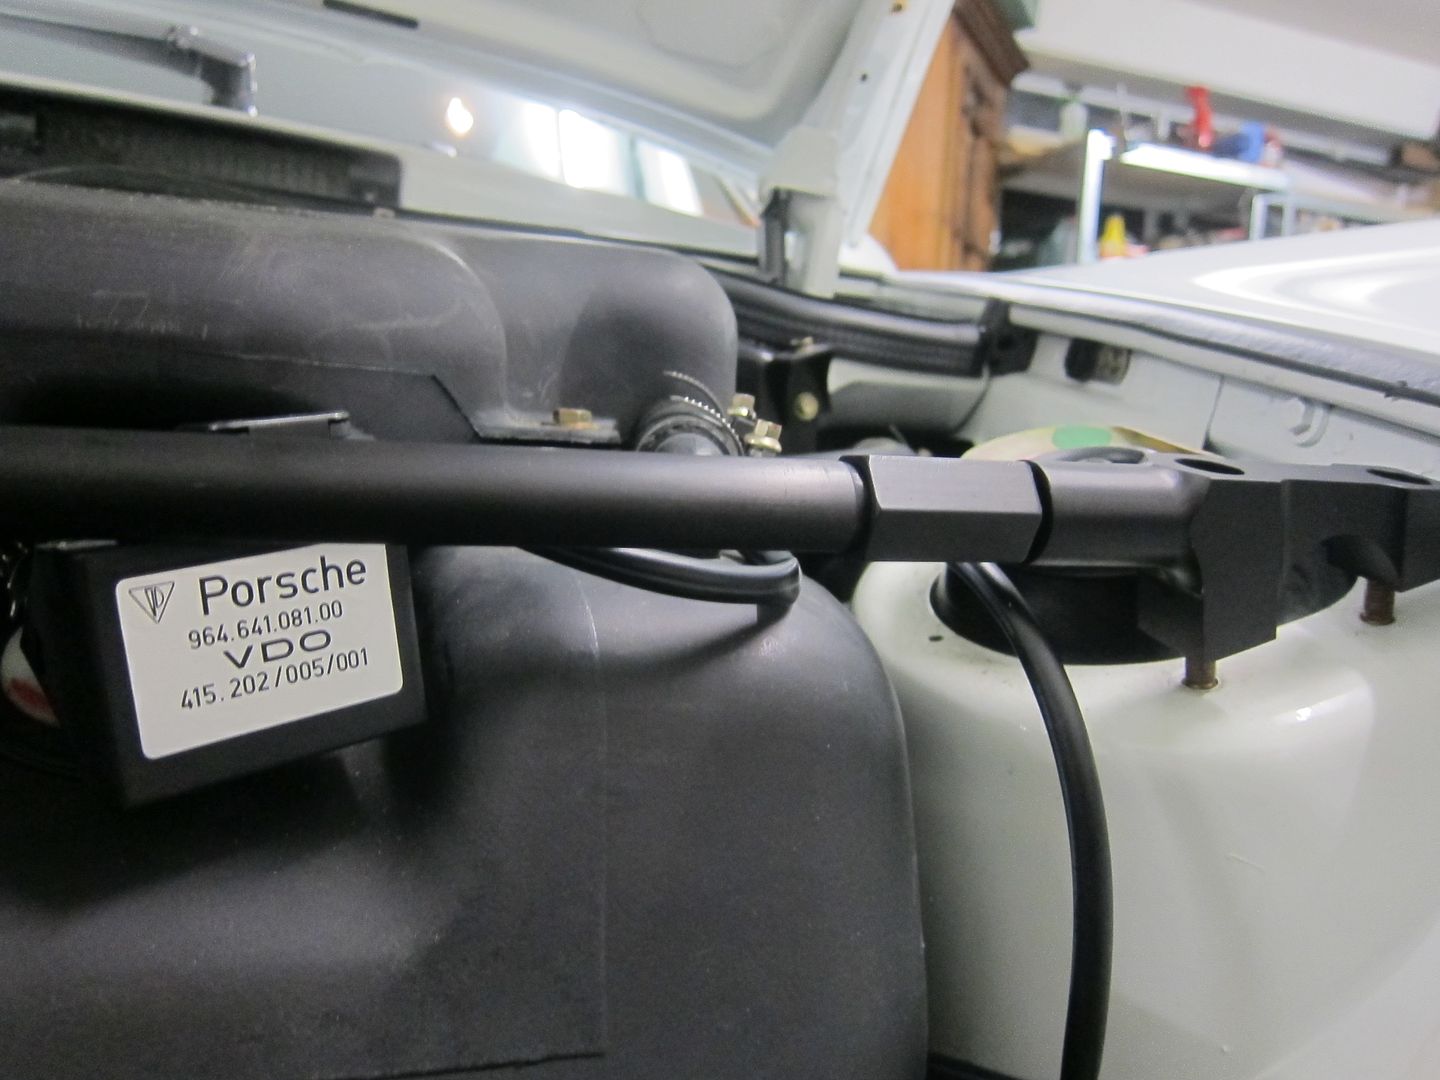
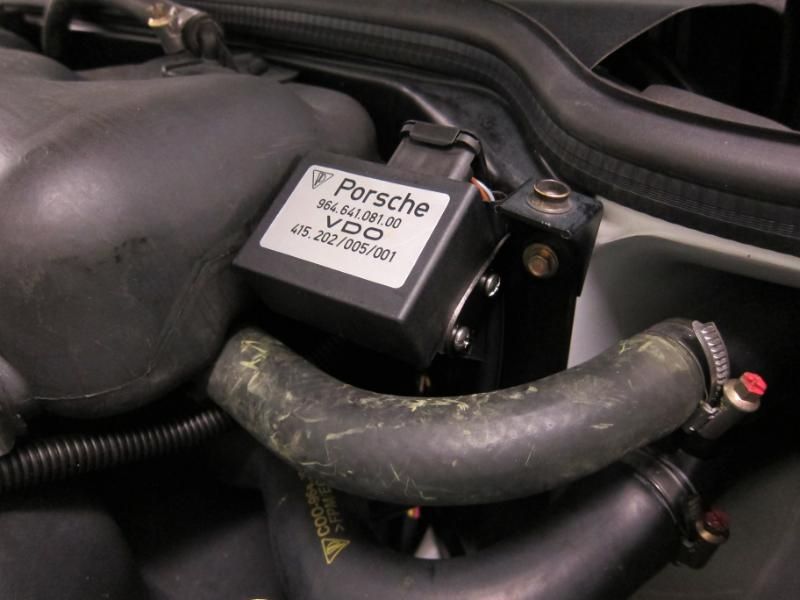
So after a bit of thought, I decided to relocate the sender unit to the firewall, where there is a convenient bolt for the carpet press stud.
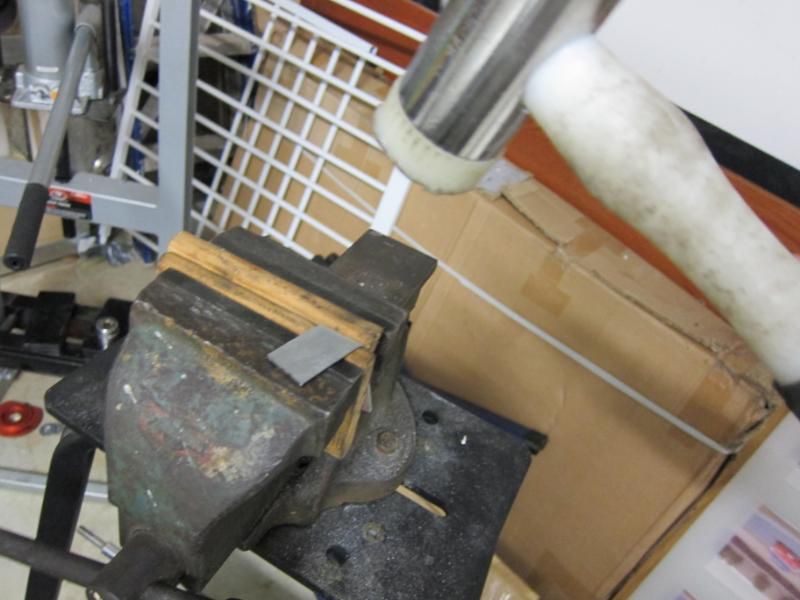
First I cut a short length of 2mm aluminium strap and scientifically put a bend in it using the BFH
Cut it roughly to shape...
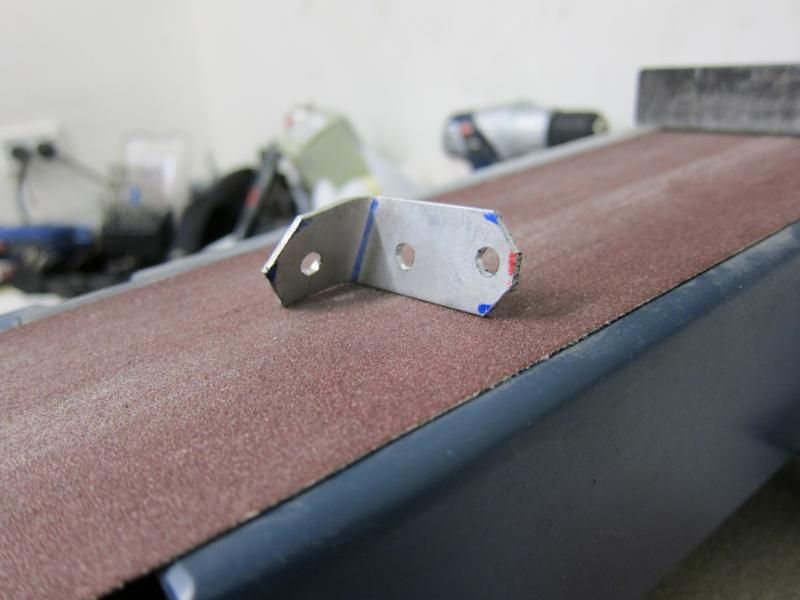
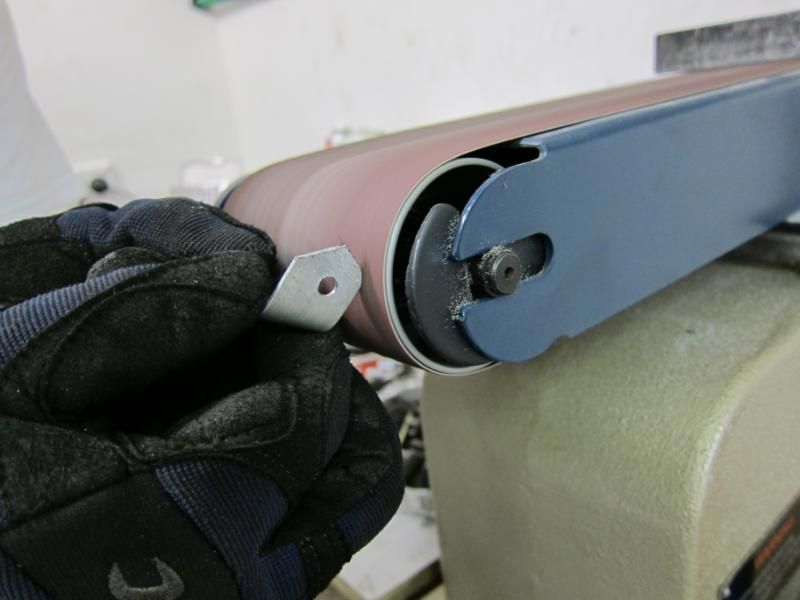
Then clean it up on the linisher
Drill some holes, and here we go.
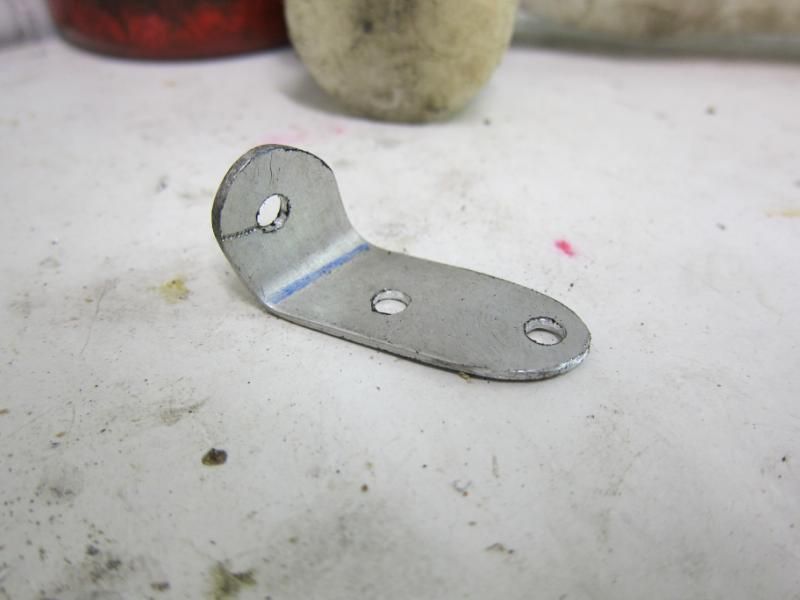
I had to drill into the sender unit, but not into the box itself, but rather the plastic bracket part
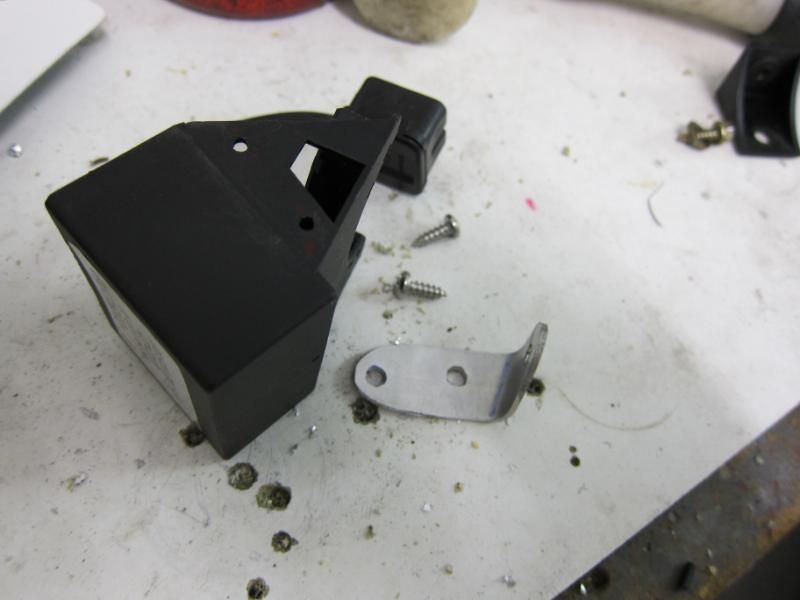
Relocating the sender to the firewall also means that the wiring has to be extended.
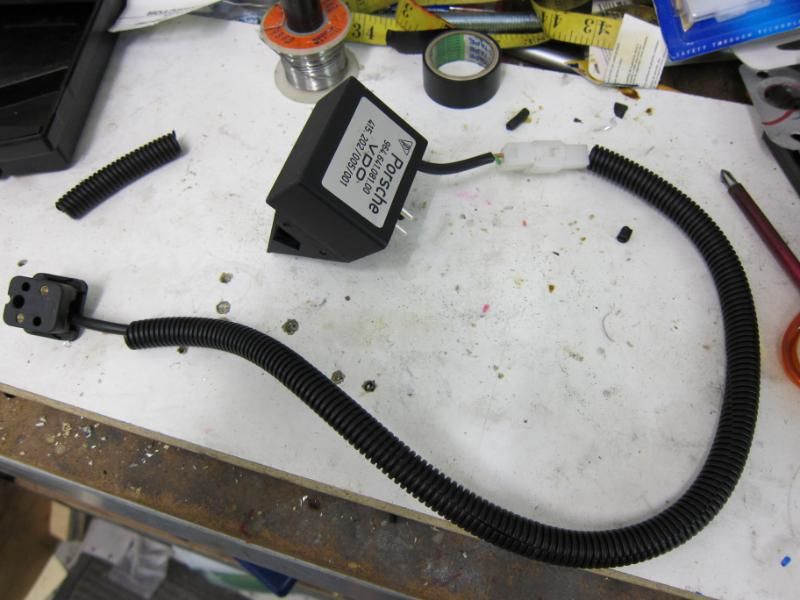
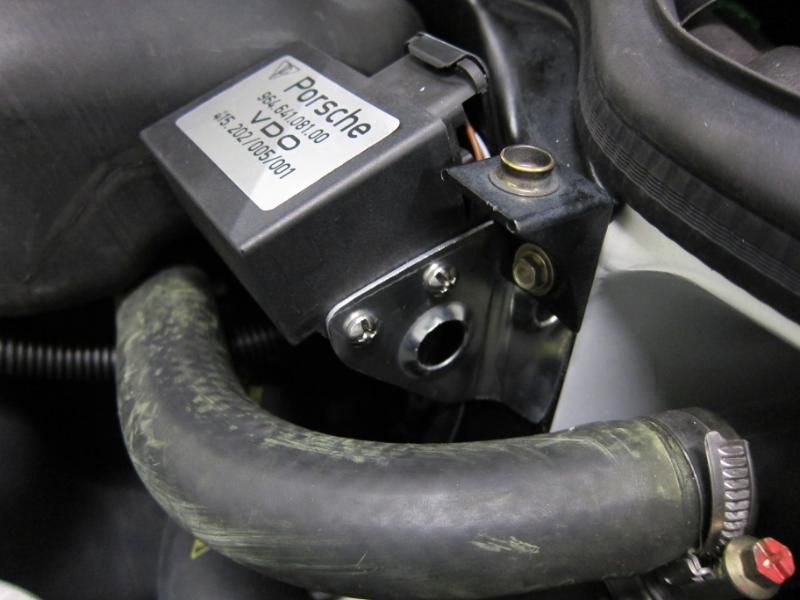
A little black paint on the new bracket, and hopefully the sender will look like it belongs in its new home.
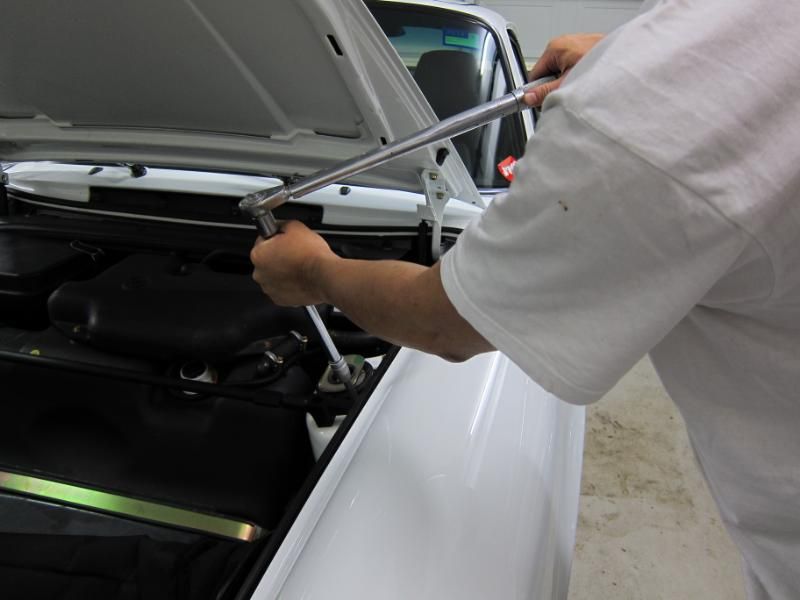
Then it's a matter of a few minutes to install the bar, and torque it up to 18ft-pounds
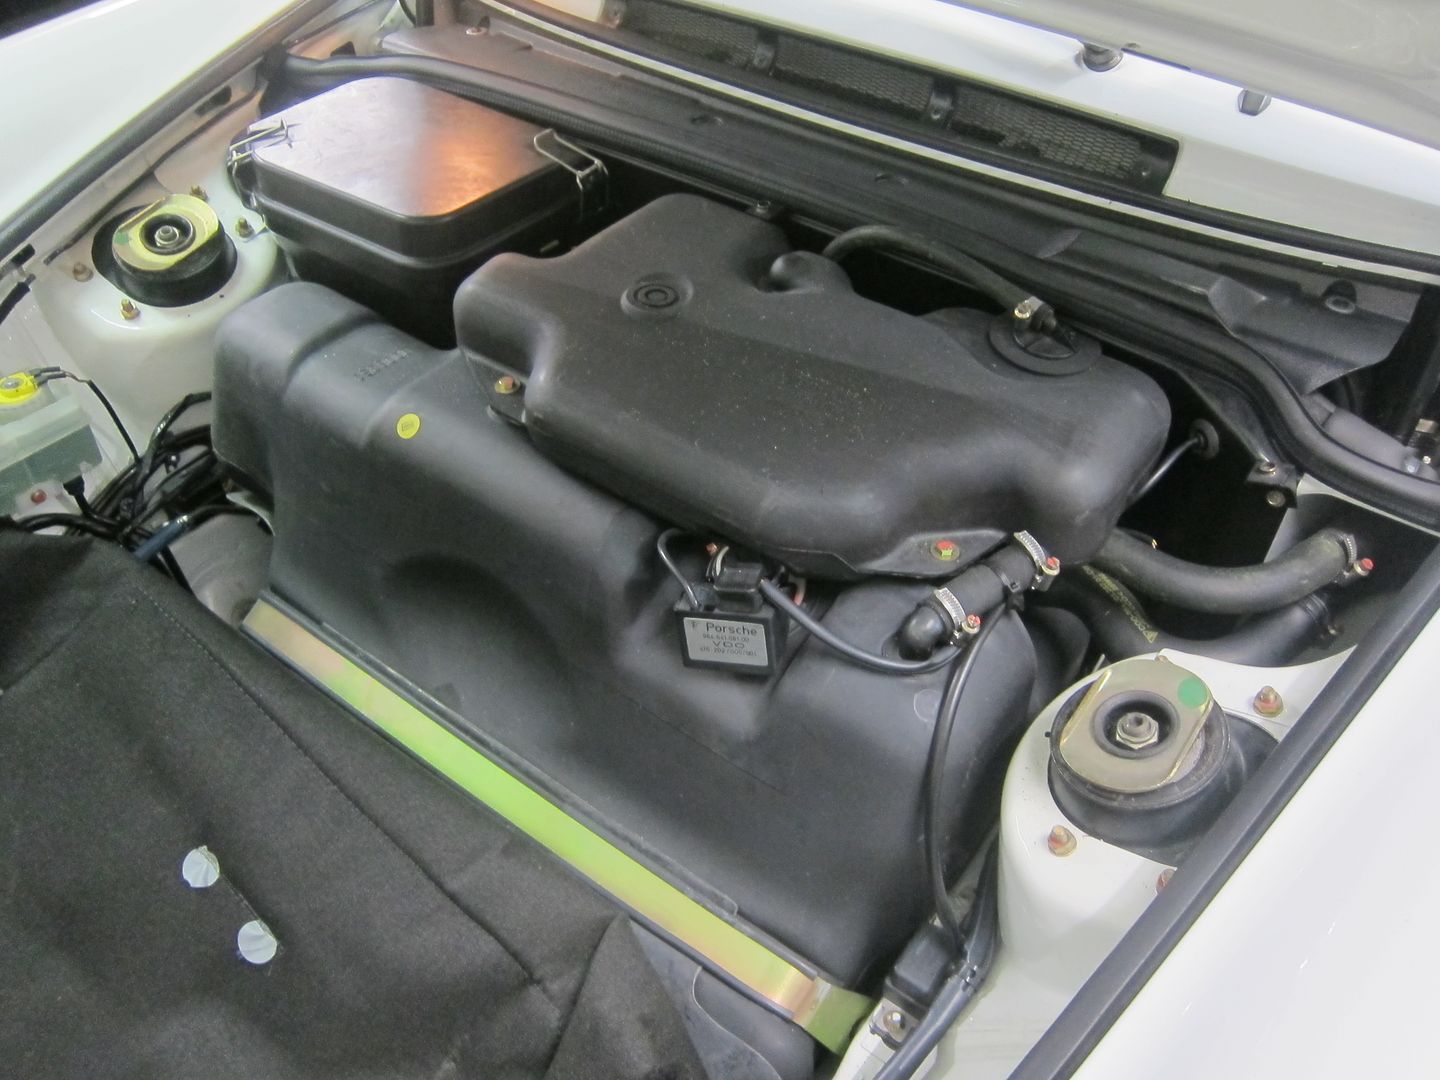
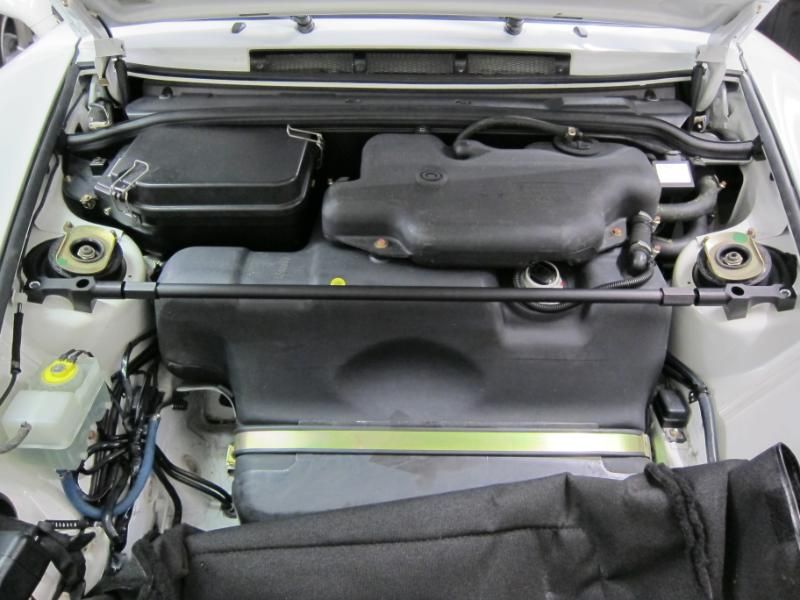
Ta-da!!
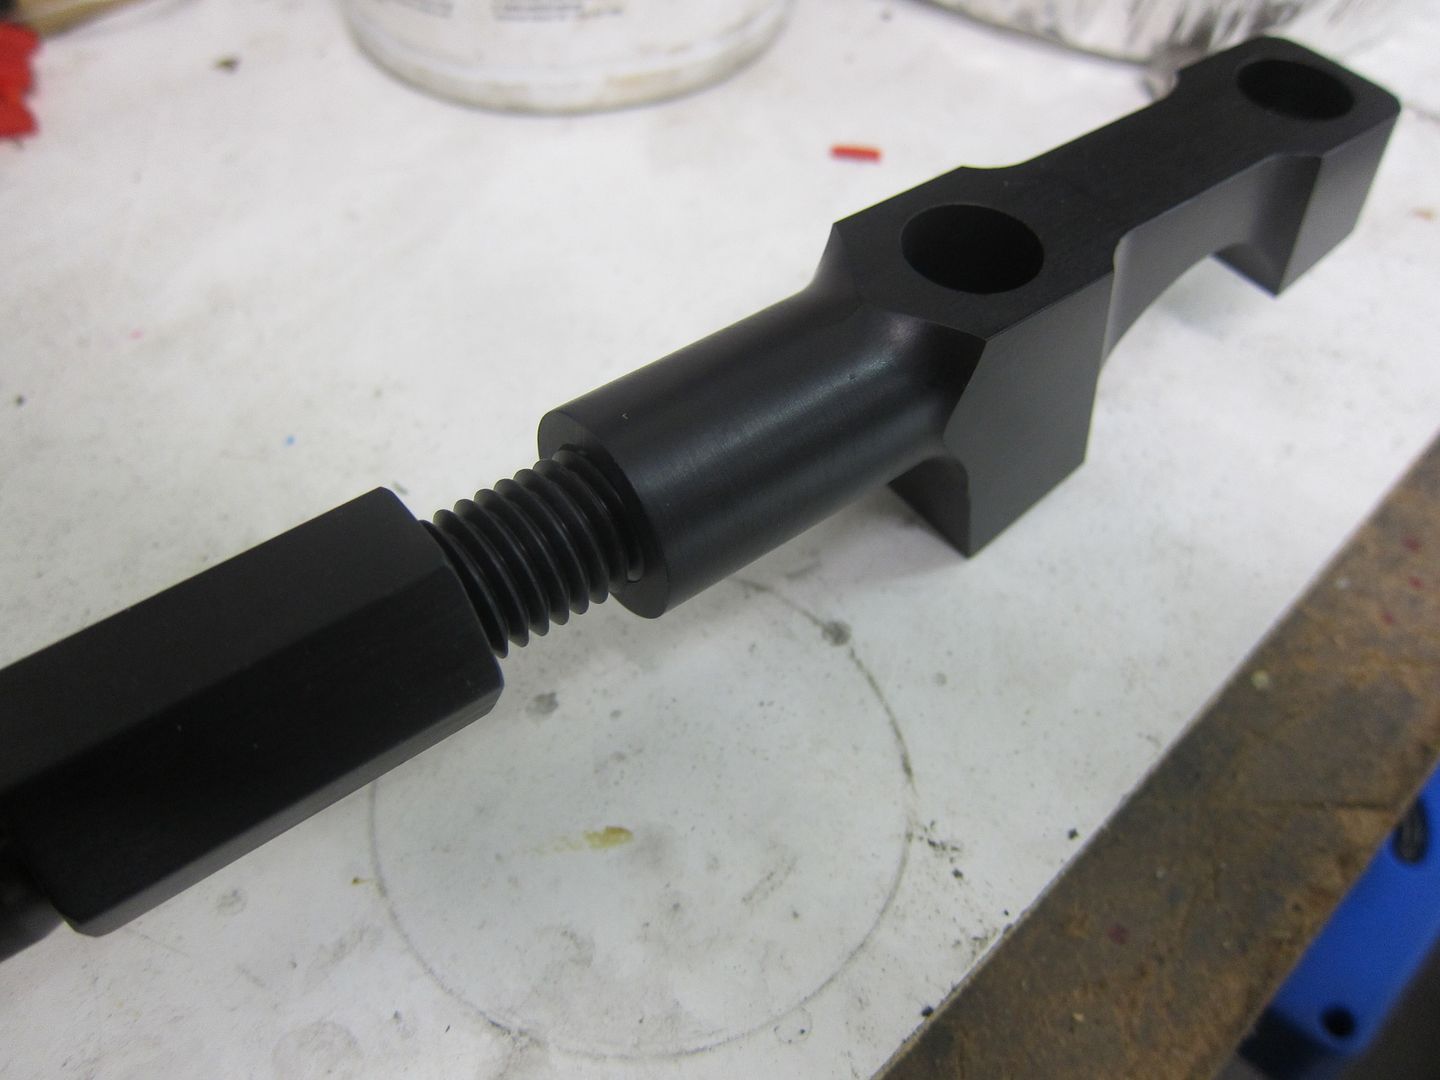
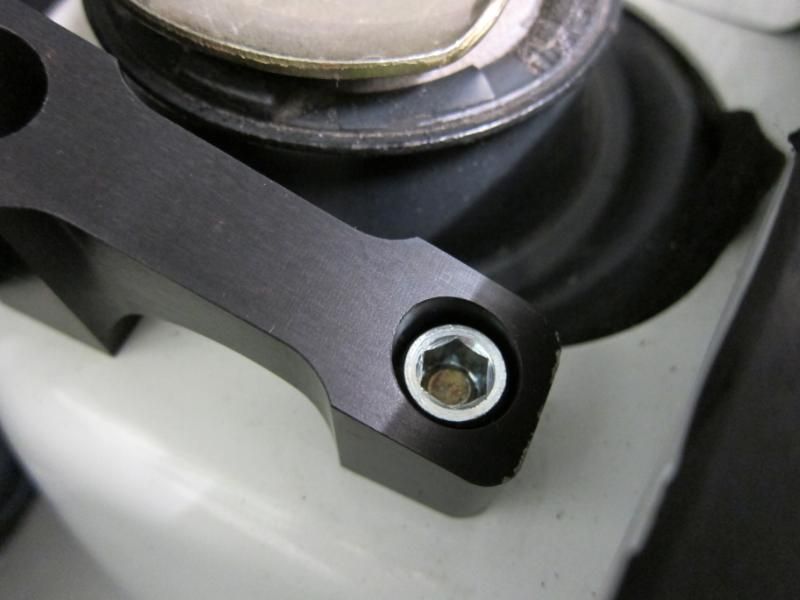
The Perfect Power instructions say that you should put two washers under the allen nut before torquing down, and this is why...the stud for the 964 is a bit long and so if you didn't pack it with washers, then the stud would protrude too much into the allen nut.
Lastly the adjuster collars are snugged up with a 22mm spanner
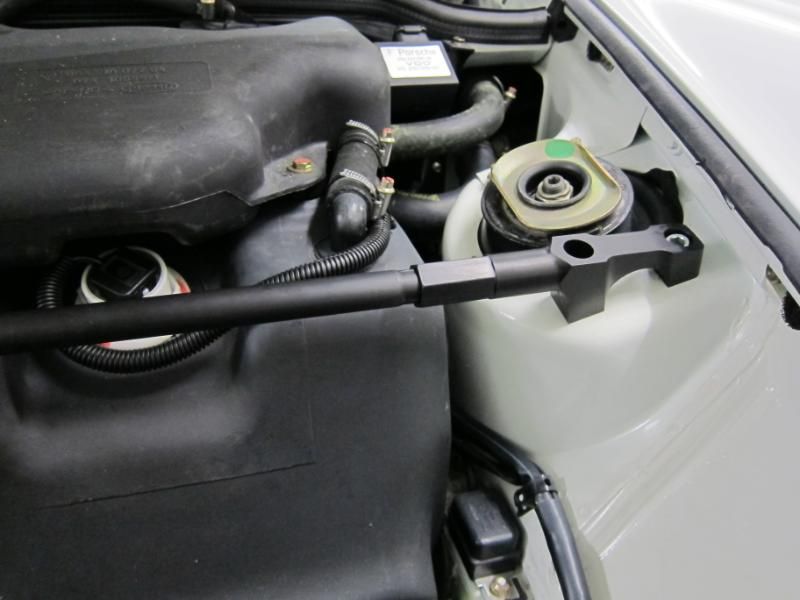
But of course, after all that...this is what the finished product looks like
How's it to drive? Well it could be my imagination, but it does seem a little keener to turn in. My car's got a pretty tight motorsport LSD, and is prone to a bit of turn in understeer if I'm not committed on the brakes, but the strut brace has seemed to help a little. More investigation will be required this weekend on some favourite roads
But when I received the strut braces, it turned out that the bar fouled the fuel tank sender unit.
There was just no way that the bar could be tightened down with that sender unit in place.
This isn't a problem on US market cars, where the sender unit is on the other side of the tank, just in front of the fuse box. The Perfect Power instructions say that you should loosen the fitting on the sender unit and rotate it out of the way, but on a RHD car, this isn't possible because the sender is on the other side, and there is this bulky expansion tank in the way.
But the Perfect Power bar is a gorgeous bit of billet. Very nicely made and expensive-feeling.
So after a bit of thought, I decided to relocate the sender unit to the firewall, where there is a convenient bolt for the carpet press stud.
First I cut a short length of 2mm aluminium strap and scientifically put a bend in it using the BFH
Cut it roughly to shape...
Then clean it up on the linisher
Drill some holes, and here we go.
I had to drill into the sender unit, but not into the box itself, but rather the plastic bracket part
Relocating the sender to the firewall also means that the wiring has to be extended.
A little black paint on the new bracket, and hopefully the sender will look like it belongs in its new home.
Then it's a matter of a few minutes to install the bar, and torque it up to 18ft-pounds
Ta-da!!
The Perfect Power instructions say that you should put two washers under the allen nut before torquing down, and this is why...the stud for the 964 is a bit long and so if you didn't pack it with washers, then the stud would protrude too much into the allen nut.
Lastly the adjuster collars are snugged up with a 22mm spanner
But of course, after all that...this is what the finished product looks like
How's it to drive? Well it could be my imagination, but it does seem a little keener to turn in. My car's got a pretty tight motorsport LSD, and is prone to a bit of turn in understeer if I'm not committed on the brakes, but the strut brace has seemed to help a little. More investigation will be required this weekend on some favourite roads
03-12-2012, 07:40 PM
#141
Burning Brakes
Thread Starter
My theory (and it's JMHO) is that once the car is moving and loads are fed into the suspension, the bar is preloaded anyway. When you jack up the car, the strut towers will spread a little, and as you lower it to the ground, they come together a little as weight is taken on the suspension.
So, to my mind, there is already preload on the bar when the car is moving, and any extra preload that you can add by twisting the strut bar with your hand will not add a measurable amount of preload. If, say the strut bar had a nut welded to the middle of it, so that you could really crank it with a big spanner and pull the towers closer together by a few mm, then that's a different story...(and if it was that important, surely strut braces would have them...)
 03-20-2012, 10:01 AM
#142
Burning Brakes
Thread Starter
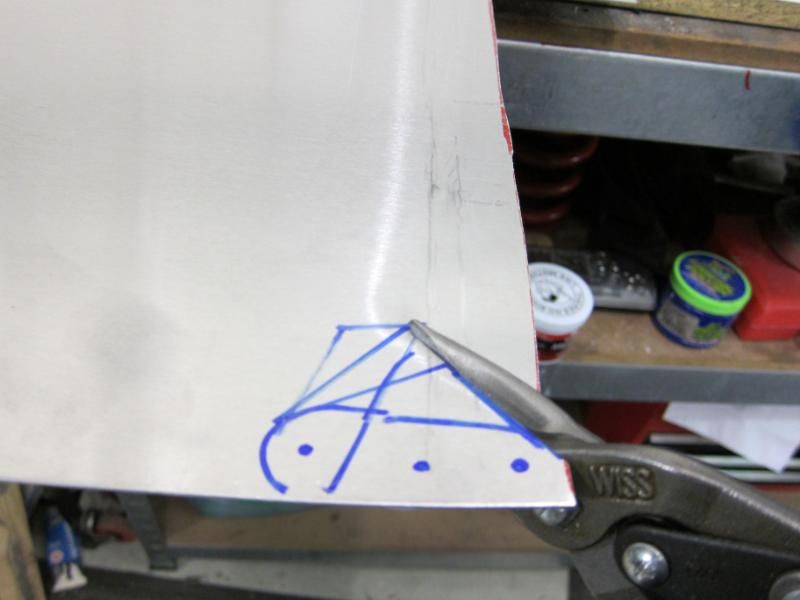
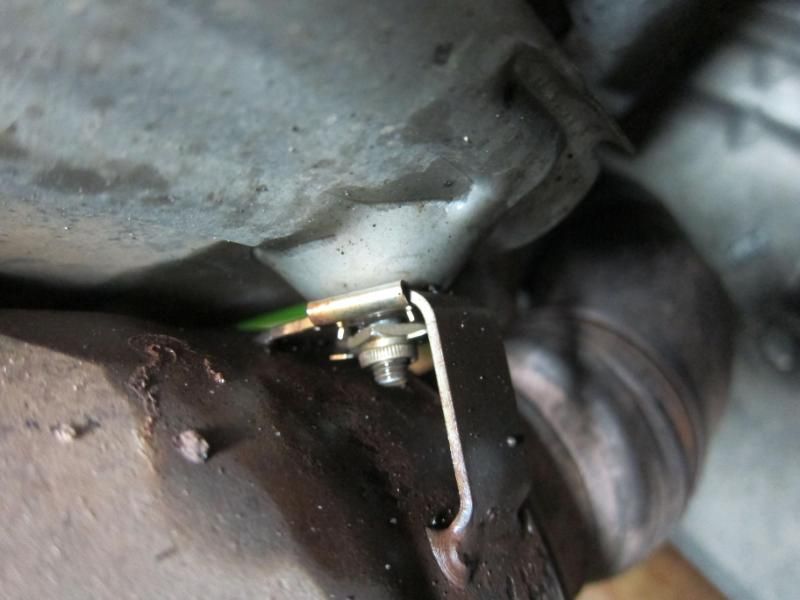
I was a little bored tonight, and decided to have another go at mounting that sender. That little L-shaped bracket was a little plain, I thought
The original bracket was made out of 2mm aluminium, which is massive overkill, so this time I'm using 1mm ally, which I like, since it's thin enough to cut with snips, and so you don't make a huge mess with the jigsaw.
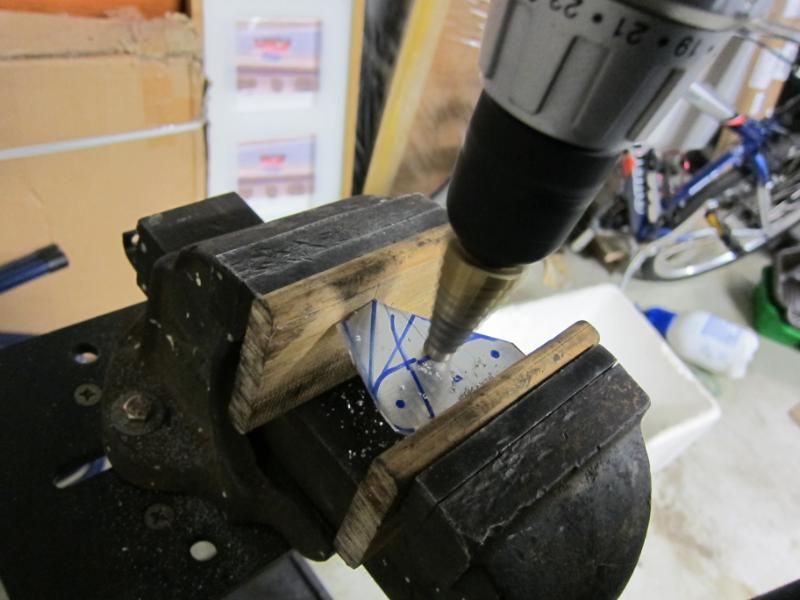
Drill the mounting holes, including a half-inch hole in the middle, which I am doing with a step drill bit. These are great for holes up to 1in, much more accurate than a holesaw.
The big hole is for this, one of my favourite tools...a set of dimple dies

You use it with a shop press.

The male and female dies go thru the big hole, and is squished by the press.
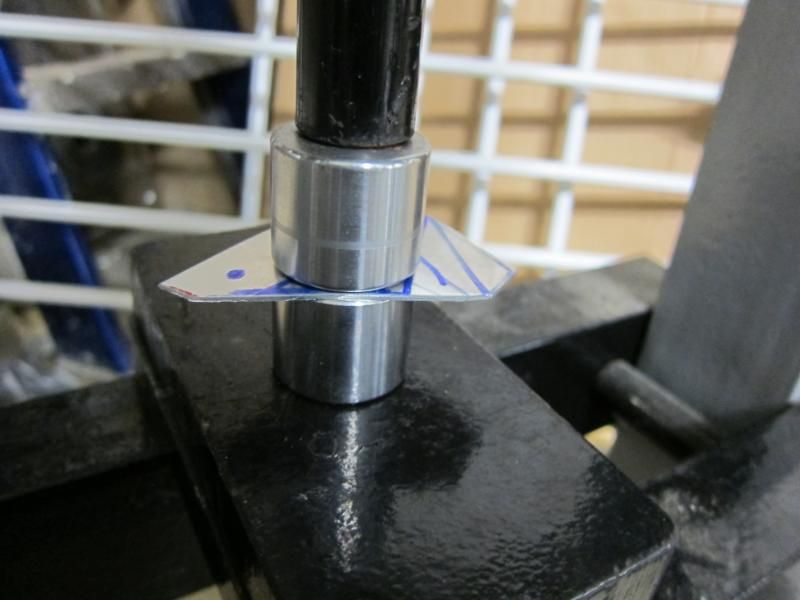
This leaves a nicely radiused hole, which adds a lot of strength, but in this application is just for added visual interest
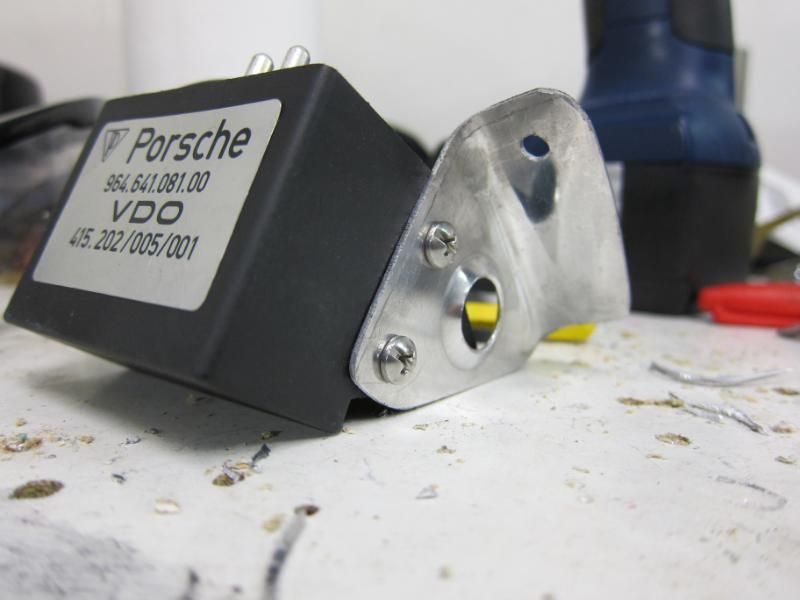
Much nicer, I think. More befitting a hot rod 911
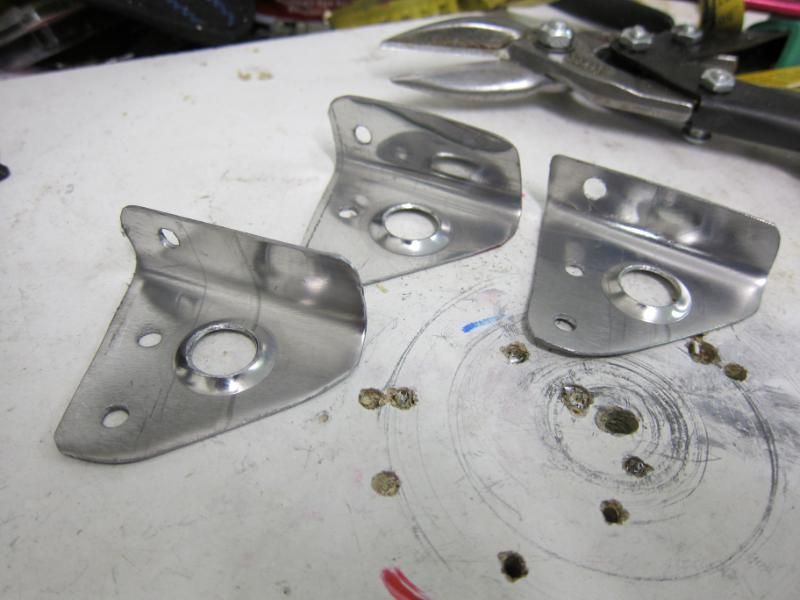
We actually bought three strut braces into the country, and I promised the other 2 aussie Rennlisters that I'd lend a hand installing them, so I knocked up a couple more
The original bracket was made out of 2mm aluminium, which is massive overkill, so this time I'm using 1mm ally, which I like, since it's thin enough to cut with snips, and so you don't make a huge mess with the jigsaw.
Drill the mounting holes, including a half-inch hole in the middle, which I am doing with a step drill bit. These are great for holes up to 1in, much more accurate than a holesaw.
The big hole is for this, one of my favourite tools...a set of dimple dies
You use it with a shop press.
The male and female dies go thru the big hole, and is squished by the press.
This leaves a nicely radiused hole, which adds a lot of strength, but in this application is just for added visual interest
Much nicer, I think. More befitting a hot rod 911
We actually bought three strut braces into the country, and I promised the other 2 aussie Rennlisters that I'd lend a hand installing them, so I knocked up a couple more
 03-20-2012, 01:02 PM
#145
Burning Brakes
Join Date: Feb 2004
Location: Derbyshire, England
Posts: 898
Likes: 0
Received 0 Likes
on
0 Posts
Wow. I love your dedication in re-mounting the sender unit. Here's to you I had exactly the same issue with my Perfect Power bar (agreed, lovely bit of kit; 'copy' of the RUF item). I wasn't quite so creative in my solution. I used double side tape to stick the sender onto the front of the tank just below the original mount. I must point out that I used Porsche supplied double sided tape! 
I had exactly the same issue with my Perfect Power bar (agreed, lovely bit of kit; 'copy' of the RUF item). I wasn't quite so creative in my solution. I used double side tape to stick the sender onto the front of the tank just below the original mount. I must point out that I used Porsche supplied double sided tape!
03-21-2012, 06:31 AM
#147
Racer
Join Date: Sep 2006
Location: Auckland NZ & Newcastle AU
Posts: 437
Likes: 0
Received 1 Like
on
1 Post
Baba, whatever disease it is that you have, I want it! 
Although, I also want your practical ability to go with it.
Looks fantastic, can't wait to drop by for the premium installation service.
Although, I also want your practical ability to go with it.
Looks fantastic, can't wait to drop by for the premium installation service.
03-25-2012, 11:41 PM
#148
Burning Brakes
Thread Starter
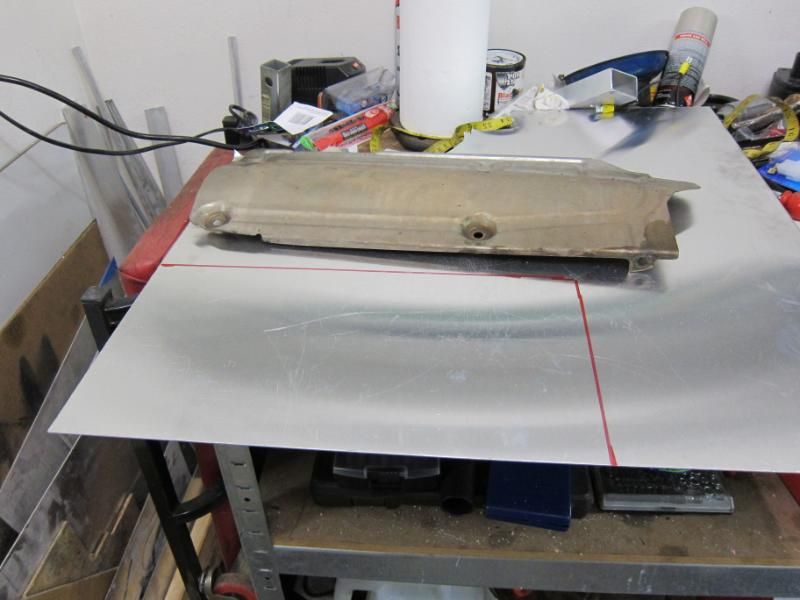
A long time ago, I bought this: a 100-cell DesignTek cat from the UK.
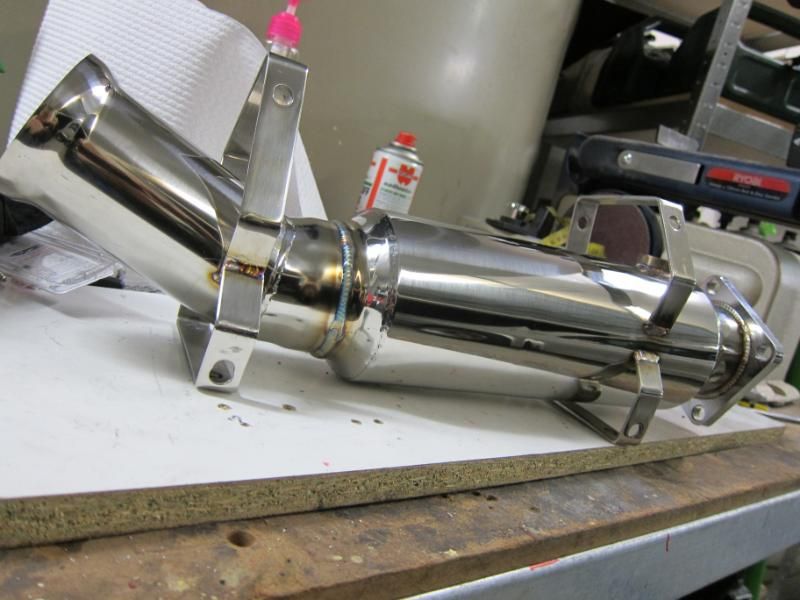
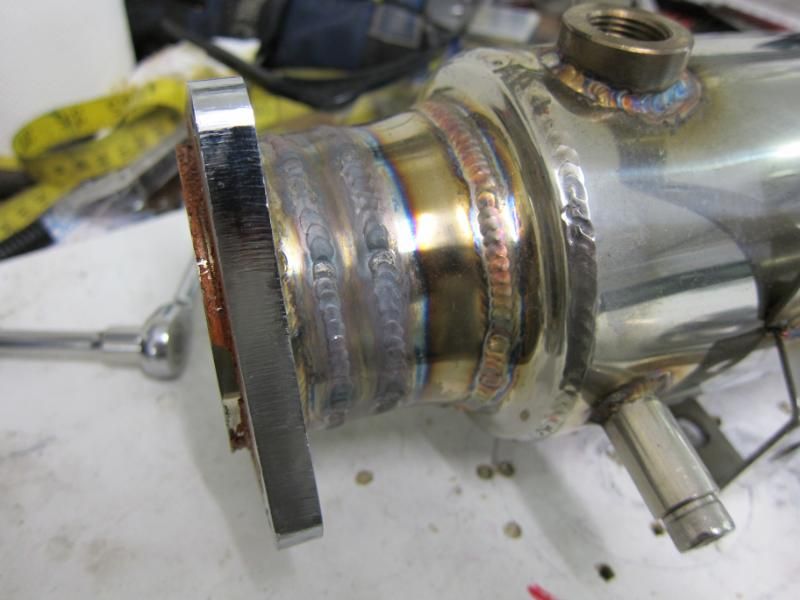
It looked super nice, but unfortunately, when I tried to install it, it didn't fit...it was a half inch too short. Two of the joints on the exhaust are quite unusual. Instead of a conventional bolted flange, you have this olive, which goes between the 2 pipes (which have bellmouthed ends) and then that big bolted clamp goes over the joint.
So it sat on the shelf for many months, until I took it to my friends at Castle Hill Exhaust, where they cut the cat pipe, and expertly TIG'd in a half inch section.
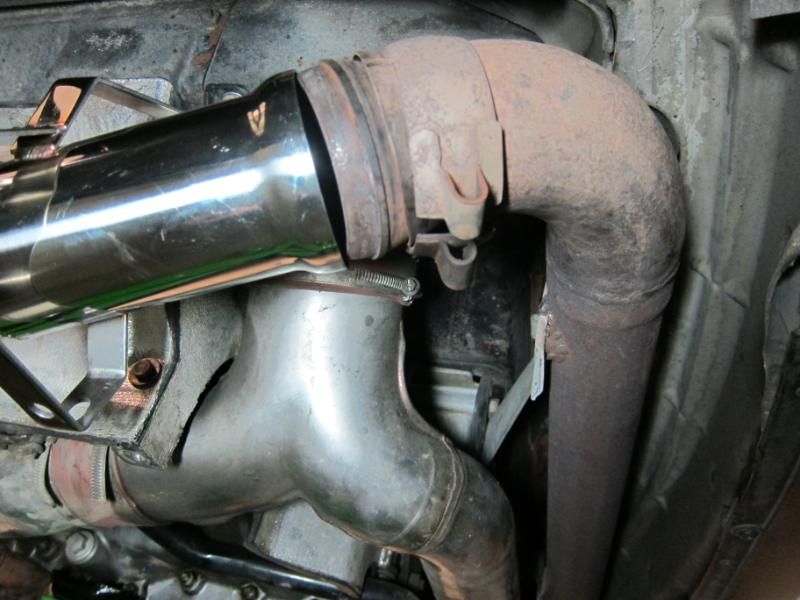
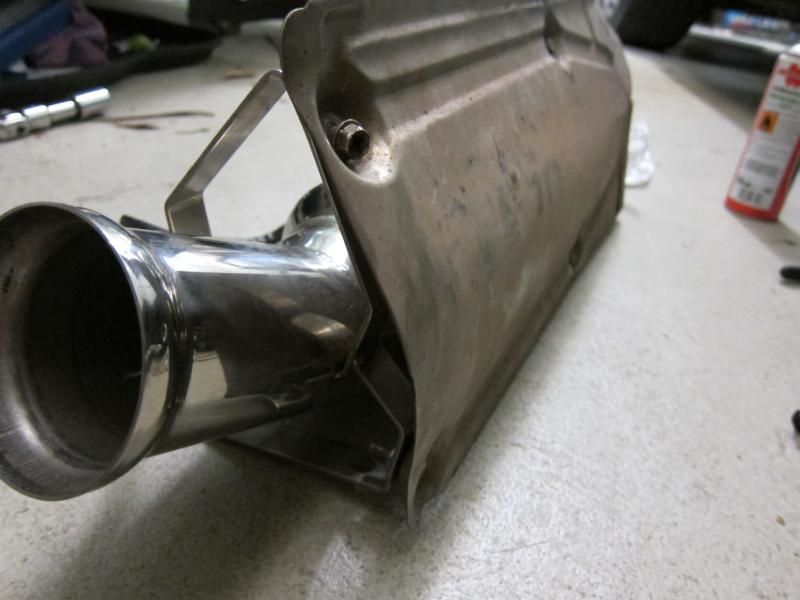
The first step of installation, is to remove all the heat shields from the old cat.
Which isn't easy, because of these horrible things. Instead of using self-tapping screws and speednuts, the 911 has these stainless fastneners which are a little bit like a hybrid of a speednut and a regular nut. The nut has a square base, and the idea is that the stainless clip prevents the nut from turning as you loosen the bolt from the other side. The problem is, stainless threads have a habit of jamming with age, and so what happens is the nut jams, and then tears the crap out of the clip (which isn't strong enough to deal with it). So then you have to find some way of getting it off with pliers, etc. It's a real nuisance and a lousy design.
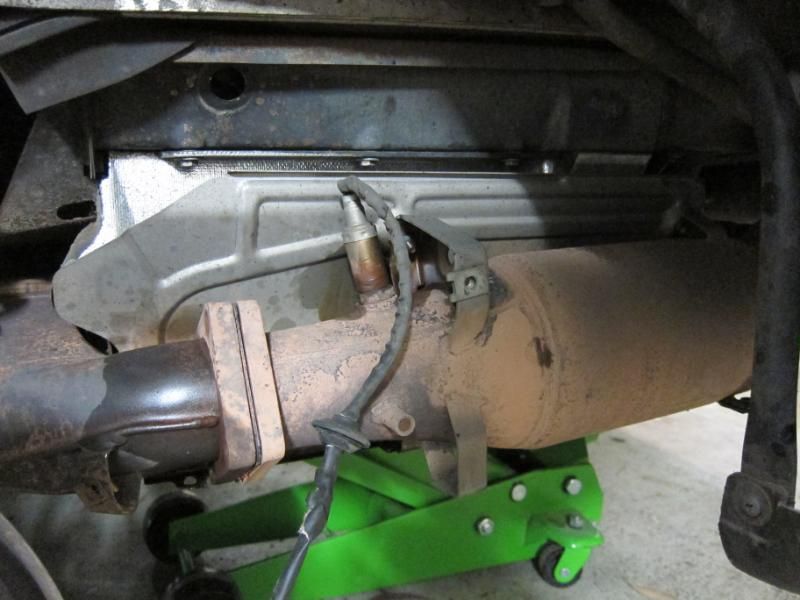
But eventually the old cat is out, and it's a lot bulkier than the new one. Also you'll spot that I'm taking the opportunity to put a new O2 sensor in....and if you're looking at this pic, thinking that the brackets for the heat shields don't seem to be the same, well, hold that thought
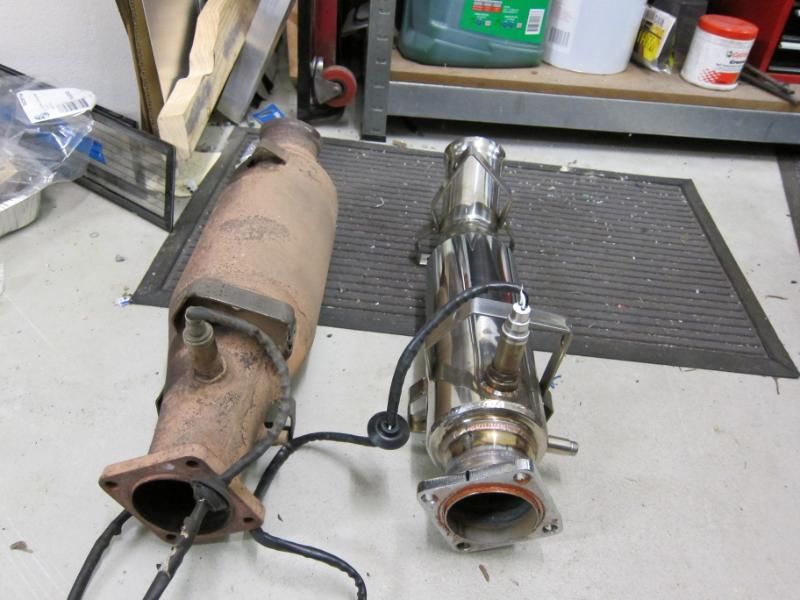
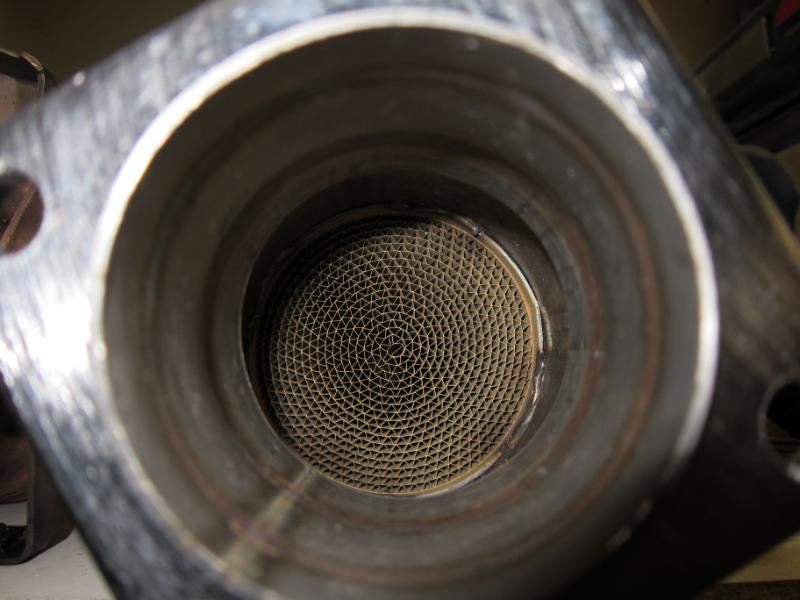
The old cat was in good shape, with no obvious signs of the substrate being damaged (they can go crumbly with age).
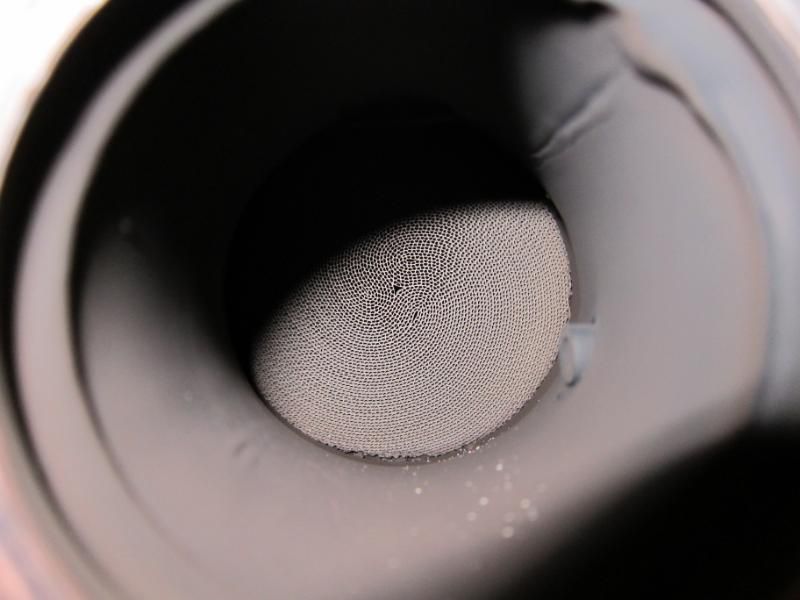
But the new one clearly has a more open "weave" to it, and should be more free-flowing.
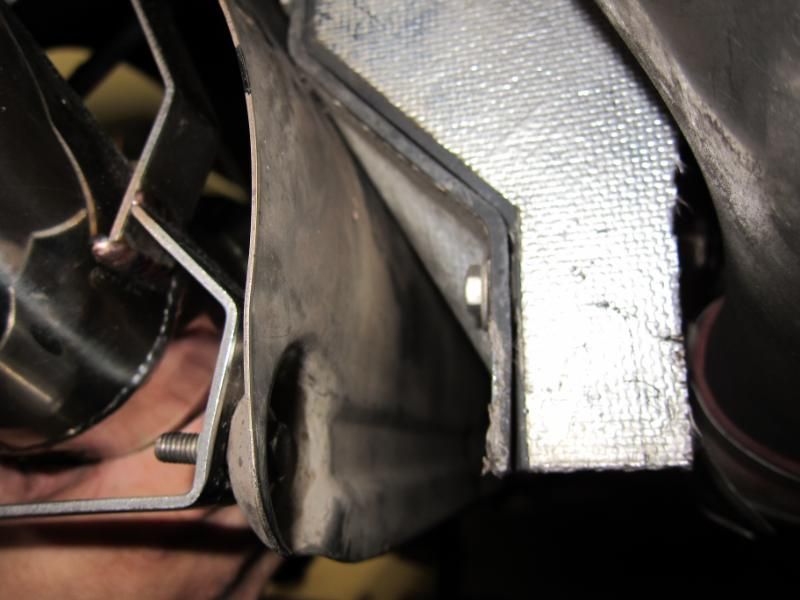
So I fit up the new O2 sensor, and bolt up the stock heat shield, in readiness for installation...
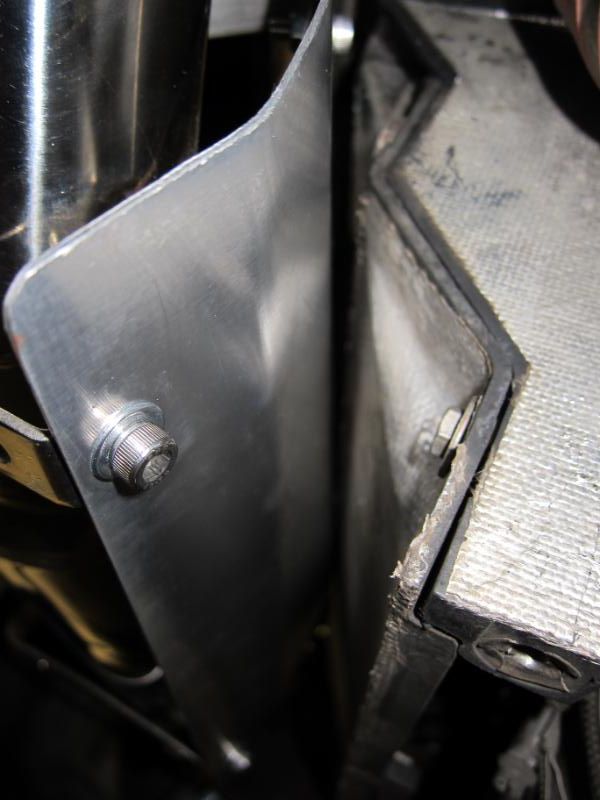
...where it immediately fouls the (plastic) shrouding over the lower cam cover. I'm not sure if the stock one did this as well, or if this is just a sign that the DesignTek cat reallY *was* made on a plasticine jig
But when life gives you lemons....you get your fabrication on
The new shield needs to have several bends in it, and a find that a neat home made way to create nice folds is to sandwich the sheetmetal between two planks of wood, and then use a second plank of wood to carefully fold over the sheetmetal, using both hands and all your weight.
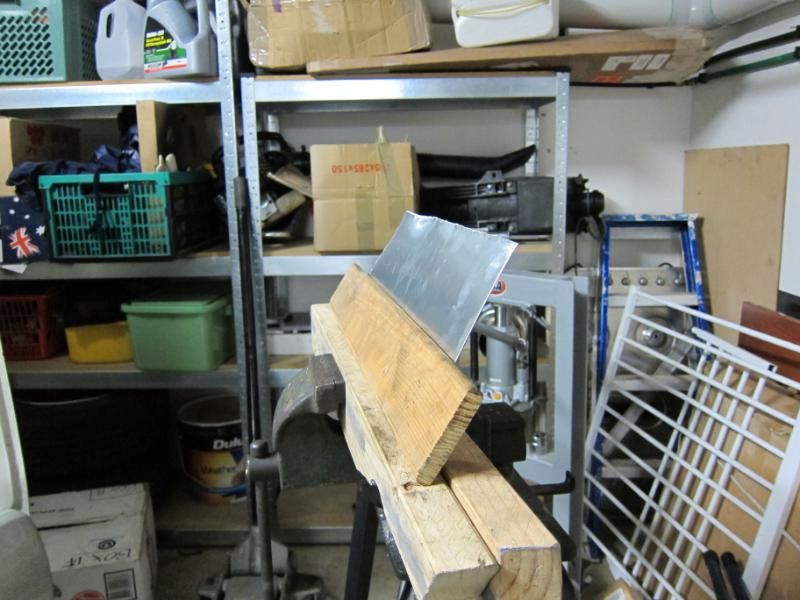
And the finished product...the front of the shield needed to curve inwards to avoid fouling the plastic shroud, so I made a piecut there and folded in two sections of the metal, and riveted in a short strap of metal behind it to hold the shape.
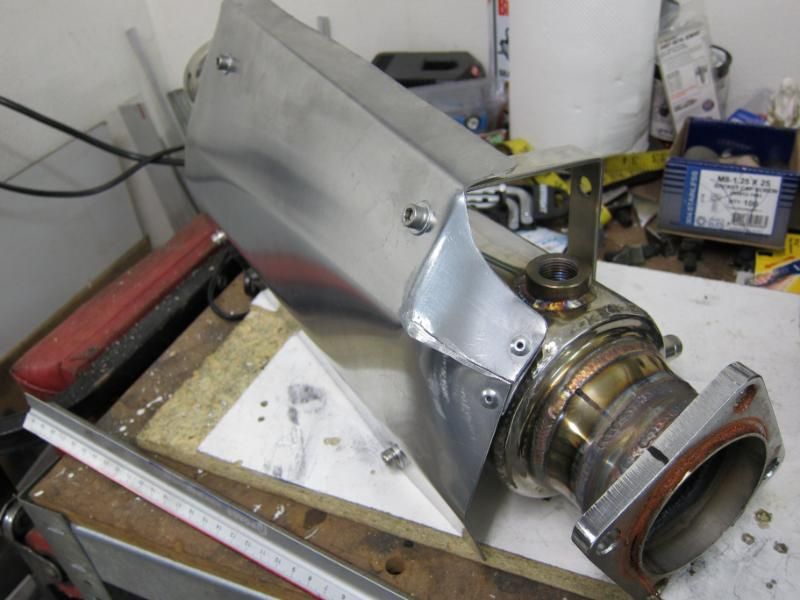
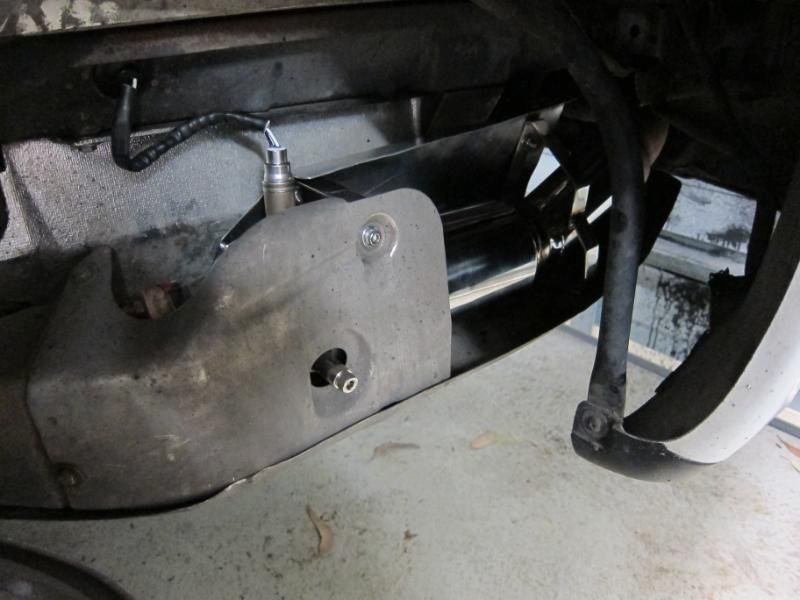
Back into the car it goes (and replacing as many of those horrible oem fasteners with nuts and bolts as possible)
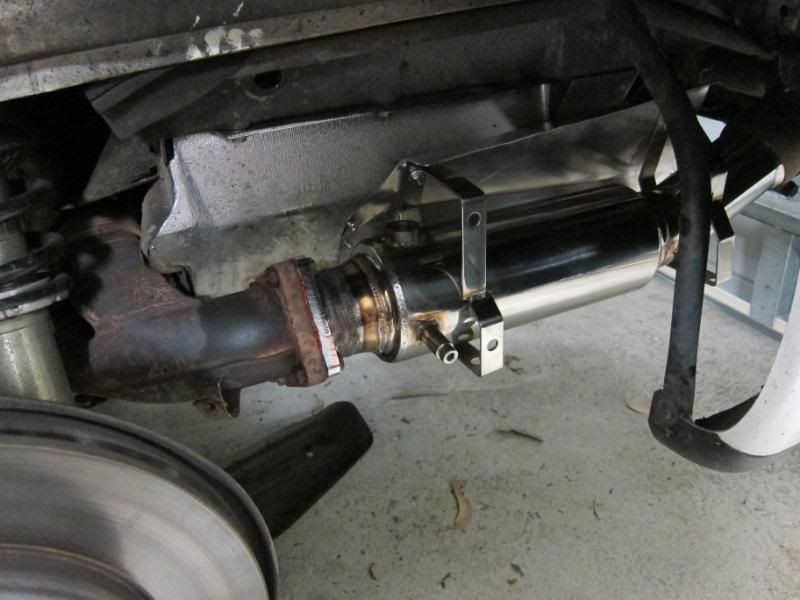
And we now have a nice gap between the cat shield and the plastic shroud.
I do think it looks a little goofy, though, with the heat shield being so much bigger than the cat...I reckon it'll look better if I cut the heat shield mounts off the cat, and make new mounts which allow a more form-fitting shield to be made.
But for the time being, it has made it noticeably louder, with more of a hollow bark to the exhaust note which isn't objectionable Power-wise, maybe I have to drive it more, but on the cruise into work this morning, it did seem to be a little sprightlier.
It looked super nice, but unfortunately, when I tried to install it, it didn't fit...it was a half inch too short. Two of the joints on the exhaust are quite unusual. Instead of a conventional bolted flange, you have this olive, which goes between the 2 pipes (which have bellmouthed ends) and then that big bolted clamp goes over the joint.
So it sat on the shelf for many months, until I took it to my friends at Castle Hill Exhaust, where they cut the cat pipe, and expertly TIG'd in a half inch section.
The first step of installation, is to remove all the heat shields from the old cat.
Which isn't easy, because of these horrible things. Instead of using self-tapping screws and speednuts, the 911 has these stainless fastneners which are a little bit like a hybrid of a speednut and a regular nut. The nut has a square base, and the idea is that the stainless clip prevents the nut from turning as you loosen the bolt from the other side. The problem is, stainless threads have a habit of jamming with age, and so what happens is the nut jams, and then tears the crap out of the clip (which isn't strong enough to deal with it). So then you have to find some way of getting it off with pliers, etc. It's a real nuisance and a lousy design.
But eventually the old cat is out, and it's a lot bulkier than the new one. Also you'll spot that I'm taking the opportunity to put a new O2 sensor in....and if you're looking at this pic, thinking that the brackets for the heat shields don't seem to be the same, well, hold that thought
The old cat was in good shape, with no obvious signs of the substrate being damaged (they can go crumbly with age).
But the new one clearly has a more open "weave" to it, and should be more free-flowing.
So I fit up the new O2 sensor, and bolt up the stock heat shield, in readiness for installation...
...where it immediately fouls the (plastic) shrouding over the lower cam cover. I'm not sure if the stock one did this as well, or if this is just a sign that the DesignTek cat reallY *was* made on a plasticine jig
But when life gives you lemons....you get your fabrication on
The new shield needs to have several bends in it, and a find that a neat home made way to create nice folds is to sandwich the sheetmetal between two planks of wood, and then use a second plank of wood to carefully fold over the sheetmetal, using both hands and all your weight.
And the finished product...the front of the shield needed to curve inwards to avoid fouling the plastic shroud, so I made a piecut there and folded in two sections of the metal, and riveted in a short strap of metal behind it to hold the shape.
Back into the car it goes (and replacing as many of those horrible oem fasteners with nuts and bolts as possible)
And we now have a nice gap between the cat shield and the plastic shroud.
I do think it looks a little goofy, though, with the heat shield being so much bigger than the cat...I reckon it'll look better if I cut the heat shield mounts off the cat, and make new mounts which allow a more form-fitting shield to be made.
But for the time being, it has made it noticeably louder, with more of a hollow bark to the exhaust note which isn't objectionable
Power-wise, maybe I have to drive it more, but on the cruise into work this morning, it did seem to be a little sprightlier.
03-27-2012, 09:21 PM
#150
Burning Brakes
Thread Starter
I'll see what I can do...might have to wait until the weekend, so that I don't wake up any neighbours with gratuitous engine revving, tho
Well things are louder overall because the new cat is less of a restriction, but the new shield is of thicker material and is affixed with bigger bolts than the stock shield, so it doesn't rattle or vibrate or anything like that...
Well things are louder overall because the new cat is less of a restriction, but the new shield is of thicker material and is affixed with bigger bolts than the stock shield, so it doesn't rattle or vibrate or anything like that...