

pulled the a.c. compressor

Super Duper Moderator
Lifetime Rennlist
Member
Lifetime Rennlist
Member

Joined: Nov 2004
Posts: 7,773
Likes: 21
From: YQU
Congrats - compressor is the first (but easiest) step....
Next you have to remove the left front and rear wheels, wheelwell covers, and rocker panel (you did buy more clips for that, didn't you? ) as well as the trim piece below the rear edge of the hood - below the windshield.
Unbolt the fan unit in-front of the left front wheel well and the lines that arch over the wheel down to the drier that is behind the front left wheel. The drier also has lines that go into a deep, dark hole and reappear under the trim panel that is at the back edge of the hood (below the windshield). This trim panel also has to come off to follow the lines to the evaporator - that is a job for next winter for me so I just cut those off and will remove the fuel tank and dig those last bits out when the snow falls.
Then follow the two other lines along the lower edge of the body (behind the rocker panel) back to the left rear wheelwell. Mine were all rusted solid so I just dremel cut them out. They arch over the left rear wheel alongside the carbon cannister and enter the engine bay high above and just behind the left rear wheel. Once you undo these lines, the ones you cut can be pulled out.
You can buy small plates from Porsche (for non-A/C) cars to cover over where the lines enter below the windshield and engine bay to keep the crap out (I forgot the p/n but can check). I also cut the a/c line brackets off behind the rocker panel and all the body studs used to hold the bits in place.
All told, about an 8 hour job for another 4.3 kg loss of weight (not counting compressor).
Marc
Next you have to remove the left front and rear wheels, wheelwell covers, and rocker panel (you did buy more clips for that, didn't you?
) as well as the trim piece below the rear edge of the hood - below the windshield.Unbolt the fan unit in-front of the left front wheel well and the lines that arch over the wheel down to the drier that is behind the front left wheel. The drier also has lines that go into a deep, dark hole and reappear under the trim panel that is at the back edge of the hood (below the windshield). This trim panel also has to come off to follow the lines to the evaporator - that is a job for next winter for me so I just cut those off and will remove the fuel tank and dig those last bits out when the snow falls.
Then follow the two other lines along the lower edge of the body (behind the rocker panel) back to the left rear wheelwell. Mine were all rusted solid so I just dremel cut them out. They arch over the left rear wheel alongside the carbon cannister and enter the engine bay high above and just behind the left rear wheel. Once you undo these lines, the ones you cut can be pulled out.
You can buy small plates from Porsche (for non-A/C) cars to cover over where the lines enter below the windshield and engine bay to keep the crap out (I forgot the p/n but can check). I also cut the a/c line brackets off behind the rocker panel and all the body studs used to hold the bits in place.
All told, about an 8 hour job for another 4.3 kg loss of weight (not counting compressor).
Marc
Instructor
Joined: Aug 2009
Posts: 133
Likes: 0
From: West Marin CA.
I would love to do this but at the same time I feel like it would never get installed again... that worries be because it would be harder to sell the car.. but wait.. should I just vow never to sell this car unless I HAVE TO?
Thread Starter
Rennlist Member
Joined: Mar 2010
Posts: 93
Likes: 0
From: atlanta
thanks for all of the feedback,
-kdf, my sentiments exactly. it's been fun. i'm more of a take it apart'er than a put it back together'er, fortunately i've a good mech. -marc, the explanation is much appreciated. haven't ordered the clips yet, but was wanting to replace the rocker panel weather stripping anyway. -might be time to contact the pelican...
-kdf, my sentiments exactly. it's been fun. i'm more of a take it apart'er than a put it back together'er, fortunately i've a good mech. -marc, the explanation is much appreciated. haven't ordered the clips yet, but was wanting to replace the rocker panel weather stripping anyway. -might be time to contact the pelican...

RL Community Team
Rennlist Member
Rennlist Member
Joined: Oct 2003
Posts: 7,853
Likes: 860
the compressor mount on the engine console weighs probably 1 pound once cut off the rest of the console - hardly worth the mess and effort... and every A/C component nicely unbolts from the car - no need to cut lines like that!  Those are valuable items to someone!
Those are valuable items to someone!
Thread Starter
Rennlist Member
Joined: Mar 2010
Posts: 93
Likes: 0
From: atlanta
i agree. taking the sawzall to it for the sake of a cleaner looking engine compartment and weight savings of 1lb. is not something i plan to do. if the engine is ever out again i may remove it but for now it stays..
Rennlist Member

Joined: Jan 2007
Posts: 2,388
Likes: 17
From: Vancouver Island, BC , Canada
Does anyone have a picture of the part/parts that would replace the aircon bracket ones removed. There would have to be some kind of spacer for the engine support to place it in the same spot.

Instructor
Joined: Jan 2008
Posts: 219
Likes: 0
From: Calgary, AB
Nordschleife Master
Joined: Feb 2007
Posts: 5,095
Likes: 3
From: Cheshire, UK
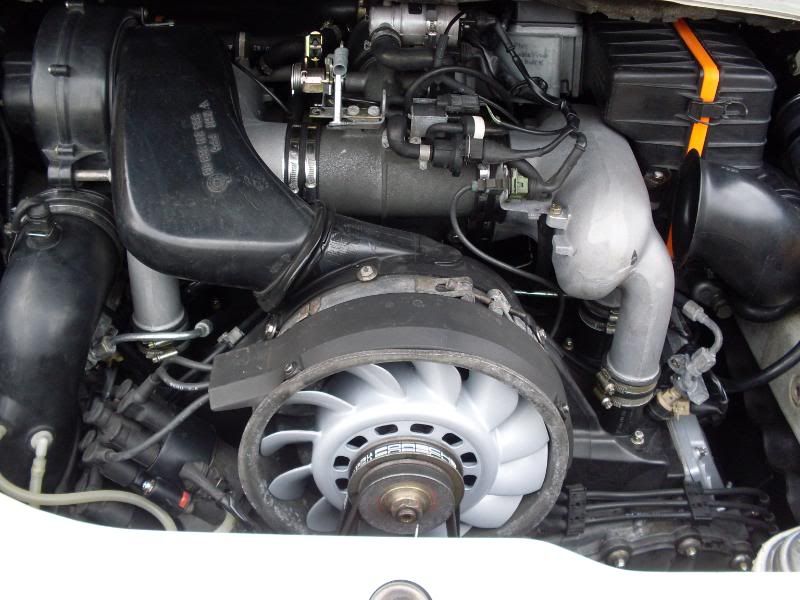
The engine bay looks a lot neater with the aircon bracket cut down. You can't even see it from this angle:
Here's what the remains of the bracket looks like from the top:
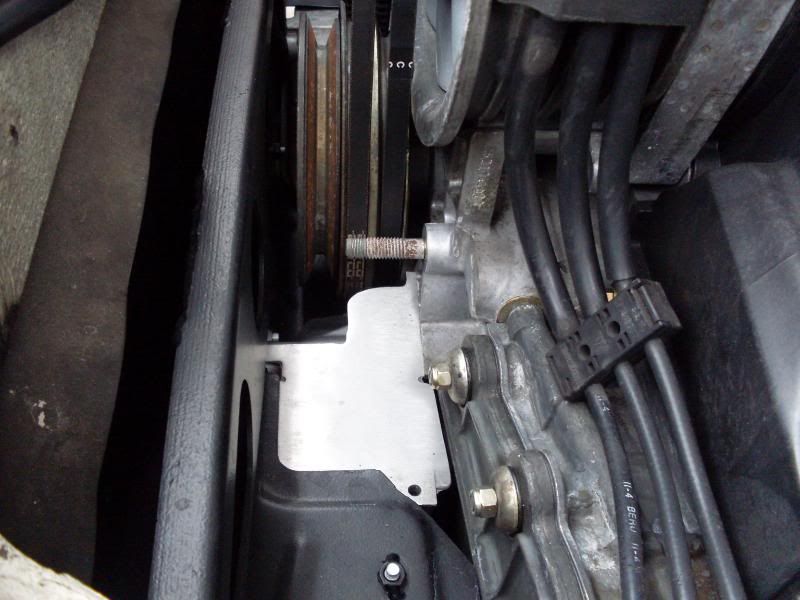
Mine was cut down by the specialists who did my rebuild. I'll see if they have a photo of the bracket before it was put back on the engine.
Here's what the remains of the bracket looks like from the top:
Mine was cut down by the specialists who did my rebuild. I'll see if they have a photo of the bracket before it was put back on the engine.

Instructor
Joined: Jan 2008
Posts: 219
Likes: 0
From: Calgary, AB

Addict
Rennlist Member
Rennlist Member
Joined: Mar 2002
Posts: 3,606
Likes: 1
From: Highland Park, IL
Not hard but, to remove it, you need to lower the motor and remove:
- Cat and primary mufflers
- Rear engine tin
- Engine bracket mount
- Crank pulley and belts
And once you've gone this far, you may as well:
- Install Rennline bracket brace
- Replace the front crank seal
- Modify the a/c bracket to facilitate access to the chain housing, i.e. grind it down so that it clears the pulley
- Install new belts
I did all this over the Winter while replacing the chain housing gaskets and am very pleased with the results. But it's one of those jobs you really want to do once. So, unless you're ready to do the full monty, you may want to hold off until you've got other jobs to address.
$0.02
Drifting
Joined: Aug 2002
Posts: 2,211
Likes: 71
From: Stockholm, Sweden
The "non A/C bracket" looks exactly as the cut off version and cost like 550-600 USD from Porsche here in Sweden so it well worth cutting the one you have. Saw it off at the casting and then sand down the surface with a finer and finer paper and you'll end up with a factory look.
Thomas
Thomas
Three Wheelin'
Joined: Jul 2007
Posts: 1,307
Likes: 0
From: Helotes, TX
OH NOOOOOOO. You cut the hoses? Could have been some return $$$ on eBay. I think you cut them to make it "impossible" to turn back.
I've seen the aluminum carrier on eBay, so I don't think you would get much for one of those. I guess you could cut it off, but to make it purdy you would want to remove it and install spacers on the appropriate studs.
Wish I could afford a track dedicated car. Good luck.
Took me about two days to get that bracket off the motor the first time I did a rebuild, and the motor was out of the car! Had to read up on the proper tool for crank pulley removal, learn about the alternate DIY tool (turned from a proper size bolt), locate the bolt and get it shipped in and machined.