
ISV, air-flow meter and idle microswitch clean
 05-26-2004, 01:36 PM
#1
Addict
Rennlist Member
Rennlist Member
Thread Starter
I had a problem with a poor idle recently. With thanks to John B, Adrian and Taj I finally got around to cleaning the bits detailed above and thought this might be of use to anyone with a simple idle problem.
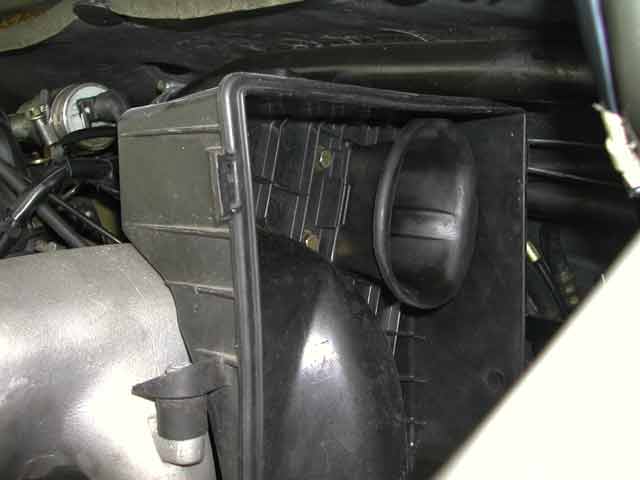
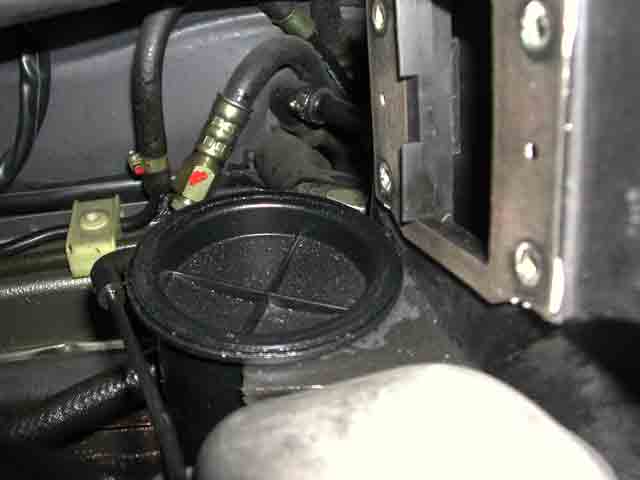
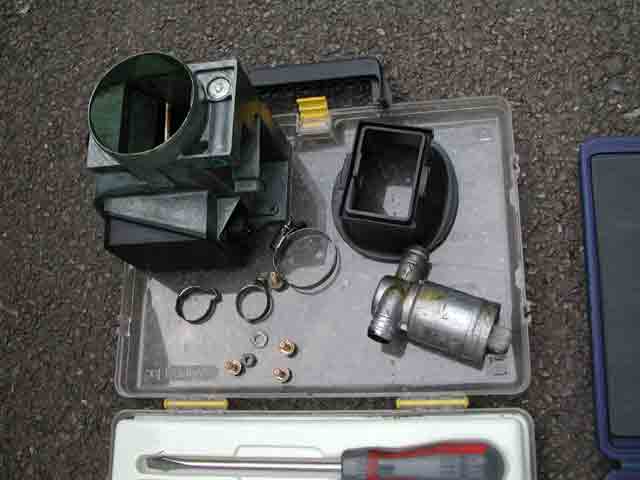
First off I removed the right side of the airbox, with filter. There are 4 clips, two front and two back. The clips should be fixed (fronts to the right side of the airbox, rears to the left) but my airbox was battered and the clips not held on. My rear lower was nowhere to be found, which in itself could apparently have caused the dodgy idle. A second-hand airbox cost me �60 and the filter is held squarely now and the clips don't disappear.
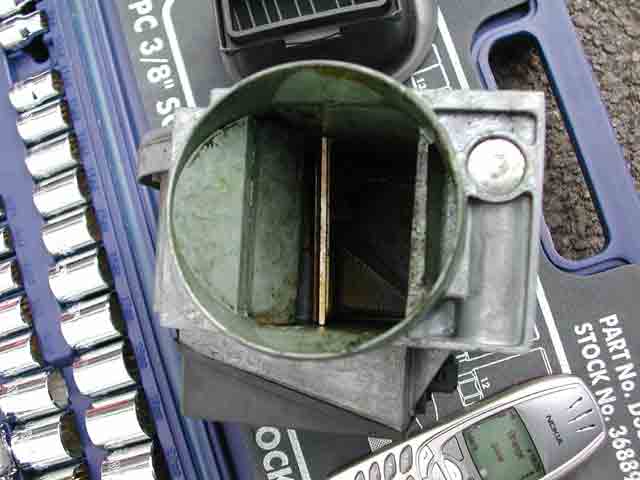
With the filter and half airbox out you will see this:
Remove the 4 nuts securing the left side of the airbox to the air-flow meter. It is much easier to get the 2 nuts out behind the plastic tube after you have levered the plastic tube out Be aware there is a gasket between the airbox and the air-flow meter. Chances are it will remain stuck to the airbox. As Jason kindly points out later in this thread Porsche recommend changing this gasket - 928.110.201.01. Another of Jason's tips is to not separate the airbox from the AFM at all; you can clean the AFM while it is still attached to the airbox, just out of the car.
If you want to remove the airbox completely there is a nut at the bottom of the airbox shown here and the last nut (and washer) to remove is the obvious silver one holding the left side of the airbox down at the front. Once I'd loosened mine it threatened to spring off presumably because of the rubber damping below it. Hold it firm! All 6 bolts that get released use a 10mm socket. Finally there are two hoses attached to the left side of the airbox; a small one that enters about level with the top of the vacuum reservoir (visible in a picture below) and a larger hose low down into the back of the airbox, also visible in Jason's picture, just above the lower clip on the right hand side. Both twist off and are far easier to get off than back on.... A little contortion is required.
First off I removed the right side of the airbox, with filter. There are 4 clips, two front and two back. The clips should be fixed (fronts to the right side of the airbox, rears to the left) but my airbox was battered and the clips not held on. My rear lower was nowhere to be found, which in itself could apparently have caused the dodgy idle. A second-hand airbox cost me �60 and the filter is held squarely now and the clips don't disappear.
With the filter and half airbox out you will see this:
Remove the 4 nuts securing the left side of the airbox to the air-flow meter. It is much easier to get the 2 nuts out behind the plastic tube after you have levered the plastic tube out
Be aware there is a gasket between the airbox and the air-flow meter. Chances are it will remain stuck to the airbox. As Jason kindly points out later in this thread Porsche recommend changing this gasket - 928.110.201.01. Another of Jason's tips is to not separate the airbox from the AFM at all; you can clean the AFM while it is still attached to the airbox, just out of the car.If you want to remove the airbox completely there is a nut at the bottom of the airbox shown here and the last nut (and washer) to remove is the obvious silver one holding the left side of the airbox down at the front. Once I'd loosened mine it threatened to spring off presumably because of the rubber damping below it. Hold it firm! All 6 bolts that get released use a 10mm socket. Finally there are two hoses attached to the left side of the airbox; a small one that enters about level with the top of the vacuum reservoir (visible in a picture below) and a larger hose low down into the back of the airbox, also visible in Jason's picture, just above the lower clip on the right hand side. Both twist off and are far easier to get off than back on.... A little contortion is required.
Last edited by DavidI; 09-04-2004 at 12:50 PM.
 05-26-2004, 01:44 PM
#2
Addict
Rennlist Member
Rennlist Member
Thread Starter
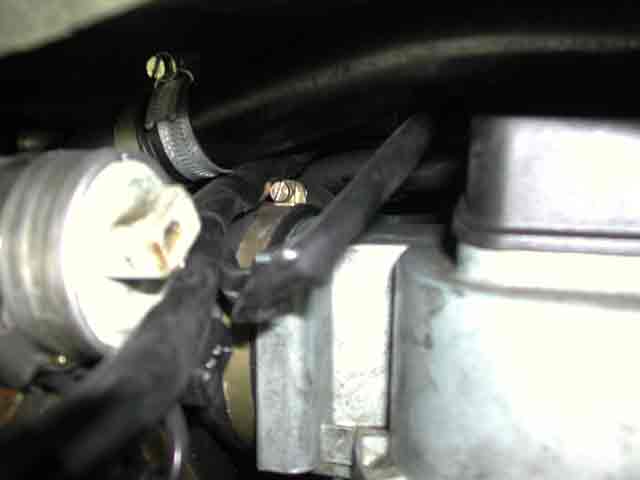
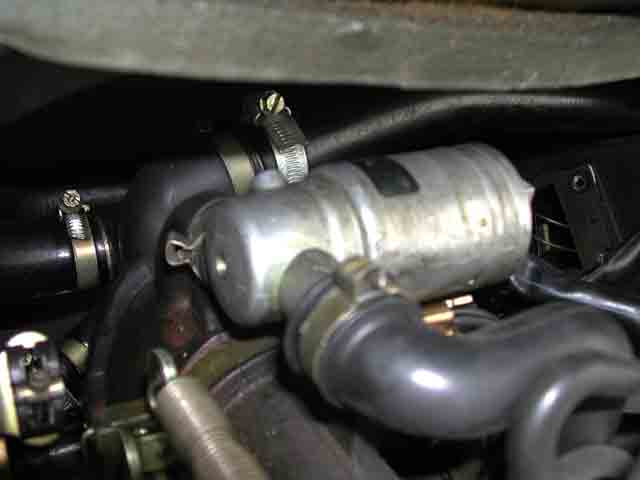
With the 4 bolts out from the right hand side of the air-flow meter you need to free the left hand side, by slackening the jubilee clip pretty much in the centre of this picture that holds the large-diameter hose onto the air-flow meter. Note! There is another jubilee clip in the picture, on a smaller hose, more toward the top left of the picture. Please only loosen the correct clip!!
With the clip loose you can easily work the air-flow meter away from the hose and it slides towards you quite easily. There is a clip attached to the back of the meter which needs to be removed, so do not try to take the meter out completely; to release the clip press down on the long edge of the metal retainer and the sides will splay outward and the clip can be withdrawn. Note there are 3 clips like this that can be released and cleaned, one on the meter (5 connecting pins) one on the ISV (2 connecting pins) and one below the ISV (3 pins). They cannot be interchanged so I didn't bother labelling them!
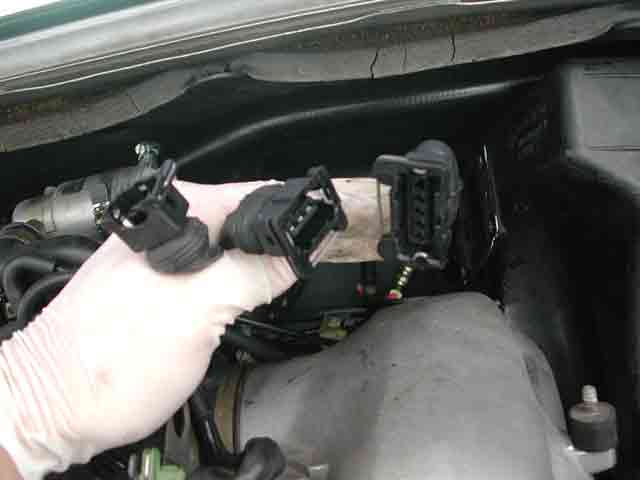
With the clip loose you can easily work the air-flow meter away from the hose and it slides towards you quite easily. There is a clip attached to the back of the meter which needs to be removed, so do not try to take the meter out completely; to release the clip press down on the long edge of the metal retainer and the sides will splay outward and the clip can be withdrawn. Note there are 3 clips like this that can be released and cleaned, one on the meter (5 connecting pins) one on the ISV (2 connecting pins) and one below the ISV (3 pins). They cannot be interchanged so I didn't bother labelling them!
Last edited by DavidI; 05-27-2004 at 05:33 AM.
05-26-2004, 01:48 PM
#3
Addict
Rennlist Member
Rennlist Member
Thread Starter
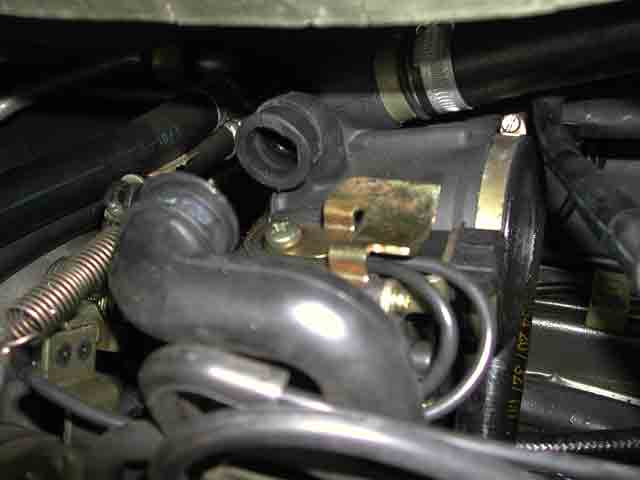
Here's the hose that was connected to the air-flow meter. This picture shows the jubilee clip that needs to be undone much clearer than the one with the meter in place:
It's also easy to see where the other two connectors were plugged into, on the ISV and just underneath it.
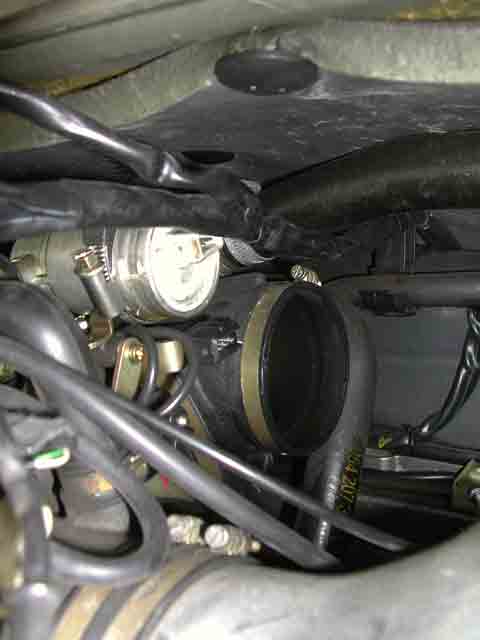
Here's the space left by the air-flow meter showing the vacuum reservoir that is normally hidden, and the gasket (928.110.201.01) mentioned earlier. Note the thin pipe mentioned earlier going into the reservoir. This needs to be removed if you intend taking out the left side of the airbox.
It's also easy to see where the other two connectors were plugged into, on the ISV and just underneath it.
Here's the space left by the air-flow meter showing the vacuum reservoir that is normally hidden, and the gasket (928.110.201.01) mentioned earlier. Note the thin pipe mentioned earlier going into the reservoir. This needs to be removed if you intend taking out the left side of the airbox.
Last edited by DavidI; 09-04-2004 at 12:52 PM.
 05-26-2004, 02:12 PM
#5
Addict
Rennlist Member
Rennlist Member
Thread Starter
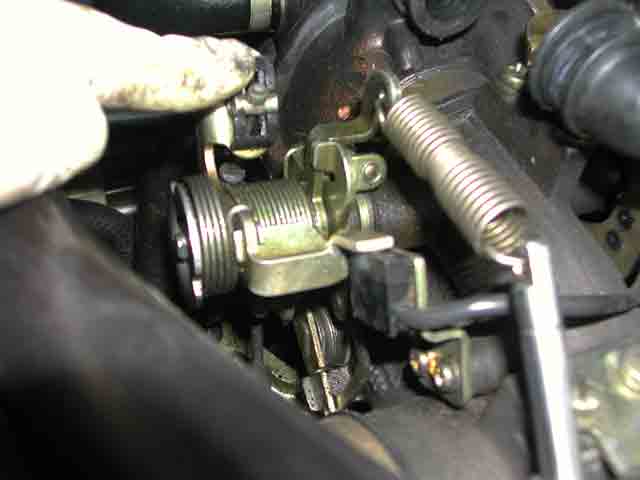
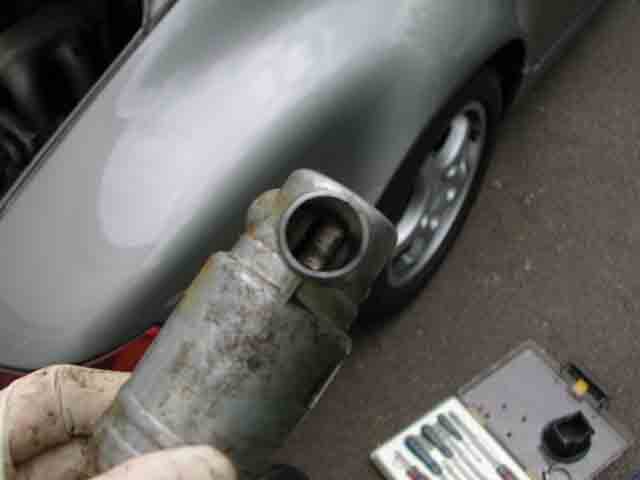
Next up comes releasing the ISV. You can see in the picture 2 above the jubilee clip that goes around the ISV and holds it to a brass-coloured frame (I've removed it when taking the picture below) - it's easier to see the frame on not the next picture, but the one below that. I removed the jubilee clip first but you could loosen it and leave it in place to stop the ISV moving while releasing the crimp clamps holding the hoses to either side of the ISV. You will need to replace these clips, they are part number 999 512 380 02. I bought replacement jubilee clips too but didn't use them, 999 512 499 00. The crimp clips can be cut off, or loosened by working a flat bladed screwdriver into the piece that is crimped and gently widening it. I did this while holding the hoses still to not put any pressure on the hoses.
Here's the space vacated by the ISV, showing the plate that the ISV sits on and that the jubilee clip goes around. Note one side of the ISV is longer than the other; the far side hose comes off very easily, the near side takes a bit more effort.
Here's the space vacated by the ISV, showing the plate that the ISV sits on and that the jubilee clip goes around. Note one side of the ISV is longer than the other; the far side hose comes off very easily, the near side takes a bit more effort.
Last edited by DavidI; 05-26-2004 at 02:45 PM.
05-26-2004, 02:17 PM
#6
Addict
Rennlist Member
Rennlist Member
Thread Starter
The idle microswitch is the black rectangle with the cable running to it under the long spring;
If you press on the bit my finger is on, it opens, like this:

I gave a quick spray with carb cleaner and wiped both sides down to make sparkly clean - they were very grubby.
If you press on the bit my finger is on, it opens, like this:
I gave a quick spray with carb cleaner and wiped both sides down to make sparkly clean - they were very grubby.
Trending Topics
05-26-2004, 02:27 PM
#8
Technical Guru
Rennlist Member
Rennlist Member
Porsche suggests replacing the gasket between the air flow sensor and the airbox if separated and if you remove the 4 M6 x 16 studs to use Loctite 270 on them when replacing them. I recently went a bit crazy with a brand new variable speed dremel tool and some blue magic metal polish (my airflow sensor is now shiny like a mirror) and with Porsche's gasket instructions I didn't bother to separate the box from the sensor. Nice pics!
05-26-2004, 02:39 PM
#9
Addict
Rennlist Member
Rennlist Member
Thread Starter
I think the disassembly took around 45 minutes, including plenty of inexperienced fumbling! Then came the good part, I got to play with my new best friend, Carb Cleaner.

I cleaned the contacts on the ISV and air-flow meter and the contacts on the plugs in the car (note carb cleaner carries warning about using on rubber and plastic, so I used a cloth to avoid spraying those bits) then cleaned the ISV and air-flow meter themselves. You can remove the plastic lid from the air-flow meter (cut the sealant and lift off), and clean the contacts inside, but I decided to leave that for another day if my idle problem isn't cured. Loads of gunk came out of both bits.
The only difficulty I had when reassembling was closing the crimp clips around the far side of the ISV. You need to open the jaws of the pliers in a tight space (throttle below, bodywork above) and you don't have much space to twist the ISV because then the hose that you're clamping won't sit perfectly with the ISV. It looked a bit scruffy for a while but ended up looking pretty much how Dr Porsche's had done to begin with
Gloves came off (the dogs relaxed), made sure I didn't have any bolts leftover, and the car fired up and idled perfectly, aircon on or off. Of course the real test will come when the engine's really hot again, but I'm fairly confident that the worst I've done is waste my time and rule out a few potential problems from the list!
 05-27-2004, 12:17 PM
#13
Instructor

Join Date: Mar 2002
Location: geneva switzerland
Posts: 243
Likes: 0
Received 0 Likes
on
0 Posts
Thanks a lot David!!
I always wanted to tackle this job but never had the courage!!! Now that I know that it can be done easily, I'll astrain myself to do it on my P-car to do list!
Gruetzi Thomas
I always wanted to tackle this job but never had the courage!!! Now that I know that it can be done easily, I'll astrain myself to do it on my P-car to do list!
Gruetzi Thomas
08-27-2004, 06:40 PM
#14
Addict
Rennlist Member
Rennlist Member
David, any update? Is the car idling properly now? How about when really warm? Thanks again for an excellent write up. This kind of thing is really appreciated!
Cheers,
Cheers,
08-27-2004, 09:12 PM
#15
Burning Brakes
Join Date: May 2003
Location: N. OC, CA
Posts: 1,060
Likes: 0
Received 0 Likes
on
0 Posts
Originally Posted by Kahdmus
David, any update? Is the car idling properly now? How about when really warm? Thanks again for an excellent write up. This kind of thing is really appreciated!
Cheers,
Cheers,
