When you click on links to various merchants on this site and make a purchase, this can result in this site earning a commission. Affiliate programs and affiliations include, but are not limited to, the eBay Partner Network.
Hey folks, just finished this on my 89 and thought I might post a time-saver or two for those who haven't done it.
1. Drain Oil
2. Remove Oil Filter
3. Remove headlight motor fuse and roll the headlights to up position
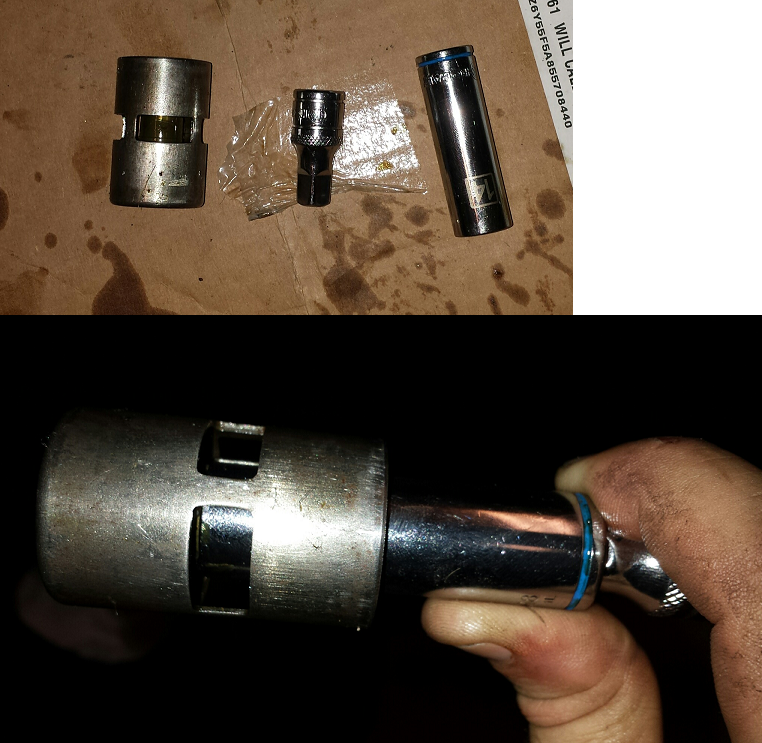
4. Removing the screw plug (it is next to where the oil filter was). Use 17mm Allen Head Socket - same that you use for manual transmission fluid.
4a. With the Oil Filter removed, you can absolutely get a wrench on it using an elbow and various extensions.
4b. Breaking this takes some serious effort - but there is no way you're going to strip anything - put a breaker bar on and break the sumbich.
4c. You'll have to get the Allen Head Socket off and extensions off before completely unscrewing, or they'll get caught under the a header bolt. Turn by hand the rest of the way.
5. Remove the old spring and sealing ring
6. Short cut for removing thermostat... everything I have read says to grab with needle nose pliers. This is not at all easy, in the same way it is not easy getting the bottom fastener of the distributor in. There is not enough room to both grab the old thermostat and also pull it up - you can't lift up far enough before needing to re-grip this pliers and losing it again. There is also vacuum pressure which tries to pull the thermostat back in. Fear not..
Take a deep 14mm socket and add the shortest (about 1") extension you have. This socket will fit right over the bulb of the oil thermostat. You can then put a little pressure with your thumb to "hook" the bulb and easily pull it out.
Installation is pretty easy - drop the new thermostat in, put in the new spring, and take a new sealing ring and put it on the plug. Use some lithium grease to make the ring stick to the top of the plug so it doesn't keep sliding off while you're trying to get it threaded. Wipe as much oil off the plug as you can, put the allen head on it (without anything else), and re-insert by hand. You have to overcome the spring pressure, so use one hand to push down (use the Allen Head to push on), and the other to get it threaded a turn or two until you can wrench it. Latex gloves may help to overcome slipperiness. Torque to 33 ft-lbs.
bumping this up...
is there any known/discovered/accepted interval to replace the Oil cooler thermostat?
Never heard of an interval.
Any time you perform a rebuild, you should really disassemble every part of the housing, especially with a failure like scuffed cylinders, spun bearings, worn oil pump...., anything that would introduce shavings to oil system.
If there is, or has ever been metal particle contamination on an engine of a car you are considering, the thermostat will tell the tale because the OD will show scratches across the otherwise smooth shiny surface.
If you ever saw a catastrophic engine failure, you'd throw the external cooler in the trash and install a new one too.
I tried to flush one once, ran my parts cleaner pressure feed through it for a couple hours. On the third or fourth time of capping the ends with my fingers, shaking it and dumping contents onto a clean paper towel, it still looked like Parker Schnabel's gold pan....
Thanks, just wondering for normal service (no destroyed parts) if it ever needs to be swapped out...guess not since it's always well lubed...
i've heard/seen photos of oil coolers being successfully cleaned in an ultrasonic tank - that's an FAA approved method for aircraft for example and there is a shop out here that is known to Porsche racers for the same service.
my particular coolers (Setrab 13 row) are throw-away if needed, because i have several on hand..
Any time you perform a rebuild, you should really disassemble every part of the housing, especially with a failure like scuffed cylinders, spun bearings, worn oil pump...., anything that would introduce shavings to oil system.
If there is, or has ever been metal particle contamination on an engine of a car you are considering, the thermostat will tell the tale because the OD will show scratches across the otherwise smooth shiny surface.
If you ever saw a catastrophic engine failure, you'd throw the external cooler in the trash and install a new one too.
I tried to flush one once, ran my parts cleaner pressure feed through it for a couple hours. On the third or fourth time of capping the ends with my fingers, shaking it and dumping contents onto a clean paper towel, it still looked like Parker Schnabel's gold pan....
T
Our Engines produce Gold when they Blow up? Man, I cant Wait to Start Racing and get some of this money back Ive been Spending...
I have replaced this and the screw on cap keeps leaking oil. I have seriously torqued it down. Did I over-torque it? It is a used oil cooler console, no other known issues with it.
You can see the oil start leaking out a few seconds after the engine is started. Any ideas why I can't get this to seal?
Definitely! I'm thinking about trying another one though.
I just resealed that cap with high temperature sealant. I reused the crush ring and torqued to 59 lbft and everything is squeaky clean! I have a separate thread about it if you are interested.
I torqued mine to 33 ft/lbs as per my original post and never a problem. This is the value from the workshop manual for my year car. I always use new sealing rings for any procedure.
As for how often to do it, I would say anyone should do it if they haven't already. I have always had an oil temp gauge and know exactly where the temp should be in all seasons. I noticed it creeping up, which prompted me to change mine. Note - you won't see the temp increase in the absence of a gauge as the water cooling and fans will work harder to mask it.


 09-13-2015 | 08:07 PM