When you click on links to various merchants on this site and make a purchase, this can result in this site earning a commission. Affiliate programs and affiliations include, but are not limited to, the eBay Partner Network.
An interesting but puzzling discovery. The end float is typically around 0.2mm in a "healthy" motor and as per Porsche end of life is when the float is 0.4mm. Difficult to understand how some pre-load can explain what you have experienced.
If the flexplate clamp is one of those "that slips" it does not take long for it to move to the slipped condition as my experience 18 years ago told me. Many examples see this "2mm slippage" without any long term damage and one tends to assume that such is a pre-cursor to the deaded TBF that ultimately takes out the motor. This slippage did not harm my motor when it was happening but when I discovered it I would not run the motor until the problem was solved [in my case by Loctite 290]. I could tell when it had slipped as a distinct vibration appeared at exactly 3050 rpm.
When TBF occurs the end float typically grinds out to around 1mm or so and then other components restrain further movement. Thus if your end float is in the region of 0.2mm all is well, if it is more than that it may be a sign that trouble is/was looming, if it is more than 0.4mm not good.
Thus if end float is in the acceptable range, I struggle to understand how releasing the tension on the flexplate would explain your findings. From the tenor of your note I assume you fitted the PKLamp in the "as it was at the time" condition without checking for pre-load first?
The end float check should "reveal all" as it were- fingers crossed for you!
Rgds
Fred
Hi Fred!
I too am at a loss to explain all of this.
All of this checked good at the shop back in April, 2000 miles ago. So, I am going to assume I have a stock flexplate clamp that slips.
That is part of why I put on a PKlamp.
You are correct, I fitted the PKlamp without checking the preload. I naively thought it was still good since I had only driven the car 2 months and 2000 miles since the last preload release.
This time, the preload was released, then the PKlamp was refitted. Much better now.
Read on for crank endplay readings, and yet another new issue...
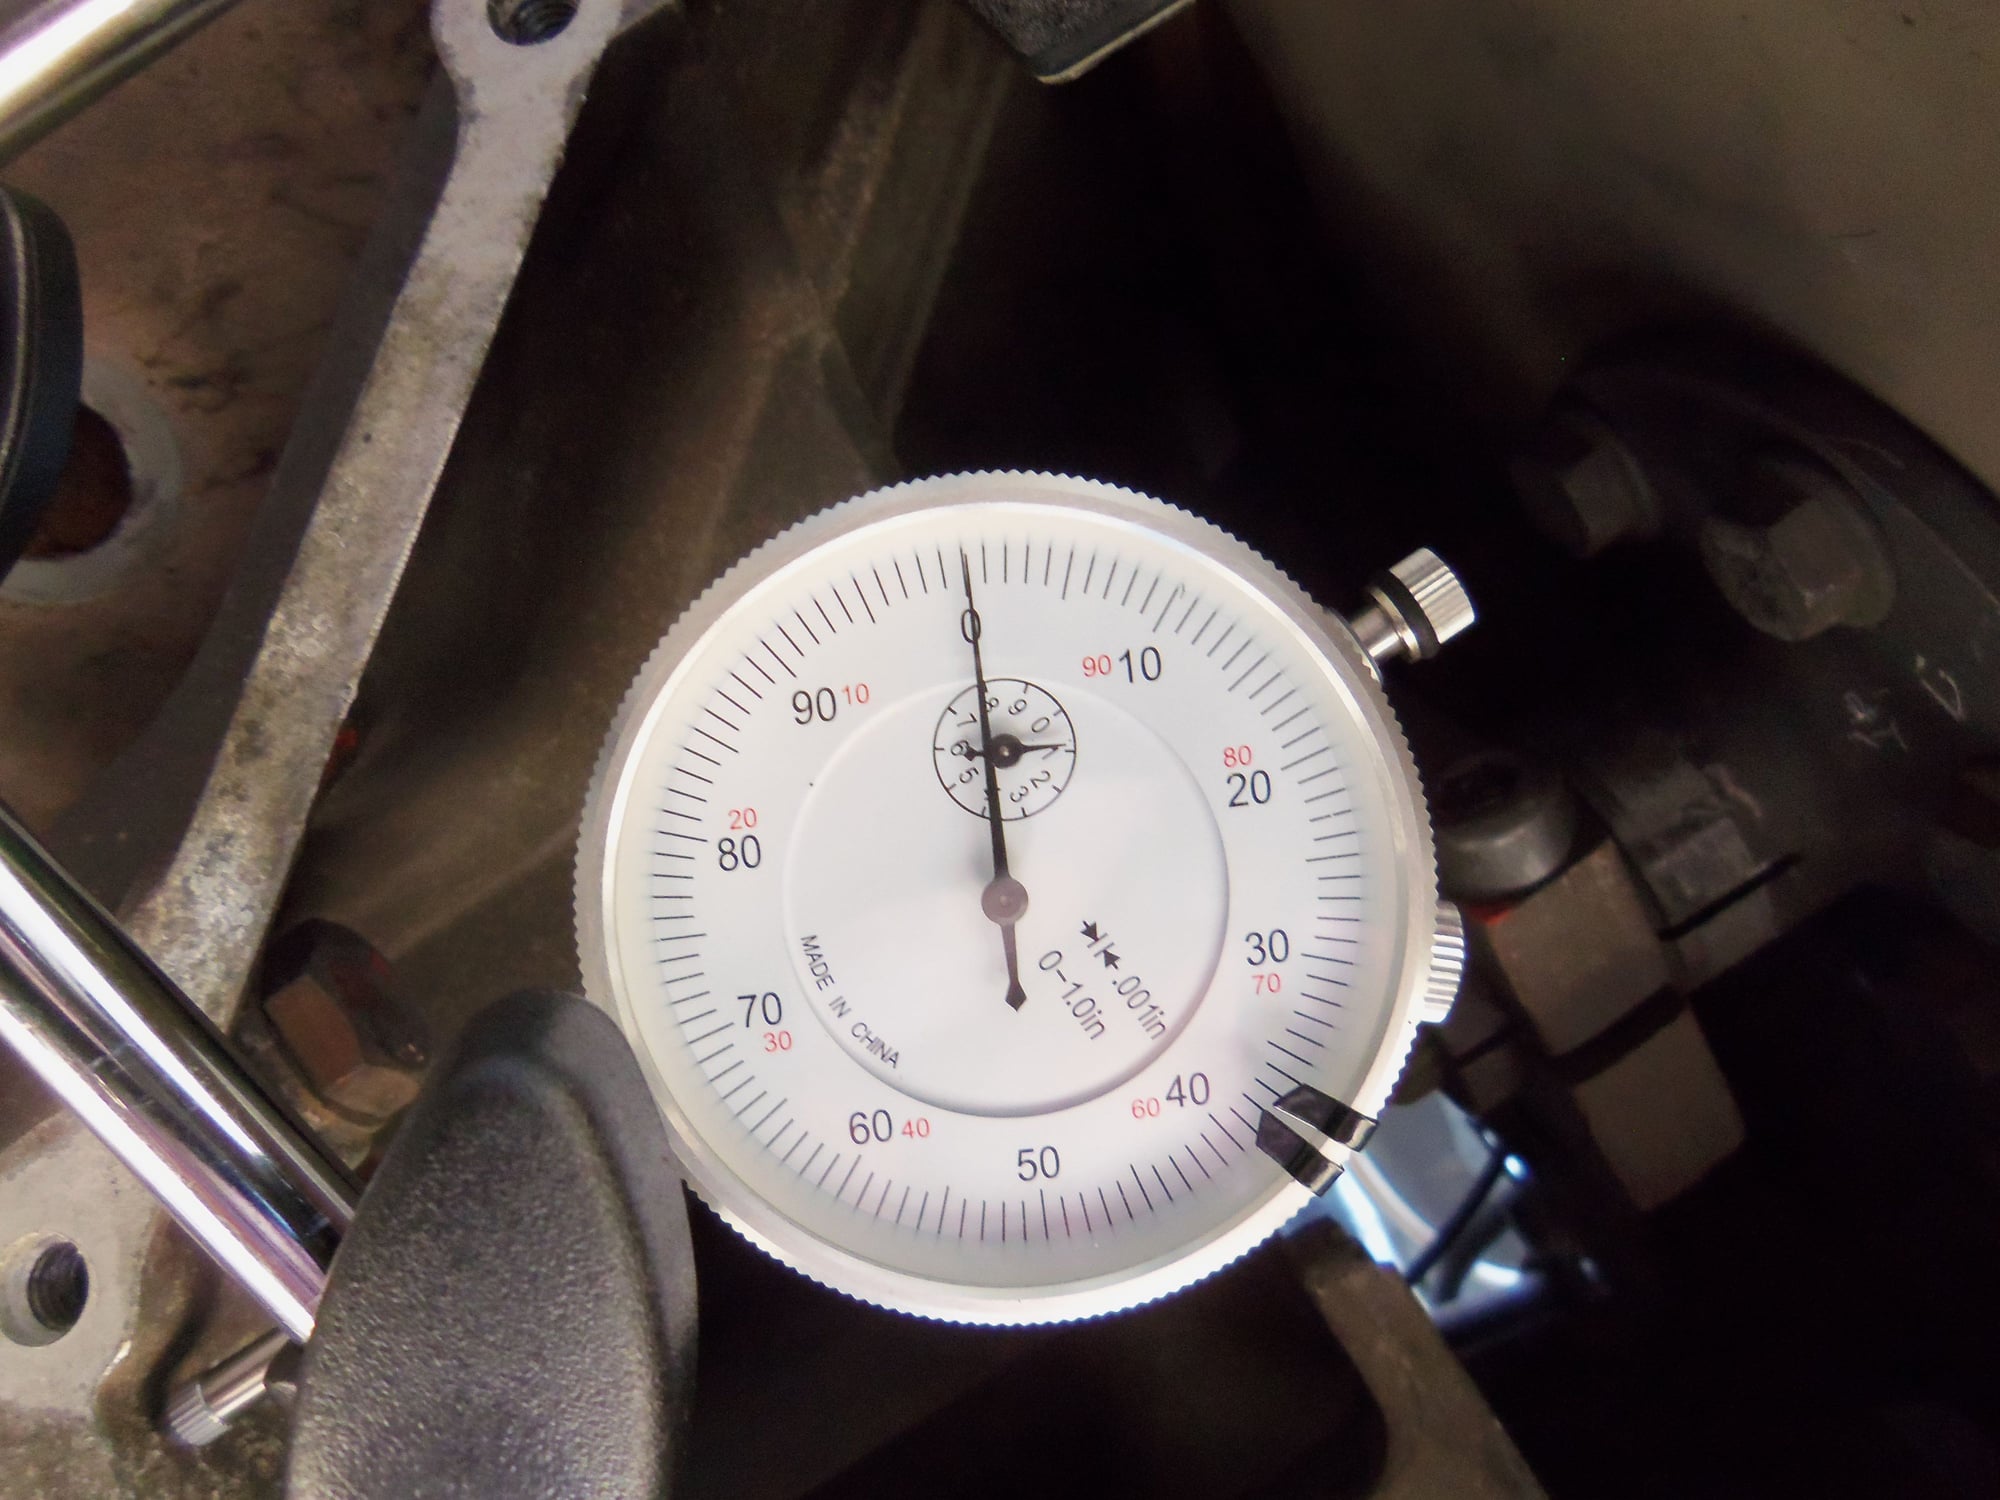
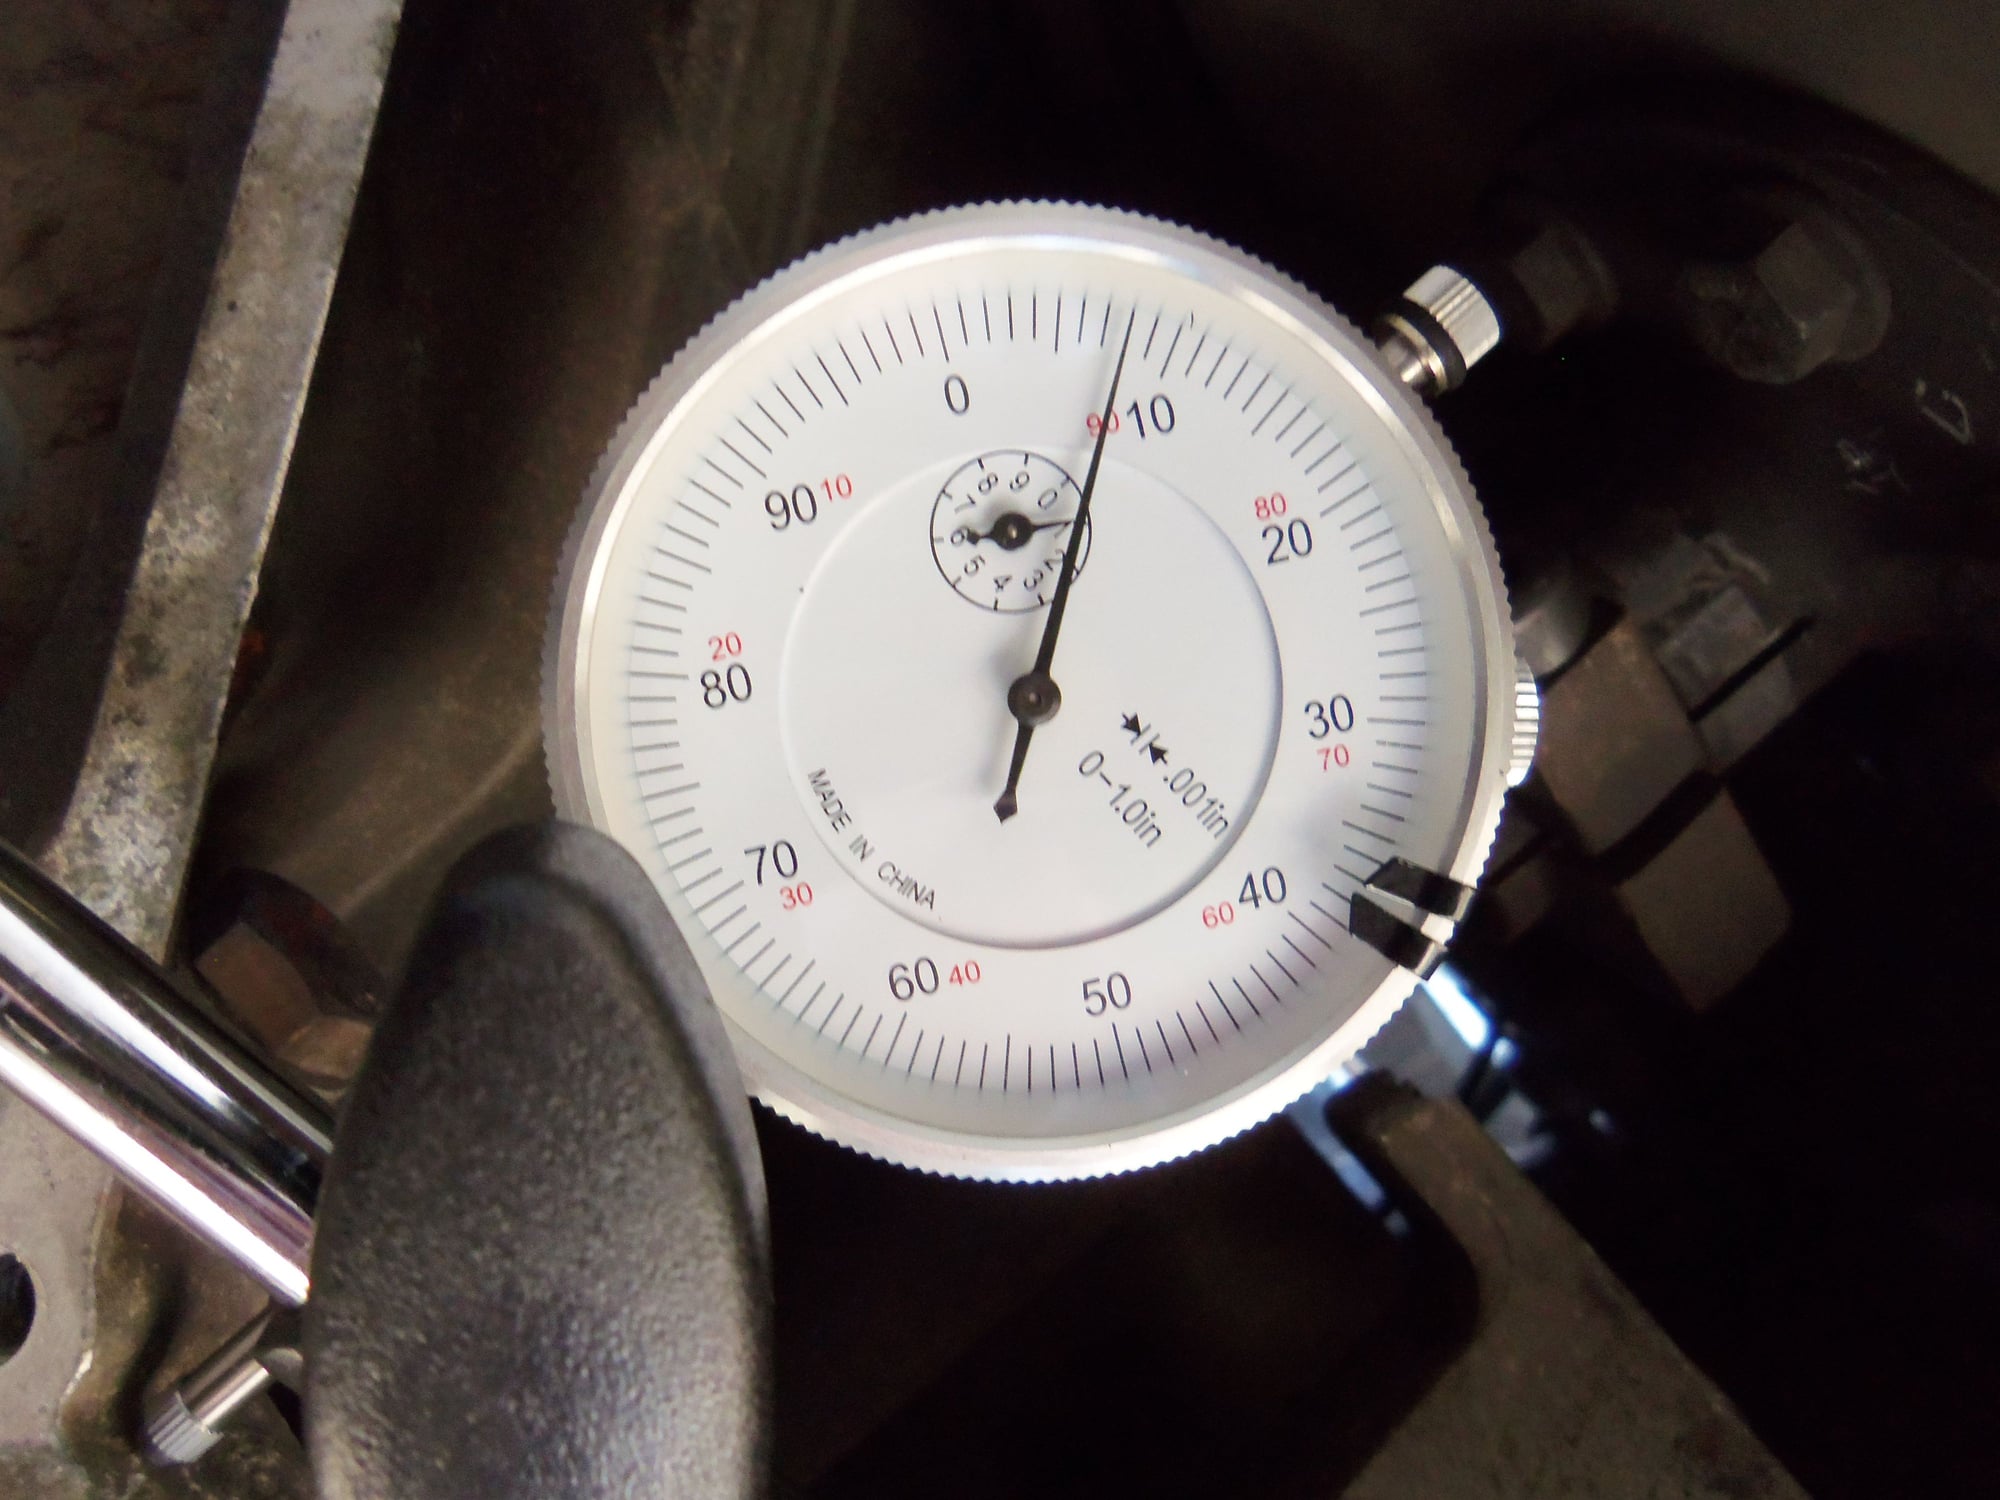
Armed with an array of weapons of mass destruction, I went out this morning to measure crank endplay, and check a few things.
All is good on the crank endplay front. It took me a few tries to get my dial indicator set up where I liked it. I ended up taking dr bob's suggestion in a long ago post: magnetic base on the flywheel, dial indicator pointer on the bellhousing. Worked quite well.
I repeatedly moved the crank back and forth, and consistently read 0.008" of play. That converts to 0.203mm of play. I call that good!
However, it is more than what the shop measured back in April. During the PPI and subsequent work, they measured endplay at 0.0055", 0.14mm. The released the flexplate preload, which was 4mm.
I am not overly concerend about the increase, as it endplay is still within spec.
As well, the 2mm preload I found may explain the slight metallic sheen I found in the oil. Could be wear from the thrust bearing.
Dial indicator set up.
I have reinstalled the new front pinch bolt with blue loctite, torqued to 66 ft/lbs. I have also reinstalled the new PKlamp, as per the instructions.
I am aware of the Constantine SuperClamp, and the next best thing, the RiTech clamp. I am in a hole as far as money is concerned, so I am going to stick with the PKlamp for the moment. After a few months of driving, if the flexplate clamp migrates again, I will sell blood and get the RiTech clamp.
Down the road, when I rebuild the torque tube, I will get the SuperClamp.
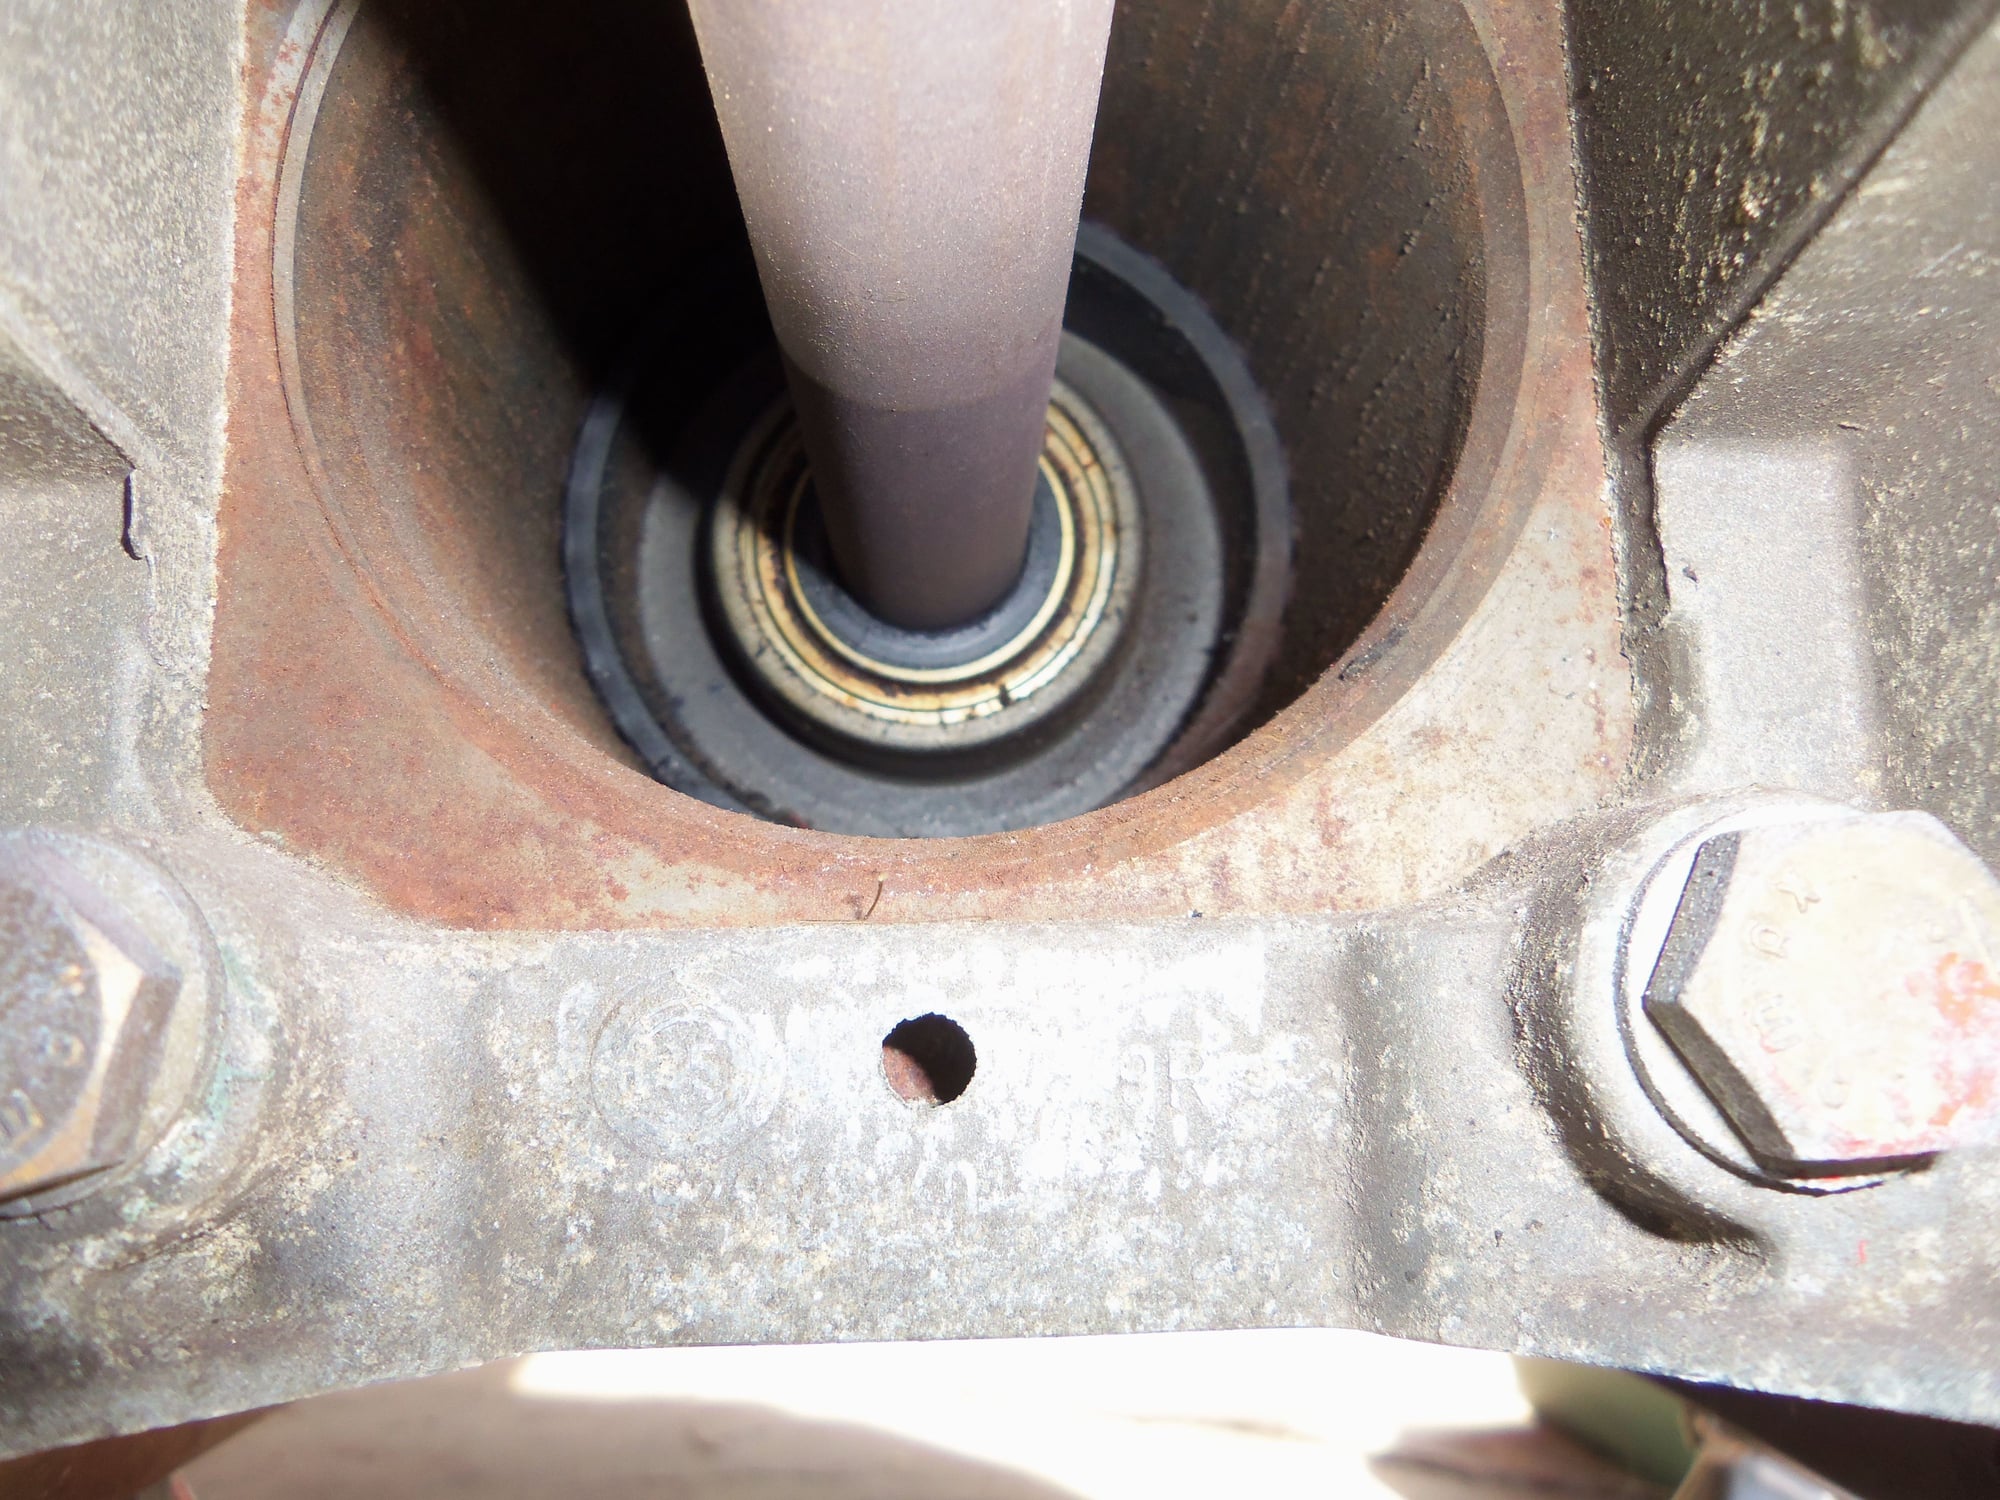
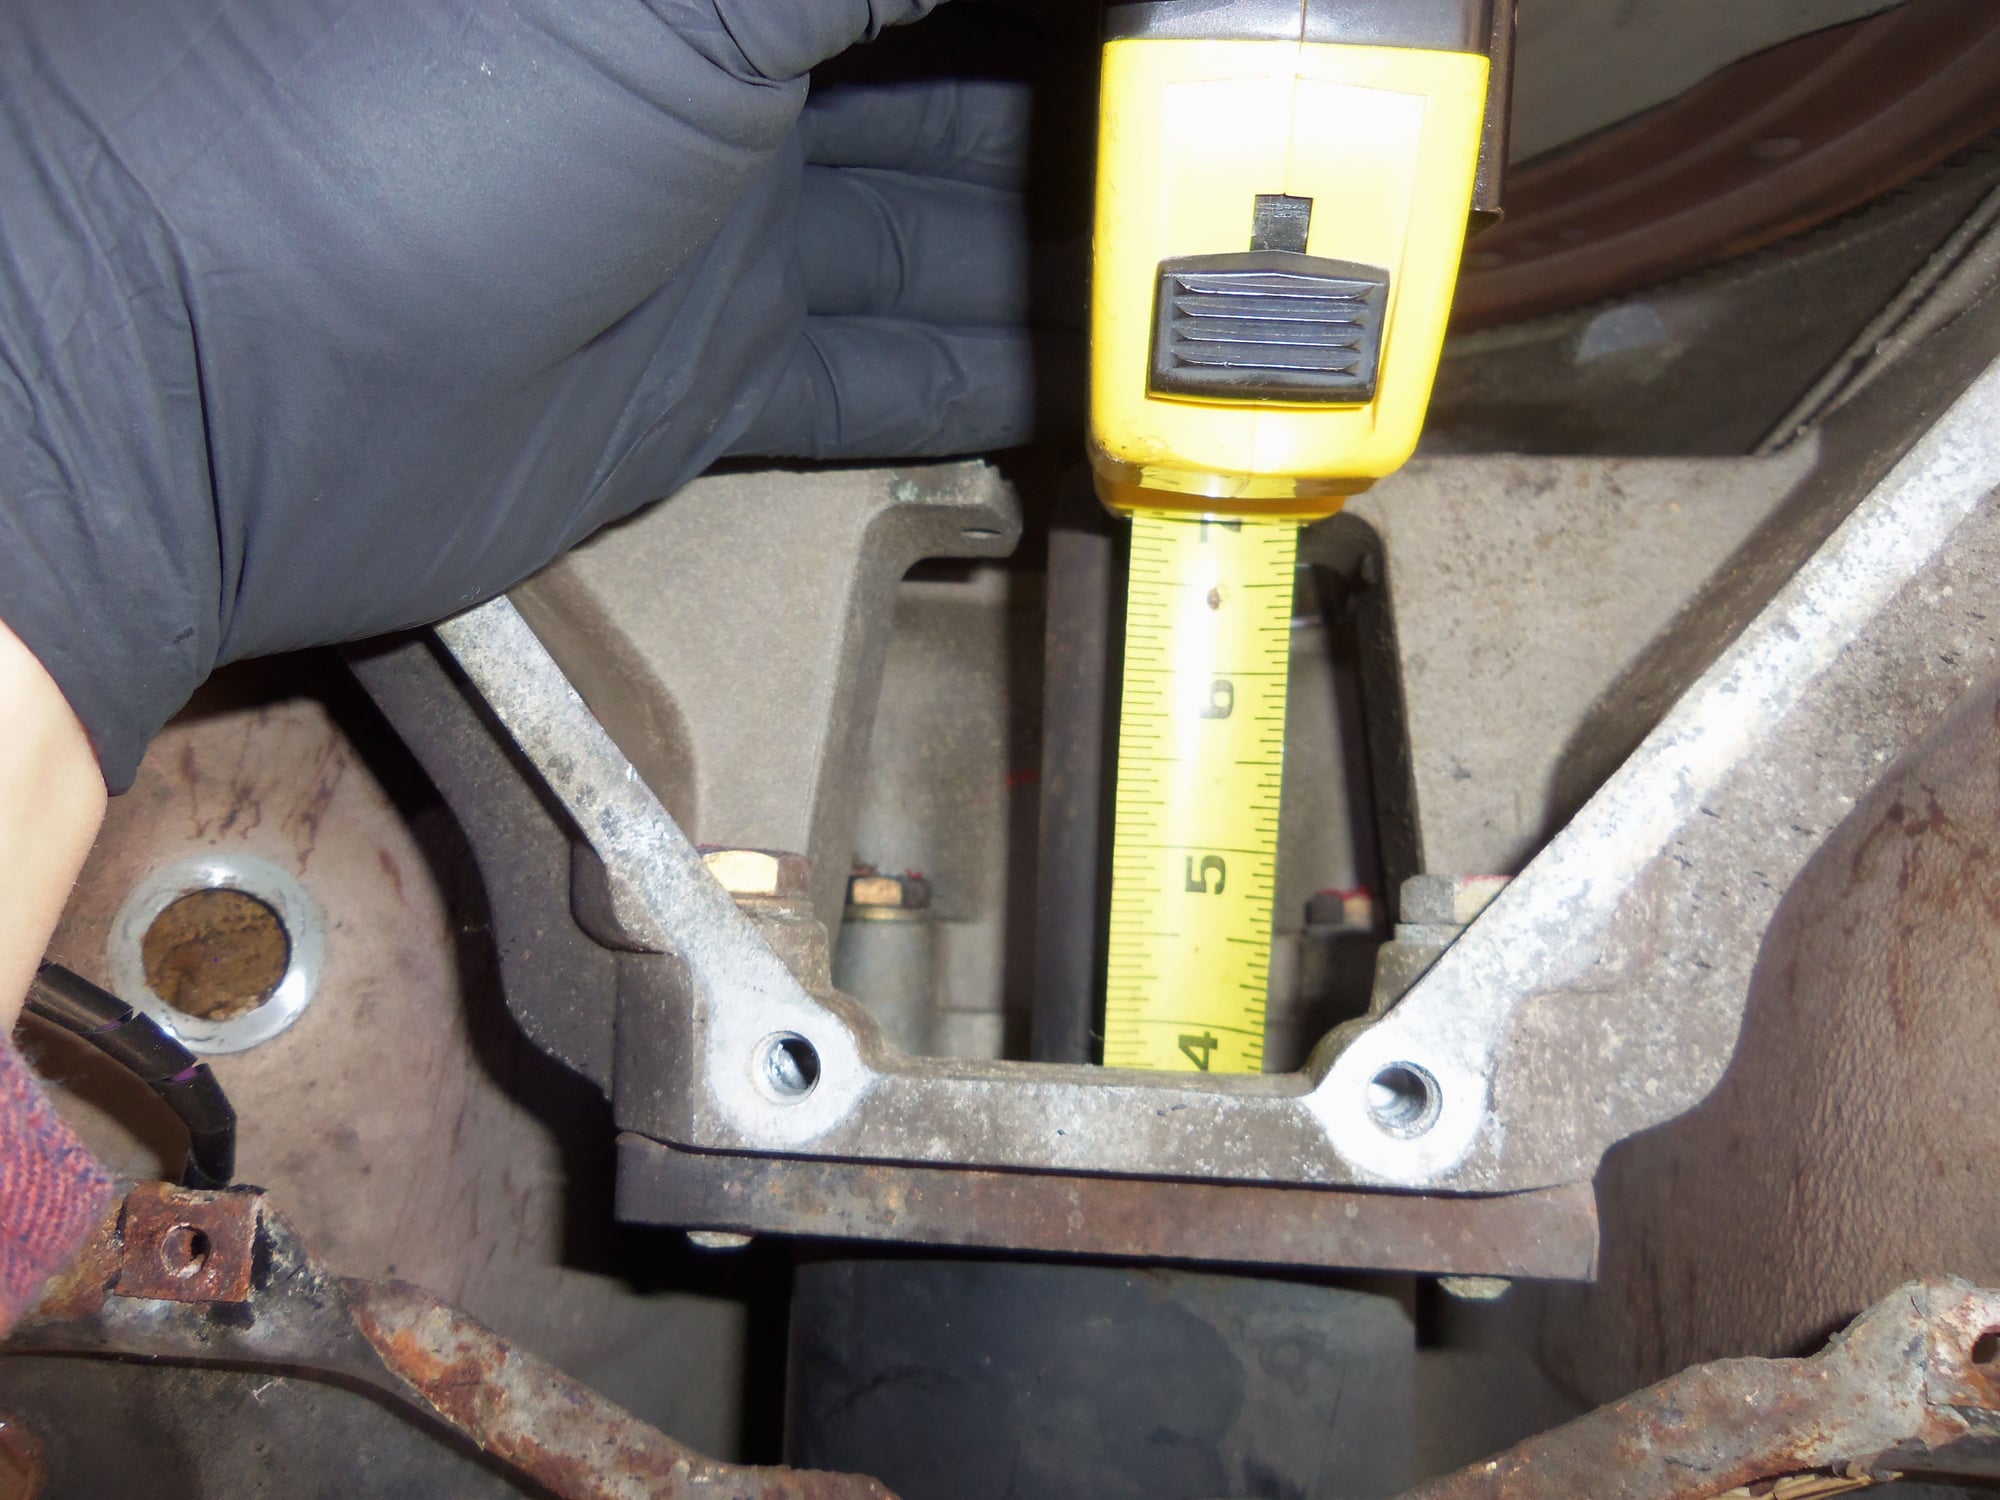
Fixed one issue, found another. In a write up on pinch bolts and such, the poster mentioned taking a photo of the front torque-tube bearing, and measuring its distance down the tube. He saw something to the effect of 11".
Great idea!
Yep. Mine doesn't match. The bearing assembly looks OK. However, it is only approximately 3-3/4" from the edge of the bellhousing. I don't believe that is good.
Torque tube bearing looks OK, just seems awfully close.
Yeah...not 11".
I am going to have to do some searching on torque tube bearing migration, whether I can just knock it back into place, and how far back it needs to be.
Good times...
I would cross check with Constantine what the depth of the bearing should be before going for your 99th nervous breakdown. The automatic tube has two bearings presumably because it is shorter than the manual tube so doubtless position has some criticality to it. The float is excellent- I would tend to doubt the original reading given I suspect not many are that tight.
Still puzzled as to why releasing the pre-load should impact the belt tracking- makes no sense to me.
You have some serious persistence dealing with these back to back issues. Nice job explaining your thoughts and testing methods.
Keep in mind, after weeks of hyper-focus working on individual components that are lying at rest at room temperature in the quiet solitude of your garage, you forget (at least I do) that you are working on a dynamic and thrilling vehicle. Once you are in the driver's seat and get that timing belt spinning at 6k RPMs it will be worth it.
I would cross check with Constantine what the depth of the bearing should be before going for your 99th nervous breakdown. The automatic tube has two bearings presumably because it is shorter than the manual tube so doubtless position has some criticality to it. The float is excellent- I would tend to doubt the original reading given I suspect not many are that tight.
Still puzzled as to why releasing the pre-load should impact the belt tracking- makes no sense to me.
Rgds
Fred
Will do, Fred. Thanks!
I still have lots of research to do.
Me too, I don't understand how 0.2mm of crank endplay would cause the timing belt to move almost 1mm on the sprocket.
It is good for the moment, though I am going to keep my eyes open.
By the way, loved the Rolling Stones reference.
Originally Posted by Majestic Moose
You have some serious persistence dealing with these back to back issues. Nice job explaining your thoughts and testing methods.
Keep in mind, after weeks of hyper-focus working on individual components that are lying at rest at room temperature in the quiet solitude of your garage, you forget (at least I do) that you are working on a dynamic and thrilling vehicle. Once you are in the driver's seat and get that timing belt spinning at 6k RPMs it will be worth it.
Alex, thank you for that! I am too far in to give up. I have blown way too much money on my dream, so I have to see it through.
I post what I do so others can see it, benefit from it, or at least throw bricks at me for it.
Oh yeah, I remember! That is why I am doing this. Those two months I got to drive the Red Witch were glorious! She will be even better to drive!
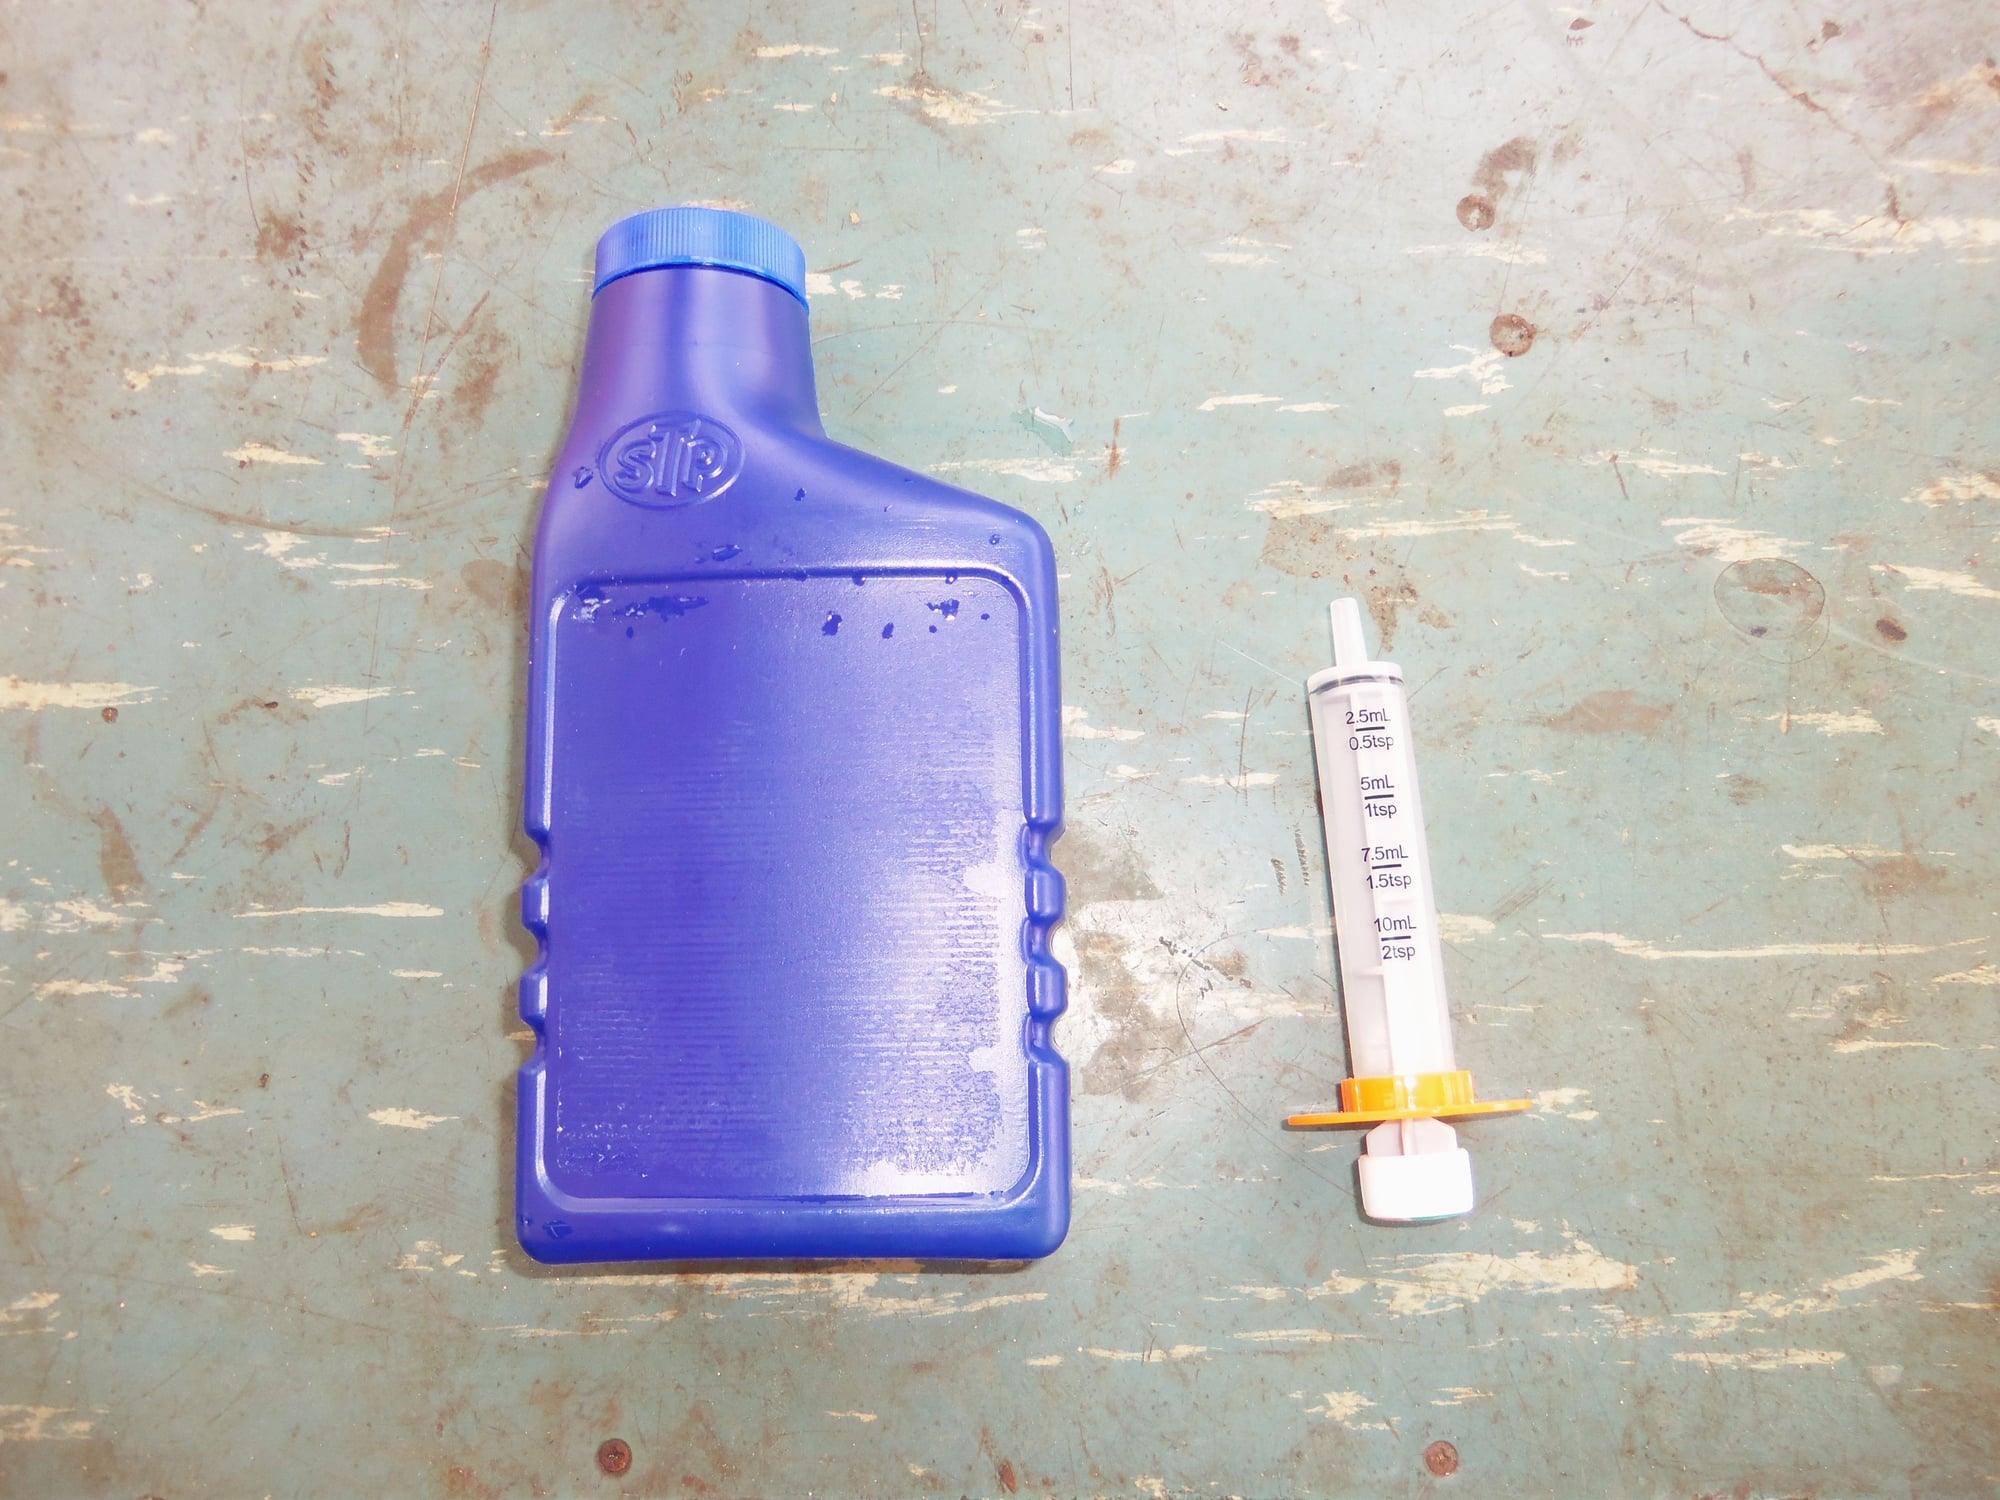
I did finally get around to filling the tensioner with STP. I warmed it in a hot water bath (kitchen sink) and used a large animal medicine syringe.
That worked quite well!
STP and animal syringe. Label fell off due to hot water bath.
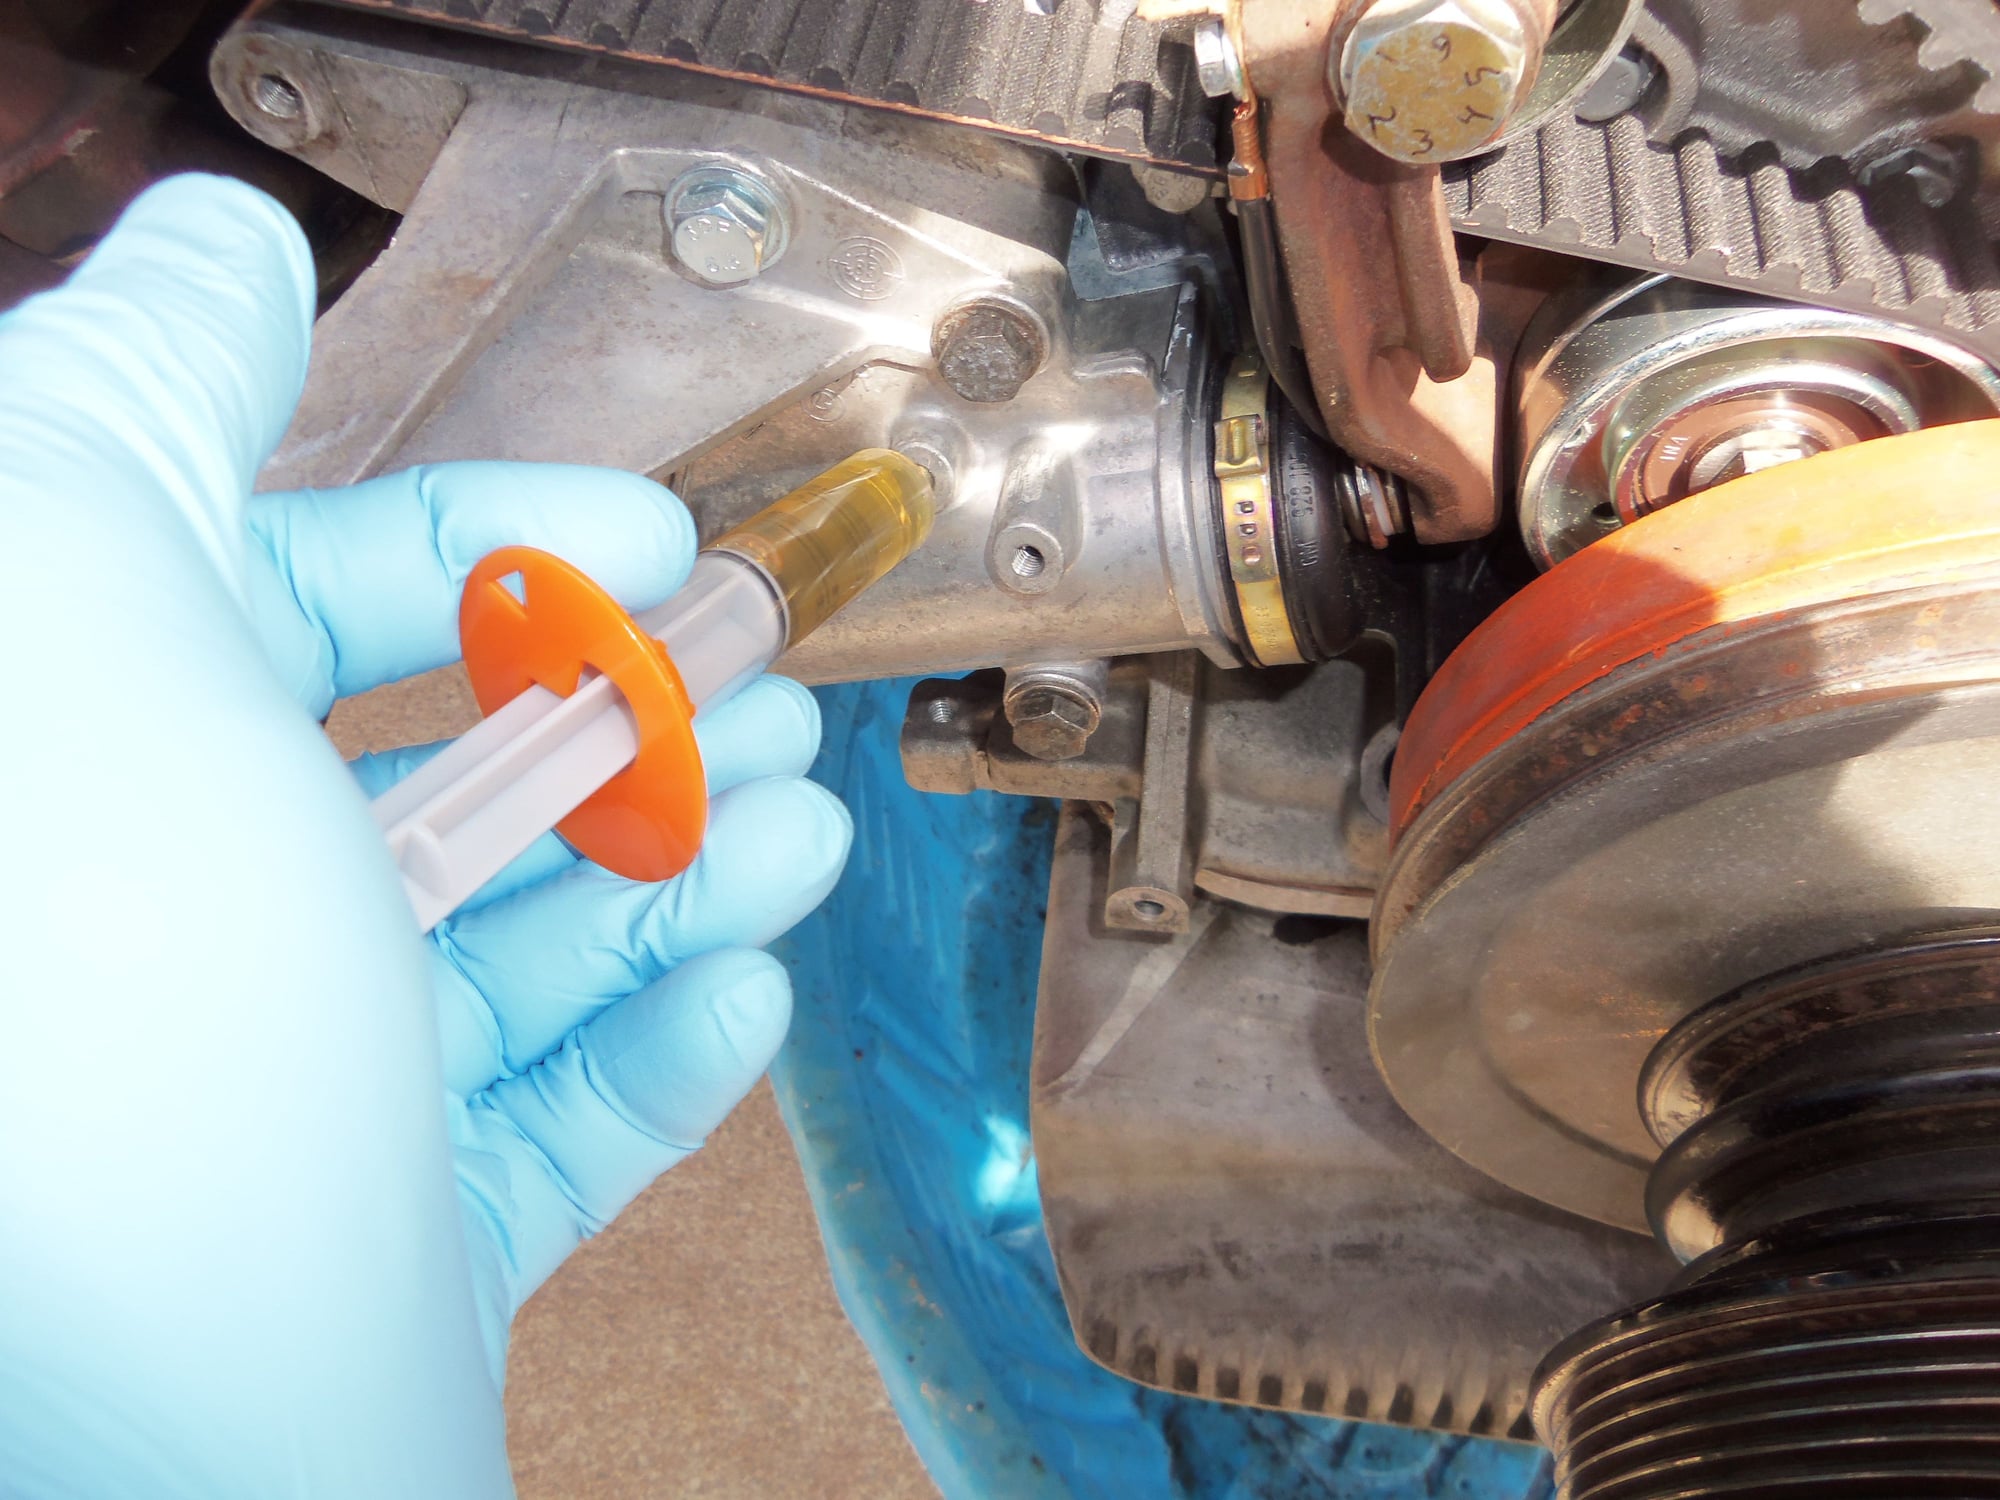
Filling the tensioner with gentle pressure.
However, my gentle pressure might not have been gentle enough. Tonight, I found a drip of STP on the bottom of the housing and some on the bottom of the boot. I may have blown the boot.
A new boot, clamp, and mounting gasket may be in my immediate future.
However, my gentle pressure might not have been gentle enough. :
I fail to see how that could be the case with both nipples removed but it is a bit of bugger to get that stuff into the tensioner. I did mine on a very pleasant day but did not heat the stuff- if and when I do this again I will do exactly as you did.
Yep, I thought I'd be safe with gentle pressure on the syringe. We shall see. I don't want to have to remove and repair the tensioner, but I will. I am not too proud to admit I screwed up.
I do believe the hot water bath helped the viscosity of the STP. It pulled into the syringe and pushed into the tensioner with no problems.
If I have to redo the boot, I will fill the tensioner with the same method. I will just be more gentle.
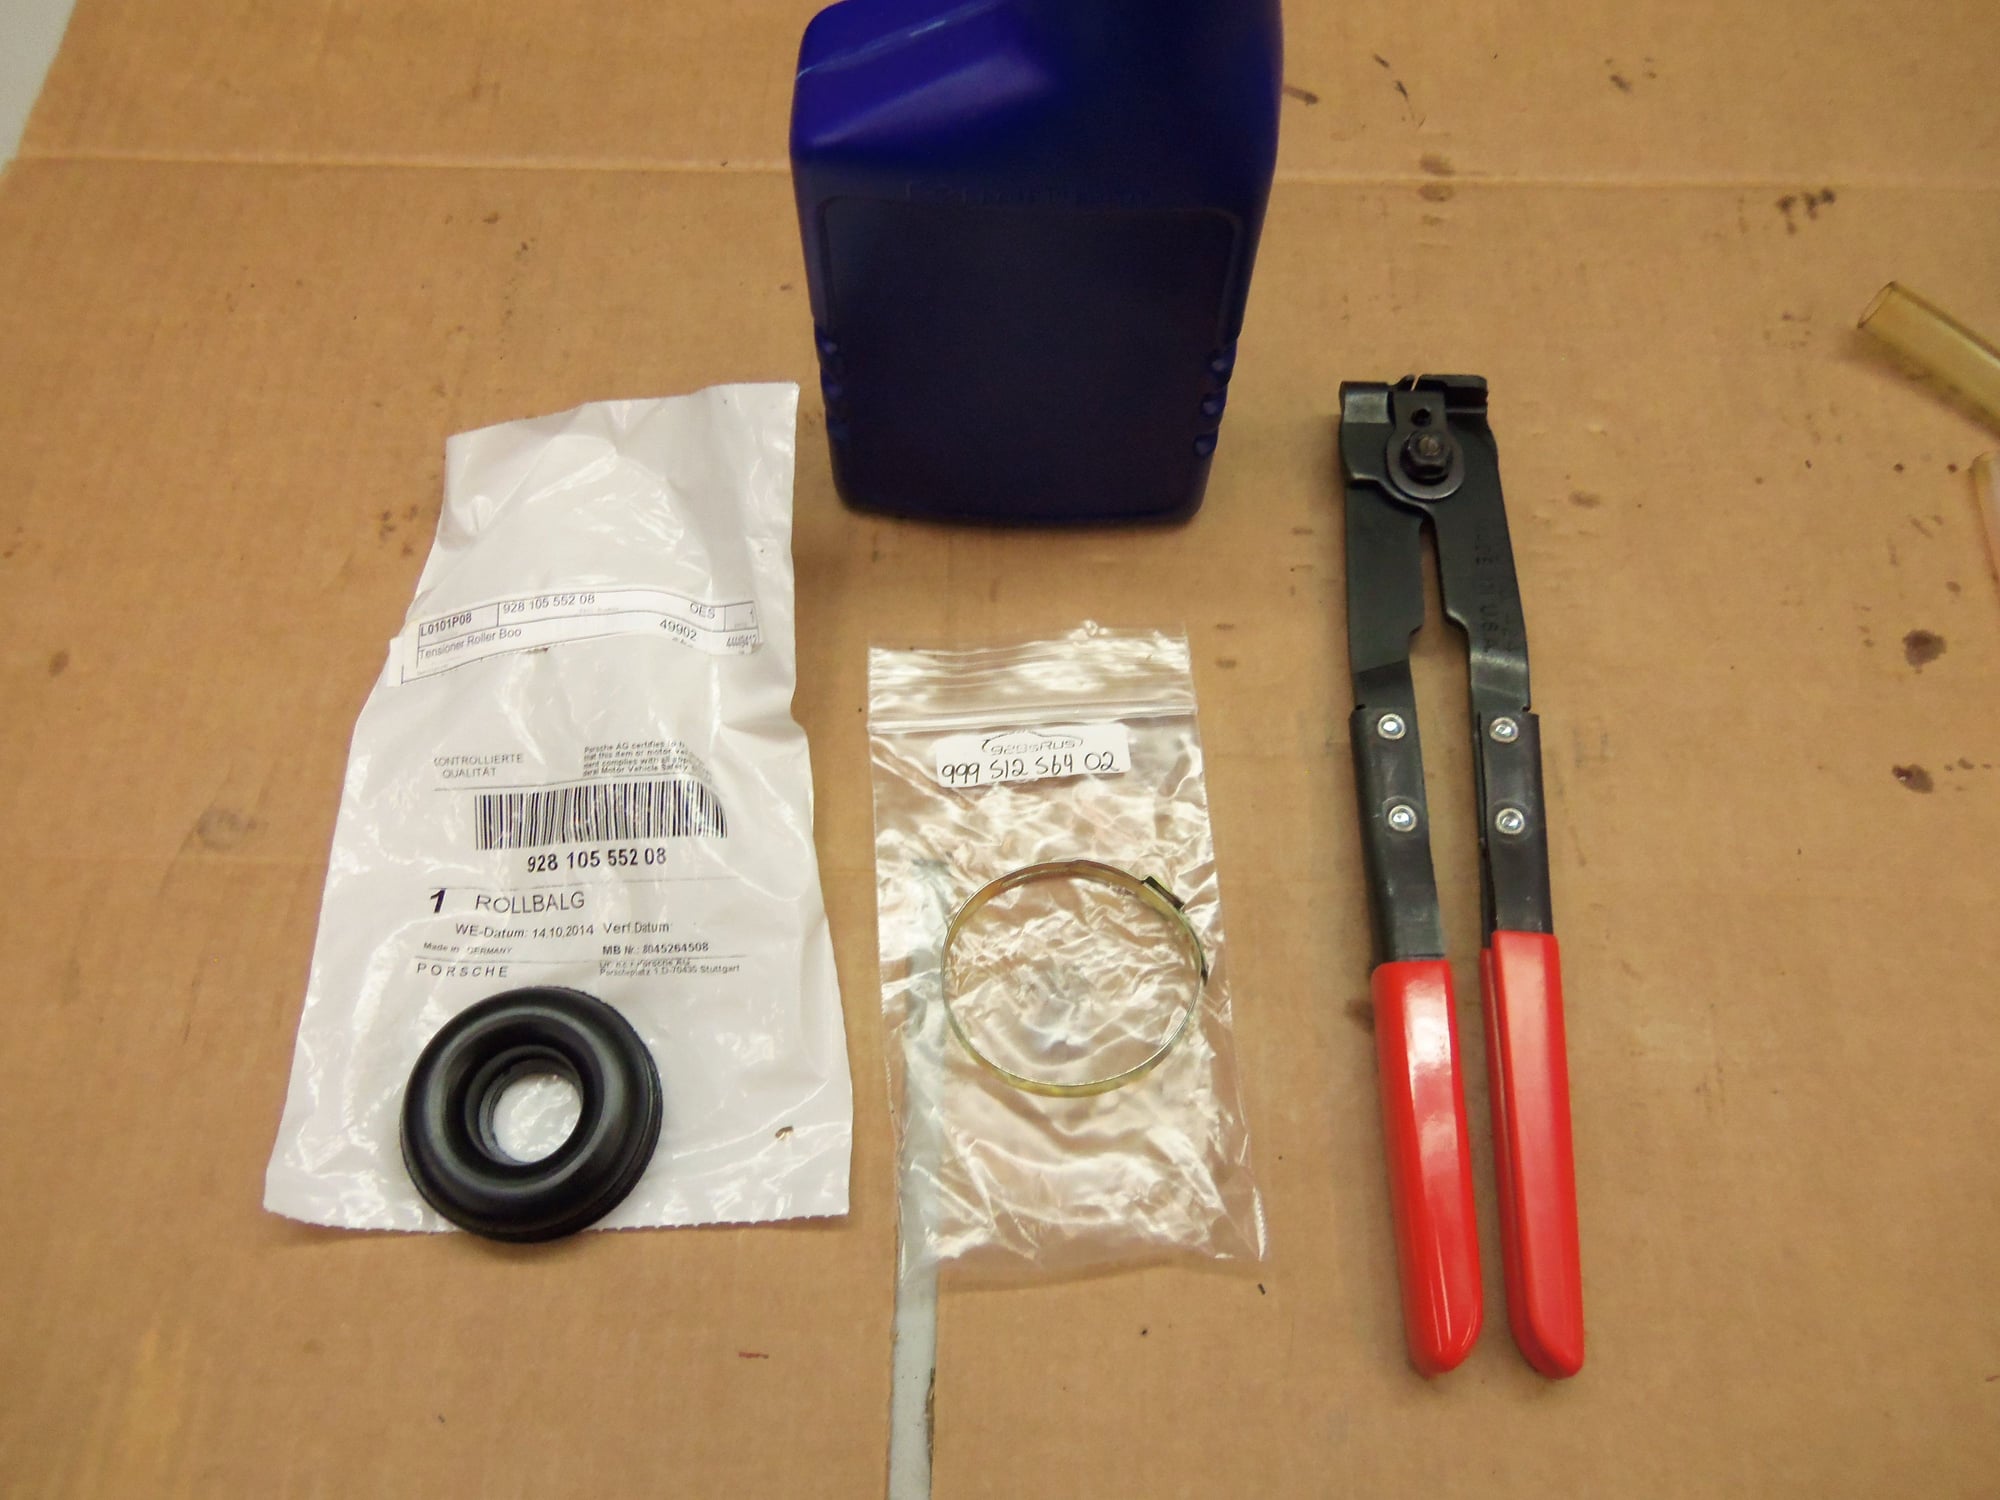
Today I revisited the leaking tensioner boot. Since I had the front of the engine torn down again to replace the cam chains and tensioner pads, now was a good time.
After prying off the clamp and offending boot, I was pleased to see plenty of STP still in the tensioner bore. I fitted the new boot and clamp. Instead of dykes, I used the crimping tool I got from Greg Brown to crimp the OET clamps on the replacement transmission hose.
Note: I crimped the clamp quite snug, but not super tight. I didn't want to cut the boot. It is possible to turn the boot on the tensioner body, though it is stiff turning. Should I have gone tighter?
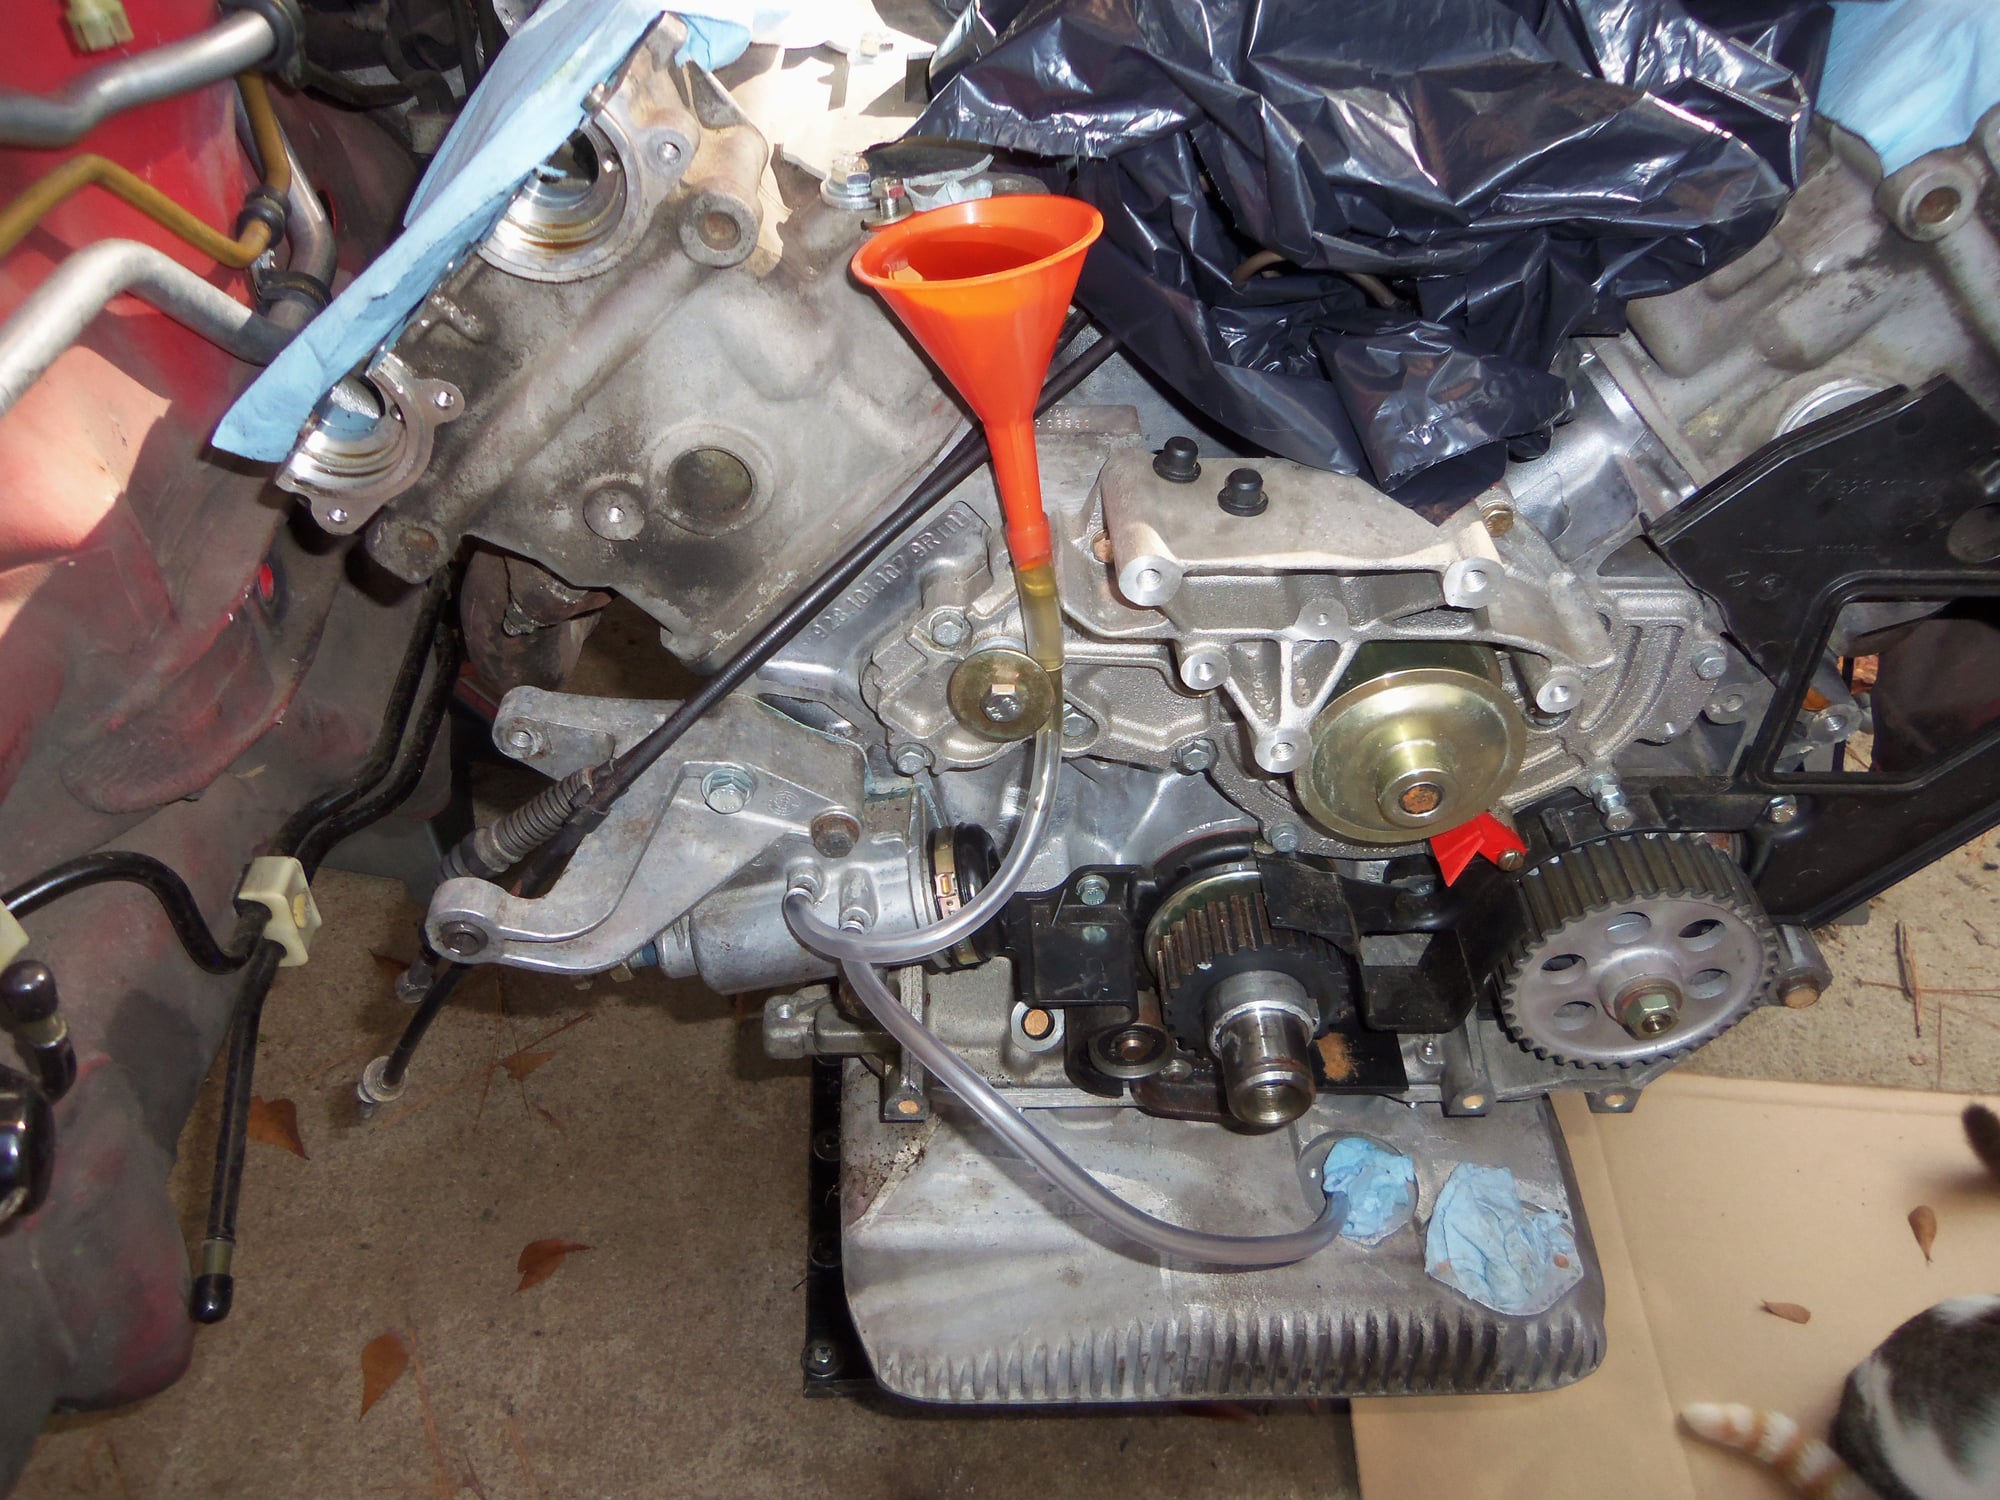
Now, for the Rube-Goldberg part. Instead of filling the tensioner with a syringe again, I am letting gravity do the work. I have a small funnel rigged up with a bolt through its eyelet into one of the water bridge mounting holes. Tubing connects the funnel to the top fill bleeder screw on the tensioner. More tubing runs from the lower bleeder screw down to the oil level sensor mounting hole in the oil pan.
With the funnel filled with STP, my intent is to let it gravity drain for a couple of days. Any excess will overflow back into the oil pan. No worries, since the oil pan isn't mounted yet. I will clean it before doing so.
If the tensioner boot leaks again, I will have to figure something else out...
Bottle of STP from last time, new boot, new clamp, and crimping pliers.
When I did my tensioner, it was off the front of the motor and the old dome was hardened and cracking - still oil in there, though. I pulled out the circlip and pulled the guts out, dumped some oil in there and shoved it all back together and let the excess oil squeeze out. Then I put the new (too big) dome into place (using a chunk of a rubber wrist bracelet trimmed to size to fill the gap) and put a hose clamp on it.
Seth:
When I "re-did" my tensioner boot on the GT, I read somewhere here to use some black silicone sealer, driebond, whatever lightly on the lip of the boot. The tool I used was a tile nibbler tool to tighten clamp. No leaks .
when fitting the boot make sure the inner C clip has the open end facing up,
the sealing area on the tensioner body should be smooth check for casting marks,. smooth as necessary.
fit the boot and clamp,
I fit them dry ,
then orient the clamp to 11 o clock while standing at the driver side fender facing the tensioner boot.
This will let the front timing cover fit without hitting the clamp.

 03-24-2017, 03:25 AM