When you click on links to various merchants on this site and make a purchase, this can result in this site earning a commission. Affiliate programs and affiliations include, but are not limited to, the eBay Partner Network.
The WSM says 60-70 mm for 1 minute. Is it OK to go further for longer?
Before pulling down it was around 230.
I pulled it down about 80 for 5 to 10 minutes.
After releasing and bouncing, it is sitting around 180. Does that mean it is settled?
The WSM says 60-70 mm for 1 minute. Is it OK to go further for longer?
Before pulling down it was around 230.
I pulled it down about 80 for 5 to 10 minutes.
After releasing and bouncing, it is sitting around 180. Does that mean it is settled?
Edit: Rear LCA clamps were and still are loose.
,
Denny,
You ask an interesting question and I suspect the only realistic answer anyone can give you is that you are much closer to "fully settled" than you were.
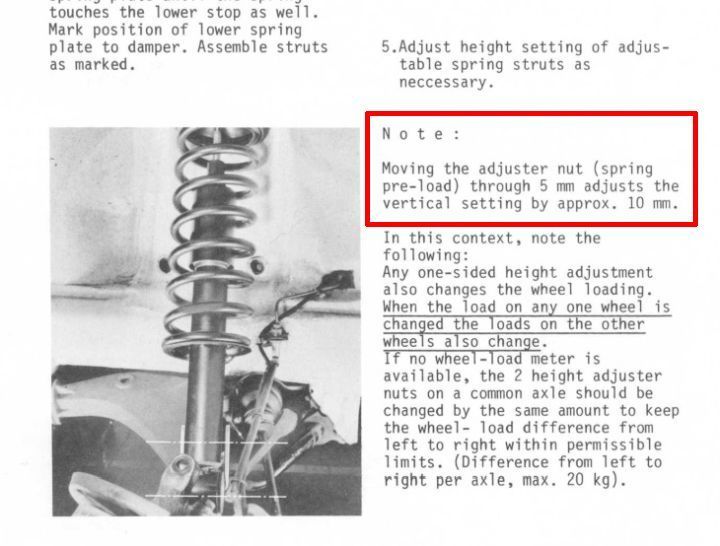
Given your car is sat on an elevated table with no drive off capability I assume you ask because you want to adjust the height from a nominally settled position to a controlled position of your specific desire whatever that may be. If that is the case then I would think the best thing to do now would be to adjust the front height to 170mm and the rear to 163mm to give a front/rear differential of 7mm.
You could pull the assembly down more from where it currently sits and that will cause it to squat some more but that does not mean it is "settled" as this procedure will cause a different "temporary set" in the front bushing that is more than likely a false one and if so would reset in due course when operated. When you are close to the correct settled height the point is that when aligned the consequences of any further settlement will be dramatically [as you have measured] reduced to a level that will have little to no significant consequence to the final alignment. This is why if alignment is critical to specific needs it should be rechecked after doing 100 miles or so.
I take the point of view that the suspension is designed to work optimally when the lower arm is horizontal [settled] operationally loaded with driver, fuel load etc. This is logical because the lower arms are identical part numbers. When the front ride height sits at 180mm it looks odd and if you read the WSM it tells that this is a condition when the all the parts are new- the intimation being that initial settlement can be expected and after this has happened the front height should be 170mm. My conclusion after studying the system was that the adjustability is to allow for weight balancing and not to lower the car for racing type purposes that can and will induce bumpsteer if not corrected.
Finally a note about elastomeric materials. They follow Hooke's law [stress= strain x constant] to a limited extent but they have tendency to take on a different set rapidly that redistributes that stresses more evenly at that position thus why when one lifts the car and it is put back down it does not go back form whence it came as it would if the material complied with Hookes law. It does however have a concept known as "memory" and as and when the system bounces up and down it eventually tends to return to that natural state. Engineers who work with this material directly can probably explain this way better than I can - I am simply aware of the concept and that probably puts me a tad ahead of the game to some extent as it were.
Is the mind the first thing to go? I can't remember!
I knew this, but forgot. Wish someone had reminded me way back at >>> post 275 <<< because it looks like I went twice as far as I should have.
Oh Well (good tune by Fleetwood Mac), I guess I'll find out how easily they adjust.
The distance between the pivot point and the mount of the strut on the lower arm is approx half that of the distance between the puivot point and the centereline of the wheel thus changes at the strut are doubled at the centerline of the wheel.
In your case if you are 10mm higher than you want you lower the strut adjuster by 5mm. Not sure what the thread pitch is on the adjuster but if it was 1mm then you need to be 5 turns lower than where you are at the moment or more to the point, where you were on the previous post.
Thanks Fred. Threads are 1.5 and I had it all figured out in >>> post 275 <<< but I forgot about the two to one so I need to come back down about eight turns.
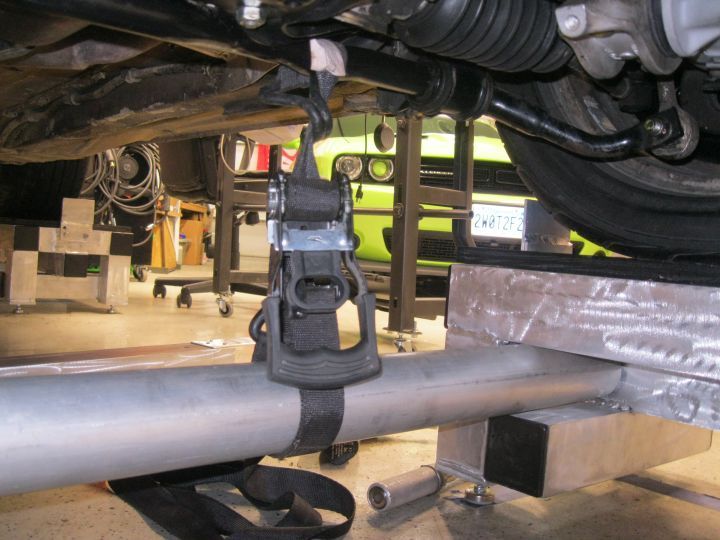
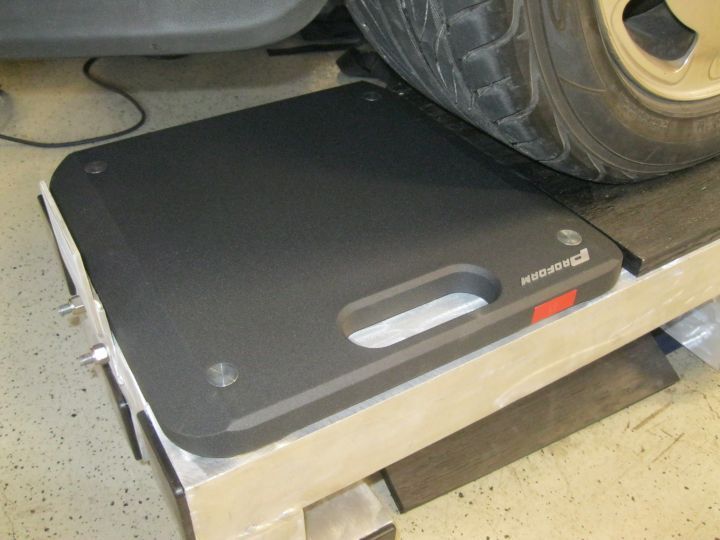
My pull down method seems to work well so I just took the wheels off for easy access.
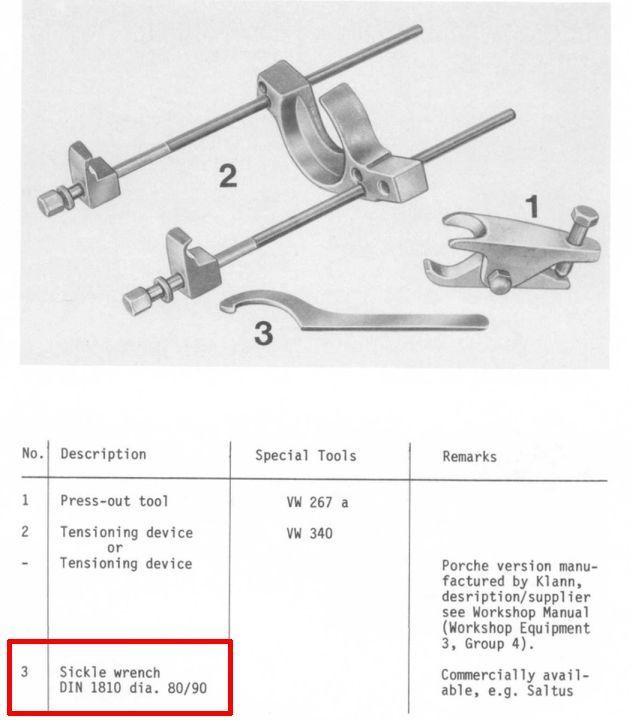
Dug through the scrap and found some pieces to improvise a sickle wrench.
Lowered it by eight turns per side (8 X 1.5 X 2 = 24) but haven't checked results yet.
Impressive! For fine tuning purposes I would drop left front by 2 turns and left rear one turn if easy enough to do so. Changing the front without lifting and removing the wheel is difficult or so I found but maybe you can do this?
Alternatively drive it as it currently is and re-check after 100 miles or so.
I'd take it out and drive it for a hundred or so miles and then remeasure/readjust. This would give you opportunity to to verify how well your pulldown actuality worked in reference to a fully settled driven car.
But I lifted it and forgot to pull it down so I'll do it again before making any adjustments.
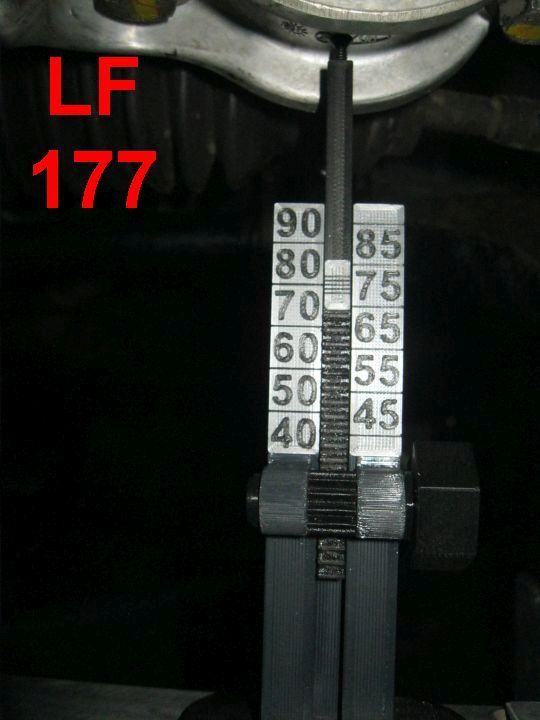
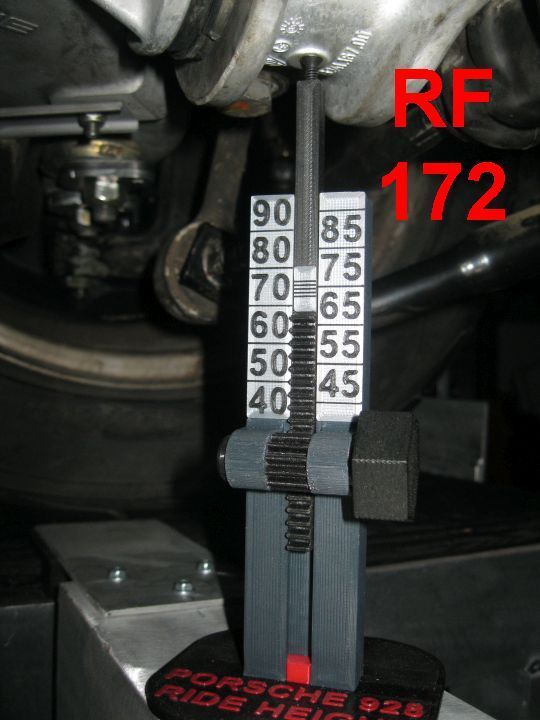
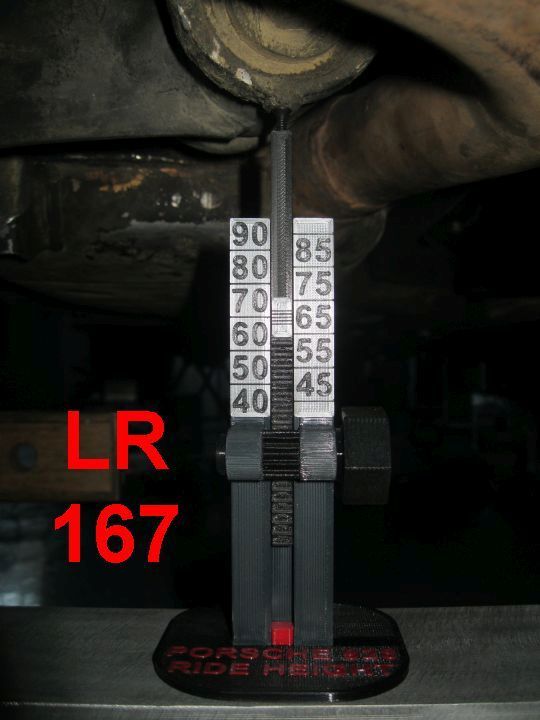
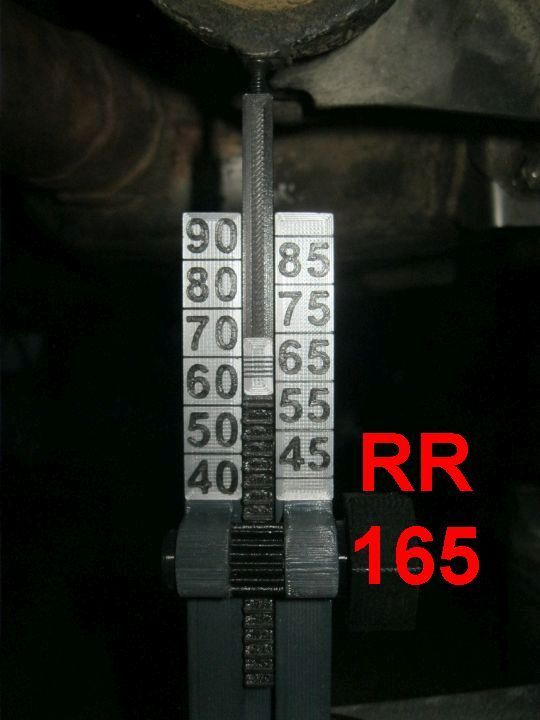
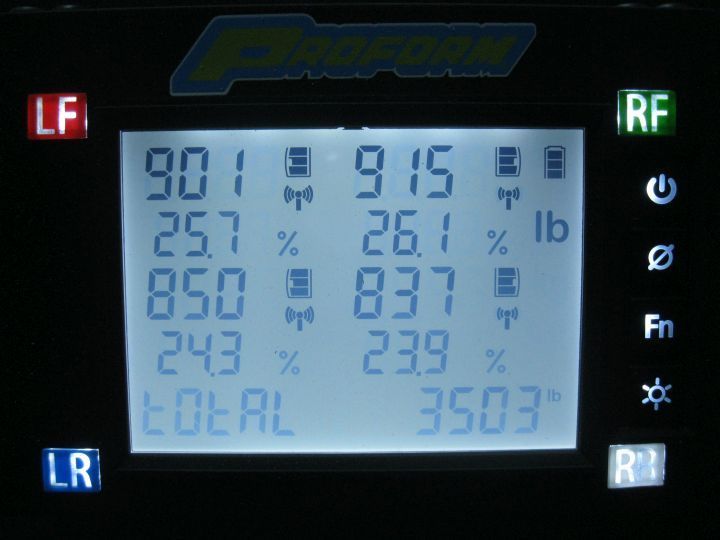
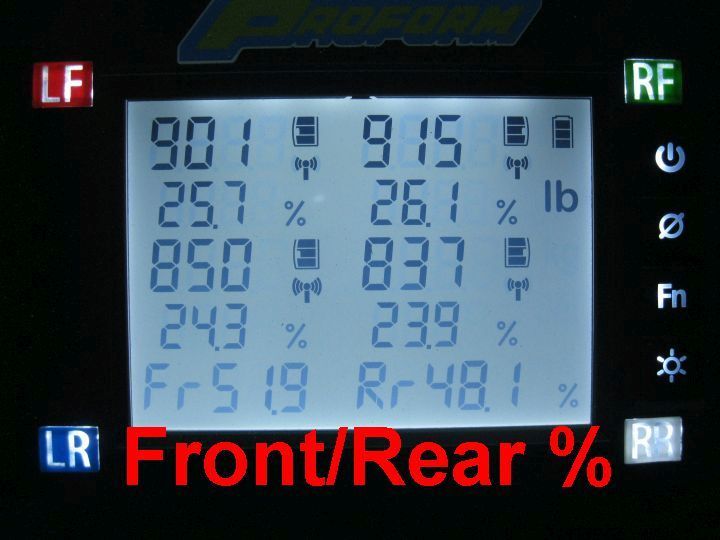
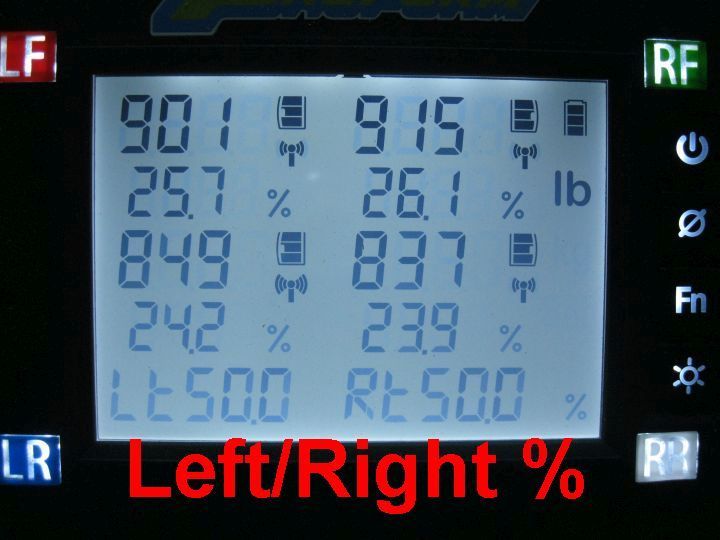
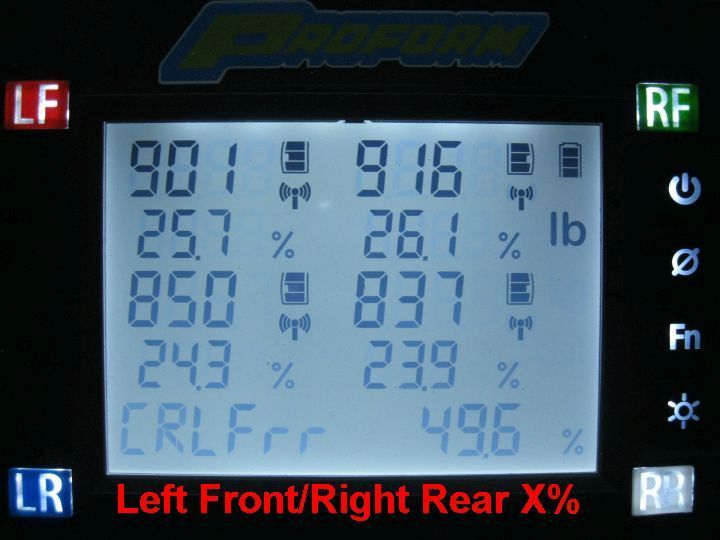
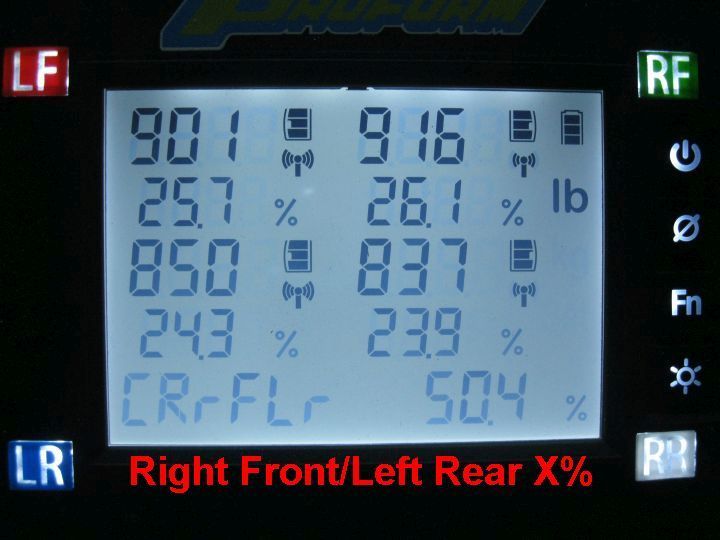
It will be interesting to see if the pull down makes any difference in these numbers.
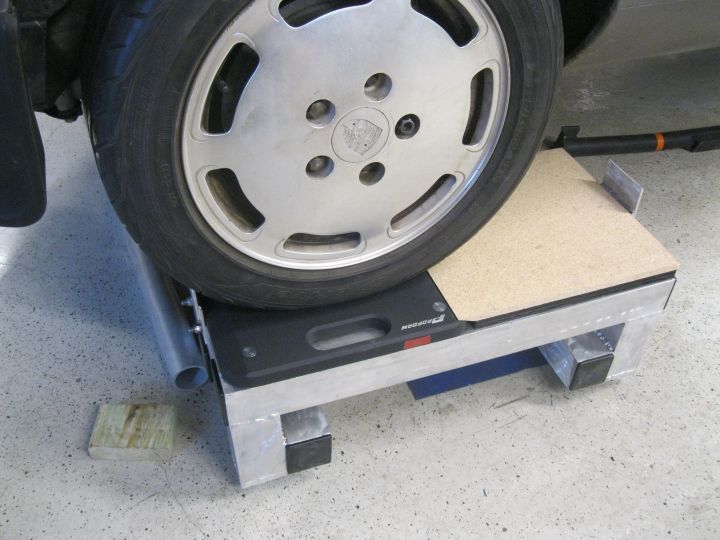
Now that I added the particle board shim pieces, it's super simple to roll back and forth.


 06-20-2024, 09:42 PM