

A 86.5 Timing Belt / Water Pump Picture Thread from a first-timer
 12-18-2013, 12:56 AM
#61
You may want to check and or replace the crankshaft and oil pump seals. Rebuilding the oil pump is easy stuff. My crankshaft seal wasn't leaking so I let it be but it's worth looking at. Plus you get to clean the back timing cover too.
 12-18-2013, 01:26 AM
#62
Burning Brakes
Thread Starter
Today was a complete disaster. My piece-of-sh*t Wet-Dry vacuum was not completely closed, and when I lifted the vacuum cleaner, it spilled 2+ gallons of Brakleen, grease, oil, etc. all over my garage floor. The sh*tty thing is that the vacuum's filter was completely clogged at the time (which is why I was picking up the vacuum in the first place) and so I had nothing to clean up the mess with.
For future reference do not buy the Ridgid WD-4070 Wet-dry vacuum cleaner.
It is very difficult to open and close the vacuum cleaner's waste compartment, and you cut your hands in the process. And, the filter is not good.
Roger sent me two new cam sprockets, a new oil pump gear, and other items. The new oil pump gear is made of steel as opposed to some kind of alloy, which means that the 1mm (thin) washer behind it will be deleted upon installation.
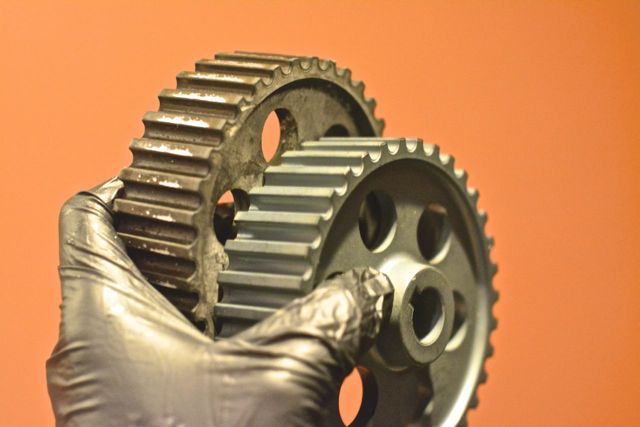
Removing the main crank gear and the oil pump gear were both extremely difficult. For the main crank gear, I had to drive to Harbor Freight and buy a two-jaw puller. I already owned a three-jaw puller from Harbor Freight.
(Obviously I have no affiliation with Harbor Freight, Amazon, or any other company- I provide links for people's convenience only.)
Anyway, I laughed when in Dwayne's and in John Kelly's write-ups they mentioned that the main crank gear would "slide off." The two-jaw was only way the main crank gear would budge. There wasn't enough room to get the jaws behind the gears, so I gently pried the crank gear forward with a wide slot-head screwdriver wrapped in cloth. The oil pump gear also came off with a two-jaw, but I didn't need to use a screwdriver.
Removing the rear timing belt cover is a real PITA. There are three 10mm bolts (easy) in the front, but then two 5mm hex bolts on the side. One is easily reached with a socket extension, but the other requires you to remove the driver's side coil so that you have enough room to use a hex key.
After pulling off the gears and removing the rear timing belt cover, I uncovered a lot of crap, so I spent loads of time with a brush, P21S Auto Wash, and cups of water, which I would drizzle over areas that I cleaned. It started looking ok.

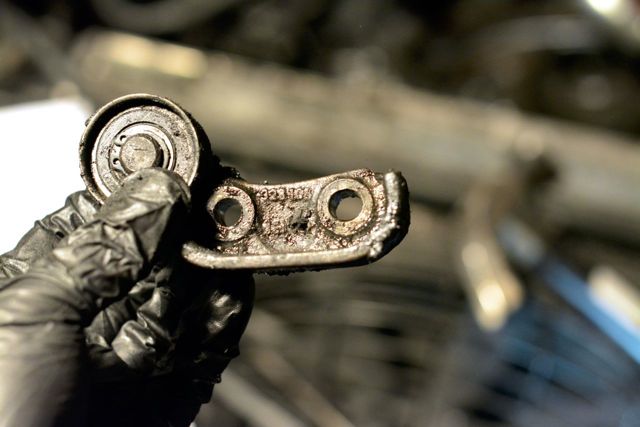
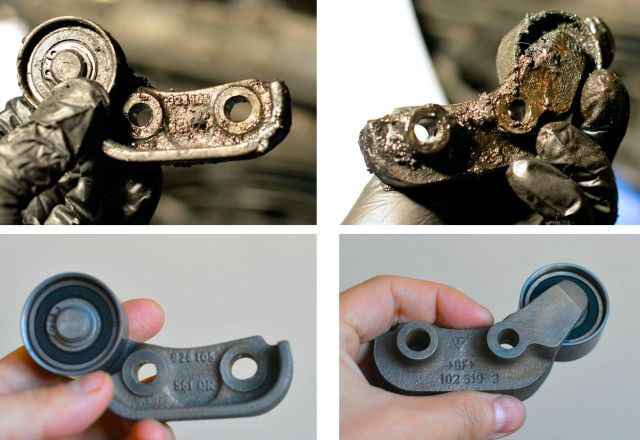
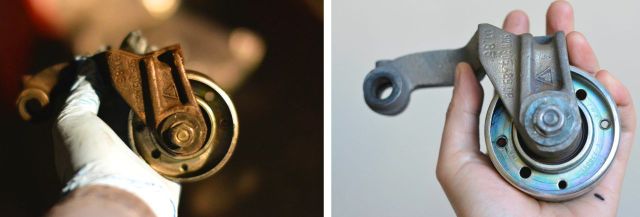
I pulled off the lower idler assembly. In the process, I dropped one of the cir clips, and I can't find it. I hope they're still available. The lower idler roller was so greasy and dirty, I have doubts that it was functioning properly. It obviously hasn't been engaged recently.
Fred D. (hessank) wrote an excellent thread about oil pump removal. His "step #5" suggests that you put in a water pump bolt to use as a lever for a crow bar to lever the oil pump out. I modified this- I used two bolts so that I could lever from different directions.
For future reference do not buy the Ridgid WD-4070 Wet-dry vacuum cleaner.
It is very difficult to open and close the vacuum cleaner's waste compartment, and you cut your hands in the process. And, the filter is not good.
Roger sent me two new cam sprockets, a new oil pump gear, and other items. The new oil pump gear is made of steel as opposed to some kind of alloy, which means that the 1mm (thin) washer behind it will be deleted upon installation.
Removing the main crank gear and the oil pump gear were both extremely difficult. For the main crank gear, I had to drive to Harbor Freight and buy a two-jaw puller. I already owned a three-jaw puller from Harbor Freight.
(Obviously I have no affiliation with Harbor Freight, Amazon, or any other company- I provide links for people's convenience only.)
Anyway, I laughed when in Dwayne's and in John Kelly's write-ups they mentioned that the main crank gear would "slide off." The two-jaw was only way the main crank gear would budge. There wasn't enough room to get the jaws behind the gears, so I gently pried the crank gear forward with a wide slot-head screwdriver wrapped in cloth. The oil pump gear also came off with a two-jaw, but I didn't need to use a screwdriver.
Removing the rear timing belt cover is a real PITA. There are three 10mm bolts (easy) in the front, but then two 5mm hex bolts on the side. One is easily reached with a socket extension, but the other requires you to remove the driver's side coil so that you have enough room to use a hex key.
After pulling off the gears and removing the rear timing belt cover, I uncovered a lot of crap, so I spent loads of time with a brush, P21S Auto Wash, and cups of water, which I would drizzle over areas that I cleaned. It started looking ok.
I pulled off the lower idler assembly. In the process, I dropped one of the cir clips, and I can't find it. I hope they're still available. The lower idler roller was so greasy and dirty, I have doubts that it was functioning properly. It obviously hasn't been engaged recently.
Fred D. (hessank) wrote an excellent thread about oil pump removal. His "step #5" suggests that you put in a water pump bolt to use as a lever for a crow bar to lever the oil pump out. I modified this- I used two bolts so that I could lever from different directions.
12-18-2013, 04:48 AM
#63
Three Wheelin'

From one Scott to another, that Tchaikovsky piece is outstanding. I am follwing your posts with much fervor as I have just purchased an 86.5 and am about to start all the work you are already undertaking. Thank you for time and effort. It is appreciated from distant shores.
Scott
Scott
12-18-2013, 10:56 AM
#64
Team Owner
Sorry about the toxic waste spill, your doing a great job.
Note when fitting the new steel oil pump drive pulley,
the 1MM spacer thats behind the keyway is deleted.
When fitting the pump together make sure that the gears both have the dots facing the block.
Use STP oil treatment on the shaft and the gears,
be generous and circulate the oil,
this will make sure that you have oil pressure at start up.
Use Dow Corning 111 on the pump O ring s The DC 111 will keep the O rings soft.
fit a new radial seal.
12-18-2013, 02:22 PM
#65
Rennlist Member
Great work Scott syoo8! But I don't use my shop vac for that stuff.
[Rant] I have a different Rigid and don't like it either. I will never buy another. It seems everything I have bought that Consumer Reports give high ratings, I don't like. [/Rant]
And Scott DeWolf, an 86.5 in Aus? That�s rare, isn�t it?
[Rant] I have a different Rigid and don't like it either. I will never buy another. It seems everything I have bought that Consumer Reports give high ratings, I don't like. [/Rant]
And Scott DeWolf, an 86.5 in Aus? That�s rare, isn�t it?
12-18-2013, 02:26 PM
#66
Burning Brakes
Thread Starter
From one Scott to another, that Tchaikovsky piece is outstanding. I am follwing your posts with much fervor as I have just purchased an 86.5 and am about to start all the work you are already undertaking. Thank you for time and effort. It is appreciated from distant shores.
 12-18-2013, 02:36 PM
#68
Consensus on that lower idler pulley is that you do not have to reinstall it because it doesn't come into contact with the belt 99.99% of the time.
However, some owners have reported that it's saved their engines since it kept the belt from bottoming out long enough for them to shut off their engines once they knew something was up. It's designed to keep the belt tracking if there's too much slack.
It doesn't do anything for the car if you take it off so for the sake of completeness you could just circlip it back. Mine was rusted onto the posts so I could only take off the bearing.
12-18-2013, 05:00 PM
#69
Three Wheelin'
12-18-2013, 05:46 PM
#70
Basic Sponsor
Rennlist
Site Sponsor
Rennlist
Site Sponsor
Trivia - ROW 32v 86 are just that 86 and not 86.5. 86.5 is for the US cars to define between an early 86 and the later 86 with the S4 suspension. All ROW 86 32v & 16v cars came with the S4 suspension. 85 32v was only made for the USA market.
__________________

Does it have the "Do It Yourself" manual transmission, or the superior "Fully Equipped by Porsche" Automatic Transmission? George Layton March 2014
928 Owners are ".....a secret sect of quietly assured Porsche pragmatists who in near anonymity appreciate the prodigious, easy going prowess of the 928."
Does it have the "Do It Yourself" manual transmission, or the superior "Fully Equipped by Porsche" Automatic Transmission?
George Layton March 2014928 Owners are ".....a secret sect of quietly assured Porsche pragmatists who in near anonymity appreciate the prodigious, easy going prowess of the 928."
12-18-2013, 09:12 PM
#72
Basic Sponsor
Rennlist
Site Sponsor
Rennlist
Site Sponsor
ROW 86 32v is organ pipe and sold in Europe, and Australia. (USA/Can of course)
ROW 86 16v is spider
Both the 86 32v and 16v had the S4 running gear as per what we know as the 86.5 here in NA.
ROW 86 16v is spider
Both the 86 32v and 16v had the S4 running gear as per what we know as the 86.5 here in NA.
Last edited by ROG100; 12-18-2013 at 09:37 PM.
12-19-2013, 10:52 PM
#73
Burning Brakes
Thread Starter
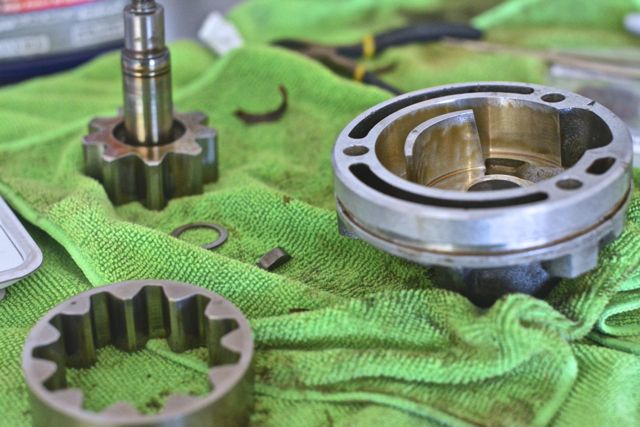
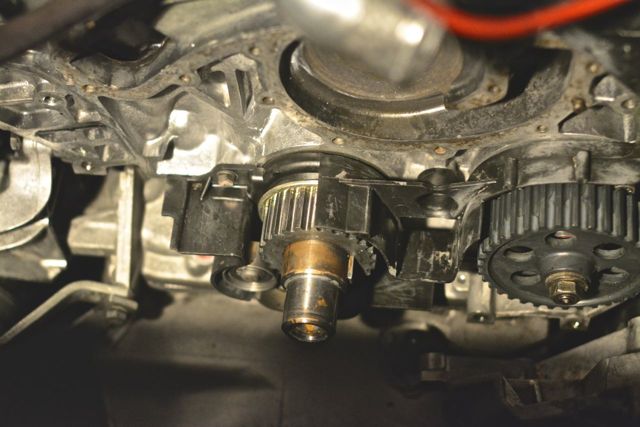
I "rebuilt" the oil pump this afternoon, after buying some
(as suggested by Stan in https://rennlist.com/forums/10986561-post64.html)

Disassembly was easy, everything falls apart.
After cleaning everything and massaging everything with a light coat of motor oil,
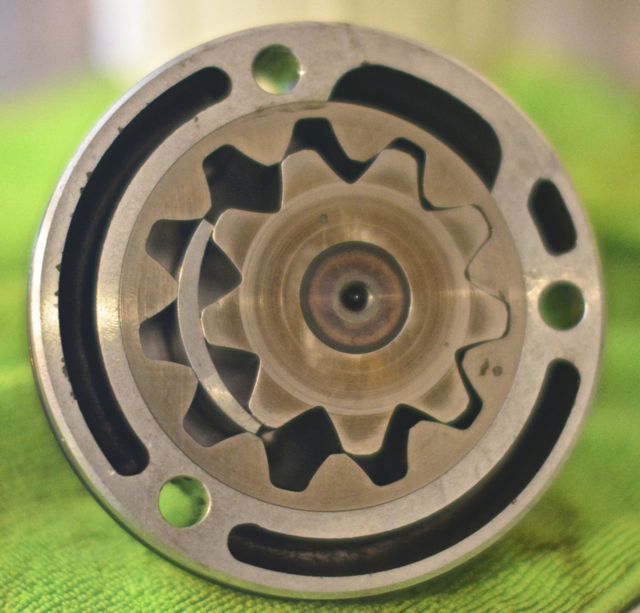
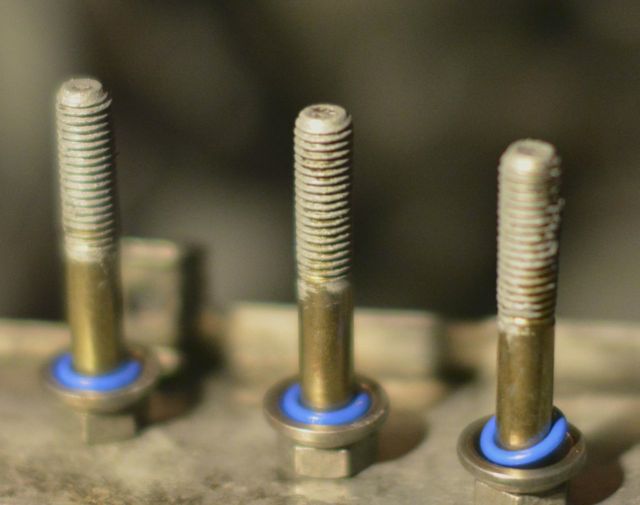
I brushed the threads of the three bolts with Optimol TA, and rubbed the three O-rings with Dow Corning 111:
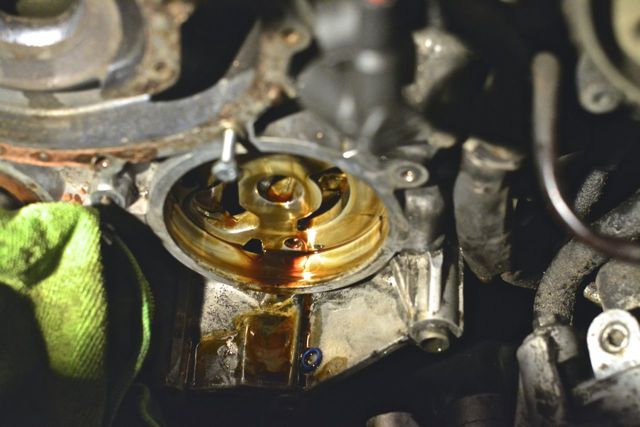
...and coated the oil pump gasket with a light coat of motor oil. I also coated the rubber O-ring that surrounds the oil pump with a light coat of STP.
The first time I pushed the oil pump gasket in, the spring that surrounds the inner circumference of the gasket fell out, so I had to clean it off, pull the gasket out, put the spring back in, and then reinstall the gasket.
I added a "generous amount" of STP to the oil pump right before installation
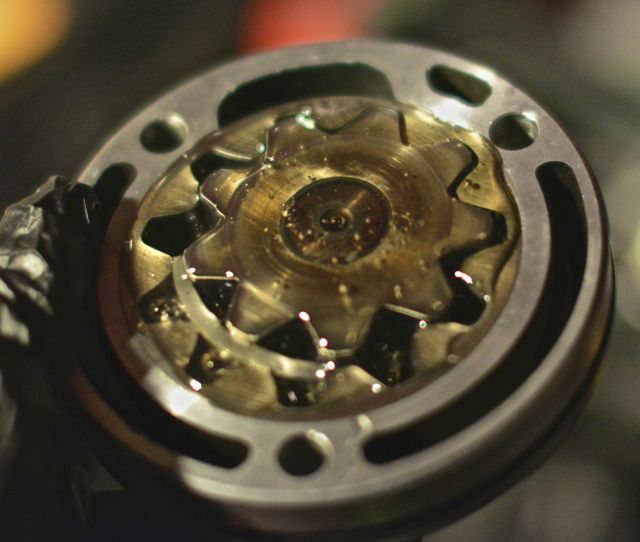
Reinstallation of the oil pump is easy, just remember the orientation of the oil pump when it came out (I took a picture) and then reorient the same way. I put the bolts in early on so that the oil pump would line up.
Disassembly was easy, everything falls apart.
After cleaning everything and massaging everything with a light coat of motor oil,
I brushed the threads of the three bolts with Optimol TA, and rubbed the three O-rings with Dow Corning 111:
...and coated the oil pump gasket with a light coat of motor oil. I also coated the rubber O-ring that surrounds the oil pump with a light coat of STP.
The first time I pushed the oil pump gasket in, the spring that surrounds the inner circumference of the gasket fell out, so I had to clean it off, pull the gasket out, put the spring back in, and then reinstall the gasket.
I added a "generous amount" of STP to the oil pump right before installation
Reinstallation of the oil pump is easy, just remember the orientation of the oil pump when it came out (I took a picture) and then reorient the same way. I put the bolts in early on so that the oil pump would line up.
Last edited by syoo8; 12-24-2013 at 12:15 PM.
12-19-2013, 11:01 PM
#74
Burning Brakes
Thread Starter
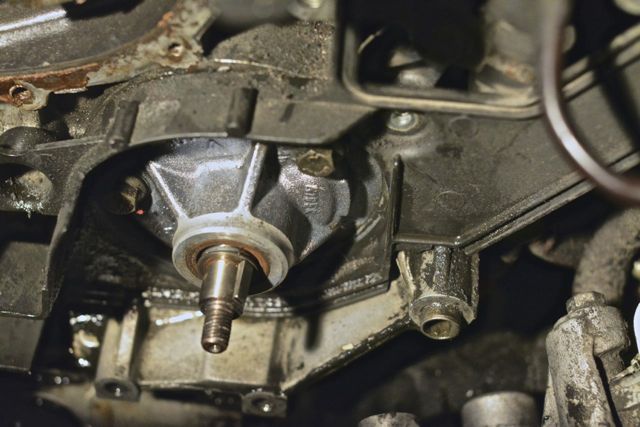
Pulling the crankshaft seal was very easy in the end, but I took the long route.
It was suggested that I drill a couple of screws into the old crankshaft seal and pull it out that way. It didn't work.
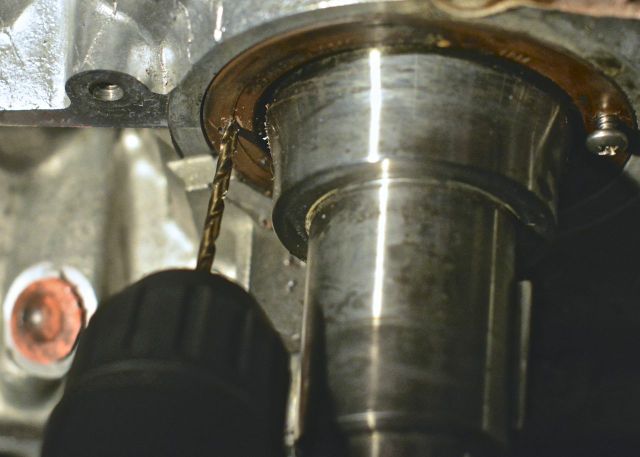
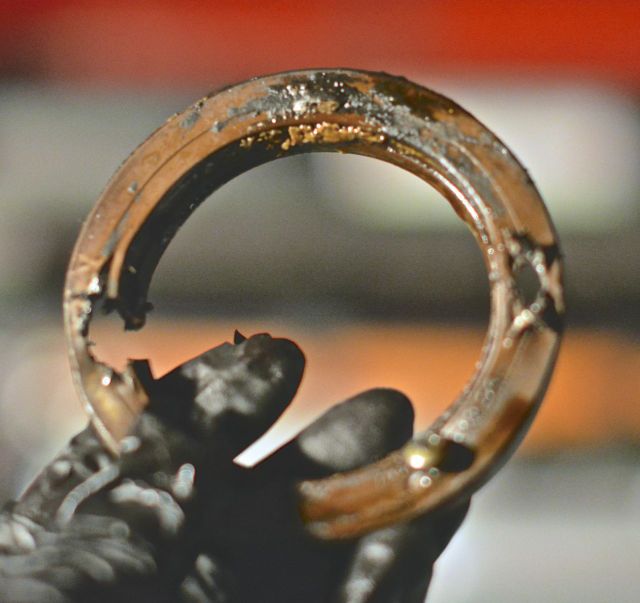
The easier way is to put a screwdriver in the notch (around 8:00) that Porsche provides. Some people on Rennlist said to lever a screwdriver in this notch. This did not work for me. What I did was hold the screwdriver at a 45 degree angle to the crankshaft, and then lightly hammer the screwdriver in. What this did was force the crankshaft seal out. Mine came out, and was mangled from the failed attempt with the screws.
I hammered the crankshaft seal in by using a PVC pipe and a hammer, being careful not to ever hit the radiator in the 'backswing.' (I did, once, but it didn't make a mark.)
Is the seal is pushed far enough? I pushed it in slightly farther than "flush."
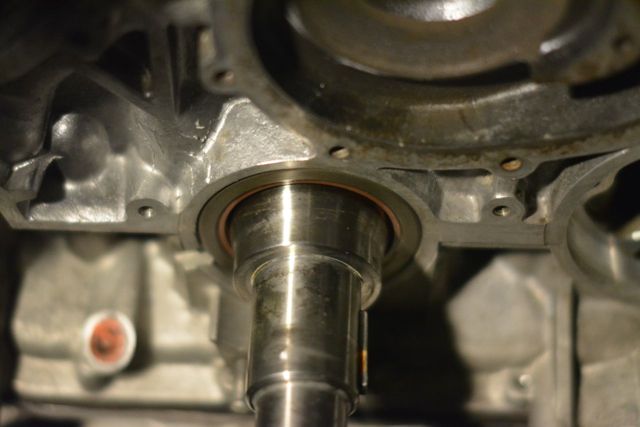
I coated the inside diameter of the main crank gear with Optimol HT.

I pushed the crankshaft gear in with the PVC pipe. It went in much easier than it came out.
It was suggested that I drill a couple of screws into the old crankshaft seal and pull it out that way. It didn't work.
The easier way is to put a screwdriver in the notch (around 8:00) that Porsche provides. Some people on Rennlist said to lever a screwdriver in this notch. This did not work for me. What I did was hold the screwdriver at a 45 degree angle to the crankshaft, and then lightly hammer the screwdriver in. What this did was force the crankshaft seal out. Mine came out, and was mangled from the failed attempt with the screws.
I hammered the crankshaft seal in by using a PVC pipe and a hammer, being careful not to ever hit the radiator in the 'backswing.' (I did, once, but it didn't make a mark.)
Is the seal is pushed far enough? I pushed it in slightly farther than "flush."
I coated the inside diameter of the main crank gear with Optimol HT.
I pushed the crankshaft gear in with the PVC pipe. It went in much easier than it came out.
Last edited by syoo8; 01-15-2014 at 10:23 PM.
12-19-2013, 11:11 PM
#75
Burning Brakes
Thread Starter
I cleaned the gasket surface on the engine block for the water pump. It took over two hours. I used a razor blade at a 90 degree angle to the block and scraped. I wetted the surfaces that had old gasket on them with Brakleen, which made them soft and easy to scrape off. Once it was relatively smooth, I used 1800-grit sandpaper (for my plastic models) to take off any extra dirt that the razor blade may have left behind.
After that, I wet a rag with Brakleen and wiped down the gasket surfaces three times. I figured that would be enough.
I applied Drei Bond 1209 to both sides of the paper water pump gasket. It was a very thin coat. Then, I put the water pump onto the block. It took three tries. The first time, the wiring harness got in the way. My fianc�e held that for me. The second time, the back timing belt cover got in the way. The third time, it worked.

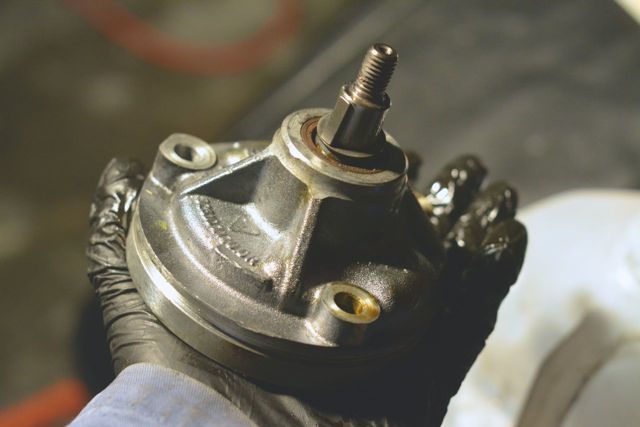
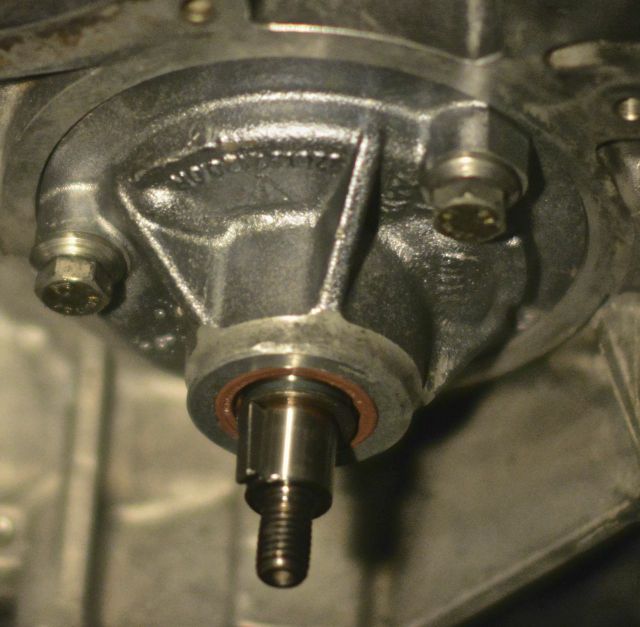
My new Laso water pump came with a bracket that I suppose holds the upper idler roller.
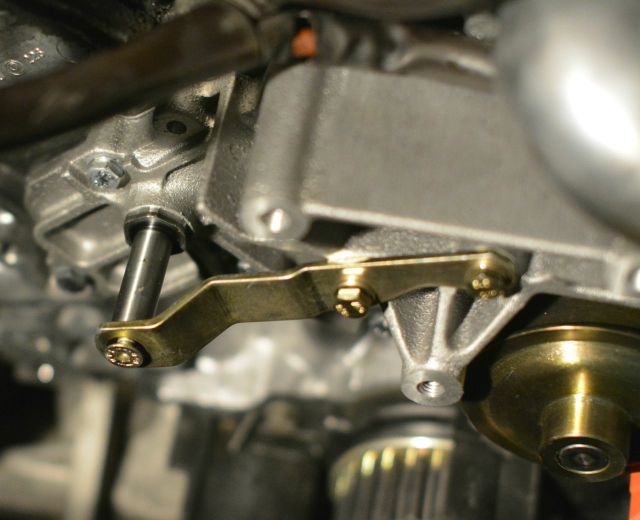
The upper idler roller that I received from Roger has a slightly larger inner diameter than the old one.
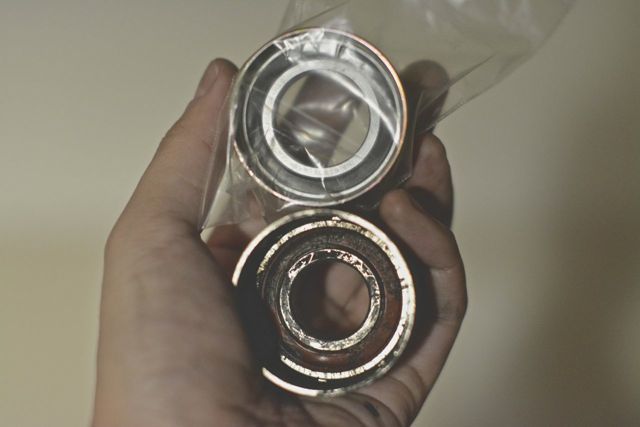
The idler roller clearly will not fit onto the shaft that is supplied by the new water pump.

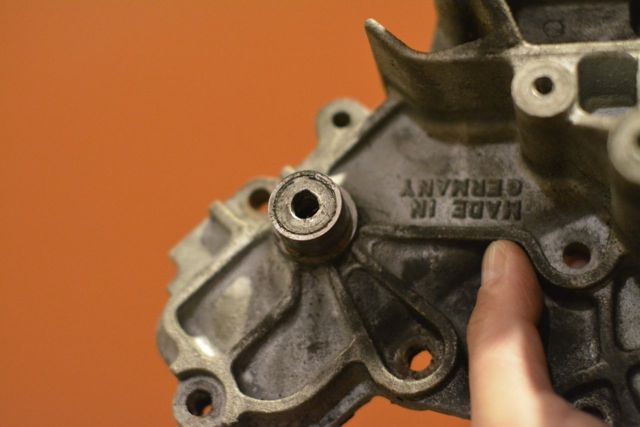
Below is a picture of the old water pump, with a boss that has the proper diameter for the old upper idler roller.
What am I doing wrong here?

After that, I wet a rag with Brakleen and wiped down the gasket surfaces three times. I figured that would be enough.
I applied Drei Bond 1209 to both sides of the paper water pump gasket. It was a very thin coat. Then, I put the water pump onto the block. It took three tries. The first time, the wiring harness got in the way. My fianc�e held that for me. The second time, the back timing belt cover got in the way. The third time, it worked.
My new Laso water pump came with a bracket that I suppose holds the upper idler roller.
The upper idler roller that I received from Roger has a slightly larger inner diameter than the old one.
The idler roller clearly will not fit onto the shaft that is supplied by the new water pump.
Below is a picture of the old water pump, with a boss that has the proper diameter for the old upper idler roller.
What am I doing wrong here?