

A 86.5 Timing Belt / Water Pump Picture Thread from a first-timer
 12-20-2013, 11:06 PM
#91
Team Owner
no worries as long as the CRANK is set to 45 BTDC,
this makes it impossible for any of the valves to hit the pistons no matter what way the cams are turned
transfer your old 45 degree marks to the new pulleys and then install the timing device to the driver side cam, install the belt , set the belt tension at TDC,
rotate a few times to settle the belt then check the timing,
 12-20-2013, 11:11 PM
#92
Burning Brakes
Thread Starter
Yes, the crank is set to 45 degrees BTDC.
Stan, can I turn the cam sprocket counterclockwise to get it to the position it used to be at?
Stan, can I turn the cam sprocket counterclockwise to get it to the position it used to be at?
12-20-2013, 11:56 PM
#93
Don't turn it counterclockwise. I believe it has something to do with the valve springs and not being able to withstand the pressure but basically something will break if you do that. A single millimeter move may be okay but not a tooth or even a half.
Go back around if you missed your mark. It's a pain but better that than risking it. Since it's set to 45 BTDC you can rotate that cam without any problems. Just make sure that the gear is set to where it was, as close as possible of course, before putting the belt on. It won't be exact but that's what the timing tool is for.
Go back around if you missed your mark. It's a pain but better that than risking it. Since it's set to 45 BTDC you can rotate that cam without any problems. Just make sure that the gear is set to where it was, as close as possible of course, before putting the belt on. It won't be exact but that's what the timing tool is for.
12-20-2013, 11:59 PM
#94
Burning Brakes
Thread Starter
When I turn it clockwise, it goes easily, then snaps forward every 45 degrees or so. Is this normal? By the way the spark plugs are still in the car and obviously the timing belt is not installed yet.
Last edited by syoo8; 12-23-2013 at 11:36 PM.
12-21-2013, 12:02 AM
#95
That's the spring pressure I believe. It's normal. Scared me the first time because I didn't expect it and the wrench left my hand and hit the body panel.
When you get close to your marking, go slow because if you go too fast you'll overshoot and then the cam will turn because of that spring pressure and you have to go around again. Think it's 2-3 teeth from 0 that it'll bite.
When you get close to your marking, go slow because if you go too fast you'll overshoot and then the cam will turn because of that spring pressure and you have to go around again. Think it's 2-3 teeth from 0 that it'll bite.
12-21-2013, 12:05 AM
#96
Also, when you time your cams with the 32vR make sure your fiancee or whoever helps you. That's a two person job in and of itself because you'll need to torque the gear to spec (and to remove it) with the spacer (you'll see in the instructions) and that's hard to do without it moving by yourself. Someone has to counter hold to keep it from moving. Using the flywheel lock isn't that effective when you're dealing with such small increments in the degrees.
12-21-2013, 01:04 AM
#97
Team Owner
its OK to turn the cams back to where they need to be,
as this isnt going to be spinning the cams full revolutions in the opposite direction.
the snapping action is the cams coming off the lifters.
Follow the instructions in post 96
as this isnt going to be spinning the cams full revolutions in the opposite direction.
the snapping action is the cams coming off the lifters.
Follow the instructions in post 96
12-21-2013, 01:24 AM
#98
Burning Brakes
Thread Starter
Dear Avar928 and Stan,
Thank you very much for your guidance. I never- in any of the threads that I read (and I believe I read every single one, and the WSM, and Dwayne's guide, and Pirtle's guide) heard of the spring pressure. It makes sense, obviously, but it scared the crap out of me the first time, and I felt my life flashing before my eyes...
I owe you guys dinner, when I meet you. And drinks too.
I pulled off the old cam sprockets with the help of a three-jaw puller I bought from Harborfreight. It wasn't really necessary, but I prefer not cutting my hands by wiggling and fighting. The new cam sprockets look better than the old.
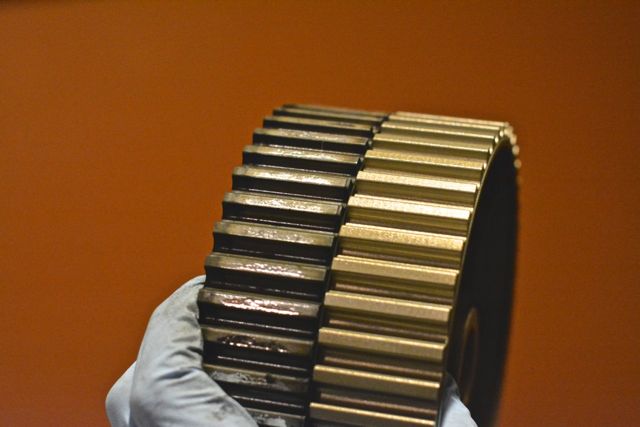
I installed the new cam sprocket in precisely the same orientation that the old one came off. I am receiving the Porken PK32V'r cam timing tool tomorrow, while will (I hope) help me time everything properly.
Thank you very much for your guidance. I never- in any of the threads that I read (and I believe I read every single one, and the WSM, and Dwayne's guide, and Pirtle's guide) heard of the spring pressure. It makes sense, obviously, but it scared the crap out of me the first time, and I felt my life flashing before my eyes...
I owe you guys dinner, when I meet you. And drinks too.
I pulled off the old cam sprockets with the help of a three-jaw puller I bought from Harborfreight. It wasn't really necessary, but I prefer not cutting my hands by wiggling and fighting. The new cam sprockets look better than the old.
I installed the new cam sprocket in precisely the same orientation that the old one came off. I am receiving the Porken PK32V'r cam timing tool tomorrow, while will (I hope) help me time everything properly.
Last edited by syoo8; 12-21-2013 at 02:07 AM.
12-21-2013, 01:40 AM
#99
Burning Brakes
Thread Starter
Now that my near-death experience was over with the cam gears, I decided to switch my attention to the clutch slave cylinder. (I will call it CSC for short.)
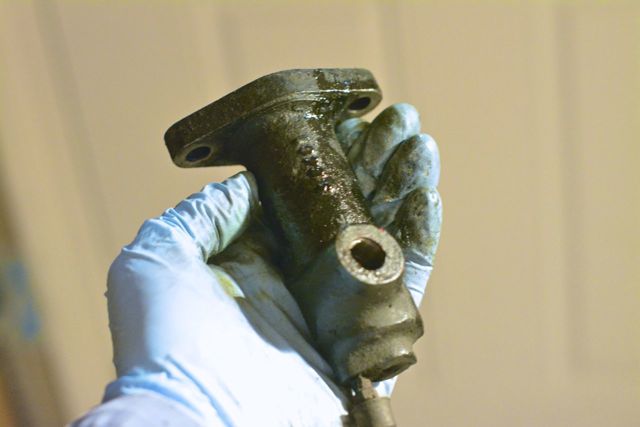
When I installed the flywheel lock tool, I pulled out the CSC push rod (so that I could move the CSC body out of the way) and the push rod's rubber cover ripped (as seen below.)
I ordered a CSC repair kit from Roger. It comes with a new circlip, new rubber cover, new retaining ring, new dust cover, and new dust cap for the bleeder screw.
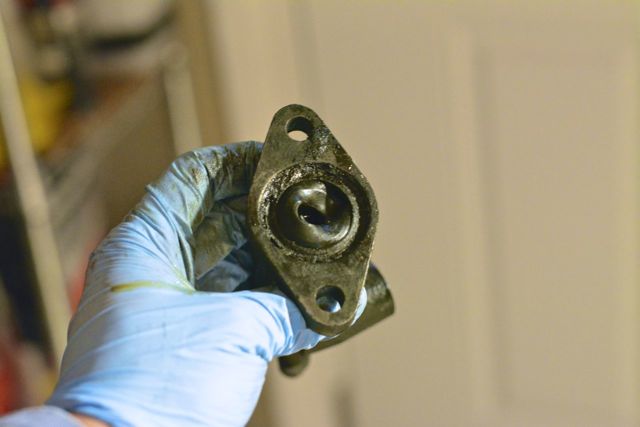
I disassembled the CSC, and the parts came out very easily.
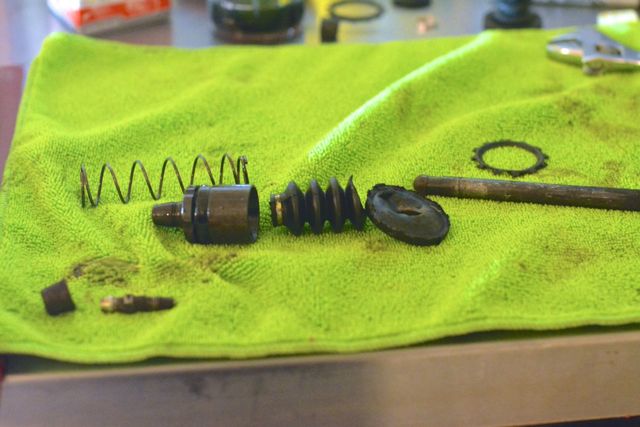
The workshop manual (Group 30, page 26) states that the CSC body should be cleaned thoroughly in gasoline. All of the components: rod, piston, and body- are soaking in kerosene. I hope that is close enough.
QUESTIONS:
1) The workshop manual states that the dust cover should be coated with brake cylinder paste. Porsche's brake cylinder paste is called Unisilkon, part number 000 043 117 00. (It is available on Pelican.) I don't have the time to wait for Pelican to send brake cylinder paste. Is there something that Rennlisters recommend for this application- something I could buy at an Auto parts store?
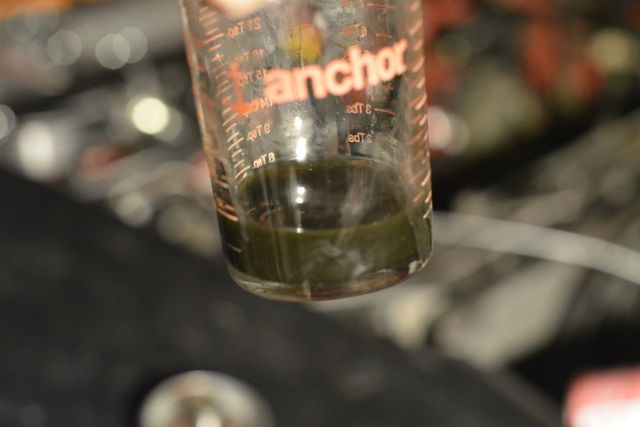
2) What fluid actually is going through the CSC? Clutch fluid? Sorry about this stupid question, but what I drained from the CSC looked like this:
Does this clutch fluid look normal to you?
When I installed the flywheel lock tool, I pulled out the CSC push rod (so that I could move the CSC body out of the way) and the push rod's rubber cover ripped (as seen below.)
I ordered a CSC repair kit from Roger. It comes with a new circlip, new rubber cover, new retaining ring, new dust cover, and new dust cap for the bleeder screw.
I disassembled the CSC, and the parts came out very easily.
The workshop manual (Group 30, page 26) states that the CSC body should be cleaned thoroughly in gasoline. All of the components: rod, piston, and body- are soaking in kerosene. I hope that is close enough.
QUESTIONS:
1) The workshop manual states that the dust cover should be coated with brake cylinder paste. Porsche's brake cylinder paste is called Unisilkon, part number 000 043 117 00. (It is available on Pelican.) I don't have the time to wait for Pelican to send brake cylinder paste. Is there something that Rennlisters recommend for this application- something I could buy at an Auto parts store?
2) What fluid actually is going through the CSC? Clutch fluid? Sorry about this stupid question, but what I drained from the CSC looked like this:
Does this clutch fluid look normal to you?
Last edited by syoo8; 12-24-2013 at 12:20 PM.
12-21-2013, 01:44 AM
#100
Rennlist Member
Edit: Sorry, you're quick and I am a whole topic behind. This is likely history, but maybe still useful.
It's OK to turn the cams either direction without the belt-- and with the crank at 45 deg. The prohibition is against turning the crank and timing belt backwards-- it stresses the tensioner and the belt could possibly skip a tooth (unlikely, but the WSM makes a big deal about it).
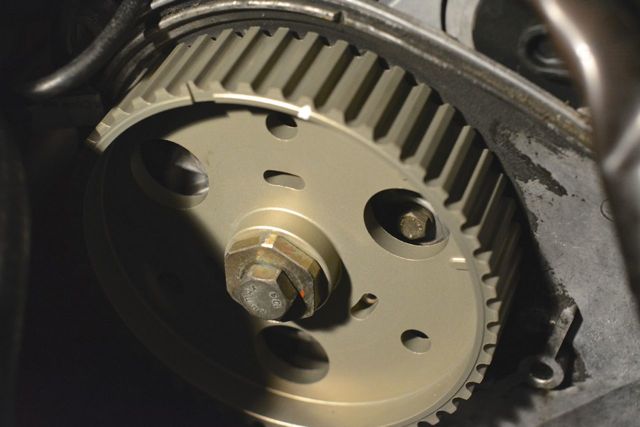
The 45-deg marks on the sprockets are three teeth to the right of the 0-deg marks-- see your picture in post #90. No need to transfer marks, just count to three and then compare as a double-check.
So go ahead and change the sprockets (wherever the cams are), and tighten the bolts with the rotor-mounting holes centered in the slots-- this will get cam timing close to correct, for now. Then rotate each cam to the 45-deg mark, and string the new belt.
The order of things is to first install the tensioner (adjuster fully loose) and the various sprockets, leaving off the front crank-sprocket flange off for now. Then install the tensioner-arm with tensioner pulley, with the belt trapped underneath. Make sure the alarm-contact parts are all there, including the washer.
Then string the belt starting with the tensioner pulley, crank sprocket, oil-pump, and driver's-side cam sprocket. Clamp it to the sprocket and check the mark after turning the sprocket CCW to take up any slack. Then past the water-pump pulley and lastly struggle the belt over the pass-side sprocket, and check the marks on both sides.
You will probably need a wrench on the drivers-side sprocket to move it a bit to slip the belt on, and then back against the belt to take the slack out. Same with the pass-side sprocket, use the 30mm wrench and go back and forth a bit to get the sprocket and belt lined up. The valve springs will have other ideas, you need to be firm.
Then tighten the tensioner. I connect a multimeter between the alarm contact and the block, and tighten it initially until the alarm contact just closes (zero ohms) and check the marks again. If everything is cool then put the front crank flange in place along with damper and crank bolt (temporarily, to turn the motor), verify that the crank is still at the 45-deg mark., Then remove the lock and turn the engine (clockwise) a few times to settle the belt (spark plugs out for easier cranking), and set the tension properly.
You can set the cam timing now with the 32v'r if you want, or wait until you get some miles on the belt and it is time to re-tension (and check the timing again then).
Cheers, Jim
It's OK to turn the cams either direction without the belt-- and with the crank at 45 deg. The prohibition is against turning the crank and timing belt backwards-- it stresses the tensioner and the belt could possibly skip a tooth (unlikely, but the WSM makes a big deal about it).
The 45-deg marks on the sprockets are three teeth to the right of the 0-deg marks-- see your picture in post #90. No need to transfer marks, just count to three and then compare as a double-check.
So go ahead and change the sprockets (wherever the cams are), and tighten the bolts with the rotor-mounting holes centered in the slots-- this will get cam timing close to correct, for now. Then rotate each cam to the 45-deg mark, and string the new belt.
The order of things is to first install the tensioner (adjuster fully loose) and the various sprockets, leaving off the front crank-sprocket flange off for now. Then install the tensioner-arm with tensioner pulley, with the belt trapped underneath. Make sure the alarm-contact parts are all there, including the washer.
Then string the belt starting with the tensioner pulley, crank sprocket, oil-pump, and driver's-side cam sprocket. Clamp it to the sprocket and check the mark after turning the sprocket CCW to take up any slack. Then past the water-pump pulley and lastly struggle the belt over the pass-side sprocket, and check the marks on both sides.
You will probably need a wrench on the drivers-side sprocket to move it a bit to slip the belt on, and then back against the belt to take the slack out. Same with the pass-side sprocket, use the 30mm wrench and go back and forth a bit to get the sprocket and belt lined up. The valve springs will have other ideas, you need to be firm.
Then tighten the tensioner. I connect a multimeter between the alarm contact and the block, and tighten it initially until the alarm contact just closes (zero ohms) and check the marks again. If everything is cool then put the front crank flange in place along with damper and crank bolt (temporarily, to turn the motor), verify that the crank is still at the 45-deg mark., Then remove the lock and turn the engine (clockwise) a few times to settle the belt (spark plugs out for easier cranking), and set the tension properly.
You can set the cam timing now with the 32v'r if you want, or wait until you get some miles on the belt and it is time to re-tension (and check the timing again then).
Cheers, Jim
12-21-2013, 01:57 AM
#101
Rennlist Member
1) The workshop manual states that the dust cover should be coated with brake cylinder paste. Porsche's brake cylinder paste is called Unisilkon, part number 000 043 117 00. (It is available on Pelican.) I don't have the time to wait for Pelican to send brake cylinder paste. Is there something that Rennlisters recommend for this application- something I could buy at an Auto parts store?
Brake fluid, should be amber (or blue) and relatively clear. That looks awful, and I am guessing that brakes and clutch are long overdue for bleeding (they share the same reservoir).
12-21-2013, 01:59 AM
#102
Burning Brakes
Thread Starter
Jim, your comments are always valuable. I have changed the sprockets, but paragraphs 5-9 of your post are already on the iPad that I have next to me in the garage at all times.
You are on my free dinner/ free drinks list as well.
You are on my free dinner/ free drinks list as well.
12-21-2013, 02:04 AM
#103
Burning Brakes
Thread Starter
----
Pardon me for my excess zeal:
I really love Rennlist. Where else can you get an expert to answer a question about a car that has been discontinued for 19 years at midnight, in about ten minutes?
I mean, really?
My fianc�e just asked me: what would you do without Rennlist? My answer: I would have to go to auto technical school. Which wouldn't happen. Which means I would be driving a Nissan 350Z or something like that.
Thank you Jim, thank you Rennlist.
 12-21-2013, 02:22 AM
#104
Nordschleife Master
The only comment I have is about the cam gear,
The notch is not at the high part of the teeth, but in the valley.
Do not look at the front, look at the back where the notch is. It is easy for some to get it off a tooth, especially looking to try to line up the wrong part of the gear with the marker....
The notch is not at the high part of the teeth, but in the valley.
Do not look at the front, look at the back where the notch is. It is easy for some to get it off a tooth, especially looking to try to line up the wrong part of the gear with the marker....