

A 86.5 Timing Belt / Water Pump Picture Thread from a first-timer
 12-28-2013, 08:21 PM
#136
Addict
Lifetime Rennlist
Member
Lifetime Rennlist
Member
Scott, when putting the belt on, it needs to be really pulled tight from the crank, to the oil pump, to the drivers side gear, under the waterpump, the over the passenger side gear. If you did all that and held the belt really tight all the way, it might be worth to tension the belt a bit, so that maybe the gear will spin cc. If the belt wasn't really pulled tightly while installing, you maybe a tooth off.
 12-28-2013, 08:46 PM
#137
Burning Brakes
Thread Starter
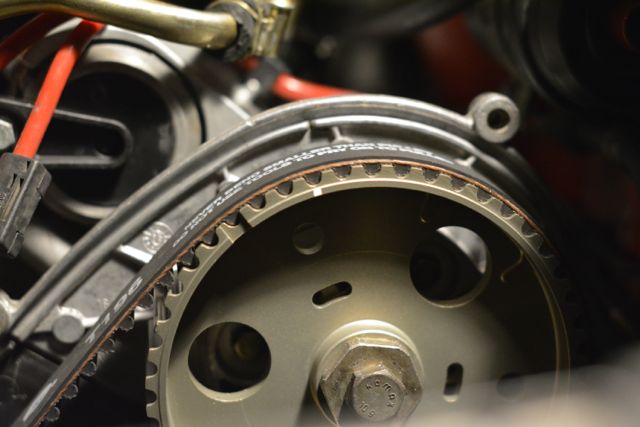
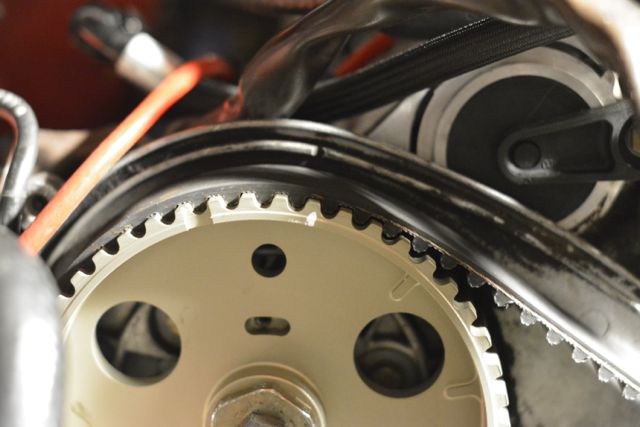
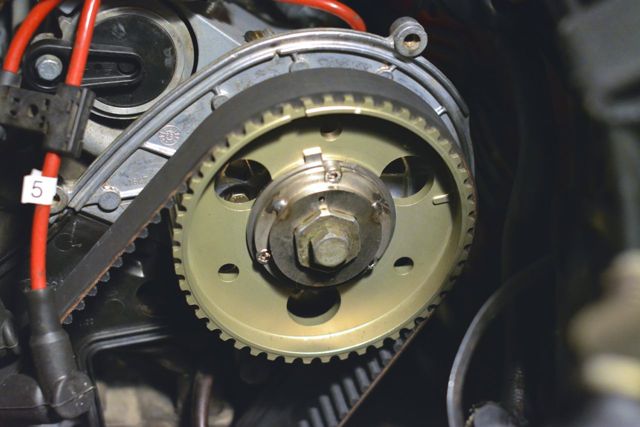
How does this look? I walked back the timing belt, and the tension on the different segments of the belt seems to be similar.
These pictures taken at 45 degrees BTDC.
These pictures taken at 45 degrees BTDC.
12-28-2013, 08:51 PM
#138
Shameful Thread Killer
Rennlist Member
Rennlist Member
II. Passenger-side cam sprocket moved clockwise a few teeth.
A little back-story here: I'm getting married in one week, and my fiance� and I are planning on driving this car to Albuquerque (to do a "Breaking Bad" tour) and maybe the Grand Canyon, before arriving in Las Vegas on January 2. So, I am in a rush- which is probably why I am making mistakes left and right.
I wanted to give my brain a break from the clutch problem I mentioned in the previous post, so I started to work on the timing belt. The tension needed to be set so that I can time the valves with the 32V'r kit that I received.
https://rennlist.com/forums/928-foru...ons-w-pic.html
However, based on the last pics in this thread, I believe you can proceed to tension the belt to spec, then move the crank around clockwise to TDC, and set the timing using the 32Vr device. Once the timing is set, move the crank around two full revs, and recheck your timing settings with the 32Vr device, then finish tighten the cam bolts, and do the final belt tension setting.
I generally remove all 8 spark plugs so that on the off chance I've messed up, I can differentiate the feel of normal non-compression pressure vs the feel of valve(s) impacting the piston(s).
Last edited by docmirror; 12-29-2013 at 05:21 PM.
12-28-2013, 09:06 PM
#139
Shameful Thread Killer
Rennlist Member
Rennlist Member
To insure any/all air is out of the clutch slave, proceed as follows.
1. Remove both bolts holding the clutch slave from the bell housing, leave the clutch fluid line attached. Pull the slave out of the bell housing and let it dangle.
2. Crack the bleed nipple on the slave cyl. Push the clutch pedal to the floor slowly and hold it there, or have an attractive assistant keep it down to the floor.
3. From under the car, open the slave bleed nipple fully. While it is open, compress the clutch slave rod fully into the cylinder. You will need to use a piece of cardboard on the rod to protect your hand. You can use a wood wedge, or anything else as long as you get the rod pushed all the way into the cylinder to compress the volume to it's minimum. Fluid should drool out of the bleed nipple, and possibly some air as well.
4. While the clutch rod is fully depressed, close the bleed nipple snug.
5. Release the clutch pedal from the floor, and slowly release pressure on the clutch cylinder rod, allowing fluid to fill the chamber.
6. Install the clutch slave cyl into the bell housing using the two bolts, and check the clutch play a few times.
If you still have a funny pedal feel it's likely that air has migrated into the master cyl. This is an ugly job, and my way to fix it is once again not an approved method requiring cutting into the driver fender well under the liner to access the clutch master. In the interest of being jeered once again, I will defer providing instructions on that.
12-28-2013, 09:15 PM
#140
Rennlist Member
The white mark should match a belt tooth, i.e. middle of the groove in the sprocket, half a tooth left of where you have it.
When you say "walked back" I assume you mean the tensioner was loosened, and you were able to turn the pass-side sprocket CCW, jumping two teeth?
That's fine, and explains why it skipped in the first place. But the belt does need to be at least snug before rotating the engine. It doesn't need to be properly tensioned, just tight enough so that there is no slack anywhere.
12-28-2013, 10:37 PM
#141
Rennlist Member
As per instructions I found on Rennlist, I followed the following procedure:
1) Pressurized the brake fluid reservoir to 12psi.
2) Loosened the clutch slave cylinder (CSC) bleeder.
3) Let drain until the air came out. Let it drain until the CSC was bleeding brake fluid w/o bubbles.
4) Pushed the clutch pedal. The clutch pedal snapped down to the bottom of the floor with no resistance. Tightened the CSC bleeder.
5) Removed the CSC's two bolts, pushed the CSC's rod in and out 10 times, slowly, to let air escape.
6) Pushed the clutch pedal. The clutch felt "normal."
7) Pressurized the brake fluid reservoir. Loosened the CSC bleeder.
8) Pushed the clutch pedal. This time, the clutch pedal snapped down halfway to the bottom of its travel, then felt "normal."
Then, I gave up. I thought about bleeding the clutch master cylinder, until I realized that I don't know where it is. That's right, I'm a novice.
Any suggestions?
It is easy to get air back into the system via the slave bleeder, and I suspect that is what happened at step 7.
So my suggestion is to go back to step 5, do the slow in-out with the slave cylinder another ten times or so, then reinstall the slave and try it.
If there is still air then go back to the pressure bleeder (step 1) but I would limit pressure to 7-8 pis, you don't want to blow the blue hose off the master or the reservoir.
Remember that you are trying to get air out of the system, and air bubbles float -- it is very difficult to make bubbles sink. You can flush them out if the fluid is moving fast enough, but the path of least resistance is to let them float. As you push the slave rod in, fluid (and bubbles) move up through the master, upwards towards the refill port, and up towards the reservoir.
And then as you release the rod (slowly), fluid runs downhill to refill the slave, but the air is still trying to float upwards. Tapping the slave gently while compressing it can also help dislodge air bubbles.
My problem is that I tend to visualize what is happening for procedures like this, and I have trouble visualizing bubbles traveling downhill. So, for me, bleeding by pushing on the slave usually works, YMMV.
Cheers, Jim
12-28-2013, 11:05 PM
#142
Shameful Thread Killer
Rennlist Member
Rennlist Member
Once the pedal is pushed more than a few inches, the refill port from the reservoir to the master cyl is blocked. The refill port is right at the rear seal of the stroke. Otherwise, fluid would be constantly pushed out the refill port when the pedal was pushed. I covered this in my post. Also, pushing the slave rod in while the pedal is down will assist in moving the potential air in the line toward the bleed nipple.
12-28-2013, 11:27 PM
#143
Rennlist Member
Once the pedal is pushed more than a few inches, the refill port from the reservoir to the master cyl is blocked. The refill port is right at the rear seal of the stroke. Otherwise, fluid would be constantly pushed out the refill port when the pedal was pushed. I covered this in my post. Also, pushing the slave rod in while the pedal is down will assist in moving the potential air in the line toward the bleed nipple.
Your method works also, and increasing the pressure with the pedal shrinks the bubbles and makes them less buoyant and easier to flush. But there is risk of air getting back in via the bleeder if you don't get the sequence right (i.e. if the bleeder is still open when pedal is lifted).
As I said, lots of different ways to attach it. I just have trouble visualizing sinking bubbles.

 12-28-2013, 11:52 PM
#144
Shameful Thread Killer
Rennlist Member
Rennlist Member
Right, that's why I didn't say anything about touching the pedal-- the slave-rod-pushing technique is done with the pedal in the normal up position. The refill port is right at the rear seal, at the highest point in the master, and is open to the reservoir with the pedal up. So any air that is trapped in the master gets pushed up through the refill port towards the reservoir when the slave is compressed. It's pretty simple and has always worked for me.
Your method works also, and increasing the pressure with the pedal shrinks the bubbles and makes them less buoyant and easier to flush. But there is risk of air getting back in via the bleeder if you don't get the sequence right (i.e. if the bleeder is still open when pedal is lifted).
As I said, lots of different ways to attach it. I just have trouble visualizing sinking bubbles.
12-29-2013, 01:30 AM
#145
Burning Brakes
Thread Starter
Clutch Slave Cylinder Update
I would like to thank JIM CORENMAN for being a really amazing guy. He spent a half hour on the phone with me, walking me through the timing belt and clutch slave bleeding. I am in his debt.

Jim suggested that I repeat what I did before, except not touch the clutch pedal. I went under the car, removed the two 13mm bolts that attach the CSC, and then- slowly- pushed the CSC rod in and out 12 times.
I tested the clutch. Voila- it felt completely normal.
At this point in my previous encounter with the CSC, I would have bled the CSC using the power bleeder, pushing the clutch while doing so. I did not do it this time. I am going to cross my fingers and hope that when I start the car, the clutch works.
I would like to thank JIM CORENMAN for being a really amazing guy. He spent a half hour on the phone with me, walking me through the timing belt and clutch slave bleeding. I am in his debt.
Jim suggested that I repeat what I did before, except not touch the clutch pedal. I went under the car, removed the two 13mm bolts that attach the CSC, and then- slowly- pushed the CSC rod in and out 12 times.
I tested the clutch. Voila- it felt completely normal.
At this point in my previous encounter with the CSC, I would have bled the CSC using the power bleeder, pushing the clutch while doing so. I did not do it this time. I am going to cross my fingers and hope that when I start the car, the clutch works.
Last edited by syoo8; 12-29-2013 at 12:21 PM.
12-29-2013, 02:56 AM
#146
Burning Brakes
Thread Starter
This evening, Jim Corenman was a great help in talking me off the ledge. He introduced me to a very good trick: once the timing of one cam sprocket has been established, use a C-clamp (wrapped in some cloth) to clamp the sprocket to the timing belt. This will ensure that the belt will not skip.
I had a timing belt with one sprocket a tooth off at TDC (top dead center.) I ended up pulling the timing belt off of both sprockets, leaving the timing belt on the main crank gear, water pump, tensioner, and oil pump. The tensioner was in its most slack position. I "started over," first threading the timing belt (TB) over the driver's side, and then carefully threading the TB over the passenger side cam sprocket.
I would not have solved this issue without Jim's help. I am very grateful to him.
Using Mike Frye's excellent downloadable reference manual, I tried the PK32V'r timing tool made by PorKen.
After using it, I have a couple of impressions:
1) I don't know how anyone could possibly time the valves without it. (The procedure in the WSM looks byzantine to say the least!)
2) "One degree off" is a very minute amount of rotation in the cam sprocket!
It is very easy to use. You take the two clamp rings that are included in the
the kit, and with included allen bolts you bolt the clamp rings into the three-pronged hub 928 105 459 00.
The arm of the unit is the "brains" of the PK32V'r. It has tiny little holes that you put a needle through (needle also included.)
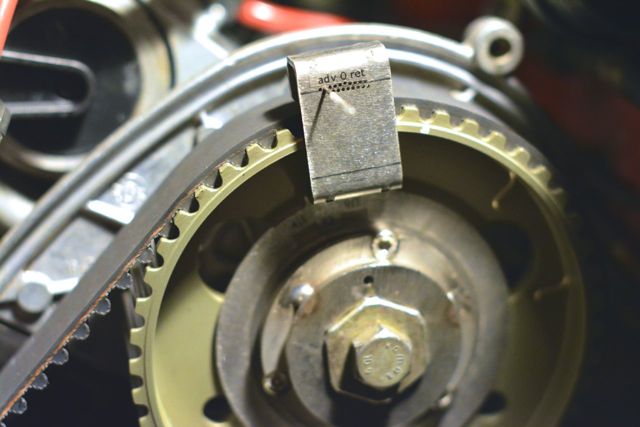
You pick the hole that best allows your needle to reach the deepest part of the groove behind the cam gear.
I also got the PKBumpStick, which allows you to rotate the cam sprocket with an included wrench.
---
That's great in theory.
Here's what happened to me:
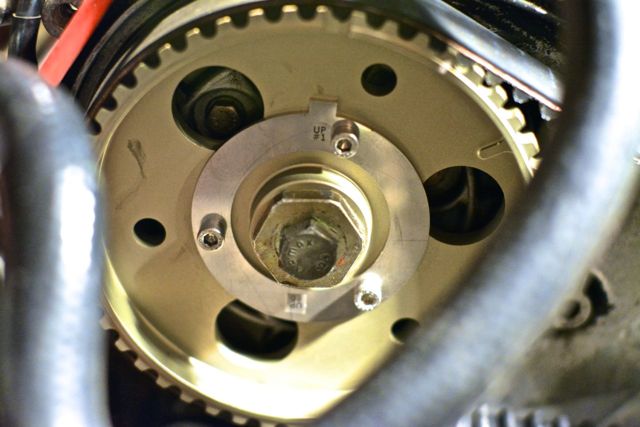
1) This has been mentioned before, but I'd like to reiterate this: the little groove in the front of the cam sprocket is not an accurate descriptor of where TDC lies. When I used the PK32V'r tool on my DS (driver's side) sprocket, I was very surprised to find out that at "TDC" (according to my cam sprocket) the cam timing was so far advanced that it was outside the range of PK32V'r tool. In other words, I was one tooth off.
2) Using the PKBumpStick and PK32V'r, I was able to retard both the PS and DS cam sprockets. This involves setting the crank to 20 degrees BTDC, then rotating the crank until the needle in the arm of the PK32V'r resides in the deepest part of the groove. Then, you loosen the three allen bolts on the clamp rings while simultaneously holding the wrench (included with the BumpStick) in place (this is harder than it sounds.) Then, rotate the crank to TDC and tighten the allen bolts.
3) The procedure worked just fine- kind of. I had to do each side several times. The really crappy thing is turning the crank. It takes a great deal of effort to turn that crank two revolutions (720 degrees), especially because I did not remove the spark plugs.
The problem I had is that after turning the crank, the measurement on the PK32V'r would be slightly different each time. It is frustrating. I finally had to give up for the night.
I was shooting for passenger side (PS) 2 degrees retard, driver's side (DS) 0 degrees retard. What I ended up with was PS 1 degree retard, DS 1 degree retard. I feel like I am chasing my own tail a little bit.
I had a timing belt with one sprocket a tooth off at TDC (top dead center.) I ended up pulling the timing belt off of both sprockets, leaving the timing belt on the main crank gear, water pump, tensioner, and oil pump. The tensioner was in its most slack position. I "started over," first threading the timing belt (TB) over the driver's side, and then carefully threading the TB over the passenger side cam sprocket.
I would not have solved this issue without Jim's help. I am very grateful to him.
Using Mike Frye's excellent downloadable reference manual, I tried the PK32V'r timing tool made by PorKen.
After using it, I have a couple of impressions:
1) I don't know how anyone could possibly time the valves without it. (The procedure in the WSM looks byzantine to say the least!)
2) "One degree off" is a very minute amount of rotation in the cam sprocket!
It is very easy to use. You take the two clamp rings that are included in the
the kit, and with included allen bolts you bolt the clamp rings into the three-pronged hub 928 105 459 00.
The arm of the unit is the "brains" of the PK32V'r. It has tiny little holes that you put a needle through (needle also included.)
You pick the hole that best allows your needle to reach the deepest part of the groove behind the cam gear.
I also got the PKBumpStick, which allows you to rotate the cam sprocket with an included wrench.
---
That's great in theory.
Here's what happened to me:
1) This has been mentioned before, but I'd like to reiterate this: the little groove in the front of the cam sprocket is not an accurate descriptor of where TDC lies. When I used the PK32V'r tool on my DS (driver's side) sprocket, I was very surprised to find out that at "TDC" (according to my cam sprocket) the cam timing was so far advanced that it was outside the range of PK32V'r tool. In other words, I was one tooth off.
2) Using the PKBumpStick and PK32V'r, I was able to retard both the PS and DS cam sprockets. This involves setting the crank to 20 degrees BTDC, then rotating the crank until the needle in the arm of the PK32V'r resides in the deepest part of the groove. Then, you loosen the three allen bolts on the clamp rings while simultaneously holding the wrench (included with the BumpStick) in place (this is harder than it sounds.) Then, rotate the crank to TDC and tighten the allen bolts.
3) The procedure worked just fine- kind of. I had to do each side several times. The really crappy thing is turning the crank. It takes a great deal of effort to turn that crank two revolutions (720 degrees), especially because I did not remove the spark plugs.
The problem I had is that after turning the crank, the measurement on the PK32V'r would be slightly different each time. It is frustrating. I finally had to give up for the night.
I was shooting for passenger side (PS) 2 degrees retard, driver's side (DS) 0 degrees retard. What I ended up with was PS 1 degree retard, DS 1 degree retard. I feel like I am chasing my own tail a little bit.
12-29-2013, 03:16 AM
#147
Burning Brakes
Thread Starter
I am about to button up the timing belt job, which means addressing the power steering pump (I will call it PSP.) I need to replace the hoses- they are leaking all over the place.
I can replace the hoses with the PSP in place (I think.) Right now, the PSP it is attached to the alternator/PSP "cassette" that I moved out of the way to remove the timing belt cover.
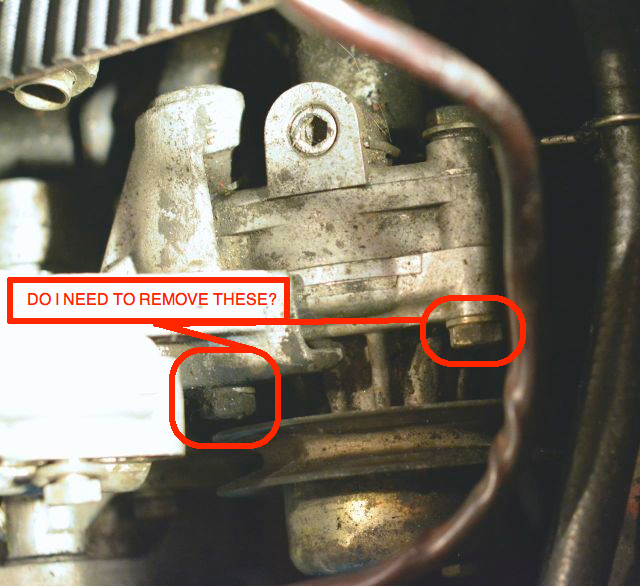
A newbie question: if I wanted to remove the PSP, do I need to remove the bolts below? One of them looks like it is not removable without disassembling the PSP 'pulley.'
I can replace the hoses with the PSP in place (I think.) Right now, the PSP it is attached to the alternator/PSP "cassette" that I moved out of the way to remove the timing belt cover.
A newbie question: if I wanted to remove the PSP, do I need to remove the bolts below? One of them looks like it is not removable without disassembling the PSP 'pulley.'
12-29-2013, 03:41 AM
#148
It pays to have someone help with the timing (call it before-the-wedding bonding with your bride). It took me a little over an hour to get it right with my dad's help. The timing was always a bit off for me on that passenger side because I was advanced and it's slightly more complicated to get it to retard.
The right bolt in the picture does NOT need to be removed. Actually, if you wanted to remove the whole PSP without disassembling the pump from the belt bracket then you don't have to remove the left one either. The left bolt (there should be a pair) is slotted into a horizontal slider. There's two sets, an upper and lower for a total of 4 bolts, that lock in the belt tension. CORRECTION: There's three bolts actually, one in each its own horizontal slider.
If you already moved the PSP out of the way, then loosen the hose clamp and take off the hose. Unbolt the banjo and carefully navigate the pump out of the way. Those are the only thing holding the PSP to the car right now. Again, have something to catch the PS fluid because that stuff will come pouring out and get everywhere.
I'm actually in the middle of changing the curved hose which I should have done instead of cleaned it. Apparently the gunk was plugging all the leaks and when I cleaned it, the hose leaked worse than ever. I just finished brake cleaning the engine again and painstakingly replacing that hose. It's just a PITA, not hard. I absolutely hate re-installing that alternator because it's heavy and threading in the long 17mm bolt is a pain to get right. Because the lower radiator hose was blocking that bolt hole, I had to drain the radiator and remove the lower part of that hose. Gave me enough room to get it straight....now I just have to re-install that hose and fill her up with Zerex.
12-29-2013, 10:39 AM
#150
Rennlist Member
Sheesh, cut it out with the big fonts already! We were all noobs once (just some of us don't remember), and still noobs outside our very narrow field of experience. A little help is helpful sometimes.
And sorry, I am a topic behind, as usual
On the valve timing, a couple of thoughts: You need the belt properly tensioned before doing anything with cam timing, especially for the passenger-side (farthest from the crank sprocket, in terms of belt travel). The belt does stretch a little, that's part of the equation.
Also, a new belt will settle in a bit during the first few hundred miles, hence the need to check things after the first 1-2K miles. That would be the time to fine-adjust the cam timing-- for now just get it close to zero on both sides and you should be good. (The pass side wants to be set 1-2 deg retarded to compensate for expansion when warm, offset by a degree or two of advance to compensate for new-belt stretch. So zero on both sides is a good first setting, or anywhere around there).
Be sure to check the alarm contact with a voltmeter before buttoning things up, you should have continuity from the alarm contact to ground with the belt tensioned. I connect a multimeter in "beeper" mode when doing the initial tension, it should start beeping when the belt is about 80% tight.
And -- important-- after tweaking the cams with the 32v'r, be sure to remove the small washer that went under the big washer to allow the cam gear to be adjusted. And double-check that the cam bolt is properly torqued, 48 ft-lbs (counter-hold the big washer with a 30mm wrench).
Cheers, Jim