When you click on links to various merchants on this site and make a purchase, this can result in this site earning a commission. Affiliate programs and affiliations include, but are not limited to, the eBay Partner Network.
Here’s a run through of the repair I did on my in-tank pump, which I’ve been meaning to document for a while.
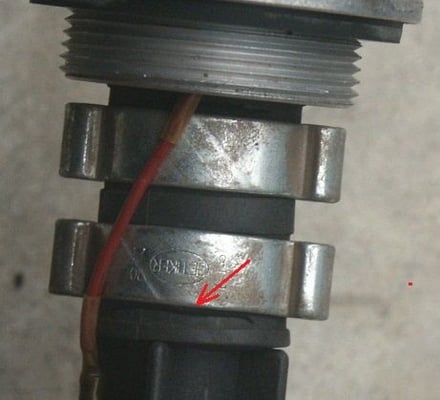
I pulled my in tank pump (original never been touched) and found that that the hose was still intact, but starting to split, as the highlighting arrows show.
When I flexed it, it wasn’t difficult to get it to split right through. I was surprised at the crappy un-reinforced hose that’s used as standard, and not at all surprised that it splits and causes the problems it does. The clamps pinch the hose so much that it starts cracks near the clamp edge as you can see.
I figured that fitting reinforced hose would limit the compression and distortion of the hose, and would be likely to be more reliable.
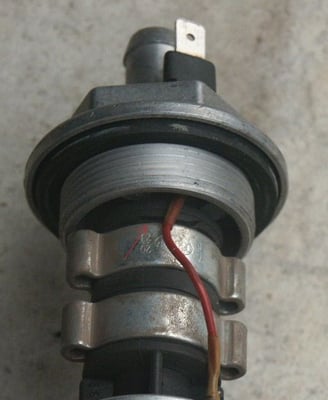
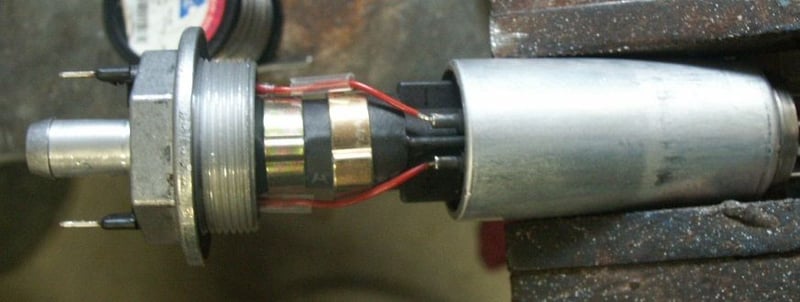
I cut the hose off, but found that when I flexed the wires I had a soldered joint come apart, so I cut away the old hardened shrink sleeves, de-soldered the wires and removed them as well. Here’s the pump with the hose and wires removed. I'm sure that the bad soldered joint that I found was causing an intermittent difficult/long cranking time start problem. The wires hadn't been inserted into the hollow terminals, or properly soldered.
I then fitted a new section of reinforced submersible high pressure fuel hose to the tank fitting, cut to the same length as the removed original; making sure it was cut really square on the ends, fitted a new clamp, soldered the wires back into the terminals, and fitted new heat shrink sleeves to those terminals.
I then pushed the assembled tank fitting and hose onto the pump, with a loose fitted clamp, re-soldered the wires back into those connectors, and loose fitted new heat shrink sleeves.
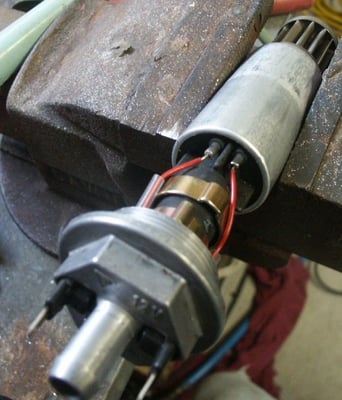
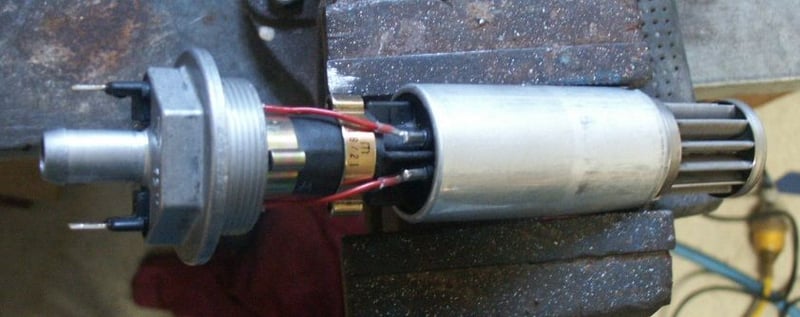
Here’s another pic of the loose assembly ready for clamping, re-soldering of the wires into the terminals, and shrinking of the terminal insulating sleeves onto the pump.
Here’s the complete assembly, with fitted clamps, and heat shrink sleeves in place. I oriented the clamps the way I did to keep them away from the wires.
Notice how the new hose is not squashed like the old one, even though the clamps are tight.
I attached a hose to the outlet and tested the pump in a bath of kerosene, and then refitted it to the tank with a new O-ring, after drying with compressed air and cleaning the pleated intake filter. After fitting I put some fuel back in the tank and ran it for a while to flush it and check for any O-ring or hose leaks.
When I took apart this pump on my '90 S4 at about 89K miles, besides the split hose, the brushes were gone on one side (cause of motor falure) and almost gone on the other side.
These internal pumps are usually only good for about 60K miles.
When I took apart this pump on my '90 S4 at about 89K miles, besides the split hose, the brushes were gone on one side (cause of motor falure) and almost gone on the other side.
These internal pumps are usually only good for about 60K miles.
Yikes! I'm glad I replaced mine at 150K miles even though it was working fine.
The hose is made by Goodyear, but I haven't got sufficient left to see the size stamped on it. It's difficult to measure with a caliper because it's flexible and not sitting perfectly round, but here's what I get as close as I can measure.
OD ... an average of about 20mm.
ID ... an average of about 12.5mm.
The length needed to replace the original is 30mm, but I cut mine 32mm and fully pushed on the both spigots I still got the same overall pump length.
Crimp clamps to suit that size should be readily available from where you get the hose. I used clamps with a size of 19/21mm, which you can see stamped on one in my previous pics.
I'll get the specs of the hose and post back to this thread, but won't be able to do that for some time. If I recall it was rated to several hundred psi and was suitable for immersion in fuels and oils.
The main issue with the original is that it has no reinforcement, and so cracks as a consequence of the deformation by the clamps, and the constant flexing in service because of vehicle movement.
Here are some more pics of the broken original hose with the original clamps, next to two offcuts of the new hose.
I checked it in the spring (after 2+ years) and it was still good, but the other layer is not rated for ethanol. I've looked for hose that was rated for in-tank use with ethanol, without luck. So more info would be great!
(FWIW, Bosh '044 pumps have a built-in strainer, which takes care of one worry).
Jim ... I'll get all the tech data I can from the specialist outlet I got it from and post back here.
They gave me all the data verbally as being more than suitable for the use, and they sell nothing but hose and fittings to auto, mining, industrial, aviation, etc; but I'll ask for a data sheet or web reference to post.
I can understand why Porsche went for a softer rubber to give a resilient mount to diminish vibration transmission, but to have the pump flapping around without some support at the filter end seems a bit of a fail to me, and I think is probably a lot of the reason the original cracks. The gyroscopic resistance to change of vehicle direction when operating, would make the flexing even worse. If they'd put a support rubber socket in the tank to push the nose of the filter into partially, that would have given support and vibration insulation. A bit hard to retro fit though ... but I might cut an old tank up and have a look at what might be possible.

 06-08-2012, 10:38 PM