
928 Special Tool Challenge (AC Evaporator Test Tool)
 05-20-2012, 10:26 AM
#1
Rennlist Member
Thread Starter
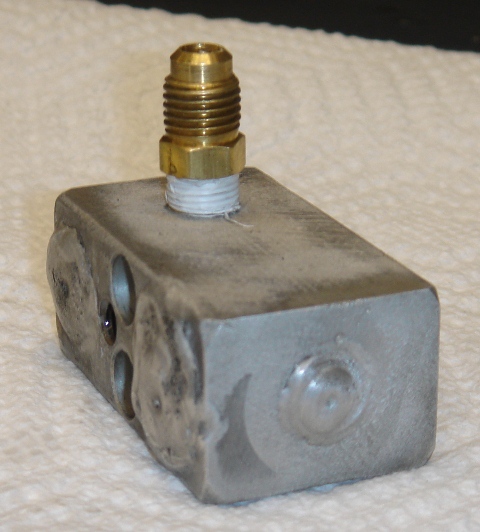
1. What is it?
2. How/why would it be used?
3. What spectacularly bad news did I receive?
1993 GTS 5 speed
Last edited by CraigL; 05-27-2012 at 05:01 AM.
 05-20-2012, 10:44 AM
#2
Archive Gatekeeper
Rennlist Member
Rennlist Member
Pressure tester for one of your AC evaporators. Hopefully it's the rear thats leaking, but if it's spectacularly had, it's probably the front? Hey, it's an opportunity to do your dash-out 20 year maintenance schedule......
 05-20-2012, 11:33 AM
#5
Rennlist Member
Thread Starter
Correct x 2. Dashboard evaporator has a leak. When I discussed this possibility with Roger, he noted that in all of his years he has never sold one. SeanR was also sceptical. So, before tearing into the dash, I decided to isolate the evaporator and test it.
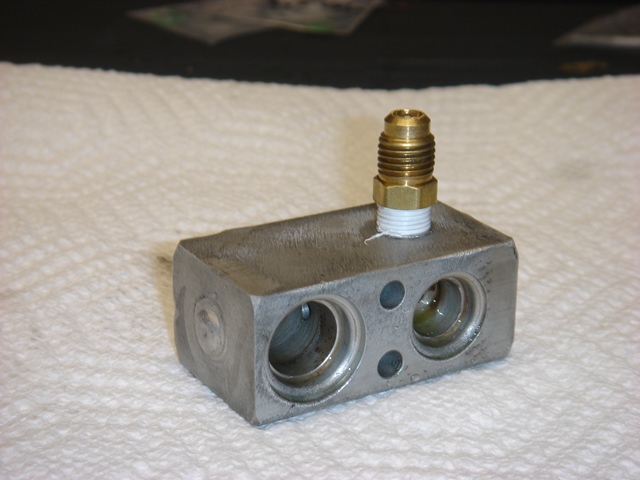
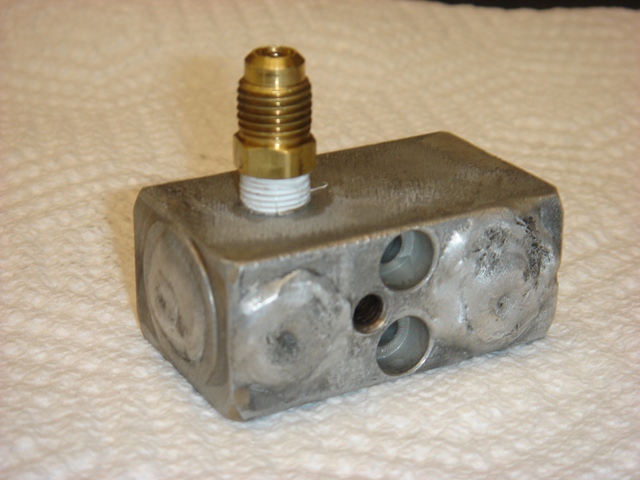
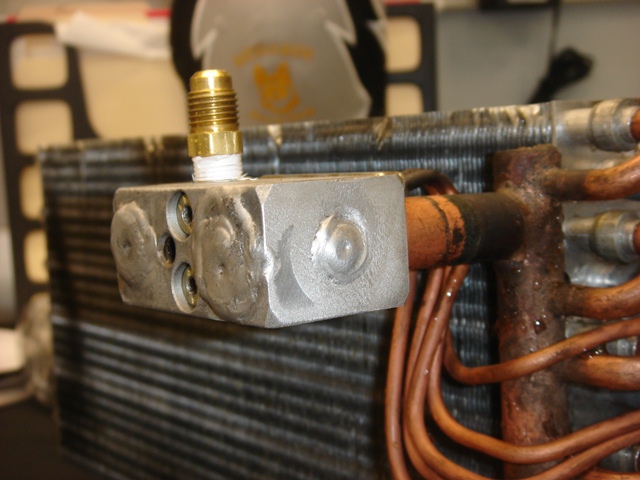
Here are two better views of the modified expansion valve:
Action shot of it being used 'in situ'. This confirmed that the pressure was not being maintained. Also, the freon detector was going bezerk in the central vent.
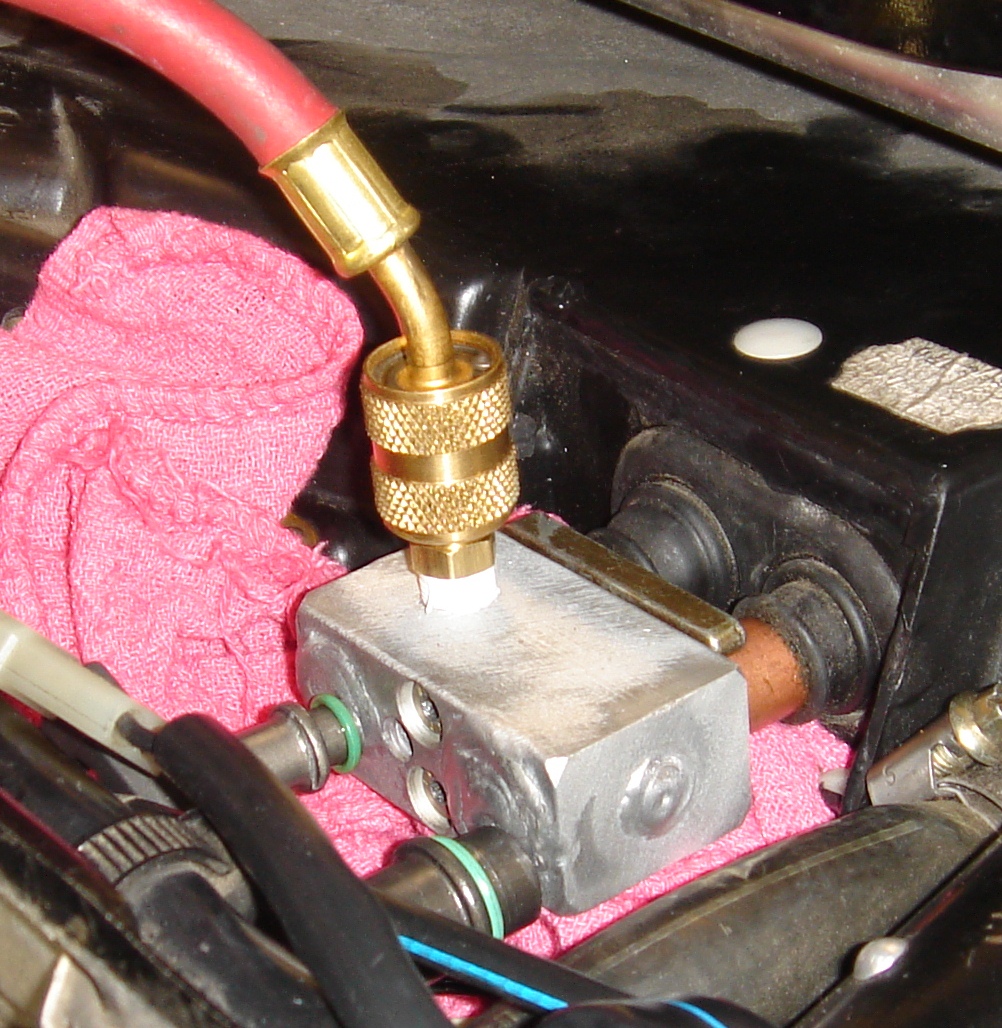
The leak was hard to localize It was in the interior of the evaporator ... about 2 or 3 rows deep into the brick. We put 100 lbs of pressure (nitrogen) into it and submerged it in a tank of water.
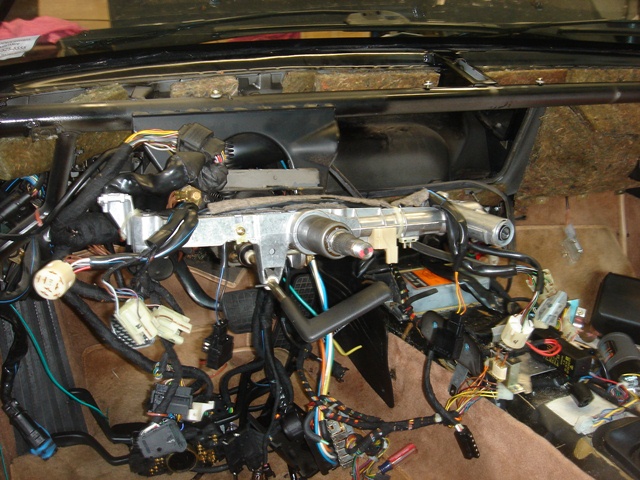
Here is the aftermath. The interior of the car has been hit by a cruise missile. I'm sure that it will eventually resemble a 928 some day soon, but this is something no one should have to experience.
As always, there is plenty of opportunity for WYAIT chores/upgrades. On my list:
Investigate getting an HVAC housing with a pollen filter (94,95)
Refurbish all of the vacuum actuators
Rebuild the suction/pressure hoses
Clean the ground points
LED instrument panel upgrade
Install RAAMmat (sound deadener)
Install new sound system
Install new carpet
Any further comments / suggestions? What a pesky car!
Lastly, if anyone has a need to use this tool, feel free to ask!!!
Here are two better views of the modified expansion valve:
Action shot of it being used 'in situ'. This confirmed that the pressure was not being maintained. Also, the freon detector was going bezerk in the central vent.
The leak was hard to localize It was in the interior of the evaporator ... about 2 or 3 rows deep into the brick. We put 100 lbs of pressure (nitrogen) into it and submerged it in a tank of water.
Here is the aftermath. The interior of the car has been hit by a cruise missile. I'm sure that it will eventually resemble a 928 some day soon, but this is something no one should have to experience.
As always, there is plenty of opportunity for WYAIT chores/upgrades. On my list:
Investigate getting an HVAC housing with a pollen filter (94,95)
Refurbish all of the vacuum actuators
Rebuild the suction/pressure hoses
Clean the ground points
LED instrument panel upgrade
Install RAAMmat (sound deadener)
Install new sound system
Install new carpet
Any further comments / suggestions? What a pesky car!
Lastly, if anyone has a need to use this tool, feel free to ask!!!
05-20-2012, 11:37 AM
#6
Race Car
I suspect I may have the same issue as you do. It would be great to be able to use yours instead of hacking up my own, mine would most probably look 50 times worse 
Dan
'91 928GT S/C 475hp/460lb.ft
Dan
'91 928GT S/C
475hp/460lb.ft
Trending Topics
05-20-2012, 09:23 PM
#8
Three Wheelin'
Join Date: Sep 2007
Location: Ridgecrest, California
Posts: 1,363
Likes: 0
Received 143 Likes
on
28 Posts
Hello Craig,
Your post was just what I needed. I've been working on fabricating a similar pressurization device for the rear evaporator that I have already removed from the 928 (Idaho, '88). I've been messing around for the last couple of weeks trying to figure out how to weld a pipe fitting with a schrader valve and gauge on it to the old expansion valve. I have a leaking evaporator and I believe it's coming from where the copper tubes enter the evaporator. I need to pressurize to locate all the leaks then repair and test pressurize when done to ensure I got them all.
Your solution is much better than what I was planning so I'm going to abandon my design and adopt yours - THANKS!! I believe I can install the schrader valve on top as you did but I also want to mount a pressure gauge so I can monitor over an extended period of time before re-installing the evaporator. Should work for the front evaporator too.
I was curious why you removed the appendages on the ends of the expansion valve. Looks like they were cut/ground off and plug welded. Is it necessary that I remove these as well? If so, how did you go about removing them? THANKS again!!
05-20-2012, 09:43 PM
#9
Chronic Tool Dropper
Lifetime Rennlist
Member
Lifetime Rennlist
Member

Dwayne--
I'll speculate that the seals between the diaphragm on the end and the rod through the middle would not survive the heat of welding the plugs in. So easiest to just remove and seal weld over the hole.
----
On the S4 valve, the cover/retainer plates are secured with bolts through the body. If I were doing this project at home, I'd fab a little steel plate to blank the engine side, and cut a thin gasket so it would seal against the expansion valve body. Drill and tap the plate for the flared fitting so test gas would pass through the larger (suction side) port in the valve. Maybe use a 90� fitting so it could point upwards. Then I could use the existing expansion valve with no welding needed. Just bolt the blanked/ported plate on the outside using the existing bolts.
05-20-2012, 10:03 PM
#10
Rennlist Member
Thread Starter
Dwayne: If you want to borrow this device, let me know. There is one person in front of you. BTW, I cannot tell you how grateful I am for your fantastic write ups. Two years ago I repaired a vacuum actuator leak and managed to get in and out of the center console unscathed. All thanks to you.
Dr. Bob: Right as usual. I didn't know what was in the bellows at one end. The other end was a giant set screw. Regardless, I buzzed off the ends with a pneumatic die grinder and a cut-off wheel. There was a steel pin inside and I tossed it. My local welder asked for $10 to do this job. I gave him a bit more.
Dr. Bob: Right as usual. I didn't know what was in the bellows at one end. The other end was a giant set screw. Regardless, I buzzed off the ends with a pneumatic die grinder and a cut-off wheel. There was a steel pin inside and I tossed it. My local welder asked for $10 to do this job. I gave him a bit more.
05-21-2012, 01:46 AM
#12
Rennlist
Basic Site Sponsor
Basic Site Sponsor
What a great idea! Adding a gauge into the other port is also a great idea!
I'll be making one of these!
Thanks!
I'll be making one of these!
Thanks!
__________________
greg brown

714 879 9072
GregBBRD@aol.com
Semi-retired, as of Feb 1, 2023.
The days of free technical advice are over.
Free consultations will no longer be available.
Will still be in the shop, isolated and exclusively working on project cars, developmental work and products, engines and transmissions.
Have fun with your 928's people!
greg brown
714 879 9072
GregBBRD@aol.com
Semi-retired, as of Feb 1, 2023.
The days of free technical advice are over.
Free consultations will no longer be available.
Will still be in the shop, isolated and exclusively working on project cars, developmental work and products, engines and transmissions.
Have fun with your 928's people!
05-21-2012, 01:48 AM
#13
Three Wheelin'
Join Date: Sep 2007
Location: Ridgecrest, California
Posts: 1,363
Likes: 0
Received 143 Likes
on
28 Posts
Dwayne--
I'll speculate that the seals between the diaphragm on the end and the rod through the middle would not survive the heat of welding the plugs in. So easiest to just remove and seal weld over the hole.
----
On the S4 valve, the cover/retainer plates are secured with bolts through the body. If I were doing this project at home, I'd fab a little steel plate to blank the engine side, and cut a thin gasket so it would seal against the expansion valve body. Drill and tap the plate for the flared fitting so test gas would pass through the larger (suction side) port in the valve. Maybe use a 90� fitting so it could point upwards. Then I could use the existing expansion valve with no welding needed. Just bolt the blanked/ported plate on the outside using the existing bolts.
I'll speculate that the seals between the diaphragm on the end and the rod through the middle would not survive the heat of welding the plugs in. So easiest to just remove and seal weld over the hole.
----
On the S4 valve, the cover/retainer plates are secured with bolts through the body. If I were doing this project at home, I'd fab a little steel plate to blank the engine side, and cut a thin gasket so it would seal against the expansion valve body. Drill and tap the plate for the flared fitting so test gas would pass through the larger (suction side) port in the valve. Maybe use a 90� fitting so it could point upwards. Then I could use the existing expansion valve with no welding needed. Just bolt the blanked/ported plate on the outside using the existing bolts.
Thanks for the idea. I believe I understand the design and see how it can be done with no welding. I'm not familiar, though, with "cutting a thin gasket". How does one find a gasket that would fit the mating surface of the expansion valve - I'm assuming it is fabricated? Maybe two O-Rings that are fitted into the small and large holes that the newly fabricated plate mates to? I'm also assuming I would need longer clamp bolts that would now go through the new plate, through the expansion valve, and thread through the clamp on the backside of the expansion valve - correct?
Dwayne: If you want to borrow this device, let me know. There is one person in front of you. BTW, I cannot tell you how grateful I am for your fantastic write ups. Two years ago I repaired a vacuum actuator leak and managed to get in and out of the center console unscathed. All thanks to you.
Dr. Bob: Right as usual. I didn't know what was in the bellows at one end. The other end was a giant set screw. Regardless, I buzzed off the ends with a pneumatic die grinder and a cut-off wheel. There was a steel pin inside and I tossed it. My local welder asked for $10 to do this job. I gave him a bit more.
Dr. Bob: Right as usual. I didn't know what was in the bellows at one end. The other end was a giant set screw. Regardless, I buzzed off the ends with a pneumatic die grinder and a cut-off wheel. There was a steel pin inside and I tossed it. My local welder asked for $10 to do this job. I gave him a bit more.
Thanks for the offer. I may take you up on it if I don't get my own device figured out. I'd still like to have one with a pressure gauge attached so I'm going to try to make that work first. THANKS for the feedback and thanks for sharing this idea - I think it's going to really help me out!
05-21-2012, 12:09 PM
#14
Chronic Tool Dropper
Lifetime Rennlist
Member
Lifetime Rennlist
Member
Dwayne--
The original o-rings seal with the added thickness of the tube roll. I think the depth of the holes might preclude using o-rings unless they are pretty thick. Otherwise a paper gasket should be OK, or maybe a film of Hylomar or similar. Make the plate the same thickness as the original and you can use the original bolts as you describe.
If I had a local welder who would do the sealing for $10, I'd be all over that vs. fabricating a plate and fumbling with o-rings. For postage, CraigL's solution is excellent.
GB--
No need to drill and tap for a separate gauge. There's one (two actually) already mounted on the manifold at the other end of that connecting hose. Unless you decide to use a Schraeder valve in the charge port, so you can "set it and forget it" while you do other things. Then a local gauge would be real handy.
Reminder: The evaporator operates at less than 50 PSI, and static sees --maybe-- 150 PSI in a hot day soak while parked. So shop air is fne. My temptation would be to do a hydro-test (put water in it) instead of air. Leaks would be easier to find, and the stored energy issue with air would disappear so no risk of catastrophic explosion. The water flushes out easily with air and an alcohol rinse, followed by vacuum.
05-26-2012, 04:18 AM
#15
Hi CraigL & Co,
My heart skipped a beat when I gasped at the sight of a nearly un recognizable interior of a 928. Good thing I knew what forum I was in
Gee, I thought I liked wrenching on cars.")
I hope I do not experience that.
Is this normal due to age?
Just curious?
Any way to prevent this from happening? Other than not owning a 928?
My heart skipped a beat when I gasped at the sight of a nearly un recognizable interior of a 928. Good thing I knew what forum I was in
Gee, I thought I liked wrenching on cars.
I hope I do not experience that.
Is this normal due to age?
Just curious?
Any way to prevent this from happening? Other than not owning a 928?