
Piston Oil Drain / Relief Holes
 05-18-2012, 12:37 PM
#16
Three Wheelin'
Thread Starter

Join Date: Jan 2010
Location: Muriland
Posts: 1,382
Likes: 0
Received 0 Likes
on
0 Posts

 05-18-2012, 02:31 PM
#17
Rennlist
Basic Site Sponsor
Basic Site Sponsor
You certainly aren't going to "hurt" anything by getting the pistons within .1 gram...although anyone in the balancing business would suggest that "you get a life", as there is nothing to be gained from this. Pistons gather carbon at different rates and certianly any added carbon weight would make your efforts competely moot. Pistons within 1 gram is certainly a more logical goal.
Do not switch pins on used pistons. Do not switch pins on used pistons. Do not switch pins on used pistons. The pieces have "worn in" together and should always remain together. I don't even switch "ends" of pins!
You'd be far better off to throw your "scale" in the trash and run the pistons the way they are!
__________________
greg brown

714 879 9072
GregBBRD@aol.com
Semi-retired, as of Feb 1, 2023.
The days of free technical advice are over.
Free consultations will no longer be available.
Will still be in the shop, isolated and exclusively working on project cars, developmental work and products, engines and transmissions.
Have fun with your 928's people!
greg brown
714 879 9072
GregBBRD@aol.com
Semi-retired, as of Feb 1, 2023.
The days of free technical advice are over.
Free consultations will no longer be available.
Will still be in the shop, isolated and exclusively working on project cars, developmental work and products, engines and transmissions.
Have fun with your 928's people!
05-21-2012, 03:11 AM
#18
Three Wheelin'
Thread Starter
Join Date: Jan 2010
Location: Muriland
Posts: 1,382
Likes: 0
Received 0 Likes
on
0 Posts
Greg, my apologies for my confusing / crapy writing above...I was actually alluding to - humorously - the "fun" process of working on the car as being a bit love-hate. That said, I've no plans to balance to 0.1g...in fact, the most precise value I'd ever come across when looking into this process, wasn't smaller than 0.5g. Measuring was about seeing what kind of variance existed, and, as I understood this process better, confirm that I'd fit into the range Porsche specified in the WSM / TSB. Thats good enough for me (and my wallet) at this point.
I appreciate the heads up on the pin swapping...hypothetically, swapping pins seemed like a simple, no cost, no effort, way to even things out a bit, but as you say, wear is a concern, and, the WSM language makes it sound a bit left/right of the norm. Thankfully, I've been careful about disassembly of the engine parts...back when I removed everything I organized it all to ensure that the rods, pins and pistons could all go back together in the same orientation if needed.
I appreciate the heads up on the pin swapping...hypothetically, swapping pins seemed like a simple, no cost, no effort, way to even things out a bit, but as you say, wear is a concern, and, the WSM language makes it sound a bit left/right of the norm. Thankfully, I've been careful about disassembly of the engine parts...back when I removed everything I organized it all to ensure that the rods, pins and pistons could all go back together in the same orientation if needed.
Last edited by aaddpp; 05-21-2012 at 10:35 AM.
05-22-2012, 10:45 AM
#19
Three Wheelin'
Thread Starter
Join Date: Jan 2010
Location: Muriland
Posts: 1,382
Likes: 0
Received 0 Likes
on
0 Posts
I've been trying to decide between dropping the pistons off at a machine shop vs. doing the oil holes myself. Best shop I'd found is almost 100 miles from my house which wasn't bad when I passed the guy for work, but now that its out of the way I'm not so inclined to make the drive. So...I'm going to have a go at it since I already have a spare / broken piston to mess around with. I also figured I'd share what I found in prepping for this incase it helps someone else along the way...
TSB calls for 4mm (0.1575") holes to be drilled in the piston, but its far easier to go with non-metric cutting tools in the US. Closest non-metric drill bit size is 5/32" = 0.1563" or 3.97mm - just a touch smaller.
After the holes are drilled, the TSB states the holes should be de-burred / beveled to remove any metal burrs. The example piston I have, which already has the holes in it, has bevels on both the top and bottom.
http://www.flickr.com/photos/51967142@N00/6841090109/
Adding the bevel to the bottom of the holes is simple, while the top can't be accessed as easily due to the ring lands / rings. After some searching, I came across a tool from E-Z Burr thats adds a bevel to the top and bottom of the hole in one pass. A nice plus as it cuts down on the overall work.
Heres their video:
I'll probably pick up this 5/32 model: http://toolinghouse.com/EZL0156.aspx - sub-model 01: B style 45/45 Standard Rake - this will put a 45 degree bevel on each side of the hole. Of note, the sellers pages says that just over a 1/2-inch is required behind the hole for the tool to clear. This 5.0L piston has 1.2-inches above the "ledge" where the holes get drilled, so it should clear no problem.
Once I put together something to safely hold the pistons in place on my drill press, I should be good to go...
04-10-2015, 08:08 AM
#20
Rennlist Member
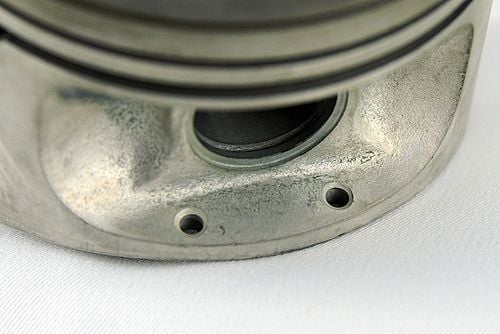
Would someone mind sharing with me the TSB that shows how to drill the holes at the bottom of the piston as shown in the photo above or let me know where I can find the TSB?
Thanks