

hatch latch welding the crack
 01-27-2011, 05:04 AM
#1
Instructor
Thread Starter
Join Date: Jul 2010
Location: belgium.
Posts: 157
Likes: 0
Received 0 Likes
on
0 Posts
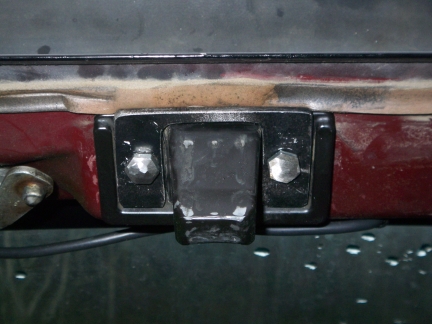
i have found out that my hatch latch has a crack in it on just one side, its a nice straight crack.
i have read all posts about the latch i could find,,,needed a week and 1000gb download ,found out taht ther might be a crack.
as you can see , its cracked up realy bad on one side.
someone spoke about welding,,,but in the end his latch was to far gone.
does this welding work on that kind of metal?
i dont know yet wat kind of metal it is, cast aluminum i think????
i can tig weld at my work, normally we weld new inox or iron , can i try with iron , or is it better to use aluminum elektrode or will it destroy the latch anyway?
is there a how to do?
i know aluminium must be supper clean to tig weld it, i can sandblast it .
the second problem could be that the metal becomes verry soft after welding and destroys the latch a little later after some slams with the hatch??? or ist this to pessimistic thinking?
i have read all posts about the latch i could find,,,needed a week and 1000gb download
,found out taht ther might be a crack. as you can see , its cracked up realy bad on one side.
someone spoke about welding,,,but in the end his latch was to far gone.
does this welding work on that kind of metal?
i dont know yet wat kind of metal it is, cast aluminum i think????
i can tig weld at my work, normally we weld new inox or iron , can i try with iron , or is it better to use aluminum elektrode or will it destroy the latch anyway?
is there a how to do?
i know aluminium must be supper clean to tig weld it, i can sandblast it .
the second problem could be that the metal becomes verry soft after welding and destroys the latch a little later after some slams with the hatch??? or ist this to pessimistic thinking?
 01-27-2011, 09:52 AM
#2
Team Owner
make a doubler the will fit up to the curved portion of the latch make sure the bolt hole is precision as this will also assist in holding the doubler in place,
add some JB weld to the plate and it should be good to go,
NOTE the bolt head should not touch the lower latch with the doubler in place
add some JB weld to the plate and it should be good to go,
NOTE the bolt head should not touch the lower latch with the doubler in place
01-27-2011, 10:15 AM
#3
Rennlist Member
Mrmerlin If you have a photo of what you described I'd love to see it. I have a small crack in mine from a new plastic insert replacement some time back.
01-27-2011, 10:54 AM
#4
Rennlist Member
There are three things wrong with you latch. One you have identified and that is that it is cracked/broken. Another is that it is also bent, probably at the base which is apparent from the fact that the break is opened up. Finally it is scraped severly on the broken side which indicates that it has been functioning in a severly missaligned situation. The missalignment is what broke it in the first palce.
You need to figure out how to cure the missalignment.
Another problem you have is that your lower hatch latch receiver liner is apparently missing because the scrapes on the broken side of the latch are not caused by scraping on the plactic liner but rather on the metal side of the receiver itself.
As to welding, I think this can be welded with the tig method. If you are not familiar with aluminum or similar metals, take it to someplace that is. The latch will need to be straightened out so the crack is closed, then cleaned and then welded. Do not worry about the softness or heat treatment. If it was heat treated before, which I doubt, it will return to that same hardness shortly after it is welded. If it was not heat treated welding will not change its hardness. Some aluminum alloys are not weldable, but I doubt that this part of made out of one of them.
Why not simply replace it, AFTER YOU FIX THE MISSALIGNMENT!
Jerry Feather
01-27-2011, 11:07 AM
#5
Rennlist Member
Jeff, I might be able to help out here, too - and Stan if you have better photos I'm sure they will be appreciated! I had to do this last spring, and went about it like so. First, components - the broken hatch plate, some aluminum stock and some layout stuff.
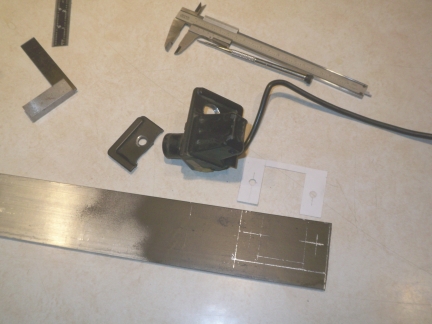
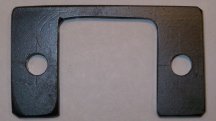
The white piece of paper is the pattern. Next is the reinforcing plate for the broken latch.
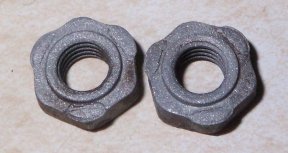
Now for the fun part. The latch is held by two bolts, threaded into a press-fit type nut in the hatch. It you are unlucky, the nut will spin the in the hatch metal. Here are the culprits.
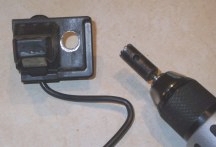
My solution was to use a hole saw to cut the broken latch so I could remove it, and then insert a wrench through the opening to hold the now-loose nut.
But of course, the fun is not over yet, because with the latch back in place, how could I hold the nut to tighten the bolt? JBWeld, one of my favorite substances BTW, worked for a day. The answer, and I didn't take any pics of this part because I was so frustrated, was to cut two holes in the inside surface of the hatch, which is covered by trim, through which I could insert a box end wrench to hold the nuts. Loctite and some hole cap inserts finished the job. It has worked very well, although it is certainly not a thing of beauty. Also note, as Stan pointed out, there has to be clearance between the bolt heads and the latch receiver - I ground mine down to fit.
Hope this helps, and good luck!
The white piece of paper is the pattern. Next is the reinforcing plate for the broken latch.
Now for the fun part. The latch is held by two bolts, threaded into a press-fit type nut in the hatch. It you are unlucky, the nut will spin the in the hatch metal. Here are the culprits.
My solution was to use a hole saw to cut the broken latch so I could remove it, and then insert a wrench through the opening to hold the now-loose nut.
But of course, the fun is not over yet, because with the latch back in place, how could I hold the nut to tighten the bolt? JBWeld, one of my favorite substances BTW, worked for a day. The answer, and I didn't take any pics of this part because I was so frustrated, was to cut two holes in the inside surface of the hatch, which is covered by trim, through which I could insert a box end wrench to hold the nuts. Loctite and some hole cap inserts finished the job. It has worked very well, although it is certainly not a thing of beauty. Also note, as Stan pointed out, there has to be clearance between the bolt heads and the latch receiver - I ground mine down to fit.
Hope this helps, and good luck!
01-27-2011, 11:11 AM
#7
Team Owner
it is easy to make a doubler a little filing so the edge fits the curved portion adds to the structure, JB weld makes it tight.
Make sure the lower portion of the latch is adjusted to center
Make sure the lower portion of the latch is adjusted to center
Last edited by Mrmerlin; 01-27-2011 at 11:46 AM.
Trending Topics
01-27-2011, 11:26 AM
#8
Instructor
Thread Starter
Join Date: Jul 2010
Location: belgium.
Posts: 157
Likes: 0
Received 0 Likes
on
0 Posts
i have allready alined it, but the electric hatch relaise wont work, it need to be welded first , before further attempts.
the scratches are strange, i have the reciever liner in place and seems to be in good condition.
i will try to weld it soon.
jb weld???? i tried to find out wat that is, i have heard about that stuff all over this forum.
never heard of it in europe.
the scratches are strange, i have the reciever liner in place and seems to be in good condition.
i will try to weld it soon.
jb weld???? i tried to find out wat that is, i have heard about that stuff all over this forum.
never heard of it in europe.
 01-27-2011, 04:09 PM
#11
Under the Lift
Lifetime Rennlist
Member
Lifetime Rennlist
Member
I didn't have any luck with JB Weld and a doubler. The thin doubler still allowed some flex and over time the plate recracked and pulled away. Obviously worth a try. Once in a very blue moon 928 International gets a car in with a good uncracked alarm lock. Almost all used ones they see are cracked or getting there. I think I had a standing order with them for 2-3 years and finally got one from a low mile car that was like brand new. I rekeyed the tumbler and swapped it in.
01-27-2011, 04:41 PM
#13
I fitted a doubler to my cracked male hatch latch years ago, fabricated my own plastic insert from a nylon board and realigned the total hatch mechanism, so as there is no tension stress on the male section for the latch in the aft direction.
A full description of the reallignment method is contained within my previous posts if interested with photographs.
It is essential that there is only pressure applied to the male latch mechanism from the plastic insert in a forward direction, so that the thin section of the mechanism is not under any tension stress, but kept under compressive stress otherwise the mechanism will fail again after repair.
Some TLC and maintenance are esssential to maintain the hatch latching mechanism in correct working order.
Tails 1990 928S4 Auto
12-14-2014, 01:43 PM
#14
Rennlist Member
Just for the record, 12/15 and she's gone. 6 years ain't too bad, though! But a thought, the longer a kluge repair lasts, the more expensive the correct repair parts (if available) will be, new or used...
