
Is This Seat Leather Too Far Gone to Save??
 07-27-2008, 09:28 AM
#1
Three Wheelin'
Thread Starter
Join Date: Sep 2007
Location: Ridgecrest, California
Posts: 1,363
Likes: 0
Received 147 Likes
on
31 Posts
I haven't paid too much attention to the seats on the '84 since I've been focused on getting the mechanicals sorted out. The leather on the seats have been cracked and dry for some time but never a rip or tear. However, a couple of weeks ago, a tear suddenly appeared on the driver's side upper bolster. I decided to give the seats some attention before other rips appeared.
After doing some research on leather restoration products, one product seemed to garner positive results, Leatherique. So I ordered Kit #3 last Friday - including rejuvinator, cleaner, crack filler, and cork dye. Here's a few pics of the seats....Driver's side first where the rip developed....
I've also got cracked piping.
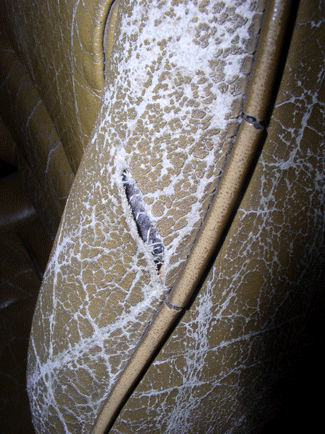
I found it convenient to put my hand on this part of the bolster and push when exiting the car. That's what probably caused the rip....it's about 1-2" long.
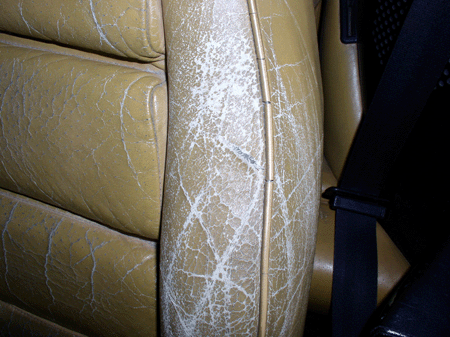
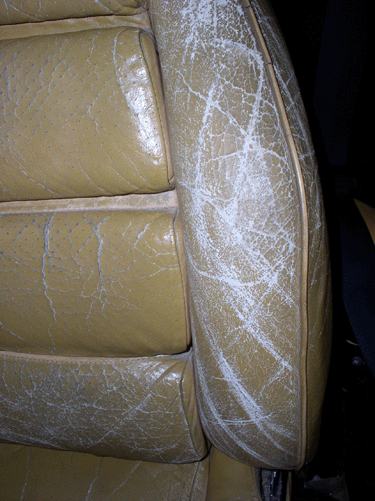
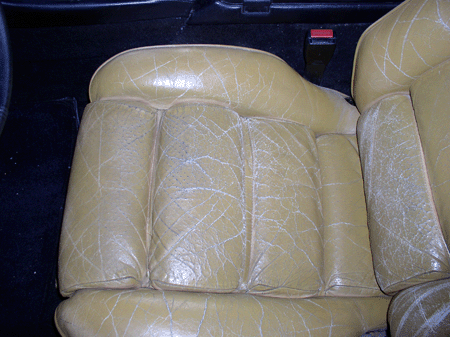
Here's the driver's side back. The car has been here in the high desert (very dry) for at least the last 13 years and the leather has never been conditioned. Hence the dried-out cracked look.
Here's the driver's side bottom - no rips yet...
Here's the passenger side seat - similar condition.

If only I had found Rennlist 13 years ago when we bought the car - some of this damage could have been avoided!
So, here's my questions: First, can the rip be repaired? Is it something I can do myself? Second, has anyone brought leather this cracked back to life again using something similar to Letherique?? THANKS!
After doing some research on leather restoration products, one product seemed to garner positive results, Leatherique. So I ordered Kit #3 last Friday - including rejuvinator, cleaner, crack filler, and cork dye. Here's a few pics of the seats....Driver's side first where the rip developed....
I've also got cracked piping.
I found it convenient to put my hand on this part of the bolster and push when exiting the car. That's what probably caused the rip....it's about 1-2" long.
Here's the driver's side back. The car has been here in the high desert (very dry) for at least the last 13 years and the leather has never been conditioned. Hence the dried-out cracked look.
Here's the driver's side bottom - no rips yet...
Here's the passenger side seat - similar condition.
If only I had found Rennlist 13 years ago when we bought the car - some of this damage could have been avoided!
So, here's my questions: First, can the rip be repaired? Is it something I can do myself? Second, has anyone brought leather this cracked back to life again using something similar to Letherique?? THANKS!
Last edited by Dwayne; 11-15-2008 at 12:22 PM.
 07-27-2008, 09:44 AM
#2
Three Wheelin'
Thread Starter
Join Date: Sep 2007
Location: Ridgecrest, California
Posts: 1,363
Likes: 0
Received 147 Likes
on
31 Posts
Oops....just found a thread by Weissach back in Jan of 2006 that pretty much answers my question. However, if anyone has some recent experiences/advice/writeups, feel free to comment. When I get around to this repair, I'll document with a few words and a picture......well, maybe 2 pics. THANKS!
07-27-2008, 10:52 AM
#3
Rennlist Member
Join Date: Oct 2005
Location: Gatineau, Qu�bec, Canada
Posts: 5,177
Received 1,317 Likes
on
498 Posts
First question: Yes, I read something that Nicole wrote on how she fixed a rip on one of her bolster. It was an old thread (maybe 3 years or so). Sure you can do it yourself.
Second question: They can only get better! It worth a try for sure.
Good luck.
Second question: They can only get better! It worth a try for sure.
Good luck.
07-27-2008, 11:19 AM
#4
Rennlist Member
Join Date: Oct 2003
Location: Saco, Maine/ Scarborough, Maine
Posts: 1,981
Received 580 Likes
on
215 Posts
Dwayne,
https://rennlist.com/forums/showthre...=271245&page=4
this was discussed back 2007 about using acrylic paint to refinish seats and some flexible acrylic filler in rips/tears.
Might be worth a read..
Bob Voskian
1989 S4 silver/black
https://rennlist.com/forums/showthre...=271245&page=4
this was discussed back 2007 about using acrylic paint to refinish seats and some flexible acrylic filler in rips/tears.
Might be worth a read..
Bob Voskian
1989 S4 silver/black
07-27-2008, 05:27 PM
#6
Three Wheelin'
Thread Starter
Join Date: Sep 2007
Location: Ridgecrest, California
Posts: 1,363
Likes: 0
Received 147 Likes
on
31 Posts
Found Nicole's post - just what I was looking for....THANKS!
Dwayne,
https://rennlist.com/forums/showthre...=271245&page=4
this was discussed back 2007 about using acrylic paint to refinish seats and some flexible acrylic filler in rips/tears.
Might be worth a read..
Bob Voskian
1989 S4 silver/black
https://rennlist.com/forums/showthre...=271245&page=4
this was discussed back 2007 about using acrylic paint to refinish seats and some flexible acrylic filler in rips/tears.
Might be worth a read..
Bob Voskian
1989 S4 silver/black
11-15-2008, 12:17 PM
#7
Three Wheelin'
Thread Starter
Join Date: Sep 2007
Location: Ridgecrest, California
Posts: 1,363
Likes: 0
Received 147 Likes
on
31 Posts
Well, I fixed the tear in the bolster thanks to a write up I found by Nicole that had a similar problem. THANKS for posting, Nicole! 
Here's some pictures of the steps I followed to complete the repair in case others want to do the same:
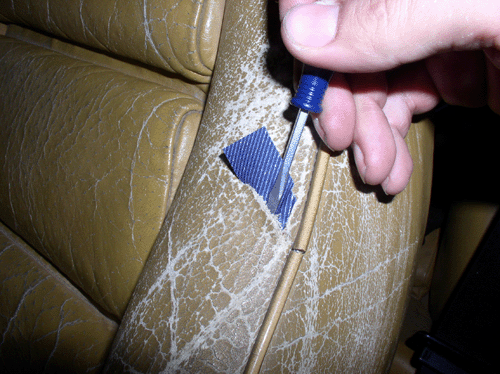
Here's the tear in the driver's side bolster. The leather is so dried out and cracked, it was only a matter of time before something like this happened. So it was a perfect opportunity to practice some leather seat repair on my daily driver "California".
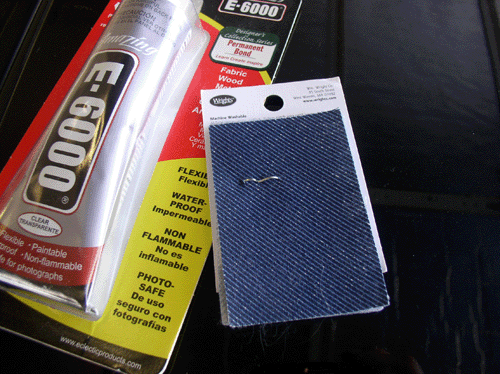
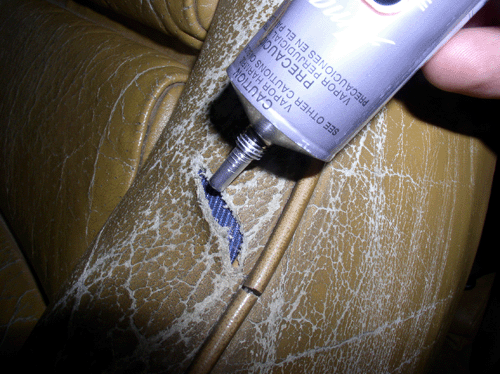
First, I went to Wal-Mart to see what they had for fabric/leather glue and found this product, E-6000, works on fabric and leather, is waterproof, and is flexible. I also got some denim patches to use as underlayment for the repair.
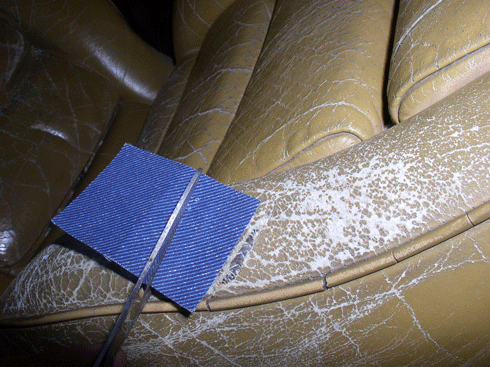
Cut the patch so that there is at least 1/4" overlap on the tear all around.
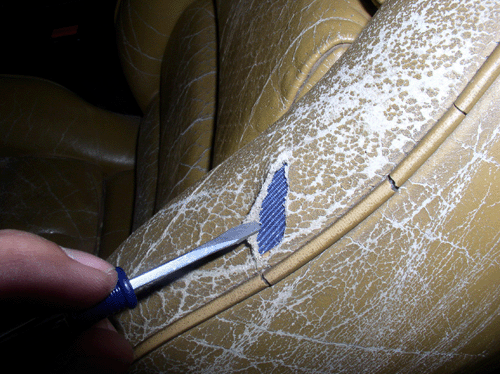
Then stuff the cut out patch into the crack using a small screwdriver to maneuver it into place.
Ensure the patch is laying flat all around underneath the leather
Apply the glue, according to the directions. I applied glue over most of the patch surface underneath the leather by inserting the nozzle under the tear. Be careful to not overdue the glue or you will have residual to clean up afterward.
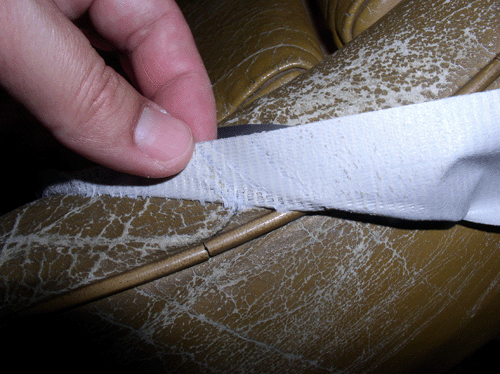
Then close the tear over the patch.
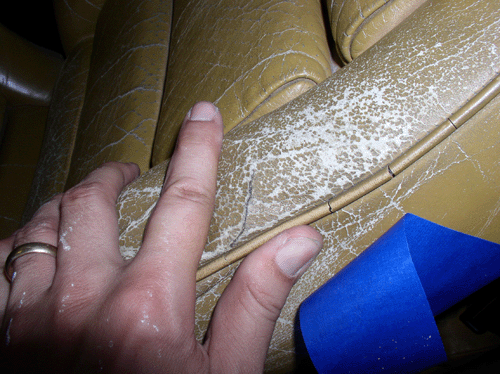
You will need something to hold the tear closed while the glue sets up. At first, I tried to use painters masking tape but it just didn't hold. So I resorted to duct tape. Run your fingers over the tape where the tear is to make sure there is no lip or overlapping leather.
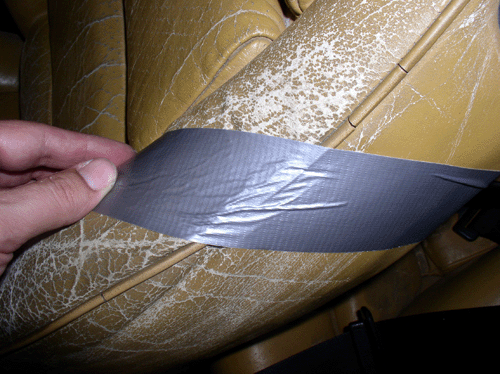
I left the tape on over night. When you remove the tape, be sure to remove it in the direction of the tear, not against the tear (perpendicular to it) or you could tear it open.
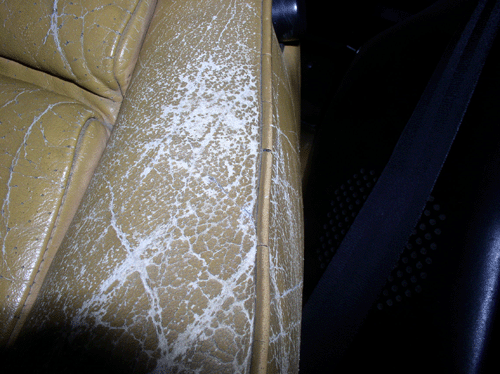
Here's the result. Hardly noticeable. If I were refinishing the seats, I'd sand the area and apply a flexible filler. As it turns out, I will not be repairing the seats (see next post) so I left it as is. It's been operational for many weeks now and has not separated at all - looks the same as the picture below today. I'm very happy with the repair and the E-6000 product is holding up nicely.
Now the rest of the story......
Here's some pictures of the steps I followed to complete the repair in case others want to do the same:
Here's the tear in the driver's side bolster. The leather is so dried out and cracked, it was only a matter of time before something like this happened. So it was a perfect opportunity to practice some leather seat repair on my daily driver "California".
First, I went to Wal-Mart to see what they had for fabric/leather glue and found this product, E-6000, works on fabric and leather, is waterproof, and is flexible. I also got some denim patches to use as underlayment for the repair.
Cut the patch so that there is at least 1/4" overlap on the tear all around.
Then stuff the cut out patch into the crack using a small screwdriver to maneuver it into place.
Ensure the patch is laying flat all around underneath the leather
Apply the glue, according to the directions. I applied glue over most of the patch surface underneath the leather by inserting the nozzle under the tear. Be careful to not overdue the glue or you will have residual to clean up afterward.
Then close the tear over the patch.
You will need something to hold the tear closed while the glue sets up. At first, I tried to use painters masking tape but it just didn't hold. So I resorted to duct tape. Run your fingers over the tape where the tear is to make sure there is no lip or overlapping leather.
I left the tape on over night. When you remove the tape, be sure to remove it in the direction of the tear, not against the tear (perpendicular to it) or you could tear it open.
Here's the result. Hardly noticeable. If I were refinishing the seats, I'd sand the area and apply a flexible filler. As it turns out, I will not be repairing the seats (see next post) so I left it as is. It's been operational for many weeks now and has not separated at all - looks the same as the picture below today. I'm very happy with the repair and the E-6000 product is holding up nicely.
Now the rest of the story......
Trending Topics
11-15-2008, 12:34 PM
#8
Race Director
Dwayne
You can re-moisturize the leather to a certain point.......using something like rejuvinator oil from leatherique......then have the seats re-dyed and they will look quite a bit better.....I had the bolsters replaced in sharky and both seats redyed to match...it was simply stunning and still looks great today
https://rennlist.com/forums/showthre...seats+restored
11-15-2008, 01:11 PM
#9
Three Wheelin'
Thread Starter
Join Date: Sep 2007
Location: Ridgecrest, California
Posts: 1,363
Likes: 0
Received 147 Likes
on
31 Posts
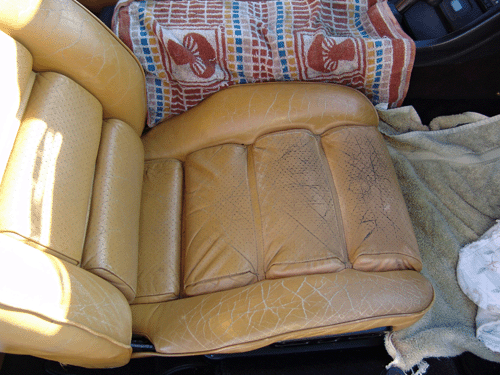
I purchased the Leatherique leather restoration kit which included Rejuvinator Oil, Pristine Clean, Prepping Agent, Dye, and crack filler. The seats were dried and cracking when we bought the car in 1995 and I'm emarassed to say, that I never applied leather maintenance products to the seats since then either. 
I have learned many lessons the hard way - this is one of them. From now on, I will apply leather maintance products to the seats regularly - especially needed here in the dry, hot desert.
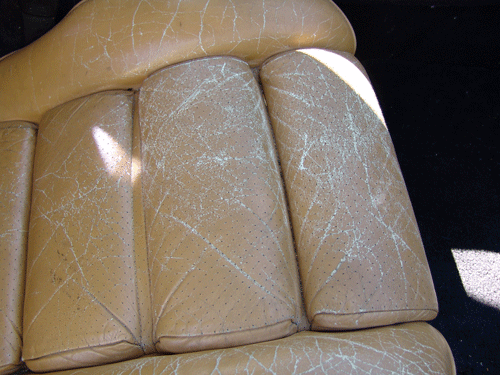
Here's what the passenger seat looked like before getting started.
By pulling the seat pads away from the bolsters, you can see the difference in color - prabably due to sun damage.
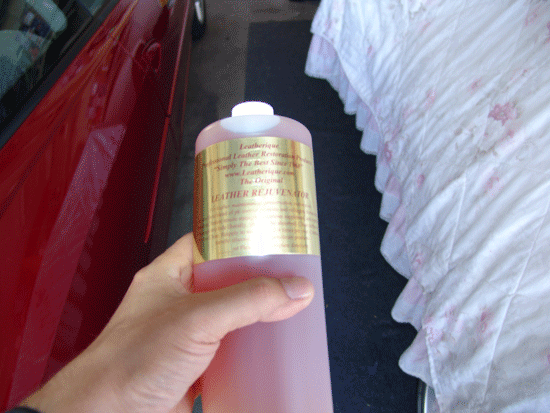
Here's the Rejuvinator Oil from Leatherique. Their product comes with directions and they have additional instructions on their web site.
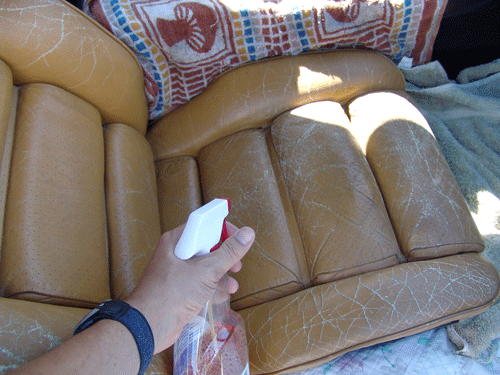
After vacuuming any debris and wiping down the seats, I masked off the interior with towels and used a spray bottle to liberally apply the oil.
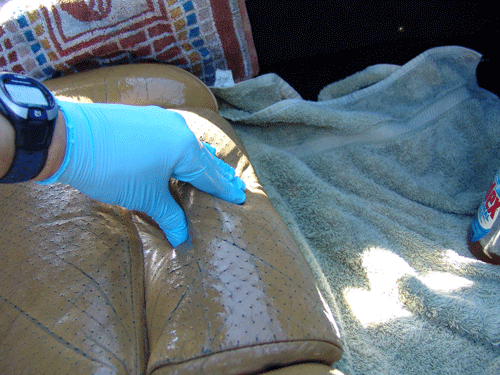
Then massage/work the oil into the leather, as instructed.
After application, I let the car sit outside with the windows up for about 5 hours and let heat build up in order to "open the pores in the leather and release the dirt/contaminants" according to the directions. To my surprise, when I returned late that afternoon, the leather on the bottom portion of the seat had shrunk and was stretched tight - even pulling away from the bottom seat bolsters to show the different color in leather. However, the rest of the seat looked just fine, no shrinkage.
I continued with the re-dye process, as per the instructions, and decided to test some of the prepping agent on a section of the seat. I used 400 wetsand paper soaked in the prepping agent....
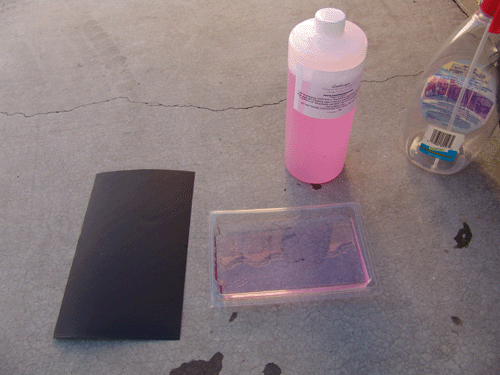
....sanded lightly on a section.
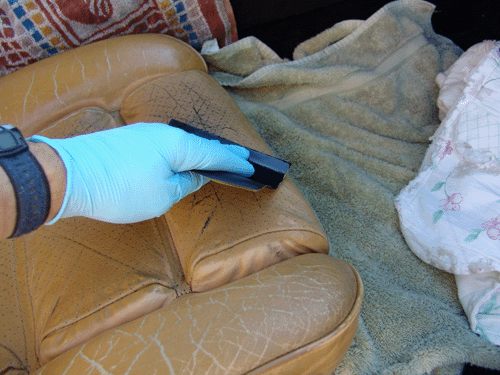
The old dye came off very easily. However, before going any further, I was concerned about the tightness of the seat leather and decided to call Leatherique for some advice.
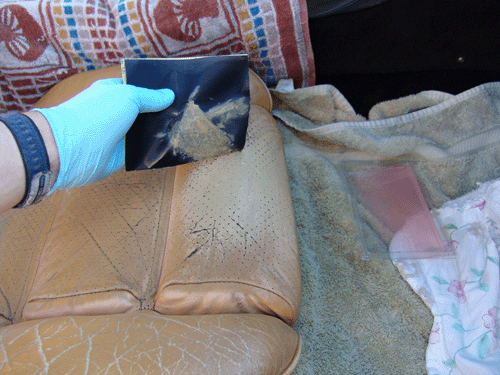
The folks at Leatherique were very helpful and I sent them some pictures to show what I was working on. He suggested that I continue with multiple applications of the Rejuvinator Oil to bring back the leather before continuing with the re-dye process and to keep him posted on my progress. So, I continued and applied 3 additional applications of the oil for a total of 4 applications.
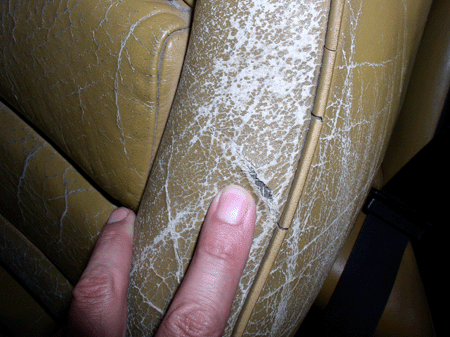
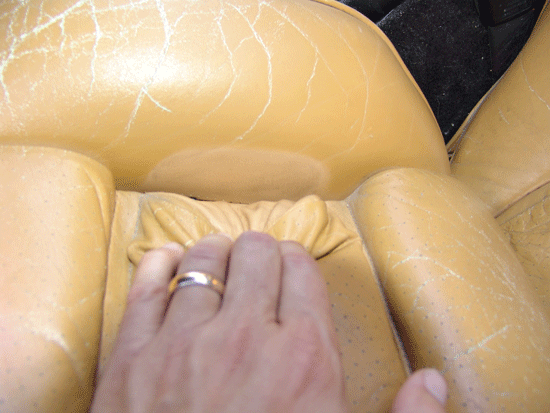
After the 4th application, I was not seeing any improvement. So, being the curious sort, I decided to test the strength of the leather by poking it with my finger in the area where it was most cracked and I poked a hole right through the leather I tried this in a couple of places and decided to pull on a piece and it tore right off with no effort. Here's a pic after poking holes and taking a piece of leather off.
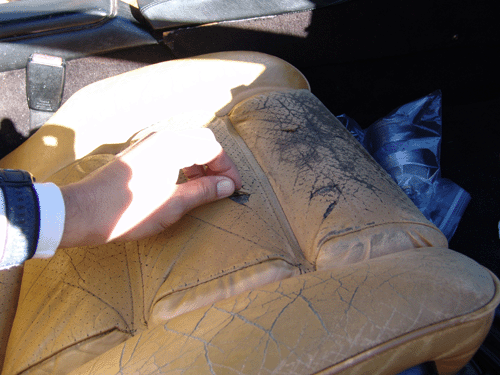
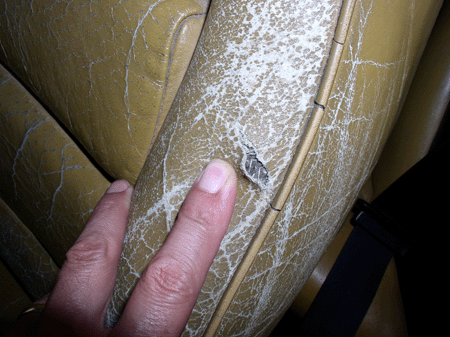
I looked at my sample leather in the sunlight to get a closer look....
When I tried to bend the little piece of leather, it snapped in two. Very brittle even when saturated with oil.
At this point, I wrote to Leatherique (e-mail) again and sent them these same pictures. He said sometimes sunbaked leather can get so dry/damaged, it becomes "mummified" and is so weakened you can poke you finger through it. He confirmed the leather was toast.
At this point, I'll probably get a nice pair of sheepskin covers for the seats. Since it's my daily driver and sits in the sun all day, I can't see expending a lot of effort to purchase replacement seats or recover these seats. Besides, the sheepskin will keep the seats cooler in the summer heat and warmer in the winter.
I do think the Leatherique is a good product and will use it on Virginia and Idaho. It's just "California's" seats were too far gone.
Anyway, just thought I'd share the results of this repair and tie up the loose ends on this thread. THANKS for reading!
I have learned many lessons the hard way - this is one of them. From now on, I will apply leather maintance products to the seats regularly - especially needed here in the dry, hot desert.
Here's what the passenger seat looked like before getting started.
By pulling the seat pads away from the bolsters, you can see the difference in color - prabably due to sun damage.
Here's the Rejuvinator Oil from Leatherique. Their product comes with directions and they have additional instructions on their web site.
After vacuuming any debris and wiping down the seats, I masked off the interior with towels and used a spray bottle to liberally apply the oil.
Then massage/work the oil into the leather, as instructed.
After application, I let the car sit outside with the windows up for about 5 hours and let heat build up in order to "open the pores in the leather and release the dirt/contaminants" according to the directions. To my surprise, when I returned late that afternoon, the leather on the bottom portion of the seat had shrunk and was stretched tight - even pulling away from the bottom seat bolsters to show the different color in leather. However, the rest of the seat looked just fine, no shrinkage.
I continued with the re-dye process, as per the instructions, and decided to test some of the prepping agent on a section of the seat. I used 400 wetsand paper soaked in the prepping agent....
....sanded lightly on a section.
The old dye came off very easily. However, before going any further, I was concerned about the tightness of the seat leather and decided to call Leatherique for some advice.
The folks at Leatherique were very helpful and I sent them some pictures to show what I was working on. He suggested that I continue with multiple applications of the Rejuvinator Oil to bring back the leather before continuing with the re-dye process and to keep him posted on my progress. So, I continued and applied 3 additional applications of the oil for a total of 4 applications.
After the 4th application, I was not seeing any improvement. So, being the curious sort, I decided to test the strength of the leather by poking it with my finger in the area where it was most cracked and I poked a hole right through the leather
I tried this in a couple of places and decided to pull on a piece and it tore right off with no effort. Here's a pic after poking holes and taking a piece of leather off.I looked at my sample leather in the sunlight to get a closer look....
When I tried to bend the little piece of leather, it snapped in two. Very brittle even when saturated with oil.
At this point, I wrote to Leatherique (e-mail) again and sent them these same pictures. He said sometimes sunbaked leather can get so dry/damaged, it becomes "mummified" and is so weakened you can poke you finger through it. He confirmed the leather was toast.
At this point, I'll probably get a nice pair of sheepskin covers for the seats. Since it's my daily driver and sits in the sun all day, I can't see expending a lot of effort to purchase replacement seats or recover these seats. Besides, the sheepskin will keep the seats cooler in the summer heat and warmer in the winter.
I do think the Leatherique is a good product and will use it on Virginia and Idaho. It's just "California's" seats were too far gone.
Anyway, just thought I'd share the results of this repair and tie up the loose ends on this thread. THANKS for reading!
11-15-2008, 01:44 PM
#12
Under the Lift
Lifetime Rennlist
Member
Lifetime Rennlist
Member
Too bad. I do like Leatherique's Prestine cleaner for both leather and vinyl. It does an excellent job of cleaning w/o leaving any slick shine. I use the Rejuvinator treatment about every 6 months on the leather too. It can bring back cardboard-like leather, but your leather was completely broken down.
11-15-2008, 04:09 PM
#13
Instructor
Join Date: Aug 2008
Posts: 180
Likes: 0
Received 0 Likes
on
0 Posts
The leather seats in my '84 were badly cracked and torn when I first bought it. After cleaning and sanding off the old dye, I slathered the seats with acrylic crack filler, which I truly believe is nothing but Elmers glue, more or less. After 3 or 4 coats, the cracks were sealed, though still visible. I repaired the bolster tears in a way similar to what you did, except I went further and sealed the tears with more crack filler. I then gave both seats a two tone finish with leather dye/colorant, which again, I truly believe is merely acrylic enamel, more or less. They now look considerably better. Not perfect by any stretch, but much better than before. I'd give that a try before resorting to covers. I admit, I'm not too crazy about the sheepskin seat cover look. Alternatively, there is that company on ebay that make a very form fitting vinyl seat cover that closely matches the original seats. Some on the list have been satisfied with their product. If I was to do it again, I think I would try Elmer's glue or thinned acrylic latex caulk in thin coats to seal the leather and give it strength, then redye. You'd be surprised by the resiliency of leather and it's ability to be brought back from the dead. Here's some pictures:
Last edited by 928 Is My Favorite Time of Day; 11-16-2008 at 01:26 AM.
11-15-2008, 04:51 PM
#14
Nordschleife Master
Dwayne,
Having used Leatherique several times on 3 cars, I've found that for dry leather, applying liberally and leaving the car for several days works well, to allow for the product to wick all the way through the hardened dry parts.
There's a few alternatives to getting seats recovered - there was this thread that got revived recently:
https://rennlist.com/forums/928-forum/247271-anyone-bought-igee-seat-covers.html