
PorKensioner installation for Dummies, '90 GT edition
 06-24-2008, 06:36 PM
#16
Basic Sponsor
Rennlist
Site Sponsor
Rennlist
Site Sponsor
Judging by the back log of orders I have this modification is very well received by the 928 community.
We fitted the first one to a GTS a couple of weeks ago and the setup is superb.
My cars will all be fitted with them as I do the TB work.
Ken you are a genius and a credit to the 928 World.
Come on Ken work faster as we have customers waitiing 8>) 8>)
We fitted the first one to a GTS a couple of weeks ago and the setup is superb.
My cars will all be fitted with them as I do the TB work.
Ken you are a genius and a credit to the 928 World.
Come on Ken work faster as we have customers waitiing 8>) 8>)
__________________

Does it have the "Do It Yourself" manual transmission, or the superior "Fully Equipped by Porsche" Automatic Transmission? George Layton March 2014
928 Owners are ".....a secret sect of quietly assured Porsche pragmatists who in near anonymity appreciate the prodigious, easy going prowess of the 928."
Does it have the "Do It Yourself" manual transmission, or the superior "Fully Equipped by Porsche" Automatic Transmission?
George Layton March 2014928 Owners are ".....a secret sect of quietly assured Porsche pragmatists who in near anonymity appreciate the prodigious, easy going prowess of the 928."
 06-24-2008, 09:12 PM
#17
Chronic Tool Dropper
Lifetime Rennlist
Member
Lifetime Rennlist
Member

On the belt tension switch and warning light--
The tensioner Ken uses has constant tension over the specified range of travel. Compare with the 928 tensioner that has a relatively short range of travel and a very steep pressure gradient over that travel. That short steep gradient is what allows the factory 'switch' to work as it does. The only option for Ken's might be a microswitch that would indicate travel out of normal range, something we never bother to check with the original tensioner. So our tension warning light would turn into a 'belt stretch' warning even though the tension is still correct. With Ken's tensioner, belt stretch is not near the worry that it might be with an unmaintained original tensioner. Much less risk of the belt 'jumping' a tooth or three and stripping the belt, bending parts and breaking cam noses.
Remind me what you wanted that light to indicate again?
06-27-2008, 03:36 PM
#18
Inventor
Rennlist Member
Rennlist Member
For this old scrap?

Here's what the current airpump and no-airpump brackets look like.

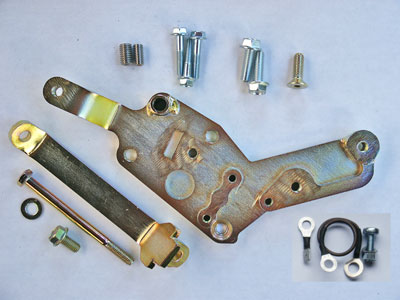
Last edited by PorKen; 06-28-2008 at 04:39 PM.
 06-28-2008, 10:48 AM
#22
Former Vendor

Join Date: Feb 2004
Posts: 2,139
Likes: 0
Received 0 Likes
on
0 Posts
It's nice to see such cool upgrades to our beloved 928s so we can keep them on the road for a long time to come. The 928 is no longer made, Porsche is not really intere$ted in making upgrade or even replacement parts for them any longer and it's left up to us to keep them going.
Nice work Ken! My hat is off to you for designing and retrofitting this newer and better style TB tensioner to the 928. I could imagine the road to a sellable product for other owners was one filled with a few curves and dips in it.
Kind regards,
Constantine
Nice work Ken! My hat is off to you for designing and retrofitting this newer and better style TB tensioner to the 928. I could imagine the road to a sellable product for other owners was one filled with a few curves and dips in it.
Kind regards,
Constantine
06-28-2008, 03:20 PM
#23
Inventor
Rennlist Member
Rennlist Member
Thanks Constantine!
As you can likely atest, it starts with a 'need' (real or imagined), and then depends on the depth of one's interest, (credit card balance,) and commitment. I kept making the PKsn'r even when few people understood the concept, because I felt I had to replace the factory unit.
Of course, the true credit goes to the brave folks like Rob who bought the PKsn'r when it was unproven. (Although Rob waited a while to install it. )
)
As you can likely atest, it starts with a 'need' (real or imagined
), and then depends on the depth of one's interest, (credit card balance,) and commitment. I kept making the PKsn'r even when few people understood the concept, because I felt I had to replace the factory unit.Of course, the true credit goes to the brave folks like Rob who bought the PKsn'r when it was unproven. (Although Rob waited a while to install it.
)
 08-30-2009, 01:40 PM
#25
Racer
Hi all,
I am to installed the P'Kension'r. There is 3 issues I 'm Not sure about it.
1 - As I Mounted the pulley, il feel that as I screwed the bolt at 15 lb fts, the center of the pulley is very hard to rotate.I was not able to rotate the center by hand but only with the tool. So I wonder if it is normal and subsequently if the tensionner itself would be able to assure the tensionning of the belt?
2 - I don't really understand how the timing belt warning for tension is to be mounted? Any pictures oh that. I have the kit from Roger T and I have il have 2 bolt without head and a wire.
3 - The former tensionner has a second pulley and it axle is already mounted on the car. Shoud I mounted the older pulley? If not, what do I do with the useless axle?
Thanks for the help
Best reards
Puyi
08-30-2009, 02:08 PM
#26
Inventor
Rennlist Member
Rennlist Member
These issues are explained in the manual, but may be unclear - http://liftbars.com/docs/PKsnr.pdf
1 - the pulley pin is sometimes pressed in too far. Tap the pin in with a hammer until there is >0.5mm clearance, and the pulley rotates freely. (Note: the pulley bolt is torqued to 17 ft lbs.)
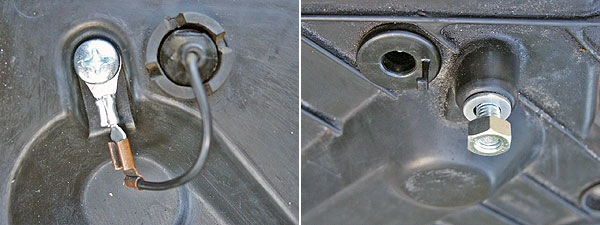
2 - there should be a philips head screw which bolts through the center cover, a terminal combination (widget) and a wire. The old tension light wire plugs into the widget. The wire goes on the outside of the cover, from the new screw to the 8mm bolt which goes through the center cover. (The headless bolts {stainless steel set screws} are for plugging the water pump hole.)
3 - remove the axle and pulley. S4-up, use the 10mm set screw to plug the bolt hole. Use silicone or red Loctite to glue the set screw in place. (The 8mm set screw is for 78-86 water pumps.) The pulley(s) and mounting bracket under the crank gear can also be removed, but this is optional.
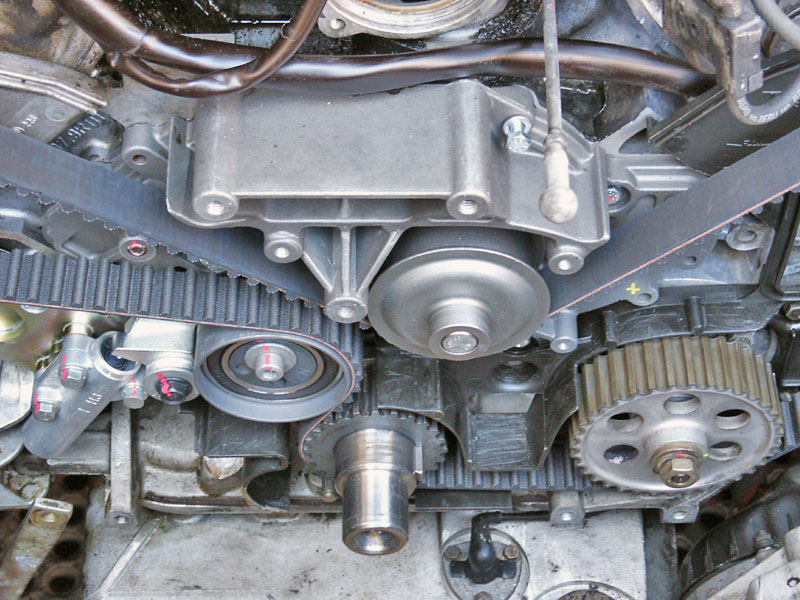
1 - the pulley pin is sometimes pressed in too far. Tap the pin in with a hammer until there is >0.5mm clearance, and the pulley rotates freely. (Note: the pulley bolt is torqued to 17 ft lbs.)
2 - there should be a philips head screw which bolts through the center cover, a terminal combination (widget) and a wire. The old tension light wire plugs into the widget. The wire goes on the outside of the cover, from the new screw to the 8mm bolt which goes through the center cover. (The headless bolts {stainless steel set screws} are for plugging the water pump hole.)
3 - remove the axle and pulley. S4-up, use the 10mm set screw to plug the bolt hole. Use silicone or red Loctite to glue the set screw in place. (The 8mm set screw is for 78-86 water pumps.) The pulley(s) and mounting bracket under the crank gear can also be removed, but this is optional.
Last edited by PorKen; 08-30-2009 at 02:28 PM.
08-30-2009, 02:15 PM
#27
Nordschleife Master
The only thing to note is that all of the ones I have installed (lots now). I found it easier to mount the bracket, then the lever. Then route the belt and then slide the pulley in (checked that it moved freely before this). I found it much more difficult to install the belt with the pulley on. After that was done I would install the tensioner.
As well I do all my timing belts at TDC as there is more than enough room to move the cams without valve interference there. I find it better as the marks are where they are supposed to be not paint marks. And then the cam timing tool can be used.
As well I do all my timing belts at TDC as there is more than enough room to move the cams without valve interference there. I find it better as the marks are where they are supposed to be not paint marks. And then the cam timing tool can be used.
08-30-2009, 02:32 PM
#29
Nordschleife Master
it eliminates failure points (shoulder bolt), doesnt have a tensioner which you have to fill with oil, properly maintains belt tensioner through all temp ranges and doesnt require any adjustments.
Plus it is far simpler
Plus it is far simpler
08-30-2009, 03:03 PM
#30
Inventor
Rennlist Member
Rennlist Member
...and more compact for less stress on the components. The pivot bearings are large diameter steel, vs. small and plastic(!), the pulley bearing is massive, with a large one piece belt surface vs. a stamped/riveted two piece pulley with rounded edges, and tiny bearing.
Compare the construction of the factory tensioner pulley to the pic above, and you can't help but chuckle.
The PKsn'r tensioner/damper has adaptive tensioning, but also hydraulically cushions belt flutter, which together should make for longer belt life, and more accurate valve timing. The factory tensioner has a limited detensioning analog, but it is not directly responsive to actual engine growth by temperature, and no real damping.