
Engine Refurbish - Boost Prep
 02-19-2008, 12:04 AM
#31
Burning Brakes
Join Date: Oct 2004
Location: Santa Rosa Beach, FL
Posts: 977
Likes: 0
Received 0 Likes
on
0 Posts
Thanks so much for the pic's and info.
I am just days behind you in pulling my engine, 87 S4. I have had a 3 day delay trying to get long enough bolts to fit my engine stand, but they should be here tomorrow. Its a Summit Racing stand and I needed 12mm x 1.5 x 90mm bolts to bolt thru the bell housing. Everything else is compete and ready.
I am pulling the engine with the harness off (still connected to the car). MY bell housing seperated easily, but the top 2 bolts were a SOB to break loose. I hope my progress goes as fast as yours once its out. (by the way, I like the paint marking the cams/chains)
I am just days behind you in pulling my engine, 87 S4. I have had a 3 day delay
trying to get long enough bolts to fit my engine stand, but they should be here tomorrow. Its a Summit Racing stand and I needed 12mm x 1.5 x 90mm bolts to bolt thru the bell housing. Everything else is compete and ready.I am pulling the engine with the harness off (still connected to the car). MY bell housing seperated easily, but the top 2 bolts were a SOB to break loose. I hope my progress goes as fast as yours once its out. (by the way, I like the paint marking the cams/chains)
 02-19-2008, 01:36 AM
#32
Rennlist Member
Thread Starter
Join Date: Jun 2006
Location: Vancouver, Canada
Posts: 165
Likes: 0
Received 0 Likes
on
0 Posts
Ryan,
Thanks for the tip on cleaning the pistons. The more I think about and how far I've already gone, most likely I'm going to pull out the pistons, clean them properly and install new rings.
also, after I powerwashed the block, I sprayed on brake cleaner to remove any residual oil and water then dried it with compressed air and some towels. Then I took an oil can and soaked the crank, rods, pistons, etc and worked it all in. I was already thinking about the oxidization.
02-19-2008, 01:42 AM
#33
Rennlist Member
Thread Starter
Join Date: Jun 2006
Location: Vancouver, Canada
Posts: 165
Likes: 0
Received 0 Likes
on
0 Posts
David,
I had the same issue trying to locate those M12 x 1.5 bolts. Then I looked through the PET Catalog and did a search for that size. I needed a 120mm bolts and it so happens that the front lower control arm bolts were M12 x 1.5 x 120mm.
I pulled one out from each side since I'm not driving anywhere and used them to bolt into the top of the block. The bottom ones I used 1/2" x 5" 'black steel' bolts with washers on each end to attach through the lower part of the block. No searching around for those bolts, and thank god because nobody around here stocks them.
02-19-2008, 02:43 PM
#34
Nordschleife Master
David,
I had the same issue trying to locate those M12 x 1.5 bolts. Then I looked through the PET Catalog and did a search for that size. I needed a 120mm bolts and it so happens that the front lower control arm bolts were M12 x 1.5 x 120mm.
I pulled one out from each side since I'm not driving anywhere and used them to bolt into the top of the block. The bottom ones I used 1/2" x 5" 'black steel' bolts with washers on each end to attach through the lower part of the block. No searching around for those bolts, and thank god because nobody around here stocks them.
I had the same issue trying to locate those M12 x 1.5 bolts. Then I looked through the PET Catalog and did a search for that size. I needed a 120mm bolts and it so happens that the front lower control arm bolts were M12 x 1.5 x 120mm.
I pulled one out from each side since I'm not driving anywhere and used them to bolt into the top of the block. The bottom ones I used 1/2" x 5" 'black steel' bolts with washers on each end to attach through the lower part of the block. No searching around for those bolts, and thank god because nobody around here stocks them.
Gold star for you.
 02-19-2008, 08:39 PM
#35
Burning Brakes
Join Date: Oct 2004
Location: Santa Rosa Beach, FL
Posts: 977
Likes: 0
Received 0 Likes
on
0 Posts
Thanks for the bolt info, I have been bogged down at work today but hope to get back to the garage tomorrow.
Reading your post, you have got me also thinking about piston removal for new rings etc. I have never done this part of a rebuild. Could you or someone give me an idea of difficulty.
My compression numbers were about the same as yours (in the 185 - 190 range) on cylinders where I don't have bent valves. But my leak down % was more in the 12% to 15% range on good cylinders.
I am also Boosting with a Murf Stage III when everything is ready.
Thanks again for your post, and keep the pic's coming.
02-19-2008, 09:02 PM
#36
Rennlist Member
Thread Starter
Join Date: Jun 2006
Location: Vancouver, Canada
Posts: 165
Likes: 0
Received 0 Likes
on
0 Posts
David,
I looked at the WSM and the piston removal and reassembly looks relatively easy. I think unless you are planning on honing your cylinders it's a pretty straight forward procedure. When I was alot younger I rebuilt a Fiat engine and recall that the piston and ring assembly was pretty easy.
The Murf Stage III is also what I'm contemplating. The first task is to get this thing back together. I've ordered most of my bearings, seals, gaskets, hoses etc so I should have them by the end of the week.
Intake and valve covers are at the bead blaster before powdercoating and I have a couple of machine shops that have been recommended for the valve work, so things are moving along. My goal is to have the engine up and running by the end of March, early April.
02-19-2008, 10:31 PM
#38
Three Wheelin'
Kudos on deciding to replace the rings. Your engine is only going to be as strong as its weakest link. To take it that far apart and not replace them could have you kicking yourself later. Most important on an engine thats to be boosted where rings and valve sealing are going to be "tested" at much greater levels. I can't imagine that ring pressure on the bores after almost 18 years hasn't diminshed significantly.
02-19-2008, 11:20 PM
#39
Rennlist Member
Thread Starter
Join Date: Jun 2006
Location: Vancouver, Canada
Posts: 165
Likes: 0
Received 0 Likes
on
0 Posts
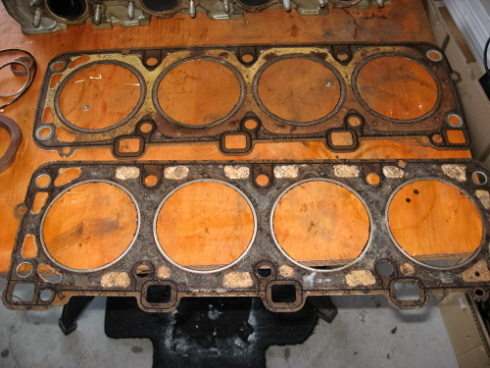
In the last few days I've manged to do a little more work. The head gaskets are beginning to wear. There are a few spots that are beginning to blister and pull apart. Luckily I'm doing this refurbish or I'm sure these would have eventually blown out.
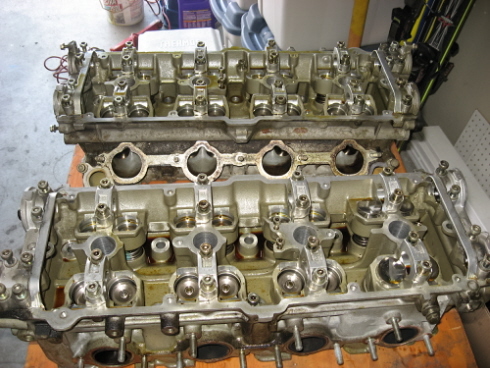
Time to clean the heads and send them off to the machine shop. I'm going to get the valves reseated and new valve stem seals installed.
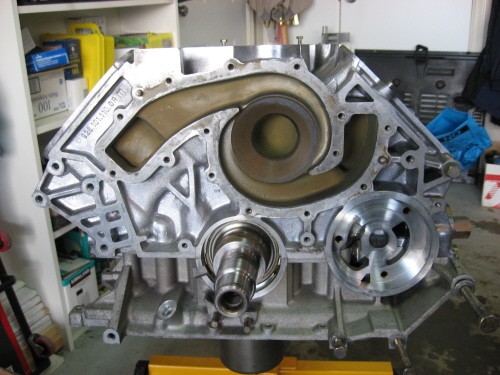
The block is getting a little cleaner. I took apart the oil pump to replace the o-ring and seal. What a beautiful piece of machine work. Those germans are pretty damn good with their precision parts!
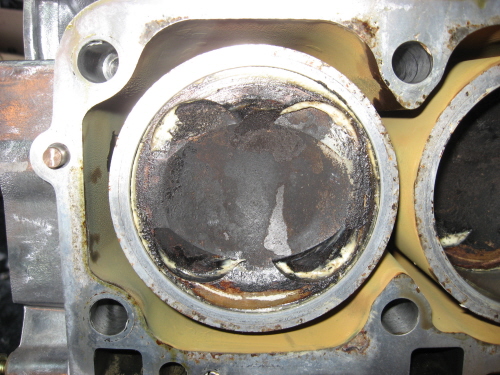
The coolant chamber in the block is a yellowish/tan colored. Not sure if this is from the stop leak that was put in there or if this is normal. I was thinking of putting some sort of pipecleaning brush bit on a drill and cleaning the surface? Is this a waste of time or should I try and get this crap off?
Time to clean the heads and send them off to the machine shop. I'm going to get the valves reseated and new valve stem seals installed.
The block is getting a little cleaner. I took apart the oil pump to replace the o-ring and seal. What a beautiful piece of machine work. Those germans are pretty damn good with their precision parts!
The coolant chamber in the block is a yellowish/tan colored. Not sure if this is from the stop leak that was put in there or if this is normal. I was thinking of putting some sort of pipecleaning brush bit on a drill and cleaning the surface? Is this a waste of time or should I try and get this crap off?
02-20-2008, 12:23 AM
#40
Nordschleife Master
Brent, you can as I said stop by my place and I can pull those heads off and show you what it SHOULD look like.
BTW I am coming home tomorrow night, but only for the night. Found out I have to go to Oaxaca for a couple of days for work.
BTW I am coming home tomorrow night, but only for the night. Found out I have to go to Oaxaca for a couple of days for work.
02-20-2008, 12:51 PM
#41

If someone is re-ringing, one should look into getting the proper rings. Those would be the 951 ring packs instead of the 928/944 ones.
02-20-2008, 05:06 PM
#43
Nordschleife Master
02-20-2008, 06:01 PM
#44
The Superseded 928 part number for rings are 944NA rings. Cast upper and lower compression rings, with an iffy design for the oil control ring.
The upper compression ring has a nice thin back-champher in it, making it even less structurally sound under the stresses the engine will see with boost (possible detonation, high compression forces, possible repeated over-revs from exuberance.
The upper and lower compression rings are black cast metal.
Now, looking at the difference, right now, as I have both versions, the 951 ring pack IS VASTLY different. The face is a chrome-like finish, with rounded upper and lower edges on upper ring. The lower compression ring is also very much more robust.
The oil control ring is very different as well. It simply looks more robust.
944NA rings were not meant for boost. 951 rings were designed for and meant for boost.
I found no real source for the teflon valve seals. I will be disassembling the heads with the intent on a thurough post-rebuild inspection and cleaning, and will verify the integrity of the viton valve seals at that time, and will probably leave them in. My original concern was that I would be running high boost, as well as ethanol, which is not nice to rubber. Viton is on the approved list for ethanol, so I think I am in the clear.
02-20-2008, 06:41 PM
#45
Under the Lift
Lifetime Rennlist
Member
Lifetime Rennlist
Member
At the risk of being branded a heretic, I'll ask whether all of that really worthwhile to do in a 24K mile motor? It appears there was a coolant leak out of the head plugs, and maybe an iffy headgasket. Rings? Bearings? Valve job? Is this an example where very low mileage is especially tough on the motor? I'll admit I do not like the deposit coating the waterjacket surfaces. That needs to be washed off somehow. Probably easier to do with the motor assembled and a good flushing agent.
Last edited by Bill Ball; 02-20-2008 at 07:00 PM.