

Writeup - Reconditioning S4 Radiator Fan
 01-25-2008, 09:26 PM
#1
Rennlist Member
Thread Starter
My thanks to Jon928se (Jon Holdsworth) for his help in posting this writeup.
Partial Reconditioning Instructions - Myles Garmonsway
Cooling Fan from 1990 Porsche 928 S4
PN 928 624 145 00
Bosch PN 0 130 304 210
Please note that I am an amateur mechanic with limited tools. I carried out the reconditioning on my garage floor. Once out of car allow 2 to 3 hours to complete the work for the first time.
Tools I used:
10mm socket
medium flat screwdiver
cold chisel
Pin punch
Centre punch
4 20mm brads
2mm, 3mm & 3.3mm drill bits
Variable speed drill
Pop rivet gun
Hammer
Two blocks of 4 by 2 wood
Penetrating oil
Cloths.
Remove fan.
I removed my left one, complete with blades, by manipulating the fan shroud into a suitable position.
Others have suggested removing the blades first then the motor by pressing off the fan retaining clip with a long lever. My blades were stuck fast to the motor so this wasn't an option.
Assembly is held on to fan shroud by 3 bolts (M6) with 10mm heads and a flat washer. Don't overtighten.
To remove the right fan requires removal of the shroud.
Disassemble fan.
Remove clip from fan onto shaft using screwdriver.
Press, tap, pull or shake fan blade off shaft.
Remove pin from shaft with punch.
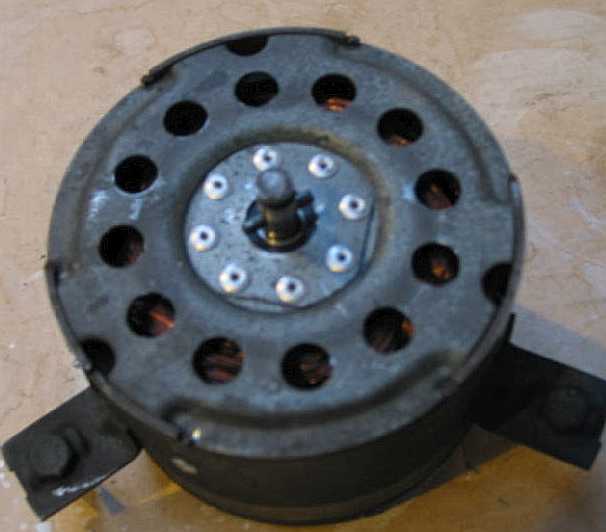
Carefully bend back tabs holding rear cover of motor onto housing. I ended up using a punch to close up the V groove that had been created when the tabs were made.
Pull off rear of motor. Careful of the small spring tab by the connector plug.
Press, pull, tap motor out of housing. I moved the windings on the shaft during this process so be careful. I reset mine flush at front of motor.
A small washer sits over shaft as a spacer between the motor & housing (against the bearing).

Remove Bearing
Centre punch the spot welds.
Mark position of plate for correct position on reassembly.
Drill out, in increments, to suitable size for rivets. I found this to be soft and easy to adjust for off centre starts.
Remove retaining plate.
Push out bearing. Mine was a NSK 608Z2 C4 which was shielded both sides and had an off centre groove running the circumference. The groove was towards the fan on mine. The replacement bearing was a NSK 608V with no groove.
Cleaning
Clean all the carbon & metal filings out of everything. In the end I drilled out the rivets holding two opposite magnet retaining plates and removed all the magnets to ensure I got all the metal filings.
I marked the magnets prior to this to ensure that I installed them in the same place.
Brushes
I was told that the bushes were not able to be replaced (NLA?) so I had to leave mine in. I think they are probably a bit over half worn (100,000 km). This was the fan that comes on with the air con. If doing both fans you may find the brushes in the other motor are less worn. I would consider swapping the motors around if this was the case.
Reassembly
I used open aluminium 3.2mm diameter by 3.2mm grip rivets as these were locally available. Clearance to the windings did not seem to be an issue.
I used four small nails to retain the bushes during reassembly.
Lightly lubricate rear bush.
Place new bearing in position & rivet retaining plate in position (head of rivet on outside of housing). I pressed all the rivets through the holes before I started tightening to ensure that a small change in position did not mean I could not get the last rivet in.
Replace magnets & the two retaining plates. I put two plates in place, pushed the rivet through the hole and then compressed the plate against the side of the housing with a pair of vice grips & a suitable rod before tightening the rivet. This can be fiddly.
Reassemble rear plate onto motor with brushes retained. Remove nails. If you only just put the nails through the top hole on the brush housings they are very easy to remove.

Place assembly into housing, remembering the washer and the small spring tab on the side.
Place holding tabs back in position. I used a cold chisel for this.
Plug in & test.
Put pin through shaft.
Put on fan & retaining clip.
Reinstall in car.
Go and ENJOY!
Partial Reconditioning Instructions - Myles Garmonsway
Cooling Fan from 1990 Porsche 928 S4
PN 928 624 145 00
Bosch PN 0 130 304 210
Please note that I am an amateur mechanic with limited tools. I carried out the reconditioning on my garage floor. Once out of car allow 2 to 3 hours to complete the work for the first time.
Tools I used:
10mm socket
medium flat screwdiver
cold chisel
Pin punch
Centre punch
4 20mm brads
2mm, 3mm & 3.3mm drill bits
Variable speed drill
Pop rivet gun
Hammer
Two blocks of 4 by 2 wood
Penetrating oil
Cloths.
Remove fan.
I removed my left one, complete with blades, by manipulating the fan shroud into a suitable position.
Others have suggested removing the blades first then the motor by pressing off the fan retaining clip with a long lever. My blades were stuck fast to the motor so this wasn't an option.
Assembly is held on to fan shroud by 3 bolts (M6) with 10mm heads and a flat washer. Don't overtighten.
To remove the right fan requires removal of the shroud.
Disassemble fan.
Remove clip from fan onto shaft using screwdriver.
Press, tap, pull or shake fan blade off shaft.
Remove pin from shaft with punch.
Carefully bend back tabs holding rear cover of motor onto housing. I ended up using a punch to close up the V groove that had been created when the tabs were made.
Pull off rear of motor. Careful of the small spring tab by the connector plug.
Press, pull, tap motor out of housing. I moved the windings on the shaft during this process so be careful. I reset mine flush at front of motor.
A small washer sits over shaft as a spacer between the motor & housing (against the bearing).
Remove Bearing
Centre punch the spot welds.
Mark position of plate for correct position on reassembly.
Drill out, in increments, to suitable size for rivets. I found this to be soft and easy to adjust for off centre starts.
Remove retaining plate.
Push out bearing. Mine was a NSK 608Z2 C4 which was shielded both sides and had an off centre groove running the circumference. The groove was towards the fan on mine. The replacement bearing was a NSK 608V with no groove.
Cleaning
Clean all the carbon & metal filings out of everything. In the end I drilled out the rivets holding two opposite magnet retaining plates and removed all the magnets to ensure I got all the metal filings.
I marked the magnets prior to this to ensure that I installed them in the same place.
Brushes
I was told that the bushes were not able to be replaced (NLA?) so I had to leave mine in. I think they are probably a bit over half worn (100,000 km). This was the fan that comes on with the air con. If doing both fans you may find the brushes in the other motor are less worn. I would consider swapping the motors around if this was the case.
Reassembly
I used open aluminium 3.2mm diameter by 3.2mm grip rivets as these were locally available. Clearance to the windings did not seem to be an issue.
I used four small nails to retain the bushes during reassembly.
Lightly lubricate rear bush.
Place new bearing in position & rivet retaining plate in position (head of rivet on outside of housing). I pressed all the rivets through the holes before I started tightening to ensure that a small change in position did not mean I could not get the last rivet in.
Replace magnets & the two retaining plates. I put two plates in place, pushed the rivet through the hole and then compressed the plate against the side of the housing with a pair of vice grips & a suitable rod before tightening the rivet. This can be fiddly.
Reassemble rear plate onto motor with brushes retained. Remove nails. If you only just put the nails through the top hole on the brush housings they are very easy to remove.
Place assembly into housing, remembering the washer and the small spring tab on the side.
Place holding tabs back in position. I used a cold chisel for this.
Plug in & test.
Put pin through shaft.
Put on fan & retaining clip.
Reinstall in car.
Go and ENJOY!
 01-25-2008, 09:29 PM
#2
Rennlist Member
Thread Starter
I would appreciate your comments & further tips on the writeup. If further tips warrant I will combine & repost.
Regards,
Myles Garmonsway
Regards,
Myles Garmonsway
01-25-2008, 10:23 PM
#4
Addict
Rennlist Member
Rennlist Member
Me also.
All the time that I was emailing Myles how to post pics directly rather than trying to upload a pdf file I was gritting my teeth at the thought that three years ago when we emigrated from the UK I threw away the two old fan motors from my SE.
Now all we need to find is
"Electric motor carbon brushes 'R us "
For Myles benefit I seem to recall a shop in Auckland NZ that specialised in electric motor stuff - maybe Eric can help you out. And glad you got it sorted despite my somewhat obtuse instructions
01-25-2008, 11:36 PM
#5
Drifting

Nice work Myles, you beat me to it.
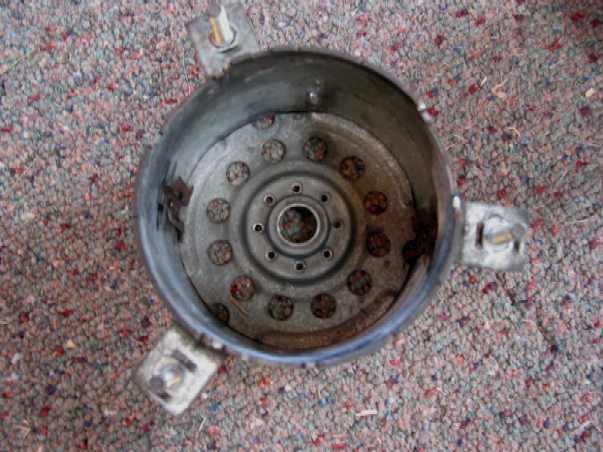
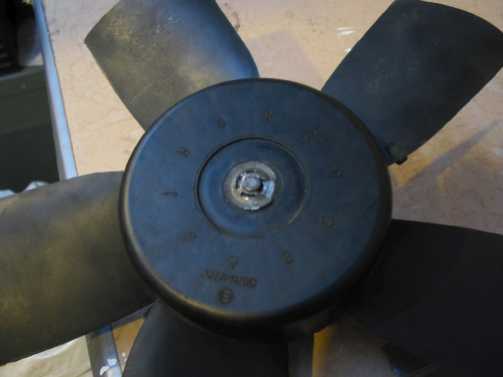
I just got my 944 fan motor (part # 944.624.021.03) yesterday. Here's some photos of the motor...


Here, the pin also removed. Used a punch and small hammer with the shaft supported by a large socket wrench.


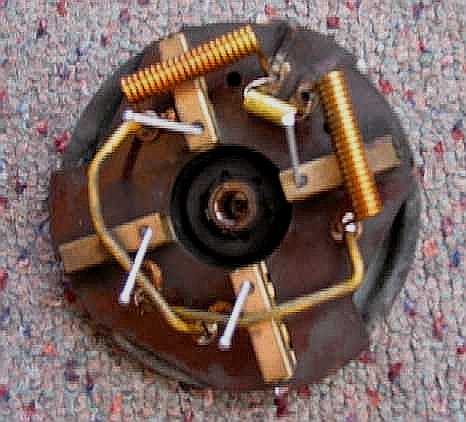
At the suggestion of Jon Gill, I remove the front plate instead. That's probably alot easier, but I'll have to figure out what he meant on getting the brushes compressed before mounting the amature/rotor.
To flatten out the tabs holding the plate in place, I used the impact socket wrench (shown in the photo below) to bend them back. Just takes a few blows with the hammer. Then using a screwdriver in the front plate holes, you can flex the plate up just enough to fit a knife blade between the plate and the motor cylinder.
Update Note: I later rebuilt two more motors. I found it much easier to use a pair of vice grips to bend the tabs outward, releasing the end bearing plate. For reinstallation, just used a hammer to bend the tabs back in place to lock the end bearing plate
With the knife in place you can then work a flat blade screwdriver in and work the plate off the cylinder. Like Jon said in a prior post, the magnets are quite strong.


Very dirty job, so wear gloves. Motor is very dirty inside, but the photos make it look clean. Light tapping moves the ball bearing off the shaft. More later.
Have to do some cleaning, find some "electrical motor grease"
I just got my 944 fan motor (part # 944.624.021.03) yesterday. Here's some photos of the motor...
Here, the pin also removed. Used a punch and small hammer with the shaft supported by a large socket wrench.
At the suggestion of Jon Gill, I remove the front plate instead. That's probably alot easier, but I'll have to figure out what he meant on getting the brushes compressed before mounting the amature/rotor.
To flatten out the tabs holding the plate in place, I used the impact socket wrench (shown in the photo below) to bend them back. Just takes a few blows with the hammer. Then using a screwdriver in the front plate holes, you can flex the plate up just enough to fit a knife blade between the plate and the motor cylinder.
Update Note: I later rebuilt two more motors. I found it much easier to use a pair of vice grips to bend the tabs outward, releasing the end bearing plate. For reinstallation, just used a hammer to bend the tabs back in place to lock the end bearing plate
With the knife in place you can then work a flat blade screwdriver in and work the plate off the cylinder. Like Jon said in a prior post, the magnets are quite strong.
Very dirty job, so wear gloves. Motor is very dirty inside, but the photos make it look clean. Light tapping moves the ball bearing off the shaft. More later.
Have to do some cleaning, find some "electrical motor grease"
Last edited by borland; 06-28-2012 at 02:28 PM.
01-26-2008, 02:10 AM
#6
Rennlist Member
Thread Starter
borland,
I thought about removing the front plate but decided against it. You could probably poke 4 pieces of thin wire into the top hole on the brushes surround to retain them while you put the amature back in then pull them out.
Your photos look good - mind if I include them in my 'final' write up?
Cheers,
Myles Garmonsway
01-26-2008, 12:45 PM
#7
Drifting
Myles, Feel free to use my photos. I'll post more later as my work progresses.
Did you use an electric motor bearing grease on the rear bearing?
Apparently the bearing is the same size as what's used on Skateboards.....I see some described here as for "electric motors".
http://search.ebay.com/search/search...ing&category0=
Did you use an electric motor bearing grease on the rear bearing?
Apparently the bearing is the same size as what's used on Skateboards.....I see some described here as for "electric motors".
http://search.ebay.com/search/search...ing&category0=
Trending Topics
01-26-2008, 01:55 PM
#8
Rennlist Member
Thread Starter
Borland,
I just used general purpose grease as I didn't have any access to a specialised one. I put a small amount of grease in the bottom of the bush then pushed the shaft home to distribute it up the shaft a bit. Hopefully it will take some time for any to work its way out of the bush & start spreading itself around the housing. The circuit board should stop any getting onto the brushes.
Regards,
Myles
01-26-2008, 05:40 PM
#9
Drifting
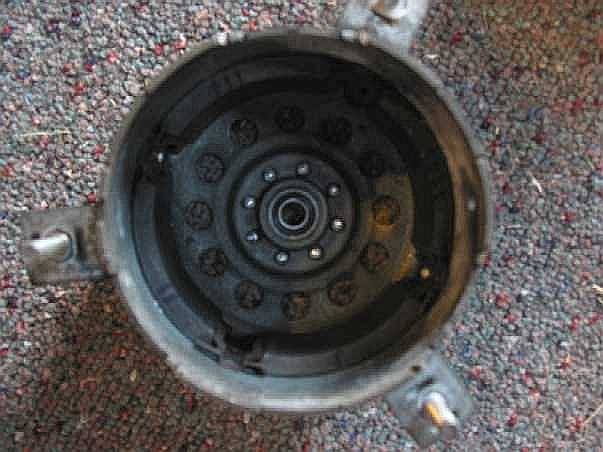
Got everything cleaned up, bearing removed. Used an aerosol electrical parts cleaner (CRC Lectra Motive).

How's it look?
I'm using nylon stay-ties to hold the brushes back. The brushes on my motor are so long, I could barely fit the nylon tip in the hole.
The bronze bushing is installed similar to the ball bearing, so that looks replaceable by the same technique. But the bushing probably never needs replacing.

Here's a close up of the backside of the front plate. No need to center punch for drilling, as you might be able to see in this photo, the indentations of the spot welding machine. Just drill from the backside into the spot weld indents. Start with a smaller drill and make a pilot hole, then finish with 1/8" drill. Drill all holes from the backside. I found some 1/8" OD x 1/8" grip aluminum pop rivets.


And the bearing just taps out gently. Shielded bearing with the following etching on the outer diameter..
SKF ITALY
-608-2Z/C3LHT30-
Nothing about good for skateboards!

That's all for now. Probably be a couple weeks before I put it back together with a new bearing and fresh grease.
How's it look?
I'm using nylon stay-ties to hold the brushes back. The brushes on my motor are so long, I could barely fit the nylon tip in the hole.
The bronze bushing is installed similar to the ball bearing, so that looks replaceable by the same technique. But the bushing probably never needs replacing.
Here's a close up of the backside of the front plate. No need to center punch for drilling, as you might be able to see in this photo, the indentations of the spot welding machine. Just drill from the backside into the spot weld indents. Start with a smaller drill and make a pilot hole, then finish with 1/8" drill. Drill all holes from the backside. I found some 1/8" OD x 1/8" grip aluminum pop rivets.
And the bearing just taps out gently. Shielded bearing with the following etching on the outer diameter..
SKF ITALY
-608-2Z/C3LHT30-
Nothing about good for skateboards!
That's all for now. Probably be a couple weeks before I put it back together with a new bearing and fresh grease.
Last edited by borland; 06-29-2012 at 08:25 PM.
01-26-2008, 08:10 PM
#10
Under the Lift
Lifetime Rennlist
Member
Lifetime Rennlist
Member
Very nice job. This needs to go into the repository for maintenance and repair tips.
I wish the Spaal fans I have were serviceable like this, but I concluded they weren't.
I wish the Spaal fans I have were serviceable like this, but I concluded they weren't.
01-27-2008, 05:39 PM
#13
Drifting
Update on bearing sourcing... I got this reply from eBay seller, seller's store "BEARING BARGAINS"":
"The SKF bearings you have are rated to 392 degrees F. The best I have are rated to 350 degrees F. It is ebay item# 260135226406. Thanks, Bob."
here's the link to his eBay listing ...
http://cgi.ebay.com/ws/eBayISAPI.dll...0%3D%26fvi%3D1
Seems like a good price for a pair, and reasonable quality, inspite of the slightly less temperature rating than the original.
On the the electric motor grease, you only need a small quantity to repack the rear bushing. This was a tough one to source. I spent lots of time and only came up with one source. Really couldn't find a suitable product in automotive, hobby, or hardware stores. Only found this one source. Grainger sell Mobil POLYREX EM, Grainger Item number 5XB54. I found numerous references to this product.. Considering the quantity you'll need, this is the smallest size I could find, 14 oz grease gun cartridge.
Grainger is not a retail business, they sell to other businesses, but you can still order from them by placing an online order. When you register for an account online, place your name in the business name field. By e-mail, they will send you a phone number that you can call to complete your order on a one time basis without activating an account. At least that's the way I order a tube, less than $10 including tax and shipping.
http://www.grainger.com/Grainger/wwg...e&L1=Grease%2C
Last edited by borland; 01-31-2008 at 09:18 PM.
02-02-2008, 10:33 PM
#15
Drifting
Got the parts and put the motor back together today. Here's what I did....
First thing is greasing the bronze bushing at the bottom of the casing. Just coating the shaft and bushing insides while leaving a dab for good measure. There's a cavity in the back to hold a little extra.
As said before, the magnets are quite strong. You'll need a string throught he shaft hole to grip the armature while you feed it into the cavity ( I used nylon stay ties ).
Then you need to find a good chair to sit in while you hold the casing by your feet and armature by one hand. As you carefully lower the armature in the casing, guide the ends of the nylon stay ties (holding the brushes in locked open position) between the armature slots (see the photo below); the stay ties are just too thick to fit otherwise.

Once you have armature in place, pull on each of the four nylon stay ties. You should hear a snapping sound as each brush is released.
Installing the bearing in the end plate is just are Myles explains. You probably only need four pop rivets, eight pop rivets is an overkill.
After the bearing is riveted in place, apply a small amount of grease to the inside bearing cavity where the shaft washer will rest. This washer's only purpose is to act as a dust seal for the bearing.
Install the end plate to the motor shaft and casing. Use a small hammer to tap the plate in place. I used a chisel to secure the plate to the casing. You can also hammer to fold over the corners, but that may not be necessary.
Install the shaft pin. Your done.

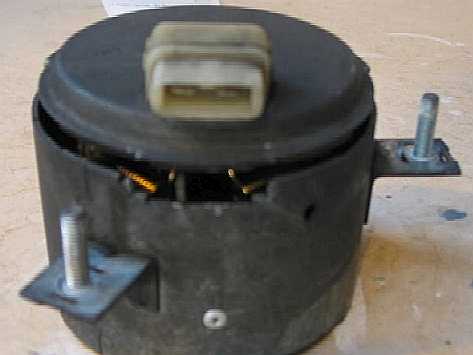
Testing at full 12VDC with a couple test leads.... "Now that sounds like an industrial strength motor !"
Can't wait to do the fans on my 90' S4.
First thing is greasing the bronze bushing at the bottom of the casing. Just coating the shaft and bushing insides while leaving a dab for good measure. There's a cavity in the back to hold a little extra.
As said before, the magnets are quite strong. You'll need a string throught he shaft hole to grip the armature while you feed it into the cavity ( I used nylon stay ties ).
Then you need to find a good chair to sit in while you hold the casing by your feet and armature by one hand. As you carefully lower the armature in the casing, guide the ends of the nylon stay ties (holding the brushes in locked open position) between the armature slots (see the photo below); the stay ties are just too thick to fit otherwise.
Once you have armature in place, pull on each of the four nylon stay ties. You should hear a snapping sound as each brush is released.
Installing the bearing in the end plate is just are Myles explains. You probably only need four pop rivets, eight pop rivets is an overkill.
After the bearing is riveted in place, apply a small amount of grease to the inside bearing cavity where the shaft washer will rest. This washer's only purpose is to act as a dust seal for the bearing.
Install the end plate to the motor shaft and casing. Use a small hammer to tap the plate in place. I used a chisel to secure the plate to the casing. You can also hammer to fold over the corners, but that may not be necessary.
Install the shaft pin. Your done.
Testing at full 12VDC with a couple test leads.... "Now that sounds like an industrial strength motor !"
Can't wait to do the fans on my 90' S4.
Last edited by borland; 06-28-2012 at 02:23 PM.