

Euro 4.7L Engine Yankfor Head Gasket Replacement
 02-15-2008, 06:29 PM
#76
Addict
Rennlist Member
Rennlist Member
Thread Starter
I pulled the disty cap and I guess I got it right the first time. Looks like I am a tooth off, but the rotor does point 180 degrees at TDC from plug wire #1.

 02-15-2008, 07:11 PM
#77
Nordschleife Master
It is out 180�,
I am photoshopping the image as we speak but you have the wrong notch.
The notch it is pointing at now is a locating notch for the dissy cap to only go on one way, and to keep the hall sensor shield from rotating.
I am photoshopping the image as we speak but you have the wrong notch.
The notch it is pointing at now is a locating notch for the dissy cap to only go on one way, and to keep the hall sensor shield from rotating.
02-15-2008, 07:15 PM
#78
Nordschleife Master
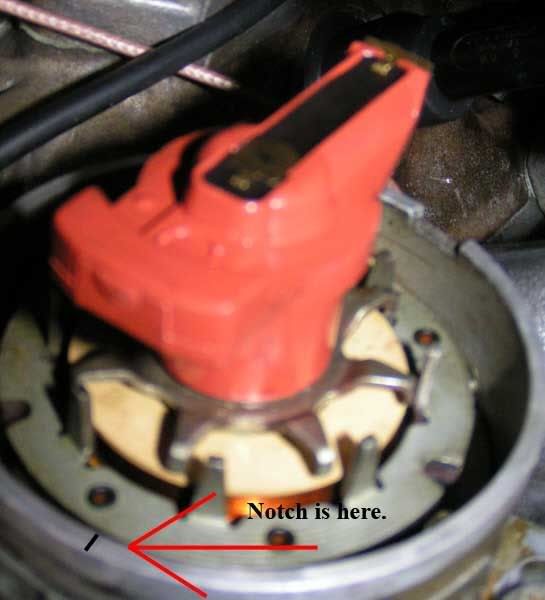
Here is the picture, I have marked the "notch/line" that the rotor arm is supposed to be lined upto.
Sorry I wasnt too clear about the line/notch before.
02-15-2008, 07:19 PM
#79
Nordschleife Master
As well for taking pictures like this,
look for a little flower icon on the back of your camera, once you find it press this button (tap it, not hold) till you see a flower icon show on the screen, below the flower (when displayed) it will say "Macro"
Once you have it in that setting zoom in as much as you like, but hold the camera about 8-16" away from the object and lightly press the "shoot" button, this is a 2 stage button, 1st stage is focus, try with different distances until you get a green square on the screen, once you have the green square press it all the way down (2nd stage) and it will take a clean unblurry picture.
02-15-2008, 07:31 PM
#80
Addict
Rennlist Member
Rennlist Member
Thread Starter
Thanks for the info on the disty...and the use of a camera...lol I did use the macro, but I was in a hurry and the area where the engine is has no light. So as the camera is on AUTO, it compensates for light, but still cannot focus in the dark too well. I used this photo cause it was enough to get my point across.
Thanks again
Thanks again
02-15-2008, 07:51 PM
#81
Nordschleife Master
np, just let us know that you find that notch/line and you can get it lined up.
This mark is also just a base setting to get you running. You will need a timing light to set the advance once running.
This mark is also just a base setting to get you running. You will need a timing light to set the advance once running.
02-15-2008, 10:14 PM
#82
Chronic Tool Dropper
Lifetime Rennlist
Member
Lifetime Rennlist
Member

Keith--
You are planning to put new rod bearings in, right? The ones you show have worn evenly but they are pretty worn. The babbit coating looks like it's gone and you are into the backing metal. Not too surprising with the coolant in the oil. Easy to take care of now while it's all open and relatively clean.
Looks like too much fun up there. We're probably done counting raindrops for a while down here. I just looked at the traffic map for this side of the basin, shows all reds and yellows. Doncha miss all your friends who are on the roads here in L.A.??
02-16-2008, 01:43 AM
#83
Addict
Rennlist Member
Rennlist Member
Thread Starter
LOL...Bob, you probably missed the last few pages, but the engine is back together going in the car on Saturday. The bearings are fine. Had nothing to do with the water. As I had stated a couple of times before, the engine never ran long enough and was never under load. Thats just normal wear after 142K. She's good for another 100K When the engine gets yanked to get put into the convertible someday, thats when the engine comes all the way apart.
"Miss" is subjective. Beautiful days up here and our weekend is looking stellar! Now I only get pissed off when traffic comes to a complete stop for a few seconds. Traveling to the other side of Portland or heading across the river up to Washington is about the same mileage as traveling across the San Fernando Valley. You get used to everything being so close up here real quick. So much so, 8 miles seems too far..."I'm not going all the way over there!"
When the engine gets yanked to get put into the convertible someday, thats when the engine comes all the way apart."Miss" is subjective. Beautiful days up here and our weekend is looking stellar! Now I only get pissed off when traffic comes to a complete stop for a few seconds. Traveling to the other side of Portland or heading across the river up to Washington is about the same mileage as traveling across the San Fernando Valley. You get used to everything being so close up here real quick. So much so, 8 miles seems too far..."I'm not going all the way over there!"
02-16-2008, 01:58 AM
#84
Rennlist Member
Those bearings did look a little worn. the are so easy to replace, why dont you put new ones in.
Mk
Mk
LOL...Bob, you probably missed the last few pages, but the engine is back together going in the car on Saturday. The bearings are fine. Had nothing to do with the water. As I had stated a couple of times before, the engine never ran long enough and was never under load. Thats just normal wear after 142K. She's good for another 100K When the engine gets yanked to get put into the convertible someday, thats when the engine comes all the way apart.
"Miss" is subjective. Beautiful days up here and our weekend is looking stellar! Now I only get pissed off when traffic comes to a complete stop for a few seconds. Traveling to the other side of Portland or heading across the river up to Washington is about the same mileage as traveling across the San Fernando Valley. You get used to everything being so close up here real quick. So much so, 8 miles seems too far..."I'm not going all the way over there!"
When the engine gets yanked to get put into the convertible someday, thats when the engine comes all the way apart."Miss" is subjective. Beautiful days up here and our weekend is looking stellar! Now I only get pissed off when traffic comes to a complete stop for a few seconds. Traveling to the other side of Portland or heading across the river up to Washington is about the same mileage as traveling across the San Fernando Valley. You get used to everything being so close up here real quick. So much so, 8 miles seems too far..."I'm not going all the way over there!"
02-20-2008, 02:30 AM
#85
Addict
Rennlist Member
Rennlist Member
Thread Starter
Got the engine back in this weekend with Kens help. It didn't go in as easy as it came out, but then again, we had no idea what to expect. The problem going in were the new motor mounts and the heat shields. After we figured out what was stopping the engine from dropping down completely, I just crawled underneath and used a pry bar to spread the motor mounts out of the way so the engine could drop the rest of the way. We had to pull it forward a tad to allow the motor shocks to clear the heat shields. After that, it slipped right in. So basically, the install took about 20 minutes. No real issues buttoning everything back up. I did discover a water leak at the water bridge, but I just tightened the bolts some and that disappeared.
As far as firing it up, I had to do some priming of the fuel lines and fuss with the mixture, but within no time, the engine was running...and rather smooth I might add. Ken came back by yesterday and helped fine tune the engine some.
I took it out for a drive tonight and though I need to do some final adjustments, it runs very smooth and quiet and most of all, NO LEAKS!
I should be able to get it legalized here this week and this episode will be over for the most part. All that will be left are some cosmetic dealios.
Thanks to all whom have helped out there. See ya on the next thread over this Euro dog!
 03-13-2008, 01:32 AM
#89
Banned
oh man... I need to do this on my euro 4.7 too... I hope not to see that when my engine comes apart...
to those in the know, can someone estimate the cost for me of replacing head gaskets if
A.) I have a shop do it
B.) I do it.
how much is involved in pulling the engine?
on a scale of 1-10, my mech aptitude is a 6, my knowledge a 3. experience 2.
to those in the know, can someone estimate the cost for me of replacing head gaskets if
A.) I have a shop do it
B.) I do it.
how much is involved in pulling the engine?
on a scale of 1-10, my mech aptitude is a 6, my knowledge a 3. experience 2.
03-13-2008, 04:37 AM
#90
Addict
Rennlist Member
Rennlist Member
Thread Starter
I think if you read my post from the beginning, you'd find that it's not difficult at all to pull the engine. When all else fails and you are short on confidence, resort to the WSM. It has ALL of the info you need to do the job of freshening the engine.
I would say double or triple the cost if a shop does it. Hard to say what materials will cost as you will not know what you need until you get it all apart. If you are going to do it, do it to the degree that you replace all of the rubber, gaskets, TB, WP... I spent around $500 just for the immediate job I think.
I would say double or triple the cost if a shop does it. Hard to say what materials will cost as you will not know what you need until you get it all apart. If you are going to do it, do it to the degree that you replace all of the rubber, gaskets, TB, WP... I spent around $500 just for the immediate job I think.