Photos of painting progress
 05-29-2007, 02:15 PM
#1
Drifting
Thread Starter
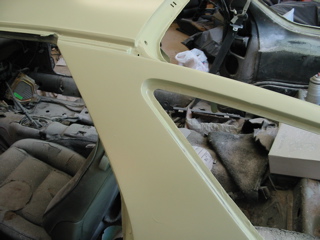
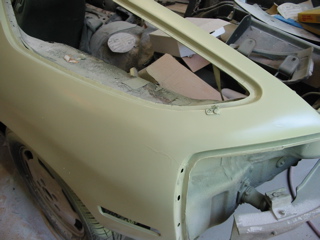
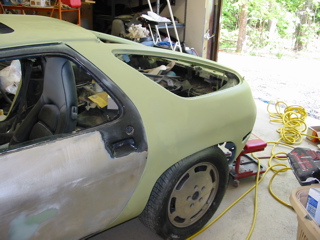
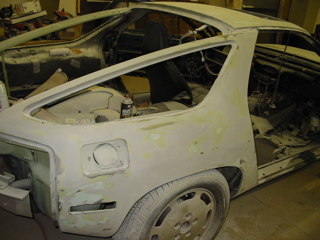
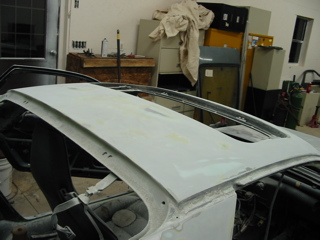
Here's some pics of my painting progress. The car has been mostly stripped of its original paint. I still have to deal with the door jambs and under the sunroof. The first two pics are o the car with it's first coat of epoxy. It's Glasurit chromated epoxy which is why it has the funky color.
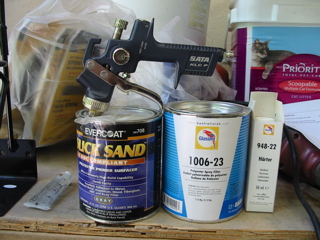
The next pic shows evercoat's Slick Sand, and next to it is Glasurit's Polyester Spray Filler. A couple of things worth mentioning here, and some lessons learned the hard way. Both products are the same. They look the same, smell the same, use the same catalyst, etc. They serve the same purpose. When I started to acquire painting materials a few months ago, no one knew what sprayable filler was. Even the local DuPont jobber was clueless. I didn't know until recently that Slick Sand was spray filler. So I bought the stuff from Glasurit first for about $65. They even charge extra for the small tube of catalyst. Last week I picked up the Slick Sand for $25. Additionally, for two products that are identical, they have different instructions. Evercoat considers Slick Sand to be a high viscosity primer-surfacer(2K) that can be applied to bare metal and painted over directly. It's actually a low viscosity bondo. And since it's filler it will have excellent adhesion to bare metal. The Glasurit tech sheet calls for their spray filler to be applied over epoxy. That's the route I took. I sort of had to, because I used some acid based rust converter on the roof and polyester does not agree with acids. Normally I'm not a fan of mixing and matching, but Evercoat is a reputable company, and since Slick Sand is more of a filler (which evercoat specializes in) I have no reservations about using it. The gun is a SATA with 2.5 mm tip. I bought it because the Glasurit spray filler calls for a tip that large. In retrospect the gun was a waste of money, but it's very nice.
I should probably explain the purpose of Slick Sand/spray filler/etc. Normally in the painting process after the body work is finished and priming begins, you use a product called primer-surfacer(2K is what it's commonly called.) IMO 2K is ****. The only good thing it does is sand easily. It offers little corrosion protection, and it has poor adhesion abilities. It's a weak link in the chain. It's weaknesses are amplified by the fact that most painters and body men are notoriously stupid and lazy and many learned their trade in the penal system. They tend to apply the stuff over bare metal, and paint right over it. The purpose of surfacer is to get the finishing touches on the bodywork. It's used to get panels straight and perfect for painting.
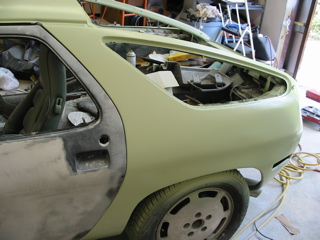
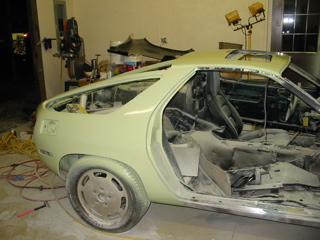
Body filler has gotten a bad rep over the years due to improper use. Plastic filler is actually very strong and will out perform lead if used properly. It has excellent adhesion to bare metals including aluminum. It also works well over epoxy. The one weakness body filler really has is in it's application, it makes it very hard to apply it smooth and straight which makes it necessary to use a 2K surfacer to get the finishing touches. Slick Sand is body filler that's thinned down and can be sprayed through a gun. This makes it possible to get an incredibly smooth application which will make it easier to sand down to the proper shape. It's applied after the filler and in my case, after the epoxy. It is better then traditional urethane 2K in so many ways. It builds much higher. It's a lot cheaper. No isocyanates. It's MUCH stroner and has vastly improved adhesion. It's a little tougher to sand then 2K but that's a reasonable trade off. The next 2 pics show the car with the slick sand applied and the car also has a guide coat sprayed on. Guide coat basically highlights high and low spots and makes sanding a breeze. All you do is get your sanding board (in my case the air file) and sand away until all of the guide coat is gone. You can use almost anything with a contrasting color as a guide coat. I prefer to use SEM Guide Coat since it's made specifically for this purpose. It takes only a few seconds to dry once sprayed and it's not very heavy.
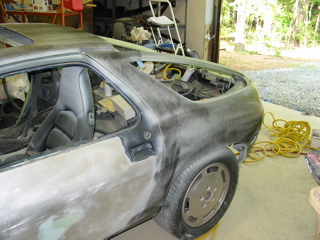
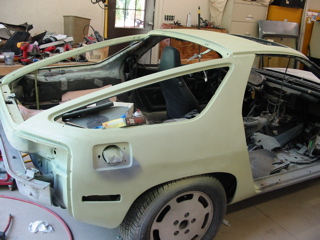
In the next 2 pics you'll see the final product after sanding. Notice that in some areas you can see the epoxy primer, and in others you can see body filler and even bare metal. At this point the body is about 95% straight. But this is about how the car should look after using surfacer. Any place where metal has broken through in the middle of the panel is a high spot and needs to be dealt with by a couple of moderate whacks of the shrinking hammer.
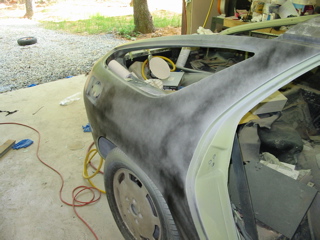
In the final pic, it looks like it did early in the day when I first started. Glasurit epoxy contains an incredibly high amount of solids. So much that it can be used as a primer surfacer. Urethane surfacer sucks. But this is epoxy which although it's very difficult to sand, Glasurit did make it to be used as a surfacer if you don't reduce it. Now many of you are wondering why I'm doing a surfacer a second time, it's because I'm not a pro, and as I said, the body was only 95% straight. Blocking out the epoxy should bring the body to a point where it's ready for another coat of reduced epoxy to seal everything and then it will be ready for paint. After I seal it, I get to start over on the fenders, hood and doors.
The next pic shows evercoat's Slick Sand, and next to it is Glasurit's Polyester Spray Filler. A couple of things worth mentioning here, and some lessons learned the hard way. Both products are the same. They look the same, smell the same, use the same catalyst, etc. They serve the same purpose. When I started to acquire painting materials a few months ago, no one knew what sprayable filler was. Even the local DuPont jobber was clueless. I didn't know until recently that Slick Sand was spray filler. So I bought the stuff from Glasurit first for about $65. They even charge extra for the small tube of catalyst. Last week I picked up the Slick Sand for $25. Additionally, for two products that are identical, they have different instructions. Evercoat considers Slick Sand to be a high viscosity primer-surfacer(2K) that can be applied to bare metal and painted over directly. It's actually a low viscosity bondo. And since it's filler it will have excellent adhesion to bare metal. The Glasurit tech sheet calls for their spray filler to be applied over epoxy. That's the route I took. I sort of had to, because I used some acid based rust converter on the roof and polyester does not agree with acids. Normally I'm not a fan of mixing and matching, but Evercoat is a reputable company, and since Slick Sand is more of a filler (which evercoat specializes in) I have no reservations about using it. The gun is a SATA with 2.5 mm tip. I bought it because the Glasurit spray filler calls for a tip that large. In retrospect the gun was a waste of money, but it's very nice.
I should probably explain the purpose of Slick Sand/spray filler/etc. Normally in the painting process after the body work is finished and priming begins, you use a product called primer-surfacer(2K is what it's commonly called.) IMO 2K is ****. The only good thing it does is sand easily. It offers little corrosion protection, and it has poor adhesion abilities. It's a weak link in the chain. It's weaknesses are amplified by the fact that most painters and body men are notoriously stupid and lazy and many learned their trade in the penal system. They tend to apply the stuff over bare metal, and paint right over it. The purpose of surfacer is to get the finishing touches on the bodywork. It's used to get panels straight and perfect for painting.
Body filler has gotten a bad rep over the years due to improper use. Plastic filler is actually very strong and will out perform lead if used properly. It has excellent adhesion to bare metals including aluminum. It also works well over epoxy. The one weakness body filler really has is in it's application, it makes it very hard to apply it smooth and straight which makes it necessary to use a 2K surfacer to get the finishing touches. Slick Sand is body filler that's thinned down and can be sprayed through a gun. This makes it possible to get an incredibly smooth application which will make it easier to sand down to the proper shape. It's applied after the filler and in my case, after the epoxy. It is better then traditional urethane 2K in so many ways. It builds much higher. It's a lot cheaper. No isocyanates. It's MUCH stroner and has vastly improved adhesion. It's a little tougher to sand then 2K but that's a reasonable trade off. The next 2 pics show the car with the slick sand applied and the car also has a guide coat sprayed on. Guide coat basically highlights high and low spots and makes sanding a breeze. All you do is get your sanding board (in my case the air file) and sand away until all of the guide coat is gone. You can use almost anything with a contrasting color as a guide coat. I prefer to use SEM Guide Coat since it's made specifically for this purpose. It takes only a few seconds to dry once sprayed and it's not very heavy.
In the next 2 pics you'll see the final product after sanding. Notice that in some areas you can see the epoxy primer, and in others you can see body filler and even bare metal. At this point the body is about 95% straight. But this is about how the car should look after using surfacer. Any place where metal has broken through in the middle of the panel is a high spot and needs to be dealt with by a couple of moderate whacks of the shrinking hammer.
In the final pic, it looks like it did early in the day when I first started. Glasurit epoxy contains an incredibly high amount of solids. So much that it can be used as a primer surfacer. Urethane surfacer sucks. But this is epoxy which although it's very difficult to sand, Glasurit did make it to be used as a surfacer if you don't reduce it. Now many of you are wondering why I'm doing a surfacer a second time, it's because I'm not a pro, and as I said, the body was only 95% straight. Blocking out the epoxy should bring the body to a point where it's ready for another coat of reduced epoxy to seal everything and then it will be ready for paint. After I seal it, I get to start over on the fenders, hood and doors.
Last edited by JHowell37; 05-30-2007 at 04:54 AM.

 05-30-2007, 12:25 PM
#4

Originally Posted by SteveG
Impressive. Uhh, are you going to ditch the tires and wheels? 
Thats why he didn't mask them. So he has an excuse to buy new stuff.
 05-30-2007, 01:07 PM
#5
Three Wheelin'
Join Date: Aug 2003
Location: DFW
Posts: 1,641
Likes: 0
Received 0 Likes
on
0 Posts
J,
After reading your initial posts about the car thats "been to the fair", and then your subsequent posts revealing your in-depth knowledge of auto painting, I have been waiting for this thread. You have not disappointed me! Damn, man, but this is one heck of a restoration. Kepp up the good work!
- Josh
Nope. Maybe with better lighting.... 
I barely kept from spraying milk out of my nose onto my keyboard when I got to this part. Quote of the day!
After reading your initial posts about the car thats "been to the fair", and then your subsequent posts revealing your in-depth knowledge of auto painting, I have been waiting for this thread. You have not disappointed me! Damn, man, but this is one heck of a restoration. Kepp up the good work!
- Josh
Originally Posted by JHowell37
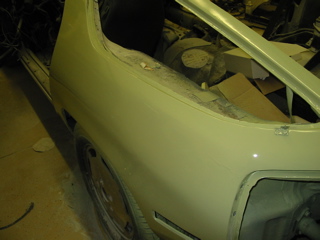
Here's another photo after I finished. Can you tell that I replaced this quarter panel and welded the rub strip holes closed?
Originally Posted by JHowell37
... the fact that most painters and body men are notoriously stupid and lazy and many learned their trade in the penal system.
...
...
05-30-2007, 01:22 PM
#6
Burning Brakes
Join Date: Mar 2003
Location: Mobile,Al
Posts: 1,085
Likes: 0
Received 0 Likes
on
0 Posts
Good thing you recoated with epoxy. Sprayable polyester should always be re-coated with primer surfacer as paint does not adhere well to polyester. As you said sprayable polyester is no fun to sand but is the only way to get a job truly straight. Btw, the new slicksand from Evercoat is much easier to sand than the old featherfill product. That stuff was like sprayable concrete. Also the chromated epoxy isn't necessary over polyester, urethane would be just fine. The chromates only react to bare metal. However if epoxy is what you have on hand its cheaper than buying urethane. I do prefer the sanding/fill characteristics of urethane over epoxies which provide far superior adhesion over metal. On a job like this one I typically let it sit a week or two after just braking the surface with sandpaper, then final sand and paint. Looks good though.
05-30-2007, 02:19 PM
#7
Drifting
Thread Starter
Originally Posted by Burma Shave
Good thing you recoated with epoxy. Sprayable polyester should always be re-coated with primer surfacer as paint does not adhere well to polyester. As you said sprayable polyester is no fun to sand but is the only way to get a job truly straight. Btw, the new slicksand from Evercoat is much easier to sand than the old featherfill product. That stuff was like sprayable concrete. Also the chromated epoxy isn't necessary over polyester, urethane would be just fine. The chromates only react to bare metal. However if epoxy is what you have on hand its cheaper than buying urethane. I do prefer the sanding/fill characteristics of urethane over epoxies which provide far superior adhesion over metal. On a job like this one I typically let it sit a week or two after just braking the surface with sandpaper, then final sand and paint. Looks good though.