

Defeating the Bulb Control Module
 02-19-2007, 12:09 AM
#31
Inventor
Rennlist Member
Rennlist Member
Originally Posted by justin
Whats the best way to defeat the bulb module on an 80 MY? I installed LED brake light bulbs and I am staring at a " stop light " warning in my dash.
Or make a plug like I did, above.
 03-07-2007, 12:42 PM
#32
Addict
Rennlist Member
Rennlist Member
Last night, at long last, I finally finished up my LED mods. I'll probably do some kind of write-up pretty soon, to add to the already good write-ups that others (like borland) have done recently. Just one more data point to add to the experience knowledge base.
But... one timely thing that I'd like to add now is that the last thing I did last night was to defeat the bulb control module (mine is a 928.641.603.07 on a '90 S4) using a very easy, non-destructive, perfectly reversible technique. You can probably do this in 30 minutes or so. All you need before you begin is:
I'll provide some explanation along with photos.
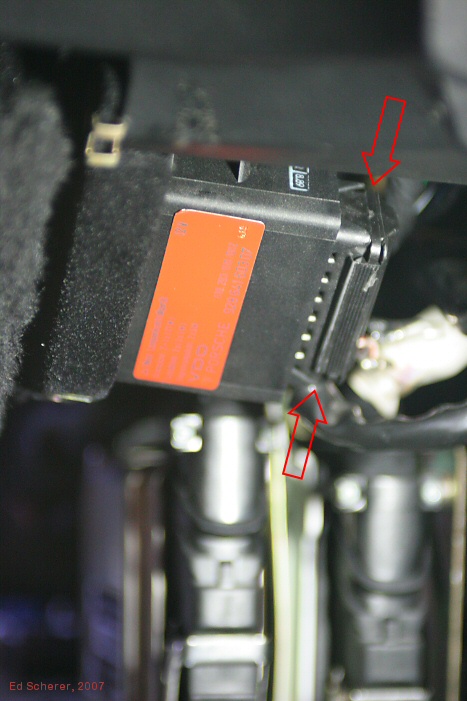
First, here's the lamp control module, after the carpeted piece of trim held on by three Phillips screws has been removed (this is under the dash between the central electric panel and the right-side door, above the LH and EZK modules). You'll want to yank that connector off; it'll probably require a little effort, as it's on there pretty tightly. There are no interlocks; it's just tight. BTW, you don't need to remove the bulb control unit, you just need to unplug the cable.
Once you have the cable unplugged, use some flat, wide-bladed tool like a putty knife or wood chisel (I used a 3/4-inch wide wood chisel) and pry open the connector along the long edge that isn't hinged; it'll open up, revealing the pins soldered to the wires as shown in the next photo. Be careful when you open this up, because some of the wires and pins might immediately pull out. Cover them with your thumb or something so they don't pop out!
Use your needle-nose pliers to pull out pin 10 (RE/WT wire) to prevent the parking/marker light failure signal from reaching the pod and pull out pin 7 (BK wire) to prevent the brake light failure signal from reaching the pod. Pull them well back and snap the connector shut again, being careful that all the pins are pushed in again (visually confirm this by looking into the pin holes once the connector is closed again; I had two pins that didn't seat properly the first time I did this, and I had to open it up again and fix that).

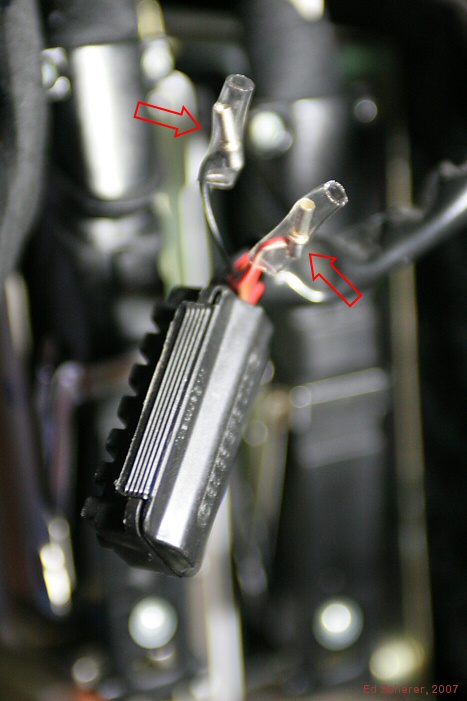
I then used some clear heat-shrinkable tubing to insulate the pins that I removed from the connector, as shown here.
Reattach the connector to the bulb control module. Test that the bulb control module is working to your satisfaction. Then refasten the carpeted trim piece. You're done. Sleep easily, knowing that you can easily reverse this sometime in the future if you need to.
But... one timely thing that I'd like to add now is that the last thing I did last night was to defeat the bulb control module (mine is a 928.641.603.07 on a '90 S4) using a very easy, non-destructive, perfectly reversible technique. You can probably do this in 30 minutes or so. All you need before you begin is:
- a Phillips screwdriver to remove the three screws holding the carpeted trim piece that, when removed, gives you access to the bulb control module;
- a wide wood chisel or putty knife that you can use to pry open the connector to the bulb control module;
- needle-nose pliers, to make it very easy to pull out a couple of pins from the connector;
- some heat-shrinkable tubing about the size of a drinking straw, to cover the pins after you've removed them
I'll provide some explanation along with photos.
First, here's the lamp control module, after the carpeted piece of trim held on by three Phillips screws has been removed (this is under the dash between the central electric panel and the right-side door, above the LH and EZK modules). You'll want to yank that connector off; it'll probably require a little effort, as it's on there pretty tightly. There are no interlocks; it's just tight. BTW, you don't need to remove the bulb control unit, you just need to unplug the cable.
Once you have the cable unplugged, use some flat, wide-bladed tool like a putty knife or wood chisel (I used a 3/4-inch wide wood chisel) and pry open the connector along the long edge that isn't hinged; it'll open up, revealing the pins soldered to the wires as shown in the next photo. Be careful when you open this up, because some of the wires and pins might immediately pull out. Cover them with your thumb or something so they don't pop out!
Use your needle-nose pliers to pull out pin 10 (RE/WT wire) to prevent the parking/marker light failure signal from reaching the pod and pull out pin 7 (BK wire) to prevent the brake light failure signal from reaching the pod. Pull them well back and snap the connector shut again, being careful that all the pins are pushed in again (visually confirm this by looking into the pin holes once the connector is closed again; I had two pins that didn't seat properly the first time I did this, and I had to open it up again and fix that).
I then used some clear heat-shrinkable tubing to insulate the pins that I removed from the connector, as shown here.
Reattach the connector to the bulb control module. Test that the bulb control module is working to your satisfaction. Then refasten the carpeted trim piece. You're done.
Sleep easily, knowing that you can easily reverse this sometime in the future if you need to.
Last edited by Ed Scherer; 10-17-2011 at 10:54 PM.
03-07-2007, 01:37 PM
#33

Ed, I think we would all appreciate a thread on your LED lights (part numbers, etc) and installation when you are ready.
Thanks
Thanks
04-01-2008, 11:32 AM
#34
Addict
Rennlist Member
Rennlist Member
Stop reading here! See more updated information in a later post on the same subject.
As of today (after having recently replaced some 3 W LEDs with 5 W LEDs a few weeks ago), I'm using:
- superbrightleds.com 1156-RLX5 for left and right rear turn signal (you'd need 1156-ALX5 if you have amber turn signals; I've painted mine red)
- superbrightleds.com 1157-RLX5 for left and right rear brake/park
- superbrightleds.com 1156-RLX3 for center brake (I'd recommend an 1157-RLX5, instead, though; they just weren't available when I first put this in and I haven't gotten around to upgrading this yet)
- superbrightleds.com 15-LED 67-R15 for left and right rear park
- superbrightleds.com 15-LED 67-R15 for rear side markers
- superbrightleds.com 15-LED 67-A15 for front side markers
- autolumination.com "1157 dual-circuit Tower II 20 LED" amber for front left and right turn signal / park (I'd still like to get these brighter)
- not quite bright enough when brake light on
- too bright with just parking lights on (in fact, while I was running these, I actually put tape over the parking light contact, because it was too difficult to distinguish between the parking light state and the full brake light state)
- superbrightleds.com
- Autolumination (a.k.a. Superlumination)
Last edited by Ed Scherer; 04-19-2012 at 08:20 PM.
04-01-2008, 01:20 PM
#35
Owns the Streets
Needs Camber
Lifetime Rennlist
Member
Needs Camber
Lifetime Rennlist
Member
Thankyou so very much Mr. Scherer for the bulb brain lobotomy write-up.
Did it late last year and it was not hard to mod at all.
I did try the 3W LED bulbs for the rear brakes and did find that the running light and brake light mode was too close to be truly effective. (Actually another 928'er following me at Frenzy complained that my brake lights weren't working right)
So I've now got the Eagle Eye 5 from Superlumination 1157 bulbs in red for the 2 brake/park lights.
Think they are working alright since it runs 4 SMT LED's for running light mode and fires up that mongo 5W luxeon bulb for brake light duty. Will see if the 928'er thinks it's better when I get to see him later this year.
04-01-2008, 02:17 PM
#36
Addict
Rennlist Member
Rennlist Member
Thankyou so very much Mr. Scherer for the bulb brain lobotomy write-up.
Did it late last year and it was not hard to mod at all.
I did try the 3W LED bulbs for the rear brakes and did find that the running light and brake light mode was too close to be truly effective. (Actually another 928'er following me at Frenzy complained that my brake lights weren't working right)
So I've now got the Eagle Eye 5 from Superlumination 1157 bulbs in red for the 2 brake/park lights.
Think they are working alright since it runs 4 SMT LED's for running light mode and fires up that mongo 5W luxeon bulb for brake light duty. Will see if the 928'er thinks it's better when I get to see him later this year.
Did it late last year and it was not hard to mod at all.
I did try the 3W LED bulbs for the rear brakes and did find that the running light and brake light mode was too close to be truly effective. (Actually another 928'er following me at Frenzy complained that my brake lights weren't working right)
So I've now got the Eagle Eye 5 from Superlumination 1157 bulbs in red for the 2 brake/park lights.
Think they are working alright since it runs 4 SMT LED's for running light mode and fires up that mongo 5W luxeon bulb for brake light duty. Will see if the 928'er thinks it's better when I get to see him later this year.
04-01-2008, 02:50 PM
#37
Rennlist Member
...Suppliers are:
- superbrightleds.com
- Autolumination (a.k.a. Superlumination)
I have to disagree with you about Autolumination. I received extremely poor service, and borderline unethical conduct. Filed a claim with the BBB, with no resolution. No response to claim.
AutoIllumination.com (aka CTIllumination) Caveat Emptor
04-01-2008, 02:56 PM
#38
Addict
Rennlist Member
Rennlist Member
Ed,
I have to disagree with you about Autolumination. I received extremely poor service, and borderline unethical conduct. Filed a claim with the BBB, with no resolution. No response to claim.
AutoIllumination.com (aka CTIllumination) Caveat Emptor
I have to disagree with you about Autolumination. I received extremely poor service, and borderline unethical conduct. Filed a claim with the BBB, with no resolution. No response to claim.
AutoIllumination.com (aka CTIllumination) Caveat Emptor
Yeah... I had problems with them (Autolumination), too, although it was pretty minor (see post #36).
06-06-2009, 08:00 PM
#40
Drifting
Thread Starter

heinrich,
I was just working on my LED upgrades again. My lights work great, but the cruise control doen't function with LED brake lights in all the sockets, I've come up with a fix.


Here's the link to the cruise control amplifier mod..
https://rennlist.com/forums/928-foru...ke-lights.html
You need at least one incandescent bulb (like the third brake light) or a load resistor installed in the brake light circuits for the cruise control amplifier to work properly. That's cause the amplifier sources a ground through the brake light bulbs.
-----------------------------------------
On your request heinrich..... Making a jumper seems unnecessary work, when you can just cut two traces on the module like I did. But here's my go on how to do what your looking for. Since the wiring of the plug is only needed at each end..... If a plug with that many pins doesn't exist, you could alternatively find one with fewer pins and cut it in half to make two plugs with the appropriate wiring for each.
I have not built this jumper, so someone may want to check my work..

I was just working on my LED upgrades again. My lights work great, but the cruise control doen't function with LED brake lights in all the sockets, I've come up with a fix.
Here's the link to the cruise control amplifier mod..
https://rennlist.com/forums/928-foru...ke-lights.html
You need at least one incandescent bulb (like the third brake light) or a load resistor installed in the brake light circuits for the cruise control amplifier to work properly. That's cause the amplifier sources a ground through the brake light bulbs.
-----------------------------------------
On your request heinrich..... Making a jumper seems unnecessary work, when you can just cut two traces on the module like I did. But here's my go on how to do what your looking for. Since the wiring of the plug is only needed at each end..... If a plug with that many pins doesn't exist, you could alternatively find one with fewer pins and cut it in half to make two plugs with the appropriate wiring for each.
I have not built this jumper, so someone may want to check my work..
Last edited by borland; 06-20-2009 at 11:05 PM.
 09-30-2011, 02:05 PM
#42
Rennlist Member
Great write up Borland. Before I start pulling pins 7 & 10, (post #32), are these pin #'s the same for a 94 GTS ? Also, WYIT, what pin # to defeat the "Brake Pad Service" from reaching the pod ? TIA. 77Tony
Last edited by 77tony; 09-30-2011 at 03:25 PM.
09-30-2011, 06:09 PM
#43
Addict
Rennlist Member
Rennlist Member
Wires are color-coded BR/BK and BR/RE.
You should be able to short terminals #15 and #16 on connector T23 (a 21-pin connector located at "footwell at left side panel") to defeat the brake pad warning.
But... I think most people just short out each pad wear sensor or bridge the terminals at each of the four wear sensor connectors.
I've never defeated the brake pad wear sensors myself and the above is just based on a quick look at the '94 wiring diagrams, so it'd be good if someone else would confirm that what I've said is correct.
Last edited by Ed Scherer; 10-22-2012 at 05:18 PM.
09-30-2011, 07:43 PM
#44
Rennlist Member
BTW, if anyone has or comes across a plug like Ken used (on the first page of this thread, for the earlier cars), please PM me. I have been looking for some time...
10-01-2011, 07:55 PM
#45
Rennlist Member
Just performed "The easy way to defeat the bulb control module on an S4 (and later)?" This worked great on the 94 GTS in case anyone needs to do this on a later model year. Next on the list is to defeat the "Brake Pad Service" on the T23 connector at the footwell. Special Thanks to Ed & Barry. 77Tony