When you click on links to various merchants on this site and make a purchase, this can result in this site earning a commission. Affiliate programs and affiliations include, but are not limited to, the eBay Partner Network.
[QUOTE=Tony;11827190]448 rwhp...442 rwTQ...and after looking at a dyno video that was in 2007. I have since upgrade to 42lb injectors, Sharktuned it and improved the airflow into the MAF. I really should go get it done again...but im sure im north of 450 now??
The prototype intercooler arrived last night. It may be difficult to tell from the these pictures out of context, but the upper air guide/shroud and the bottom of the end-tanks are designed to promote flow and equal filling of the intake ports (yes, I know the system is under pressure, and that these are not necessary features). Placement of the core is now centered in the manifold, and there is enough of an air gap inside to hopefully allow for the most direct and symmetrical air path possible.
You can also see the custom bulkhead fittings with the sealing nuts installed. The intercooler fittings will exit the lower manifold through holes machined in the back. The nuts have a captive o-ring, and will screw tight against the rear external face of the lower manifold with some thread sealant providing an air-tight but field serviceable assembly. The intercooler can be removed for maintenance, or a basic kit upgraded to intercooled int the future.
The fittings are a standard -16AN for flow to exceed what is necessary for a 500hp constant duty. I will try two pumps and adjust as necessary, both brush-less and rated for coolant and automotive environment with extended service life. One has 3/4" hose fittings and the other 1".
Getting ever closer. Hopefully the new rails will be here next week.
The prototype intercooler arrived last night. It may be difficult to tell from the these pictures out of context, but the upper air guide/shroud and the bottom of the end-tanks are designed to promote flow and equal filling of the intake ports (yes, I know the system is under pressure, and that these are not necessary features).
<snip>
Hans
Beautiful work Hans. Yes, the same properties apply to air (fluid) flow whether at atmosphere pressure or some higher pressure. It'll take less power to run X mass of air through the system when fluid flow is optimised than if not optimised.
Any ballpark on cost.
I will be ready for something in the spring...
LOVE the twin screw setup as it is the cleanest install..don't like the look of the murf style setups
It looks like it's about time to finish this Supermodel project. Circumstances have resulted in this thing sitting for about 5 years in this state of work. It starts and drives but that's about it.
I will be working with Colin Jensan of Jensanracing.com, in Abbotsford, BC. Colin has been tuning these things with the SharkTuner for a while now, and is the Canadian distrubutor of all things JDS, up here.
Colin wants me to make a few modifications to the Andy Keel kit that I have installed on the car, the first of which is a change of injectors. He wants me to transition to the Siemens Deka4 60# injectors. This will require the fabrication of an adaptor for the smaller-diameter injector body, and the injector will now have to seal on the lower o-ring, rather than on the larger injector body. This will actually be a pretty simple CNC lathe project, so while I have the TL-1 turned on, I might just as easily turn a few sets of these things if anybody out there is interested in this modification. They will be turned from 6061 aluminum. I am thinking that they will be located by one or two 4mm bolts through the adapter flange, secured into threaded holes drilled into the Keel manifold.
Like this drawing, which was the original Pizza bushing concept for the OEM style injector, when he wanted it it seal on the bottom o-ring, as the DEKA4 injector must.
Price will depend on the number of sets, but I'm thinking about somewhere around $150.00- $200.00 US for the set of 8. I could get them anodized if we can all agree on the color. Black would probably work.
This will be a one-time operation, so if you think you might want them, speak up now. PM please.
The adapters will looks sort of like this picture, but be longer to provide the boss for the lower o-ring.
Price will depend on the number of sets, but I'm thinking about somewhere around $100.00 US for the set of 8. I could get them anodized if we can all agree on the color. Black would probably work.
This will be a one-time operation, so if you think you might want them, speak up now. PM please.
I bought a set of those adpaters ages ago..but..i think i have the 2nd? maybe 3rd manifold from Andy. These adapaters actually dont fit my manfifold...i was bummed.. Im still using the old rubber "grommets". One of these days when i need to remove the manifold for what ever reason i will machine the openings just a tad more so they fit..
I bought a set of those adpaters ages ago..but..i think i have the 2nd? maybe 3rd manifold from Andy. These adapaters actually dont fit my manfifold...i was bummed.. Im still using the old rubber "grommets". One of these days when i need to remove the manifold for what ever reason i will machine the openings just a tad more so they fit..
Tony, mine has the rubber grommets as well. You might be in luck!
Tony, mine has the rubber grommets as well. You might be in luck!
so they fit yours?? Mine dont fit...and i know that for sure. Perhaps the openings onthe manifold just needed shaving down a tad...i wasnt about to do it while it was all on the car though.
As i look...your manifold is different than mine. Is your water inlet on the top?
so they fit yours?? Mine dont fit...and i know that for sure. Perhaps the openings onthe manifold just needed shaving down a tad...i wasnt about to do it while it was all on the car though.
As i look...your manifold is different than mine. Is your water inlet on the top?
I have pulled a fuel rail, now and the size of the holes in my manifold is ~1.185", so I will turn the outside diameter of this adapter to 1.177 as spec'd in the original Pizza drawings. edited
Yes, one of the intercooler outlets is just in front of the air pump.
These are meant to replace the large rubber grommets in Andy's manifolds and will accept an OEM (Bosch) type injector or the DEKA 4 type that I will be using. [/B]
The price that I have received from eMachine is $200.00 per set of 8, priced at one set; ~$100 ea set, for 2 sets. It comes down with each additional set. Anyone interested?
I will provide the eMachine drawings and/or the MasterCam files to anyone that wants those, as well. No Charge
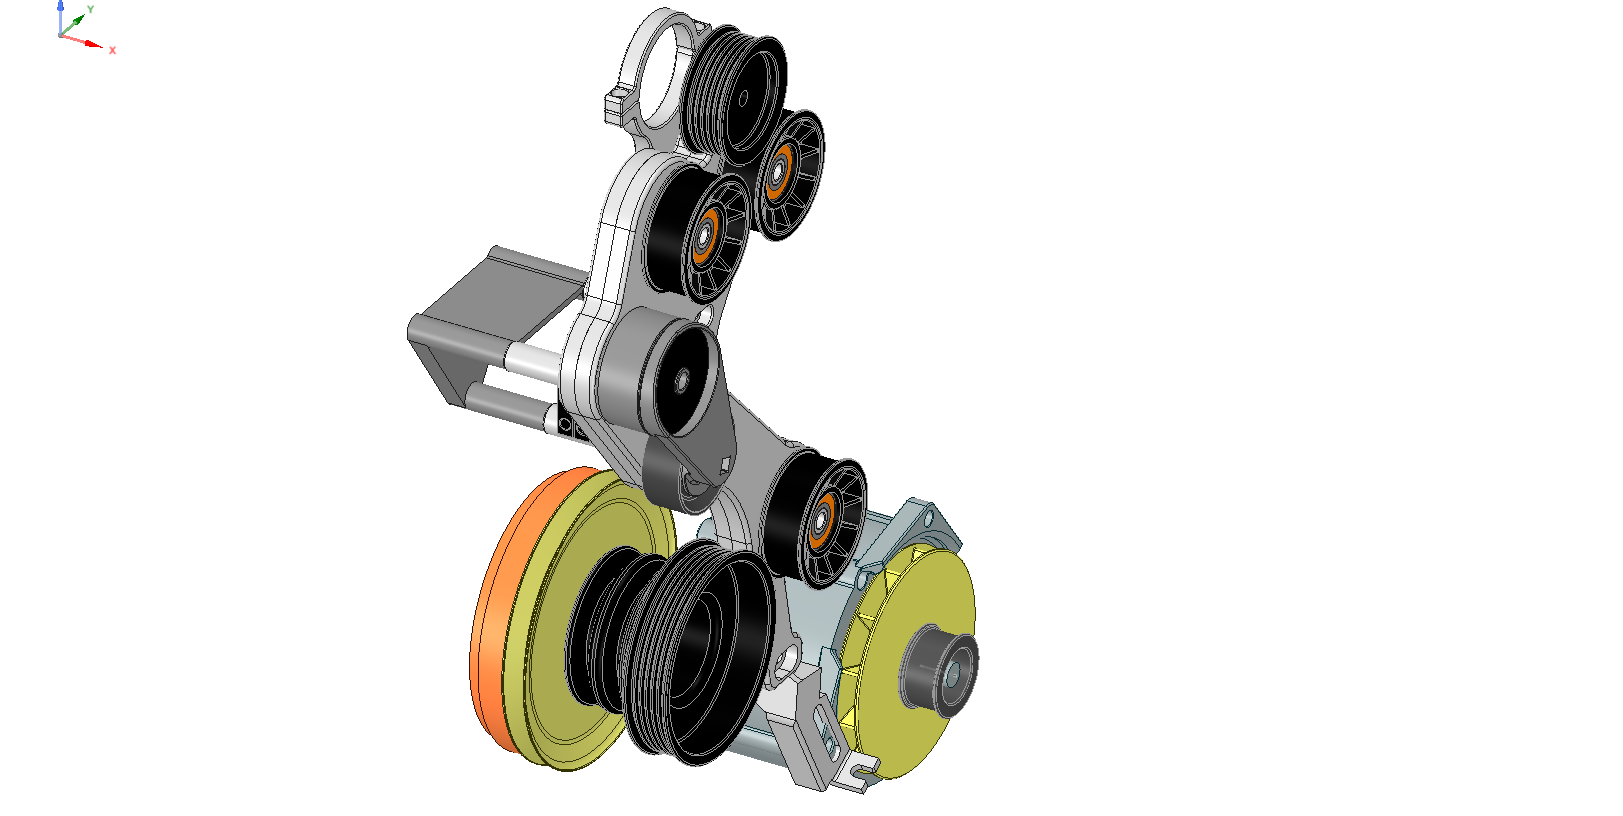
Went back and redesigned the tensioner system again over the weekend. I finally decided not to move the supercharger belt closer to the motor like I originally planned. I really wanted to make a dedicated supercharger belt system, but really didnt like holding it captive behind the alternator and power steering. Plus, it leaves the smog pump drive open for a vacuum pump if it becomes necessary.
Instead, I designed the bracket with a modular lower pulley in mid. I plan on making a billet crank pulley that can use the Metco supercharger drive rings. The 6.55" looks to be the perfect combination with an off-the-shelf 2.75" supercharger pulley and 2.5" alternator pulley.
It needs another evening of tweaking and re-thinking some of the hardware choices for reduced machining costs, but it should be ready to go to the shop before the end of the week.
Hans,
It's difficult for me to see exactly how the belt path will be. A couple things to consider is that if possible you should have a dedicated belt for the SC. Those air pumps take quite a bit of power especially when accelerating. The tensioner should be on the loose (non drive) side of the belt. Having the alternator on the tight side of the belt puts a large load on the alternator mounting brackets and the bearings. I'm not sure the stock crankshaft multi rib pulley is strong enough to absorb the load of the alternator and SC.
Find a similar SC installation and open the throttle quickly while watching the belt and tensioner.
Theon Goes Full Carbon Fiber With Stunning New Build
Slideshow: Built around a carbon-bodied 964 and a naturally aspirated 4.0-liter flat-six, this bespoke commission highlights how far the restomod formula has evolved.
Tuner Is Converting Porsche 911s Into Shooting Brakes
Slideshow: A Polish Porsche specialist is moving ahead with one of the most unusual 911 conversions in recent memory: a shooting brake version of the 991-generation sports car.
This Coachbuilt Creation Is A Modern Take on the Legendary Porsche 917
Slideshow: A Porsche Carrera GT has been transformed into a one-off coachbuilt machine that blends analog supercar engineering with styling inspired by the legendary 917 race cars.
Is This Convertible Cayenne A Steal, Or A Returnless Investment?
Slideshow: A heavily modified Porsche Cayenne convertible with faux wood trim and a long list of flaws recently sold at auction for surprisingly little money.
Porsche's Top 5 Most Questionable Naming Decisions
Slideshow: For a company obsessed with engineering precision, Porsche has occasionally named its cars in ways that left even loyal enthusiasts scratching their heads.
Pogea Racing's 964 Porsche 911 Reimagination Stands Out in a Crowded Field
Slideshow: Pogea Racing's latest Porsche 964 project blends carbon-fiber construction, modern chassis upgrades, and up to 500 horsepower while keeping the air-cooled 911 experience firmly analog.


