

Flip-up headlights - adjustment confusion...
 08-29-2004, 02:36 AM
#1
Cottage Industry Sponsor
Lifetime Rennlist
Member
Lifetime Rennlist
Member
Thread Starter

On my car the drivers side headlight is further "down" when the headlights are in retracted position, and as a result also does not come out far enough when the lights are on. Basically, the drivers side light blinds oncoming trraffic.
Sinde the whole assembly on the drivers side is not aligned with the one on the other side, this is not a matter of the simple aiming mechanism for the light, but must be an issue with the arms, brackets or stops involved in all this movement.
I have read Randy's writeup about positioning the lights in the fender opening, but that only lets me move the assembly sideways, or back and forth. I've also looked at the possibility of adjusting that upper stop on the drivers side, bu tthere are two nuts on the wall between engine and fender - and the upper one is hiden behind a brake line from the brake bias valve. There is no way I can get a wrench or something in there to losen it.
Before I start taking the fender liner out etc, here are a few questions:
1. Would adjusting the stops really help, or is there another adjustment that lets you fine tune the aligment of the two light assemblys with the bar in the center (the one that moves both lights)? I'm worried that adjusting the stops on one side might just give the whole thing "play" to vibrate or whatever.
2. Can the upper stop be adjusted from the fender side, if I can't losen the nut from the engine side?
3. Any other tips or comments on how to get this aligned right?
Thanks!
 08-29-2004, 03:41 AM
#2
Fleet of Foot
Rennlist Member
Rennlist Member
Hi Nicole... at the risk of sounding a litttle vague (can't get to my car at the moment) There is a 'ball and socket' joint in the headlight assembly that when, for whatever reason it is pulled apart, will cause the headlight to lay back as you describe. BTDT. Remove the cowling on the headlight and see if you can move the headlight back and forth about an inch or so. If this is the case, you have this problem. Look at the assembly as it moves and see if you can locate this joint I'm referring to and reconnect it... it's an easy fix and I hope that is the problem. Good luck!
08-29-2004, 06:24 AM
#3
Rennlist Member
Good call, Bill. Nicole, knowing your car, knowing it hasn't been knackered... I bet the little socket is the problem. Something must have bumped it. I went through this myself my first day with the shark... in fact, BOTH of my headlights had this issue. Good luck...
08-29-2004, 07:46 AM
#4
Cottage Industry Sponsor
Lifetime Rennlist
Member
Lifetime Rennlist
Member
Thread Starter
Thanks, guys! Can you see the part in the above diagram? I'm not sure what you are describing.
I did notice that when the headlights are retracted, I can pull the lights up manually - it has a little resistance at first, but then kind of "snaps" and is easy to move the rest of the way. That feels the same on both sides. Does this have to do with the ball joint you describe?
PS: Dave: In the first five years of its live, my car must have had some minor front damage. The sheetmetal all seems original, but I can tell that the hood and right front fender have been resprayed. It was done well enough that I did not catch this until long after I bought the car. Since there are no traces of major damage, I think it was no more than a fender bender (or bumper bender) type incident. But they might have taken the light assembly apart in the proocess...
08-29-2004, 09:11 AM
#5

Nicole/ Dear Turk -Wagner PowerPainter, indeed-,
I 'm not sure if there is a difference beteen the early( therefore better looking ) models or not.
But on the 81'/82' models there are 2 bolts, or allens with nuts that run vertically thru the main rotator bar #18. I think there were acorn nuts on the white 81'.
When the bolts/allens are loosened you can turn/wiggle the ends connected to the light/bucket and move the light/bucket both in and out and up and down(fore and aft). Front splash guard will have to come out for the next two.
While the stops are important I don't believe they are the cause of your problem.
The two bolt clamping piece you mentioned is indeed a pain but you can, with patience and another hand, do the loosening adjustment (up and down only -I think) I used a 1/4" drive rachet with a short wobblle extension and it took awhile.
Again I don't think your problem is with the thru the bulkhead clamping -sort of half moon- piece nor the stops. but with the end pieces -adjusted by two allens/bolts at either end -..
Keep in mind that you can adjust up/down and in and out. After loosening -don't remove them- raise the headlamps if they aren't up already and simply twist the bucket forward or backward ( not in and out)
A word of caution!
Look closely at the open space around the headlight bezel before you loosen anything.
As owners we seldom note the gap between the hole in the fender and the headlamp bucket -open or closed - . The gap is a lot bigger than you think or notice. but if you push/ pull -in/out- on the bucket end when the two allens are loose the gap will change and it's about as much fun to adjust your hood for fenderline alignment -by yourself-.
Speaking of hood/fender alignment gaps and headlamp bucket gaps... One of the biggest gaps on the early - possibly late - models is the external gap between the windshield and the A pillars, check it out,
our babies do have a flaw or two...
This problem is not technically difficult Nicole just eyeball things and figure out what they do...
The following users liked this post:
gazfish (12-27-2020)
08-29-2004, 09:40 AM
#6
Nordschleife Master
If the ball/socket thing is disconnected, the headlight will tip back/forth with light pressure.
The headlight can be lifted in the socket by adjusting the bushing where the main shaft goes through the body. The bolts should be accessibly from the inside of the hood. You'll likely need to re-adjust the aim unless it has slipped down and the aim is thus fixed.
The headlight can be lifted in the socket by adjusting the bushing where the main shaft goes through the body. The bolts should be accessibly from the inside of the hood. You'll likely need to re-adjust the aim unless it has slipped down and the aim is thus fixed.
08-29-2004, 12:04 PM
#7
Rennlist Member

I have a related question. When your lights are at the full upright position does the arm of the motor and the lever form a straight line? And should they? I can turn the manual headlight adjustment and get them straight.
I really don't like annoying folks in oncoming vehicles.
I really don't like annoying folks in oncoming vehicles.
Trending Topics
08-29-2004, 02:46 PM
#8
Inventor
Rennlist Member
Rennlist Member

 08-29-2004, 03:01 PM
#9
Rennlist Member
Originally Posted by Nicole
Thanks, guys! Can you see the part in the above diagram? I'm not sure what you are describing.
I did notice that when the headlights are retracted, I can pull the lights up manually - it has a little resistance at first, but then kind of "snaps" and is easy to move the rest of the way. That feels the same on both sides. Does this have to do with the ball joint you describe?
PS: Dave: In the first five years of its live, my car must have had some minor front damage. The sheetmetal all seems original, but I can tell that the hood and right front fender have been resprayed. It was done well enough that I did not catch this until long after I bought the car. Since there are no traces of major damage, I think it was no more than a fender bender (or bumper bender) type incident. But they might have taken the light assembly apart in the proocess...
I did notice that when the headlights are retracted, I can pull the lights up manually - it has a little resistance at first, but then kind of "snaps" and is easy to move the rest of the way. That feels the same on both sides. Does this have to do with the ball joint you describe?
PS: Dave: In the first five years of its live, my car must have had some minor front damage. The sheetmetal all seems original, but I can tell that the hood and right front fender have been resprayed. It was done well enough that I did not catch this until long after I bought the car. Since there are no traces of major damage, I think it was no more than a fender bender (or bumper bender) type incident. But they might have taken the light assembly apart in the proocess...
Anyway, has your headlight always had this misalignment you're talking about? Can you quantify it, or send a pic?
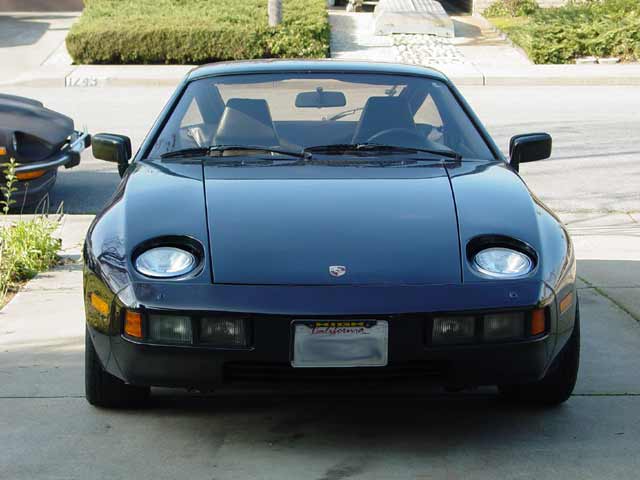
What Bill and I tried to direct you to is the highlighted part in the image below. You can inspect it by simply removing the three screws on your pod cover and removing it.

Also, here's a pic of my shark when I first got it, illustrating the issue with both lights.
 08-29-2004, 03:08 PM
#10
Rennlist Member
Originally Posted by 86_5Tiburon
I have a related question. When your lights are at the full upright position does the arm of the motor and the lever form a straight line? And should they? I can turn the manual headlight adjustment and get them straight.
I really don't like annoying folks in oncoming vehicles.
I really don't like annoying folks in oncoming vehicles.
08-29-2004, 03:19 PM
#11
Rennlist Member
Yep, that's what I figured. I went out loosened the nut at the motor and got it to be totally straight when the lights are on. Made a difference with the drivers side. The passengerside is still a few degrees short of the limiter. Can someone explaing the purpose of the 10mm bolts that go through the fender.
08-29-2004, 03:42 PM
#12
Rennlist Member
Originally Posted by 86_5Tiburon
Yep, that's what I figured. I went out loosened the nut at the motor and got it to be totally straight when the lights are on. Made a difference with the drivers side. The passengerside is still a few degrees short of the limiter. Can someone explaing the purpose of the 10mm bolts that go through the fender.
08-29-2004, 04:25 PM
#13
Rennlist Member
Thanks. You are right. That won't do the trick for me.
08-29-2004, 07:24 PM
#14
PorKen,
Rightious!
Nicole/86_5Tib,
It's always easier to just point and explain rather than this remote explanation stuff....
Oh well.
# 18 is the long actuator bar, it has an ear for the motor linkage to attach and rotate the headlamps up or down. The linkage has a pin at the end that goes thru the ear and is secured by the 'C'clip.
#30 is the heavy plastic guide -split in the middle- that 'captures' the short end of the rotator bar attaching ear. The plastic guide is held in place by two screws/bolts from the bottom of the pan.
This plastic guide also does double duty as an assistant rotator/light stop.
Though, looking at the motor/actuator linkage/plastic guide area won't automatically give you that intuitive fuzzy feeling that: " This is the de-facto pivot point for the whole she-bang. "
IT IS!
#14 & #3 are the clamping pieces that allow you to raise or lower the headlamp bucket in the headlamp well (hole). Keep in mind that it is a vertical adjustment only, maybe a little more than a 1/2" range. Since the plastic guide/linkage/motor area is a floating pivot point you can adjust either pass. or driver side headlight bucket independent of the other. Basically, its a heavy plastic bushing that lets you move either the driver or pass. side of the rotator bar up or down.
There are two 10mm nuts, facing up, just to the right of the linkage -facing rear of car- on the rotator bar. There are two more toward the Pass. side. These are clamping screws/bolts.
The rotating bar has a shorter bar imbedded in it that is attached to the headlamp bucket.
When you loosen those two nuts (don't remove them) with a little effort you can rotate the headlamp bucket fore and aft or in and out -preferably, the headlamp is in the up position for this.
Keep in mind the vertical adjustment, and the fore/aft, in/out adjustments can cause the bucket to wedge, scrape, and generally become horribly mis-aligned if you aren't careful.
Unlike my long term electrical woes this is 'Farmer John technology' -and I appreciate it!-
Enjoy
08-29-2004, 09:13 PM
#15
Hi Nicole. I just had my headlights completely out when I did the repaint on my 81'. If you pull the plastic shroud in the wheel well you can get a good look at what is happening with the light in the stowed position. Also if you pull the headlight bucket off of the light you have the whole works exposed. My first thought was the little spring and detent assembly, but if it has popped out the light will sit higher while stowed. I think it is # 9 & 10 in your illustration. There are not really a whole lot of adjustments to go out. I'm sure this will be an easy fix after the A/C bearing fix you just did! Good luck.