When you click on links to various merchants on this site and make a purchase, this can result in this site earning a commission. Affiliate programs and affiliations include, but are not limited to, the eBay Partner Network.
Thanks, Kevin H. for your thoughts and the pictures of the woven leather. The two projects shown are pretty far from what I have in mind. As to the contrast, if the pattern were to be woven in the same color of leather the pattern would become very subtle, much like it is in the Paul C. lazer embossed pattern on the same color of leather. However by me using two quite contrasting colors of leather the pattern is going to end up almost as stark as it is in the red and white rendering I did on paper.
Yesterday I picked up some more material to work up some of the final parts of the loom. I think I will finish that up this weekend unless the weather clears up enough to work on the reroofing of my rental next door.
The next thing I need to figure out and work up is some kind of jig to use to cut the leather into strips the correct widths for the weaving. I think I will check with my plastics guy to see what he has for some kind of cutting-board plastic that I can cut against with a utility or box cutter knife. Then I'll put a fence on one edge of it that I can place the edge of the leather up against and then clamp a bar onto the leather with the correct width of the strip to be cut exposed and simply cut it. Then I can do several that will be needed for the pattern. I'll cut rectangles of leather out of the hides that I have chosen for this and simply cut them into strips as needed.
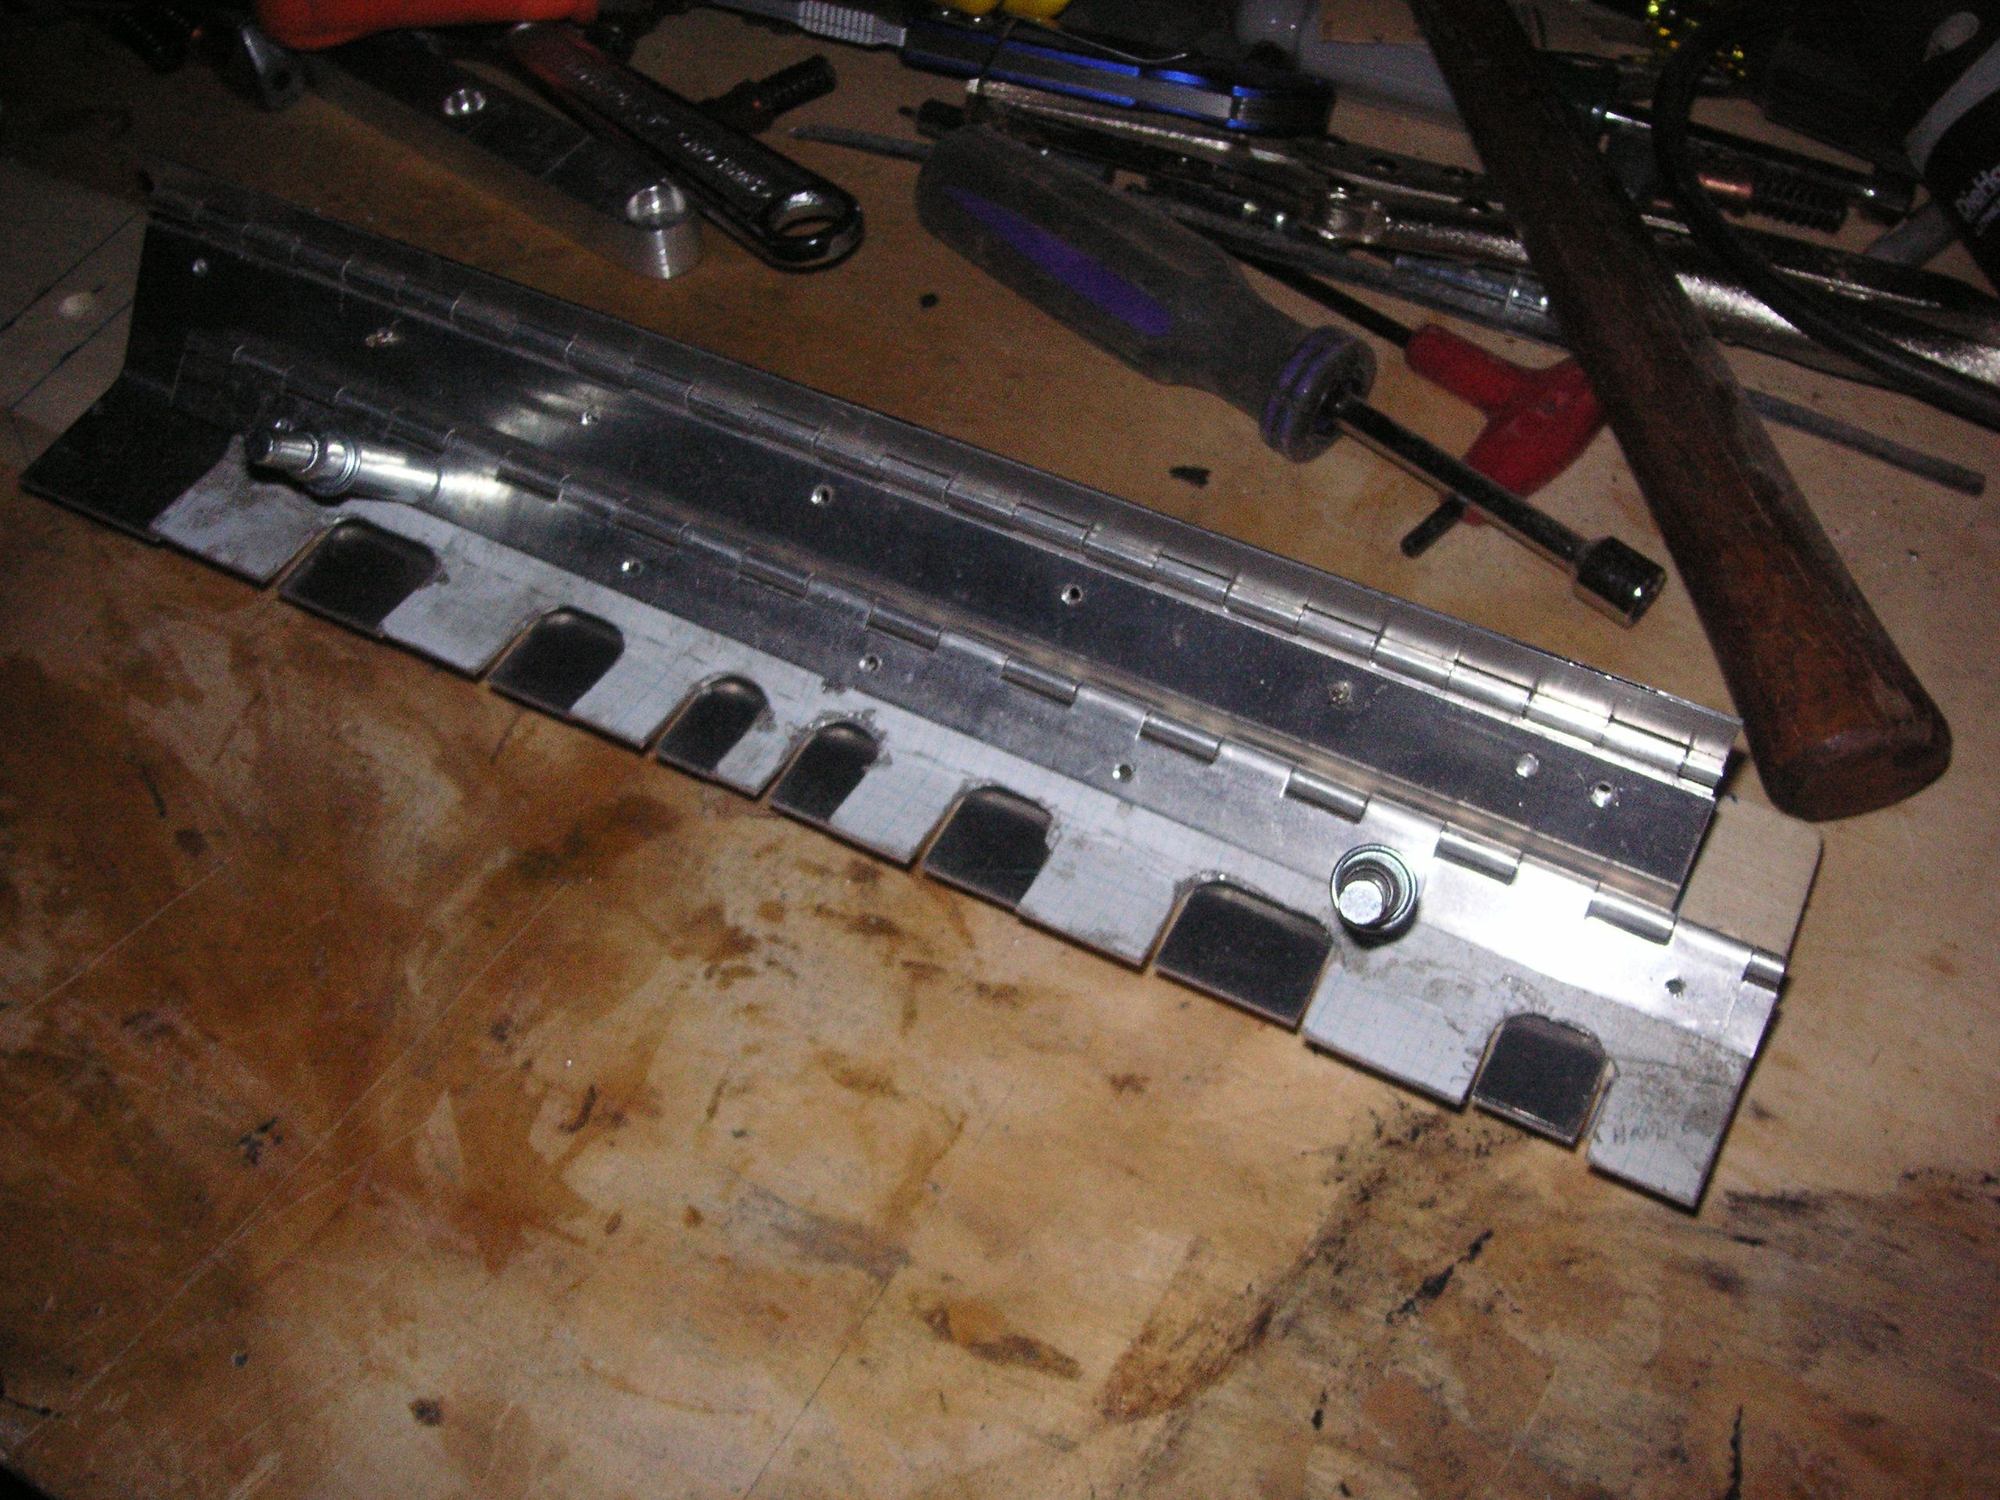
Then I have decided that I can use the tamping bar both to tamp the cross ways strips into place and to shuttle the strips across the weave by simply tapeing the end of a strip to the end of the bar and pushing it through. I plan to first tamp the seat for the cross ways leather strips and then put the leather in the "nest" then tamp it into place with the back side of the bar. The front side of the bar will be tapered down to a fairly narrow edge of about a sixteenth of an inch for tamping into the nest for each strip. The material for the bar I have obtained is aluminum flat bar in 1/4 inch by 1 1/2 inch.
I will be weaving the leather strips with the raw side facing outward so the finish of the pattern will be visible only from the back. That is because when the pattern is completed I plan to glue some kind of fabric backing onto it to keep it in place for the sewing and so forth so I'll need to back that process up with a heavy plywood board under it against the finish face of the pattern so with the contact cement sprayed onto the exposed back and onto the fabric I can roll the two together very firmly against the plywood underneath.
Last edited by Jerry Feather; 01-05-2023 at 06:06 PM.
Jerry ,I think we all know you are one of the most capable people to be in this place so let your better judgement be your guide. We all know you can do it. Ray
Jerry ,I think we all know you are one of the most capable people to be in this place so let your better judgement be your guide. We all know you can do it. Ray
Thanks, Ray, for that vote of confidence. I wish that I will be able to come close to living up to it to some degree in this project. I predict that one shortcoming that is going to show up, or maybe already has, is in my Pasha design. It does not seem to have the kind of visual life that the original pattern seems to have that inspires everyone. I'm not quite sure just what makes the difference, but I don't think it has to do with the corrections that I perceived and have made, either here or in my earlier design endeavors with Pasha. I'm going ahead with this current design and will see how it works out, at least in respect to the weaving. If that works I may put some more effort into the design with what I continue to think of as corrections, but with a little more of what I think the original pattern may have over mine.
Last edited by Jerry Feather; 01-12-2023 at 10:14 AM.
Thanks for this suggestion and for the Amazon Link about them. I actually ordered a couple of them and two or three other realted items that will be useful in this project. I'm hoping that I might be able to cut two, three or even four strips of leather at a time with the circular cutter. That will save a lot of time; and I think the cuts might be a bit nicer for these raw edges rather than knife or scissor cuts.
Last edited by Jerry Feather; 01-09-2023 at 10:46 AM.
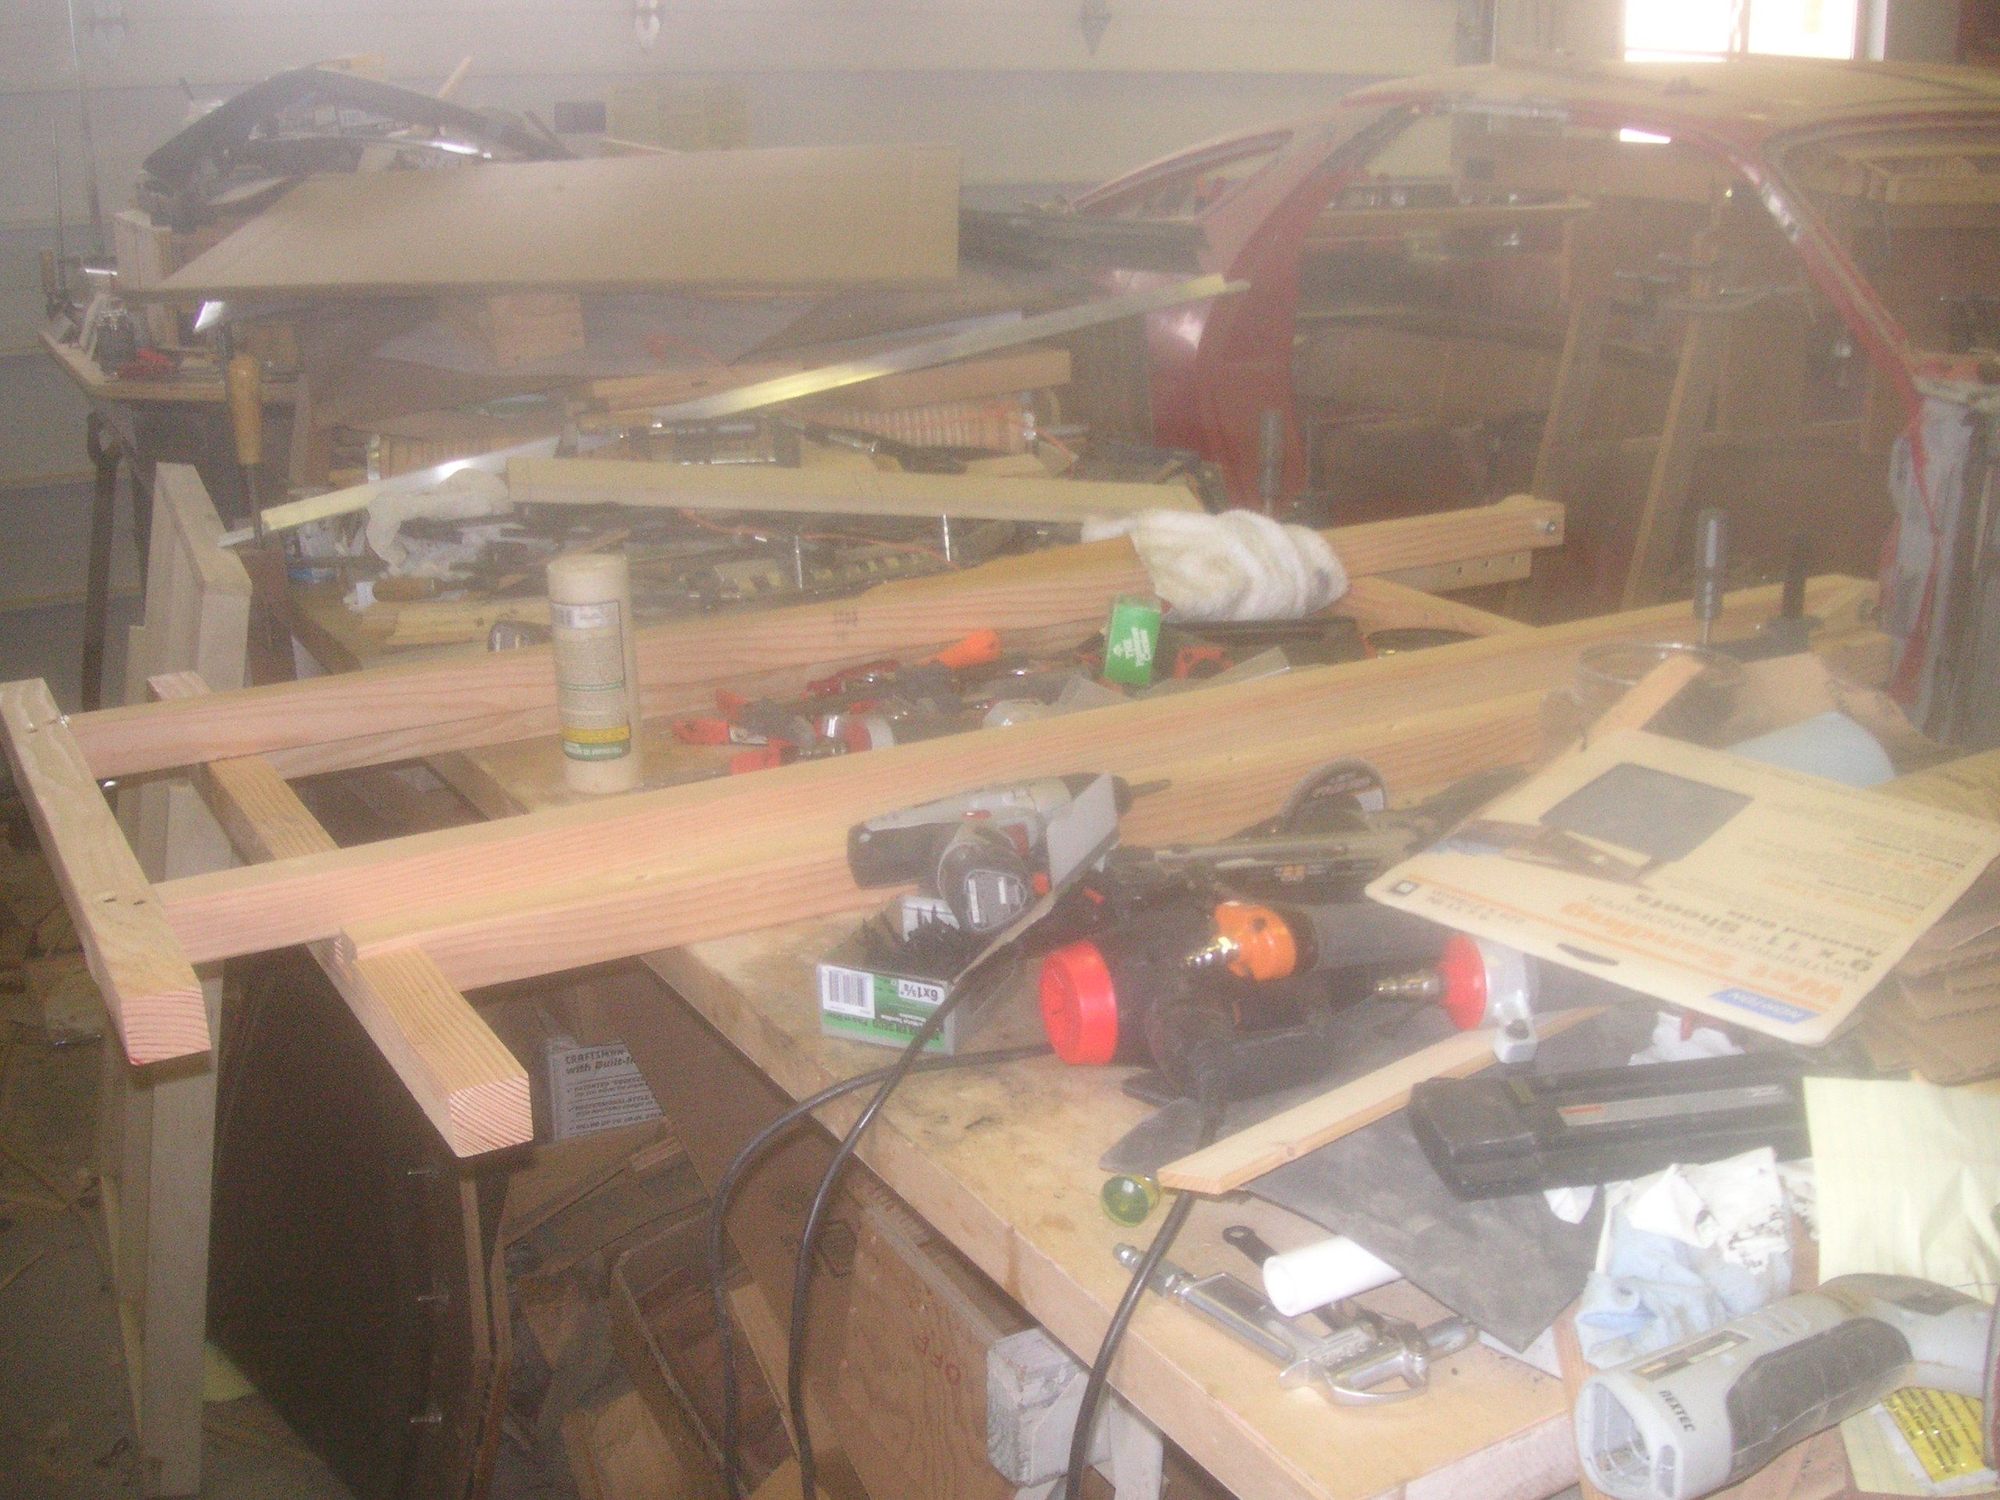
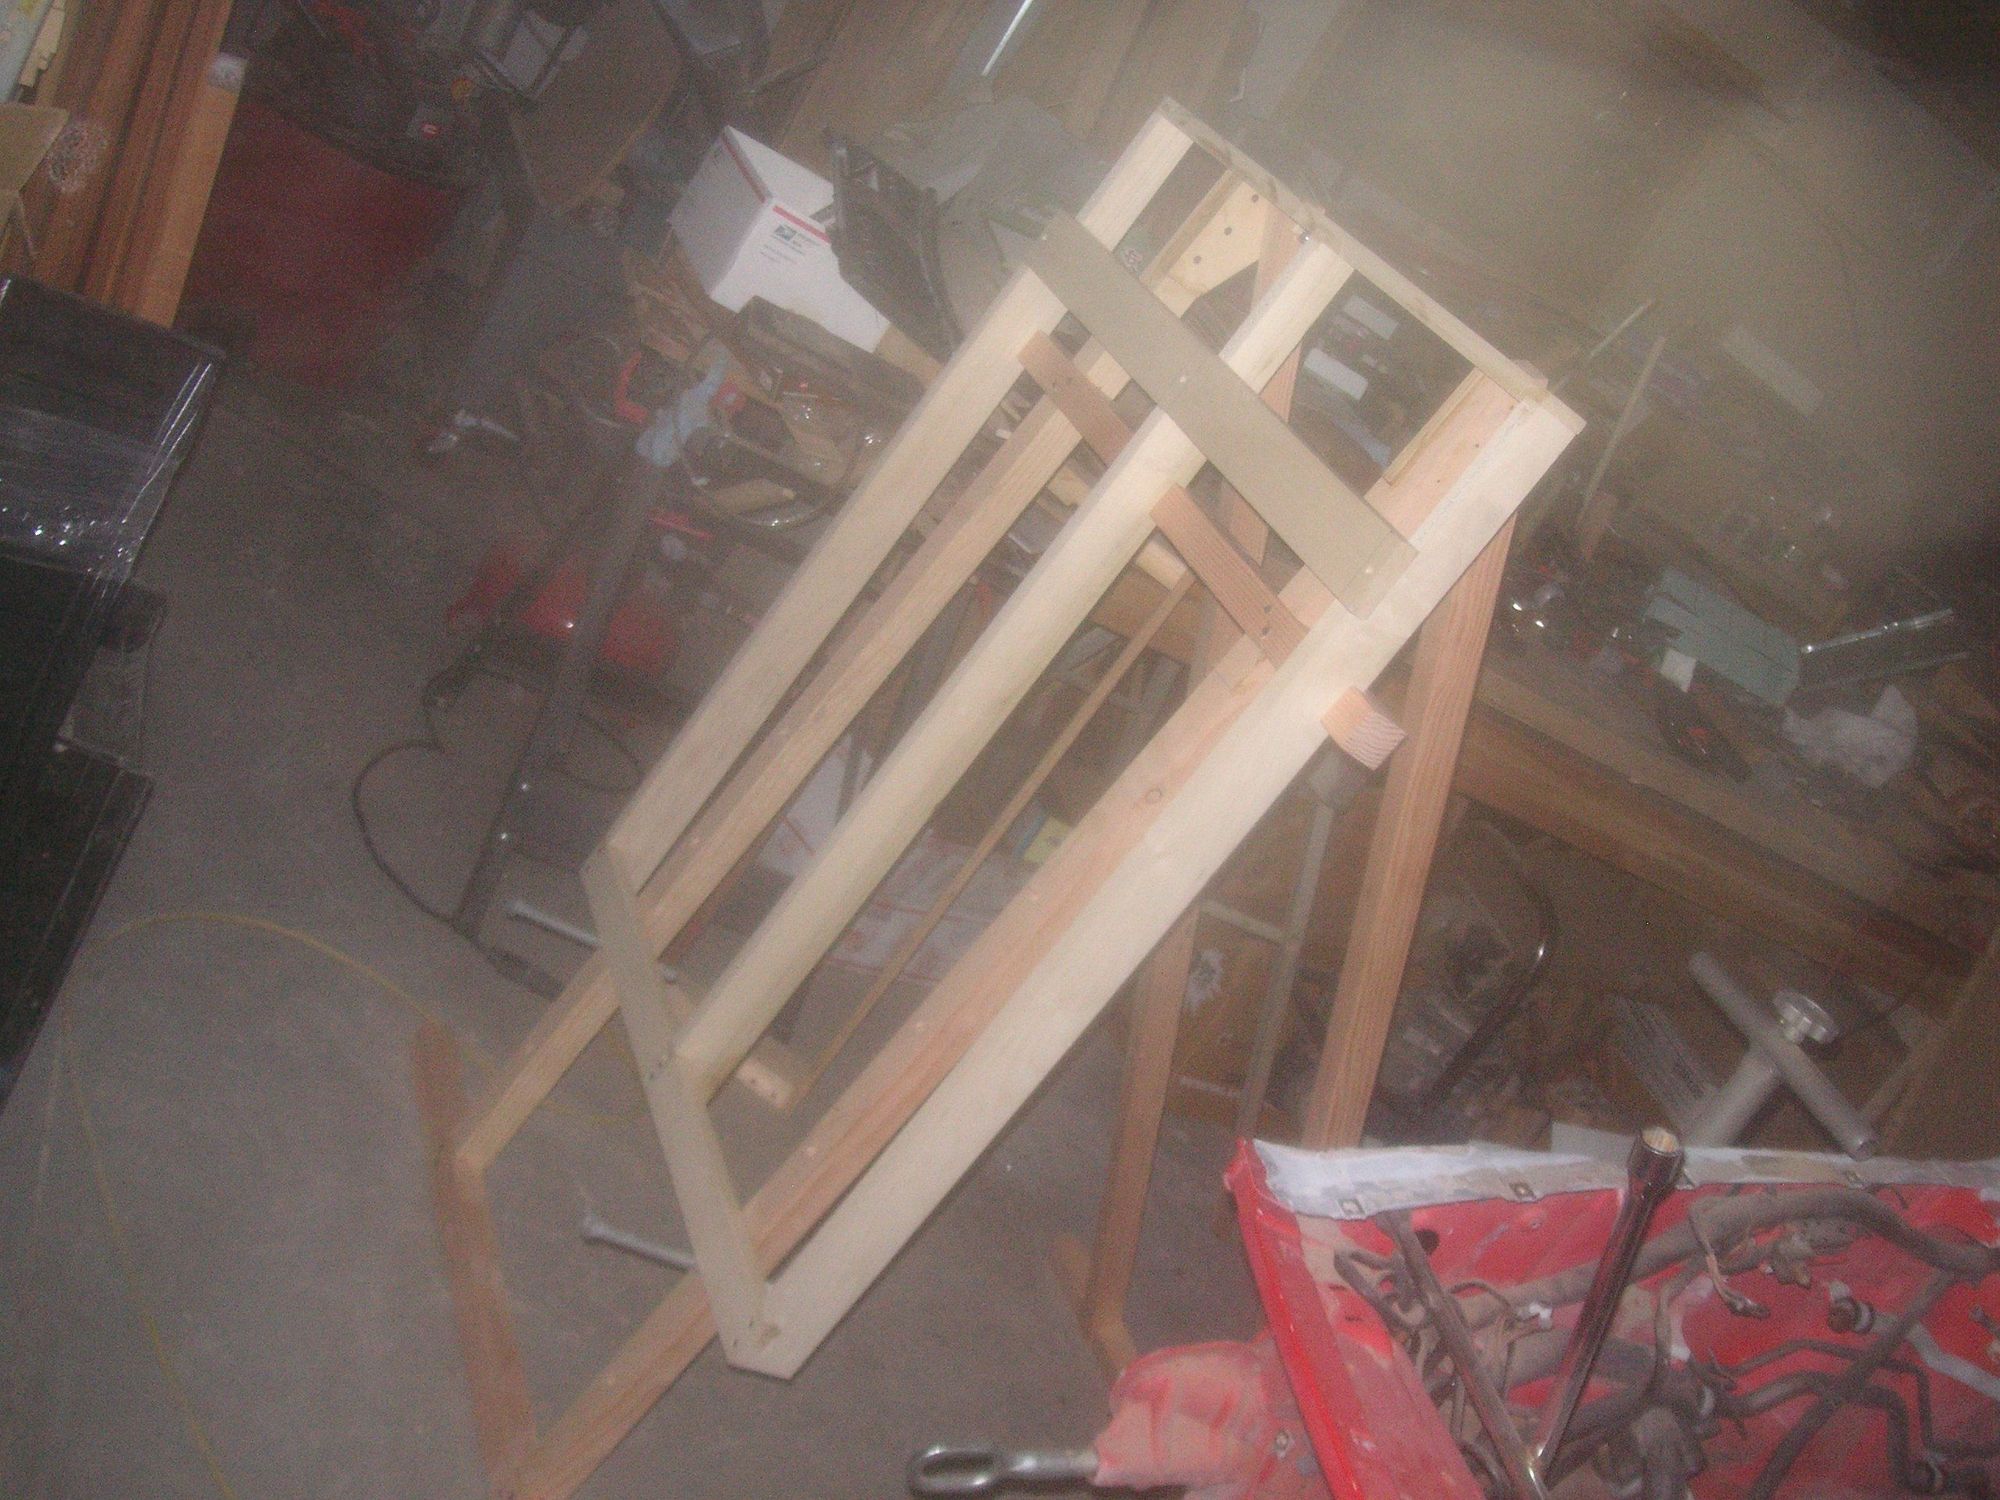
Earlier today I was able to draw up some of the designs for the items that I will have to use to offset the up/down strips of leather in order to weave the cross bar into them to put the cross strips in. That actually took a while, and then I worked some of that up into metal, but not yet finished. Then I glued and screwed the basic loom frame up. Tomorrow I'll finish up the offsetting framework items and then have the loom pretty much finished. I also got some 2 by 4 boards and will work up the tripod for the loom. With that all I'll need to proceed is to cut some stips of leather, and that will take another kind of jig..
Last edited by Jerry Feather; 01-18-2023 at 09:28 AM.
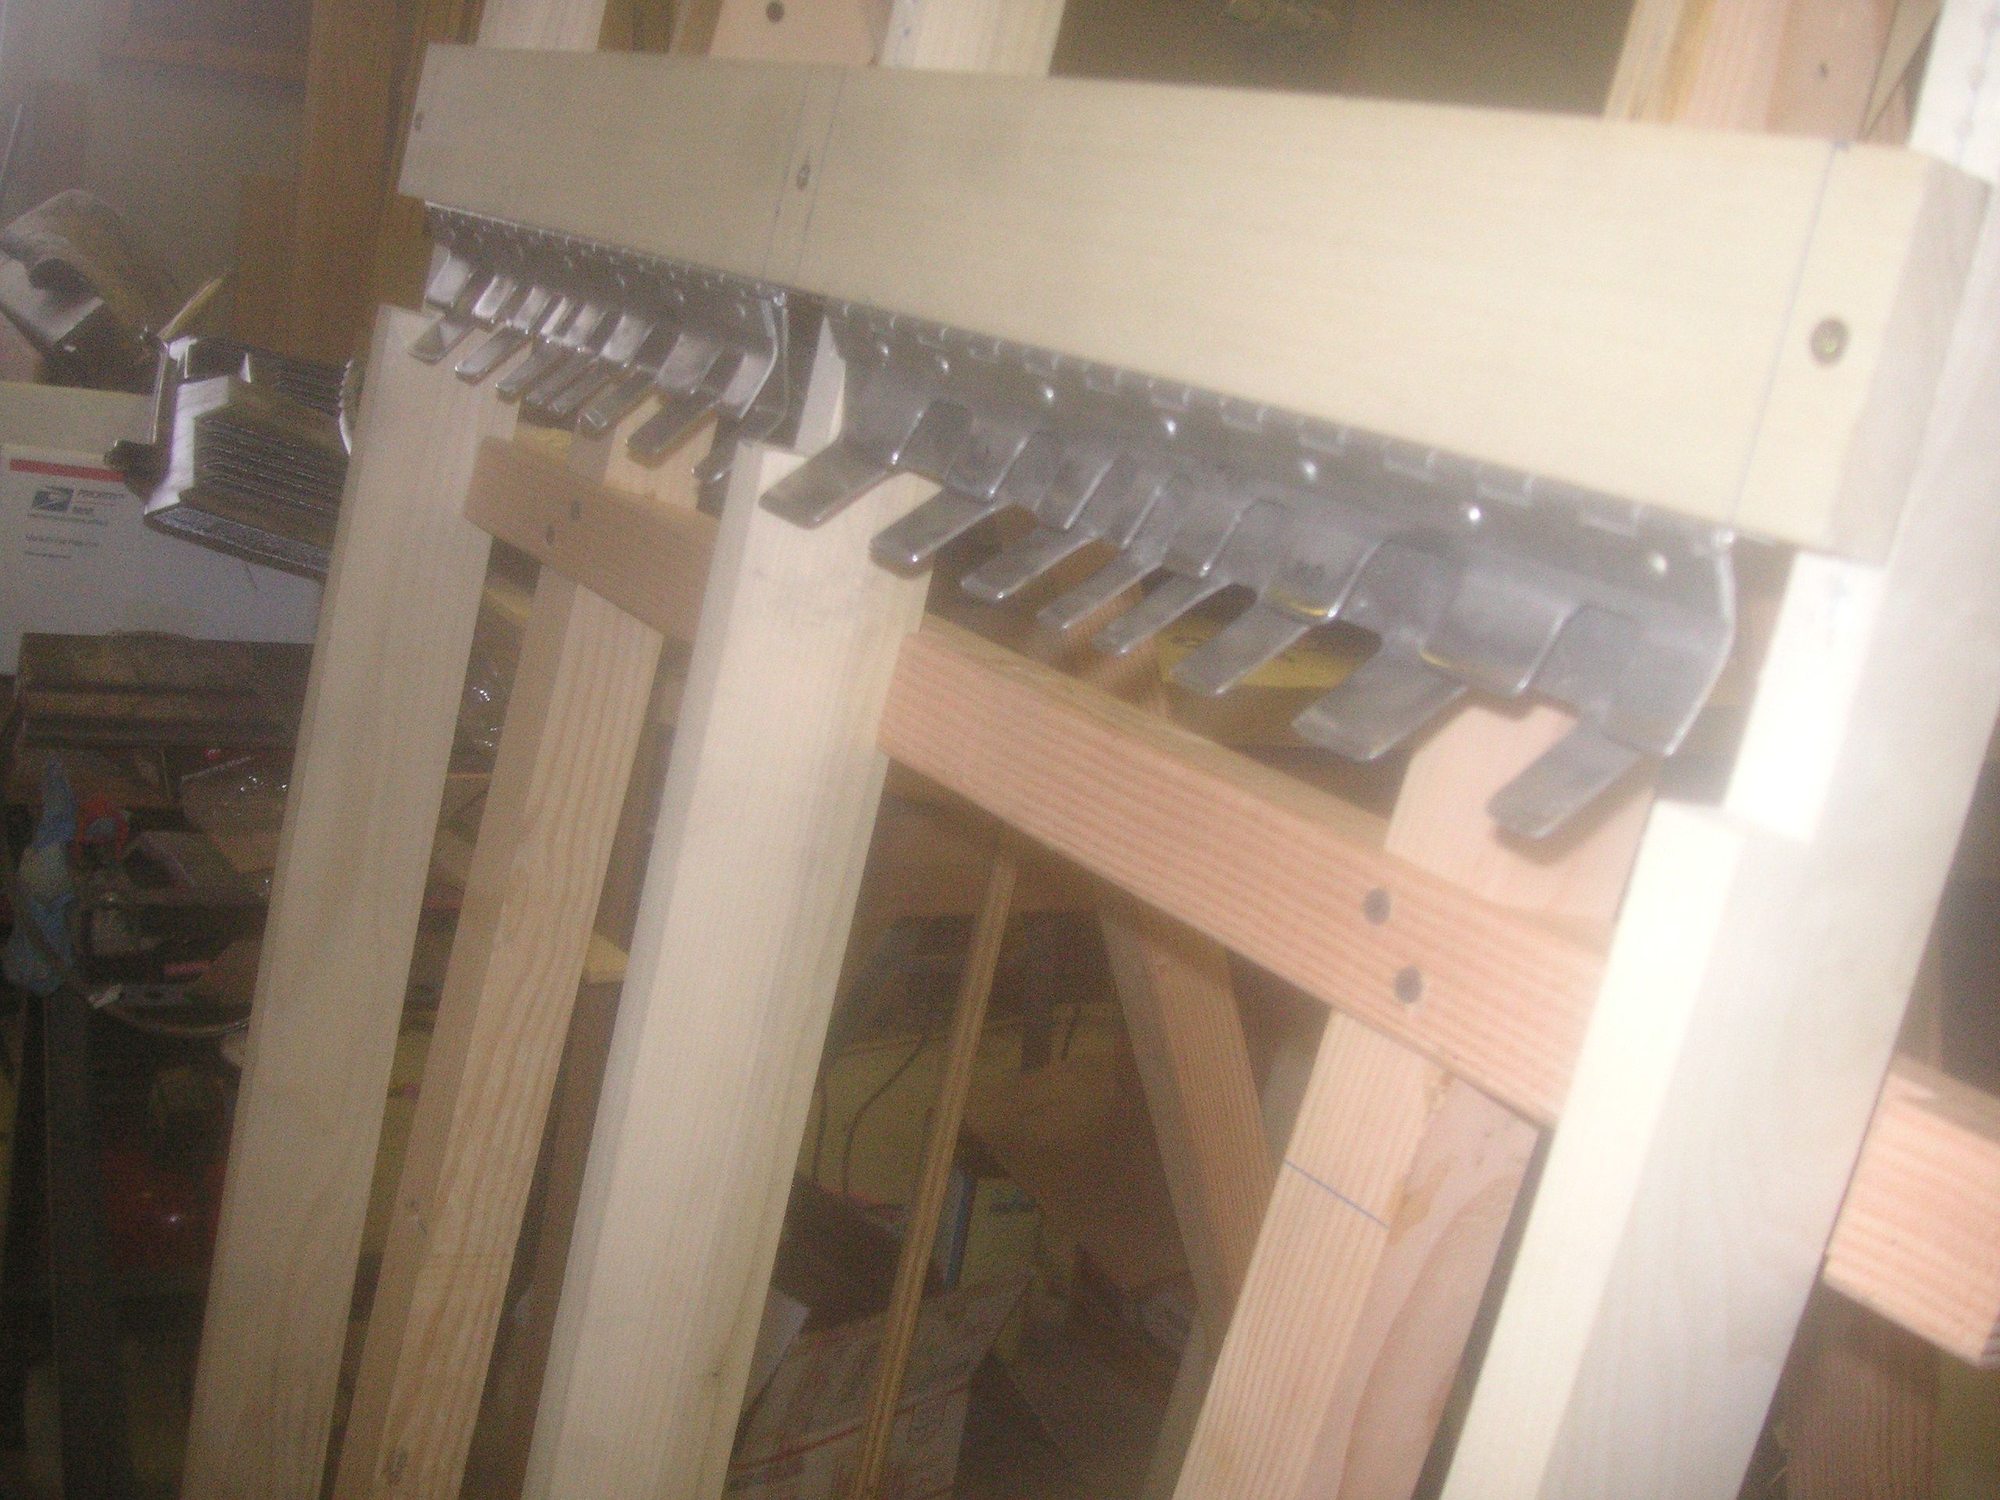
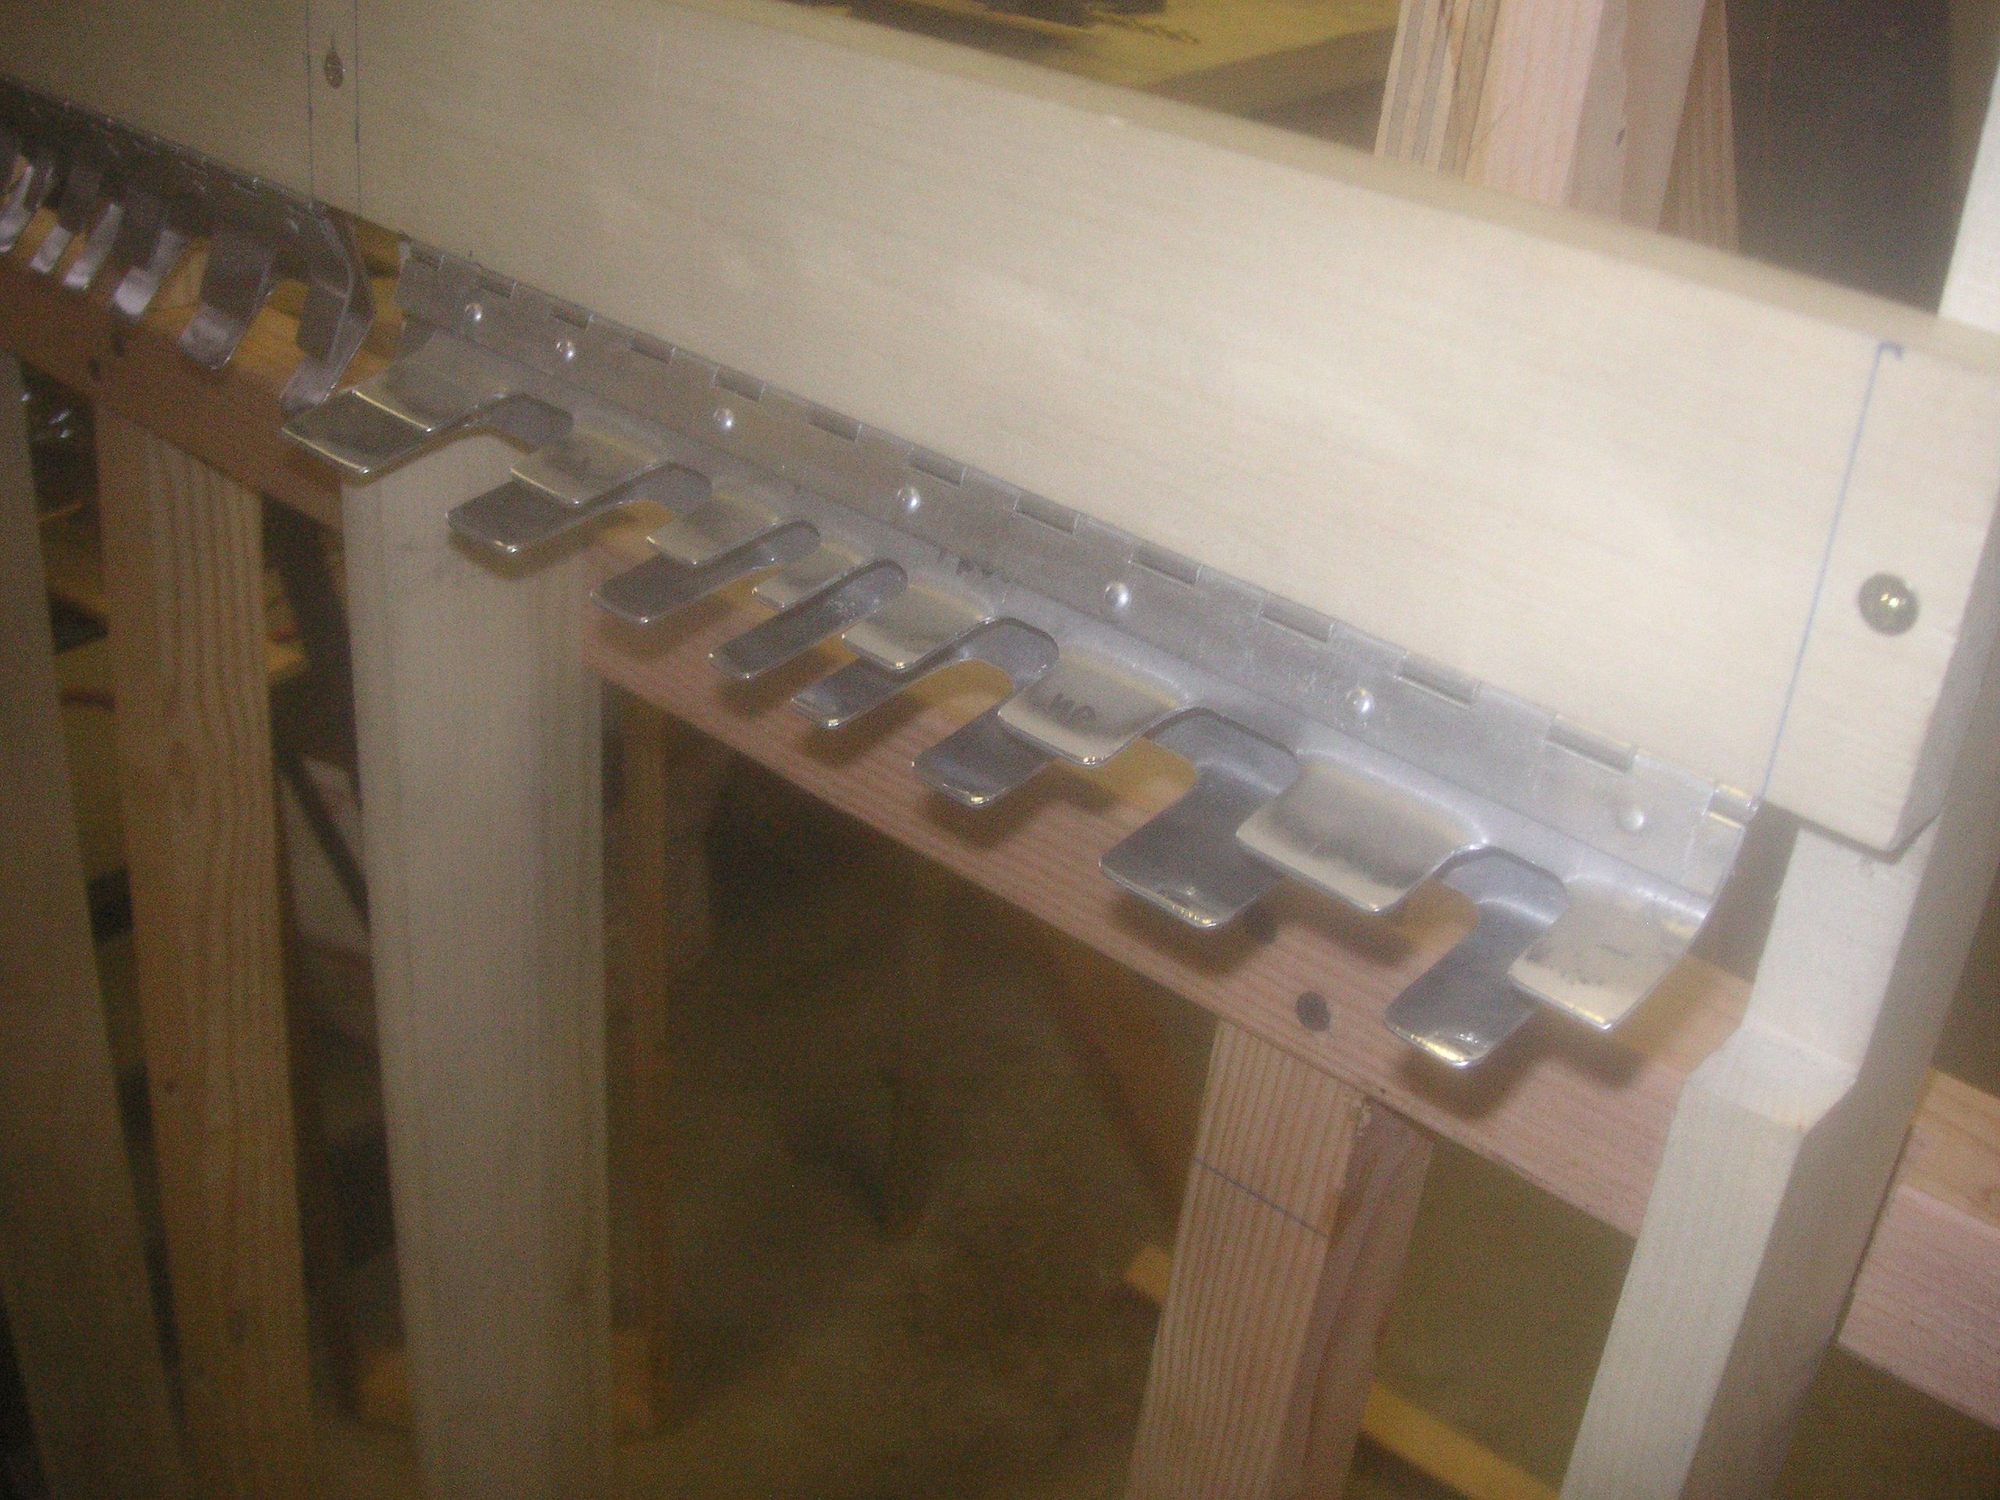
I didn't get quite as far along with this yesterday, but I do have the separation devises just about ready to mount on the top cross bar of the loom. Before I do that however I'l need to refinish the bottom edges of the fingers so that they do not scar the leather, because they will be offsetting the strips of leather from the finish side. Here are some pictures of how they will kind of be oriented.
Last edited by Jerry Feather; 01-13-2023 at 09:34 AM.
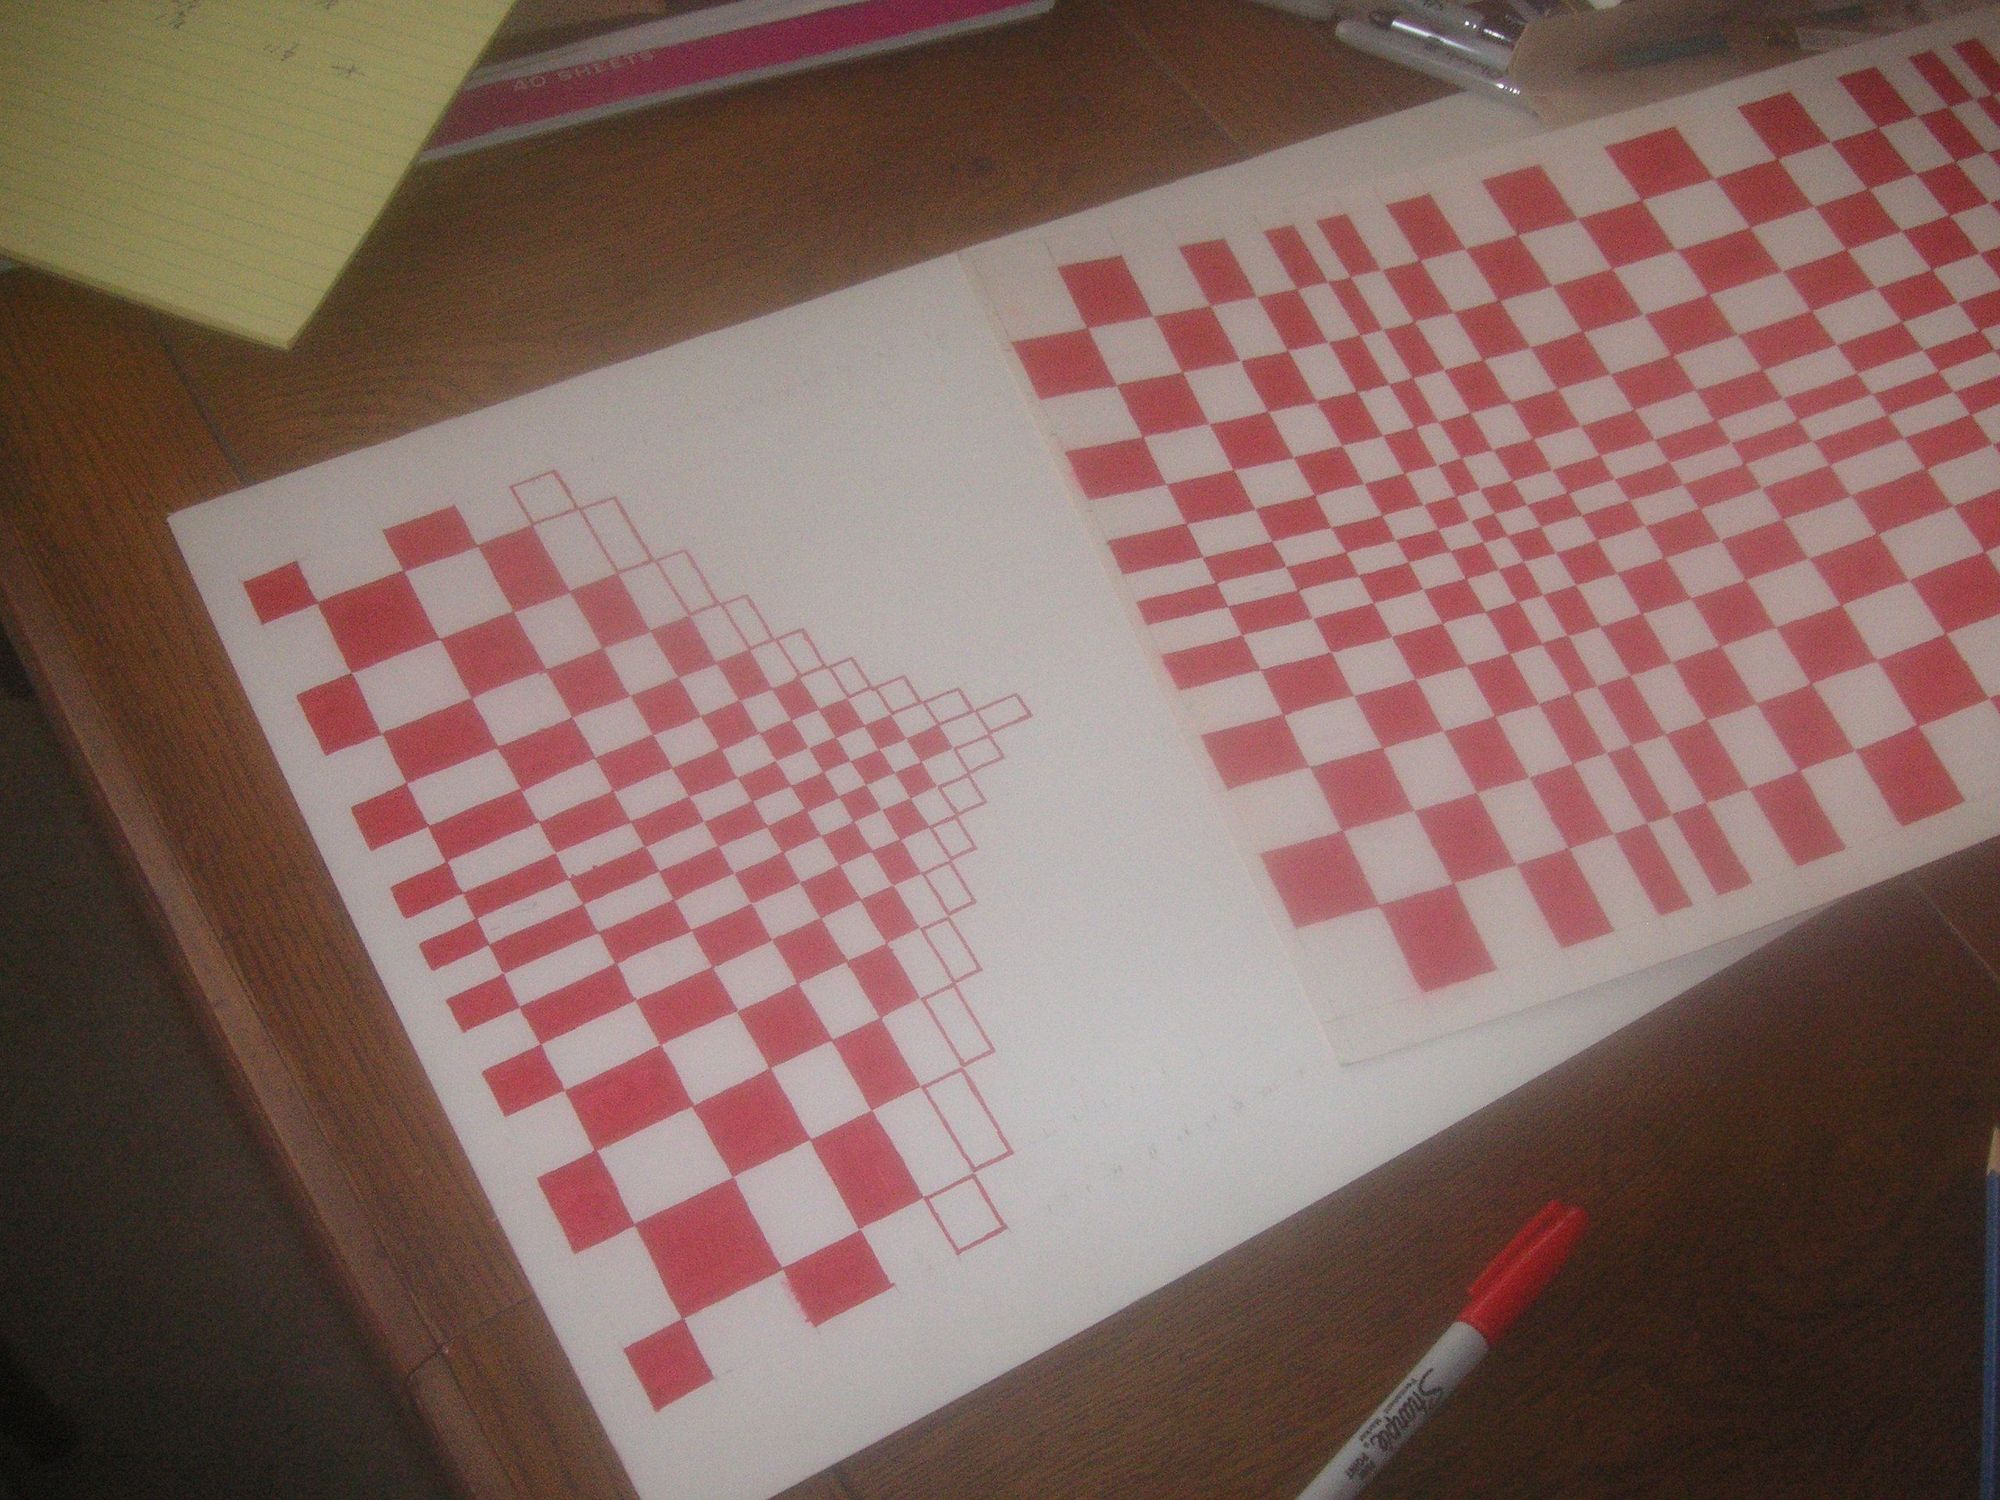
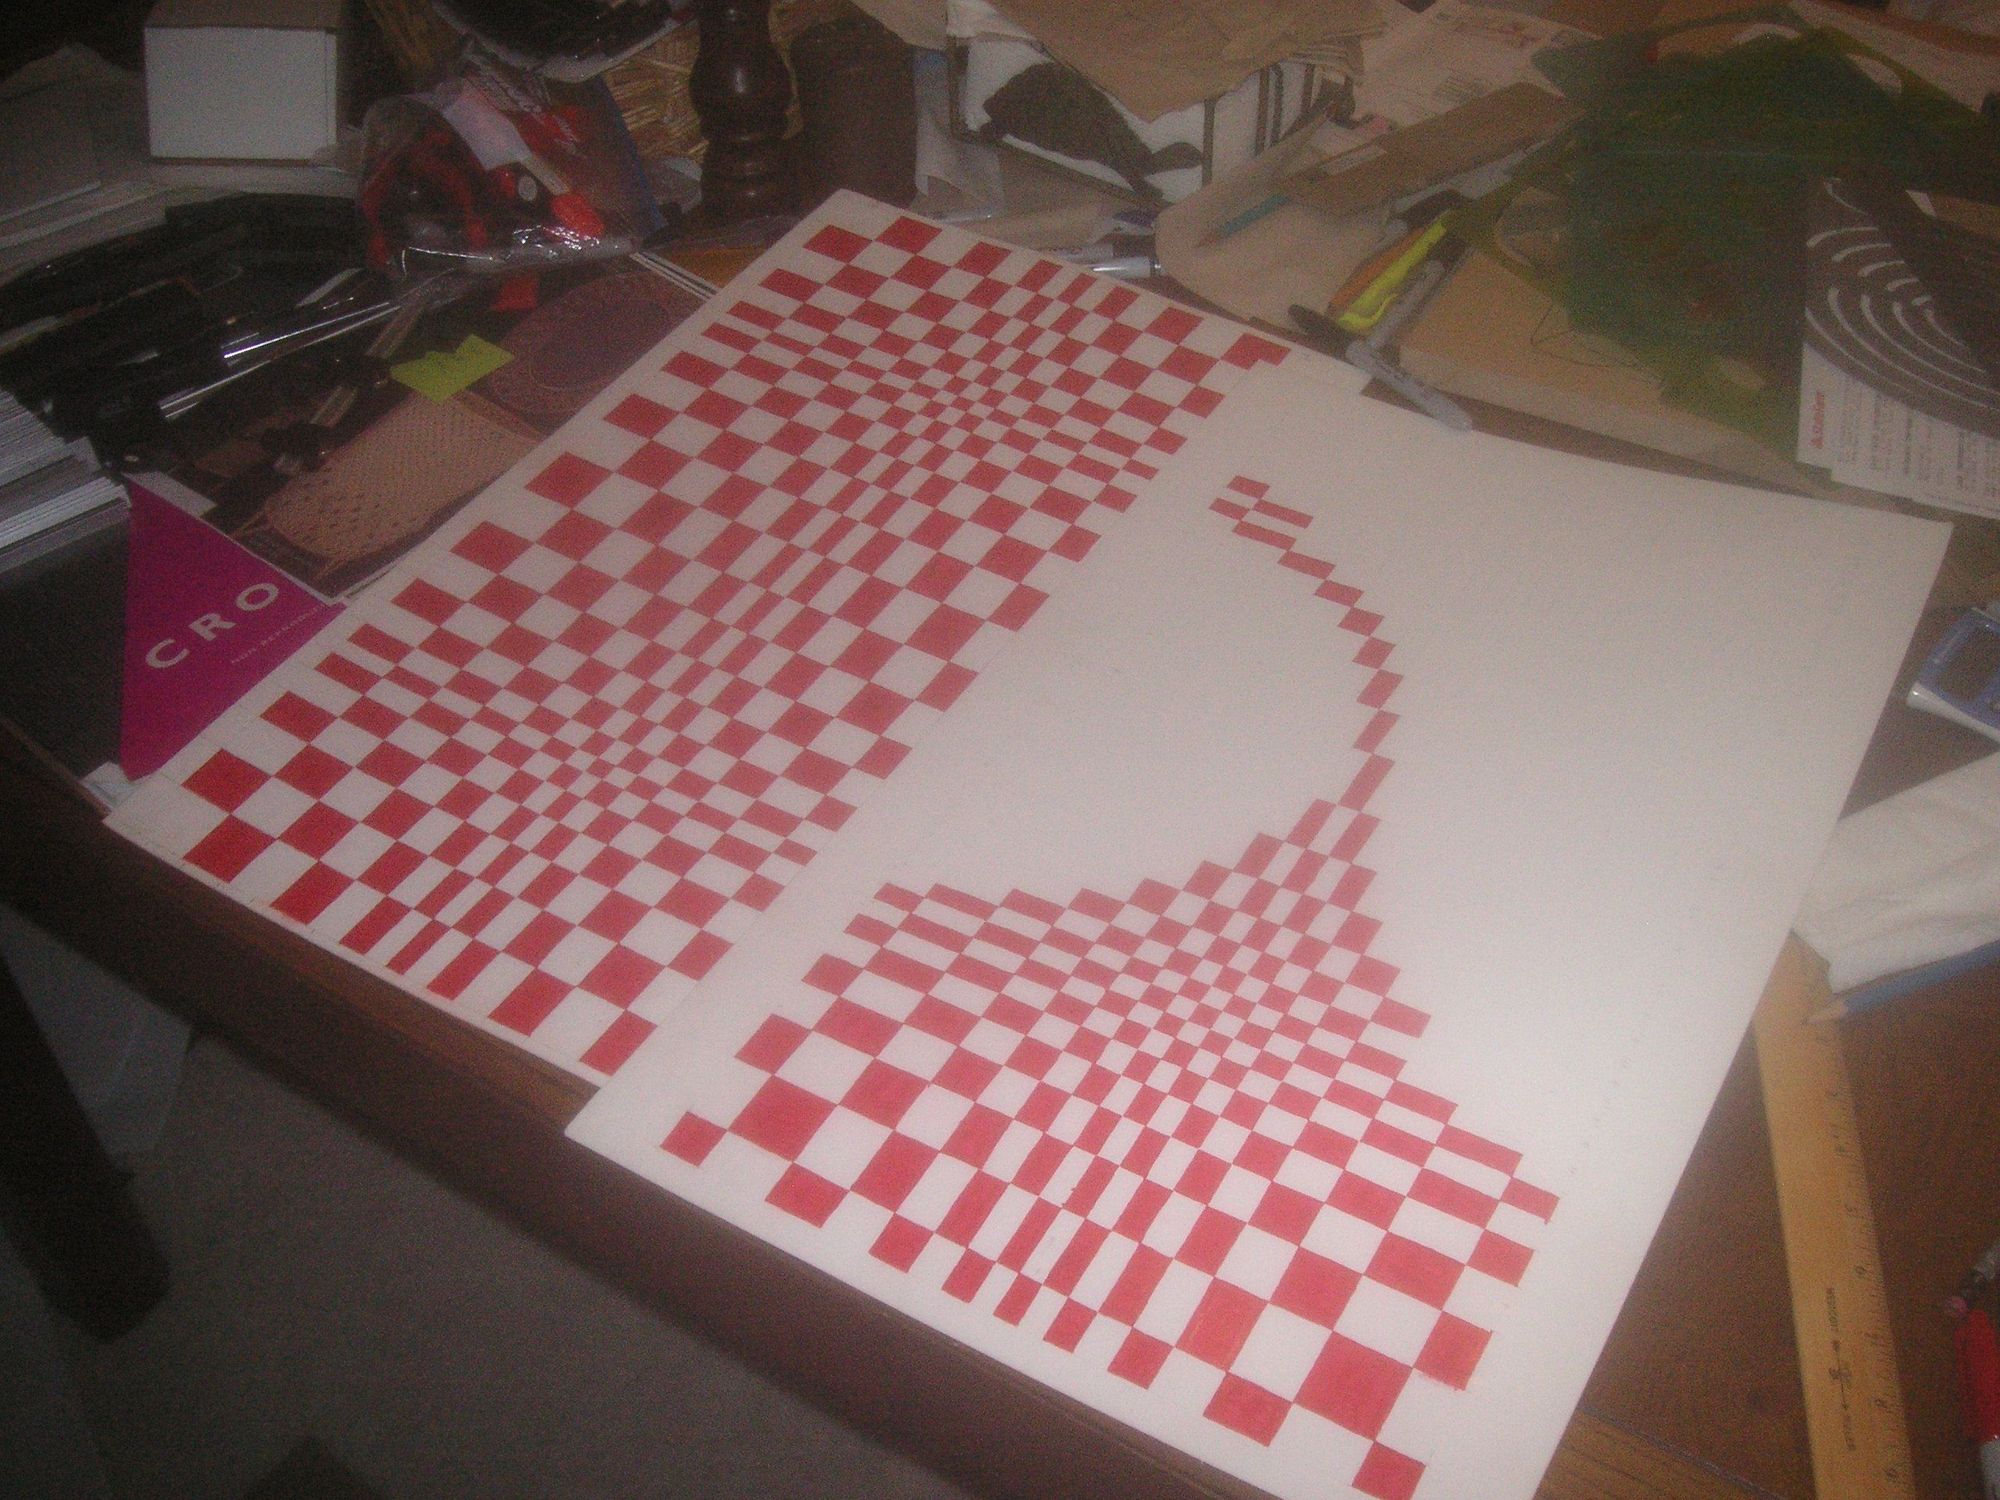
Based on what I think I taught myself long ago in the older thread about Pasha I have put the center of my pattern in the center of the smallest block. That puts the outer edges of the pattern repeat up the middle of the largest blocks in the pattern, both ways. That also puts the same color of block (or half a block) along the outer edges of the pattern where the large blocks are.
When I did this most recent pattern I started with a 3/8 inch square in the middle and then widened each block or band of leather by 1/8 inch going out from center. Where I stopped was where I though the width of the seat insert cushions sections were. I actually came very close since when I measured the Cushion Sections they are right at 11 1/2 inches wide and my pattern is 11 3/8 inches wide. Then on top of that happenstance I find that in order to have the pattern repeat and be centered in every other cushion section that, with my design of five cushion sections, that space is also 11 3/8 inches.
I plan to weave these items so that for the back of the seat there will be a group of small blocks in the second and fourth sections and the first, third and fifth in the seat bottom.
I also figured out that if I were going to do this weaving for a seat with the original 4 cusions sections I would be able to adjust the pattern by simply changing the number and witdth of leather strips so that I could and perhaps would have the small blocks in the middle of all 8 cushion sections.
I now have just about all the material I need to finish up with the fabrication of the loom and cutting apparatus. I'm going to work on much of that today.
Last edited by Jerry Feather; 01-14-2023 at 11:24 AM.
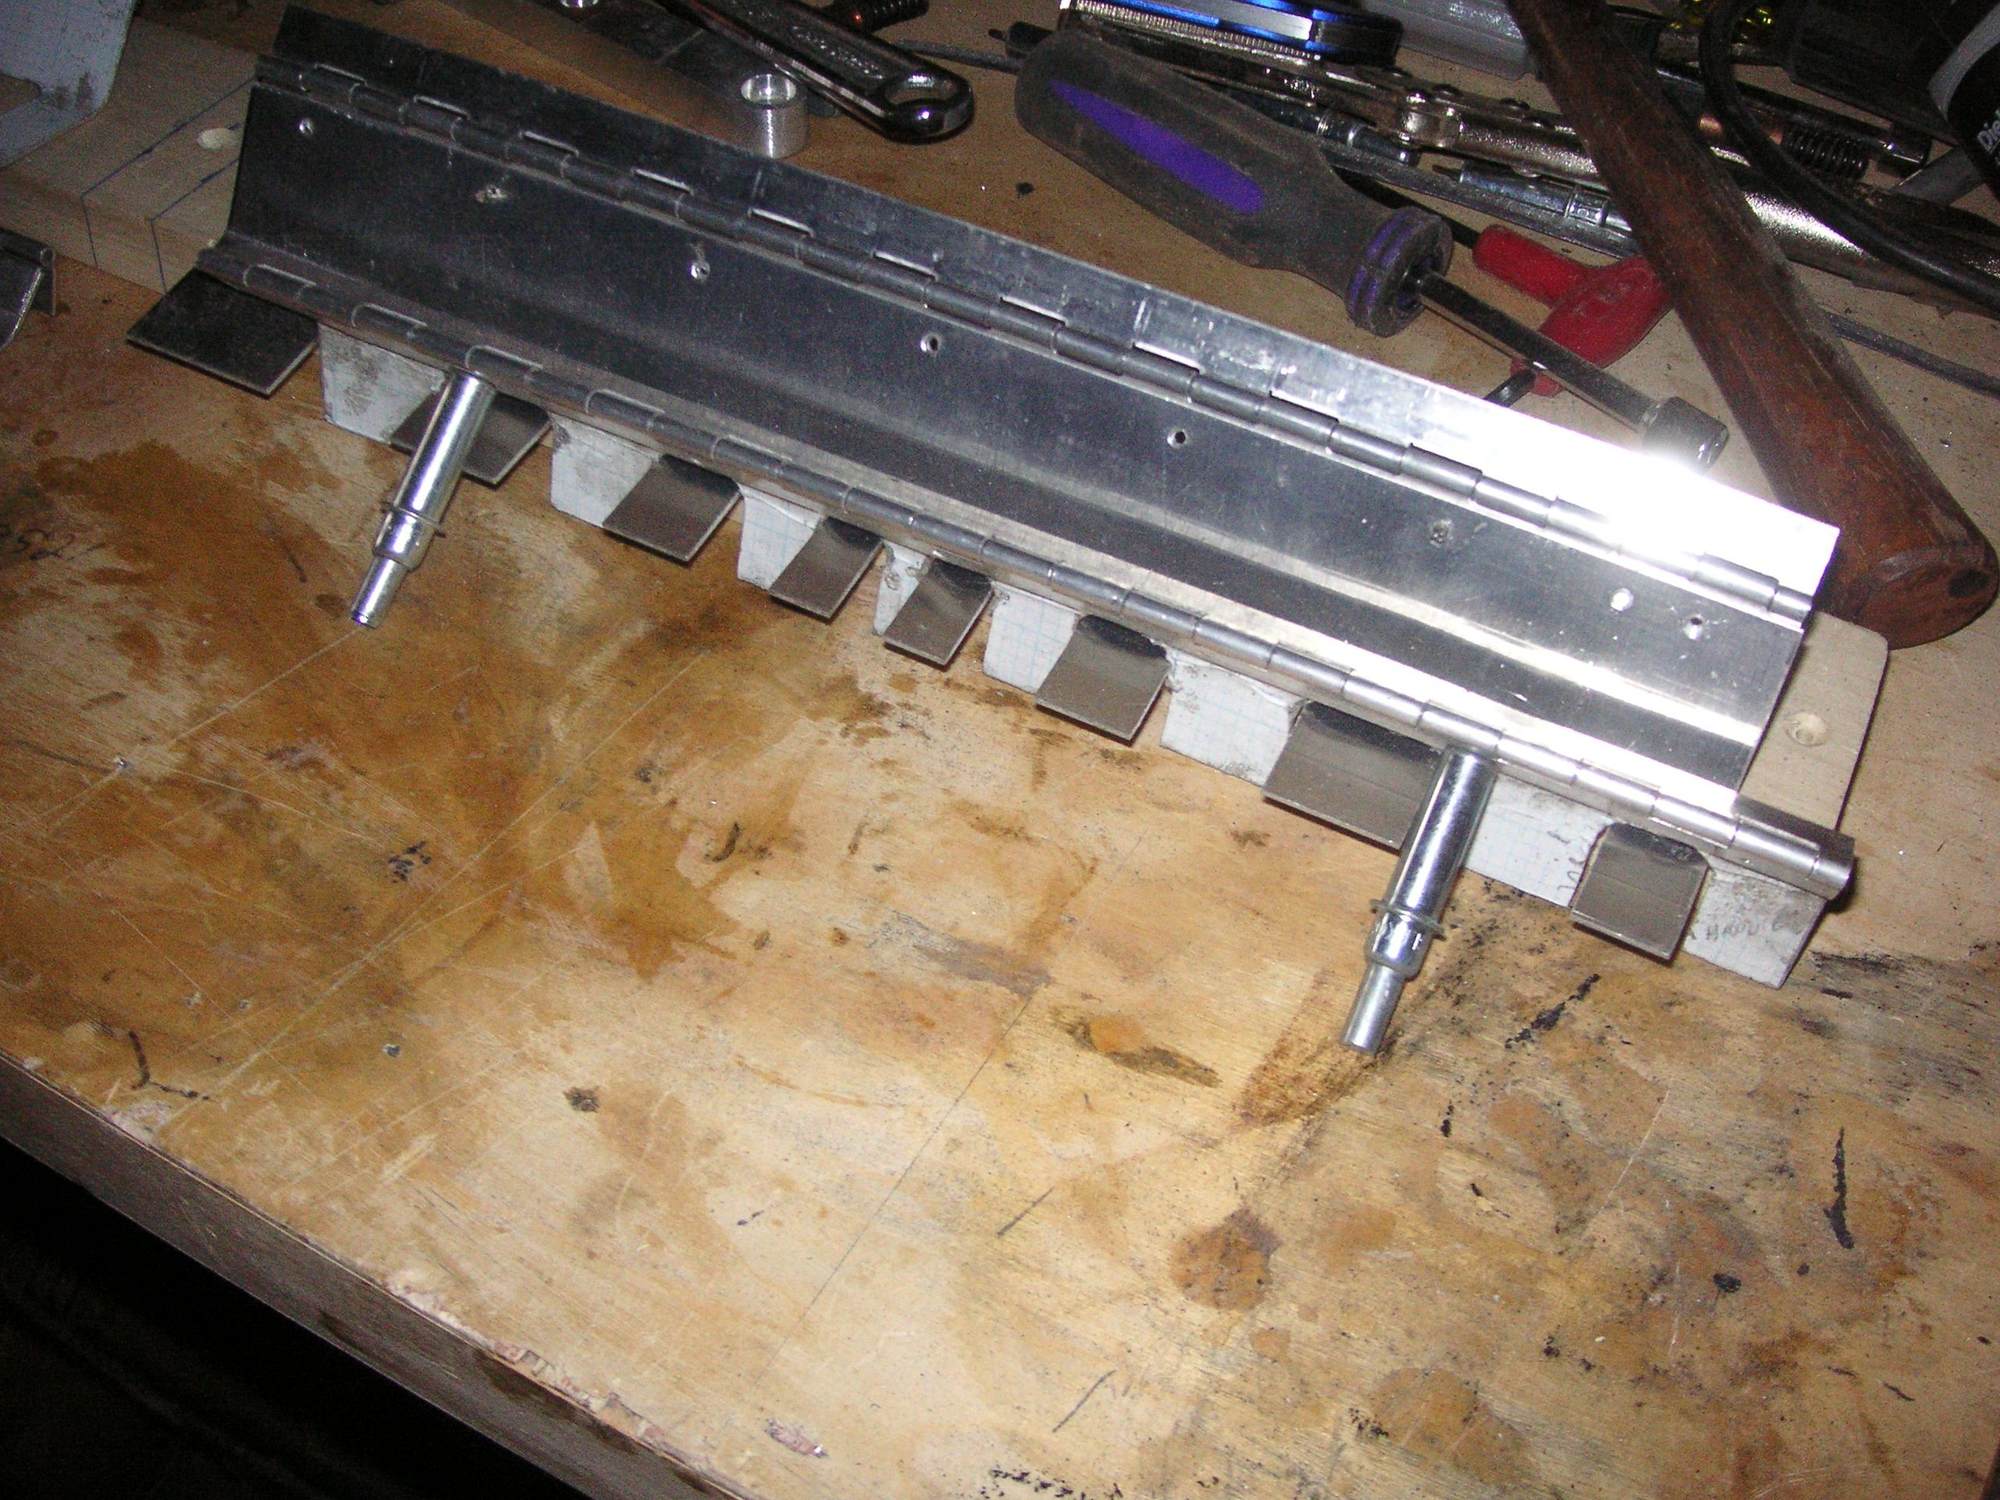
I have the loom almost complete. I have just to rivet the separation fingers to their hinges and screw them to the top cross-bar of the loom and the loom will be finished.
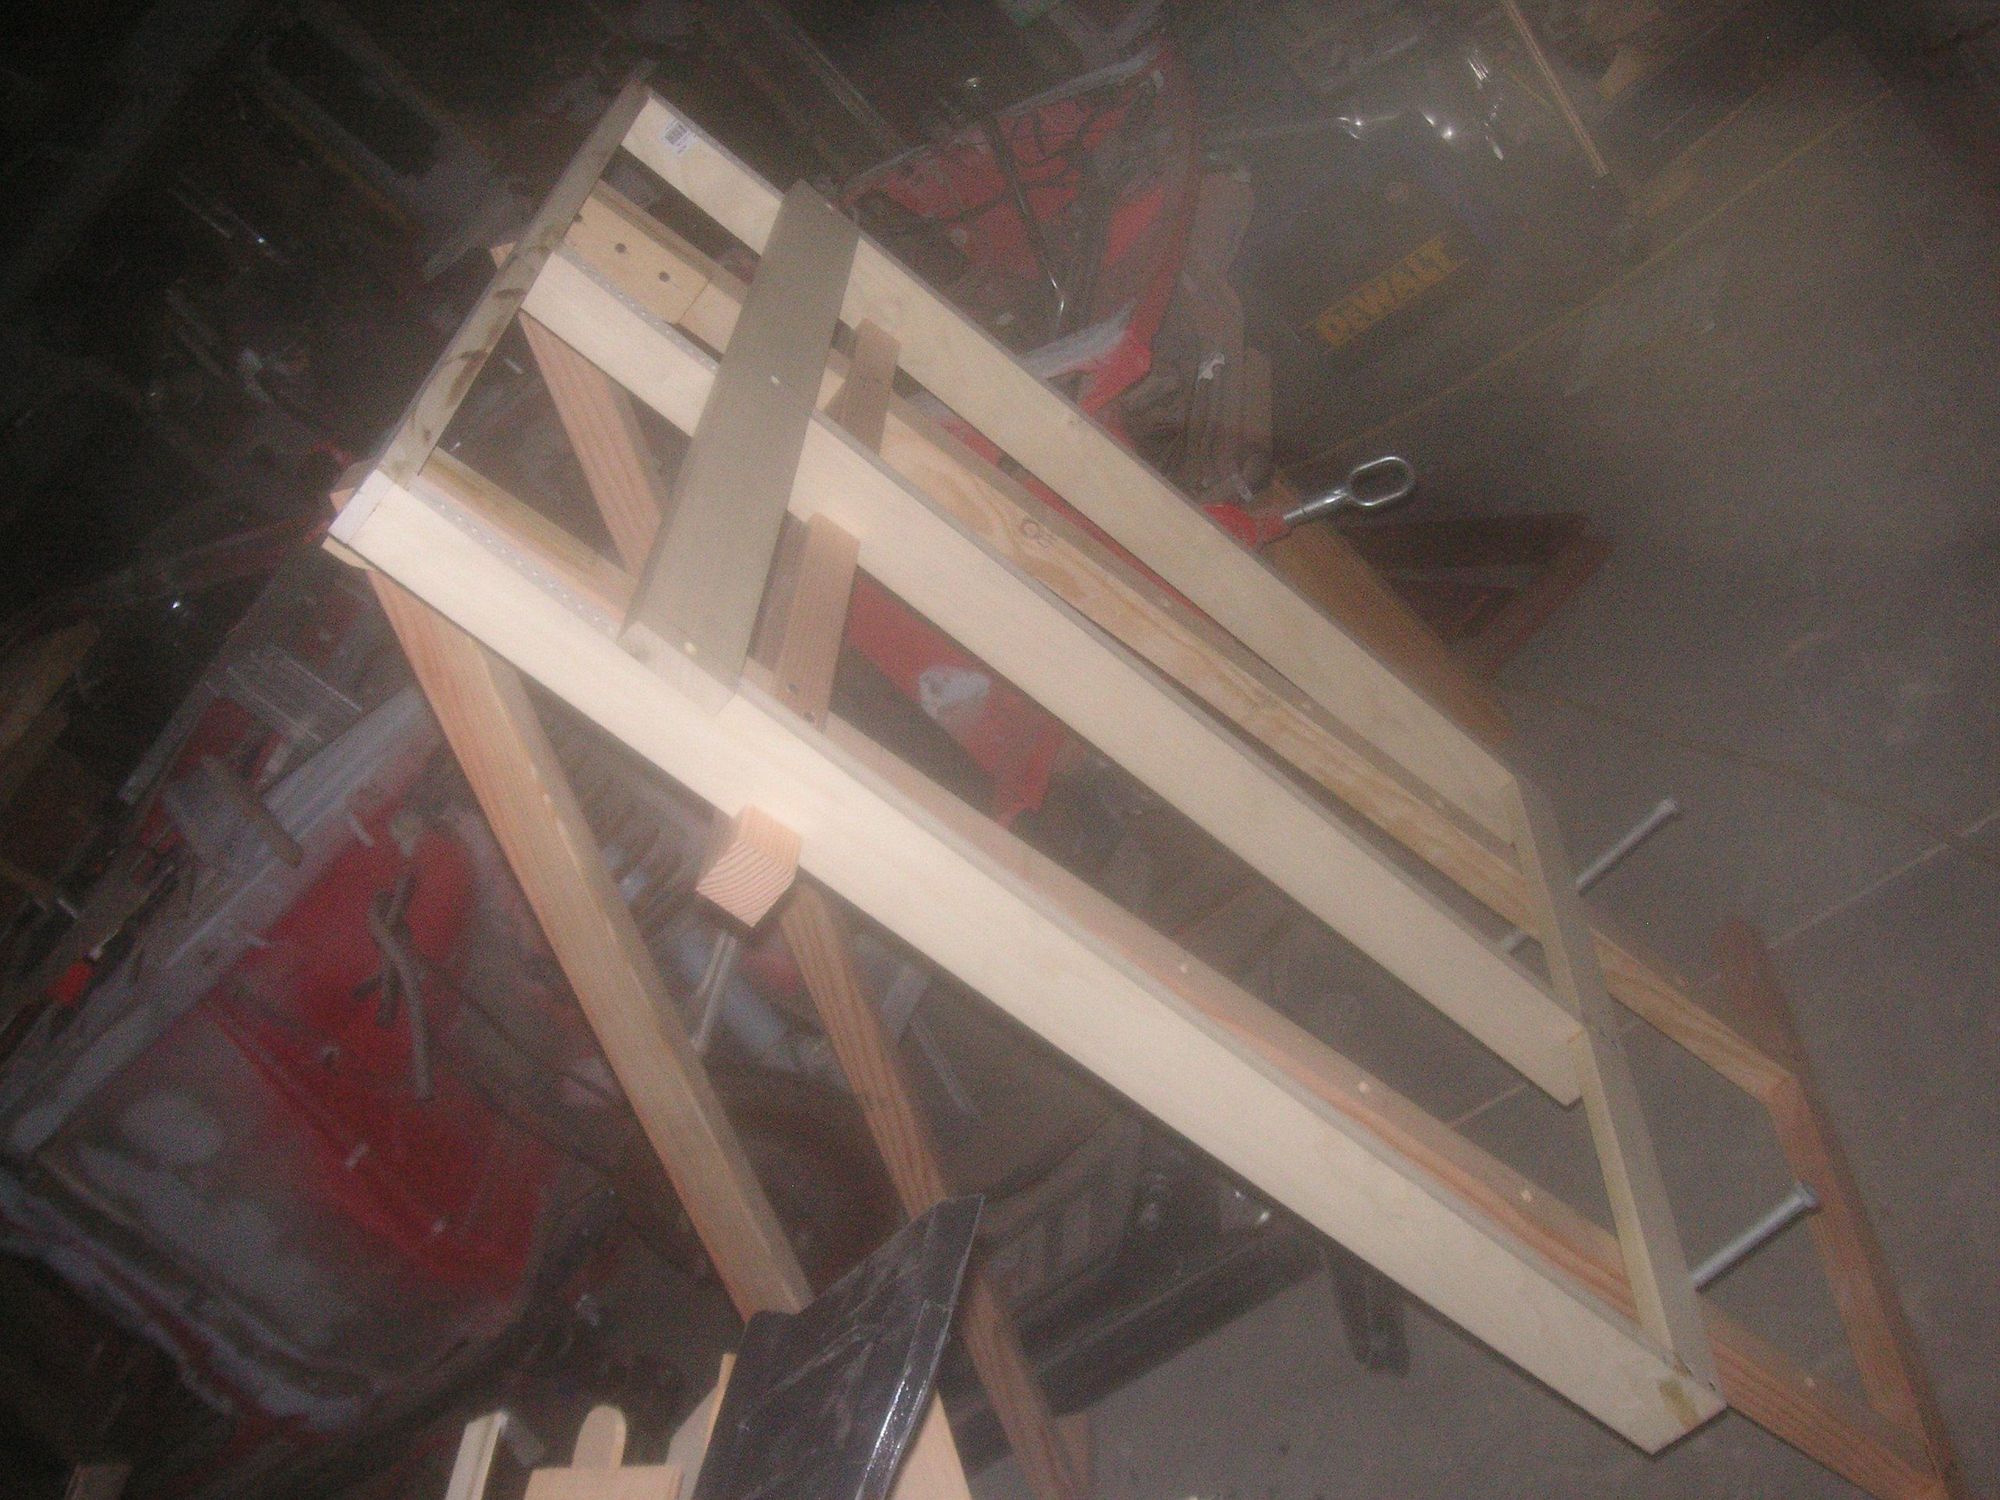
The loom is now mounted on what was going to be a tripod, but which turns out to be more of a quadra-pod. See the pictures.
I have the offsetting fingers finished and installed. The only thing about it is that I may want to fasten some little handles on each of the finger pieces.
I am now into fashioning some little width guides to use in setting the leather strip cutting devise. I have about half of them done; and there is a need for about 32 of them using two for each strip or pair of strips cut. That will save me some time in not having to measure the cutting guide bar with a tape measure each time.
Last edited by Jerry Feather; 01-15-2023 at 05:08 PM.
I made the top bar of the loom adjustable up and down for two reasons. One is that in a lower position I can make the pattern for the back rest insert and in doing so I can start with the leather just barely taught, but I am thinking that as it is woven it will get tighter so I can start out with the top bar a little higher than needed to finish but then I can adjust it down a bit as the upright leather strips get more taught. The other reason of course is so that I can weave both the seat back inserts and then the longer seat bottom inserts which are longer since they go back under the bottom of the seat back
I am in the process of taking a step or two backwrds. I have decided to work the basic pattern over so that it is a bit more refined and a little closer to looking like the original Pasha. That is going to entail me doing the top cross bar over with a different set of offsetting finger devises, but not much else. Now that I know just how to do that it wont be too much of a setback.
With the new pattern I have started with three rows in the middle at 3/8 inch wide and then changed the outward progression to something more geometric rather than linear. That is adding a couple of extra rows each way, but the width and length of the pattern is still very close to the width of the cushion sections in the seats. It also gives the appearance of movement, or just the curve of the lines the blocks seem to make from corner to corner an little tighter.
Last edited by Jerry Feather; 02-19-2023 at 10:58 AM.

 01-05-2023, 11:53 AM