When you click on links to various merchants on this site and make a purchase, this can result in this site earning a commission. Affiliate programs and affiliations include, but are not limited to, the eBay Partner Network.
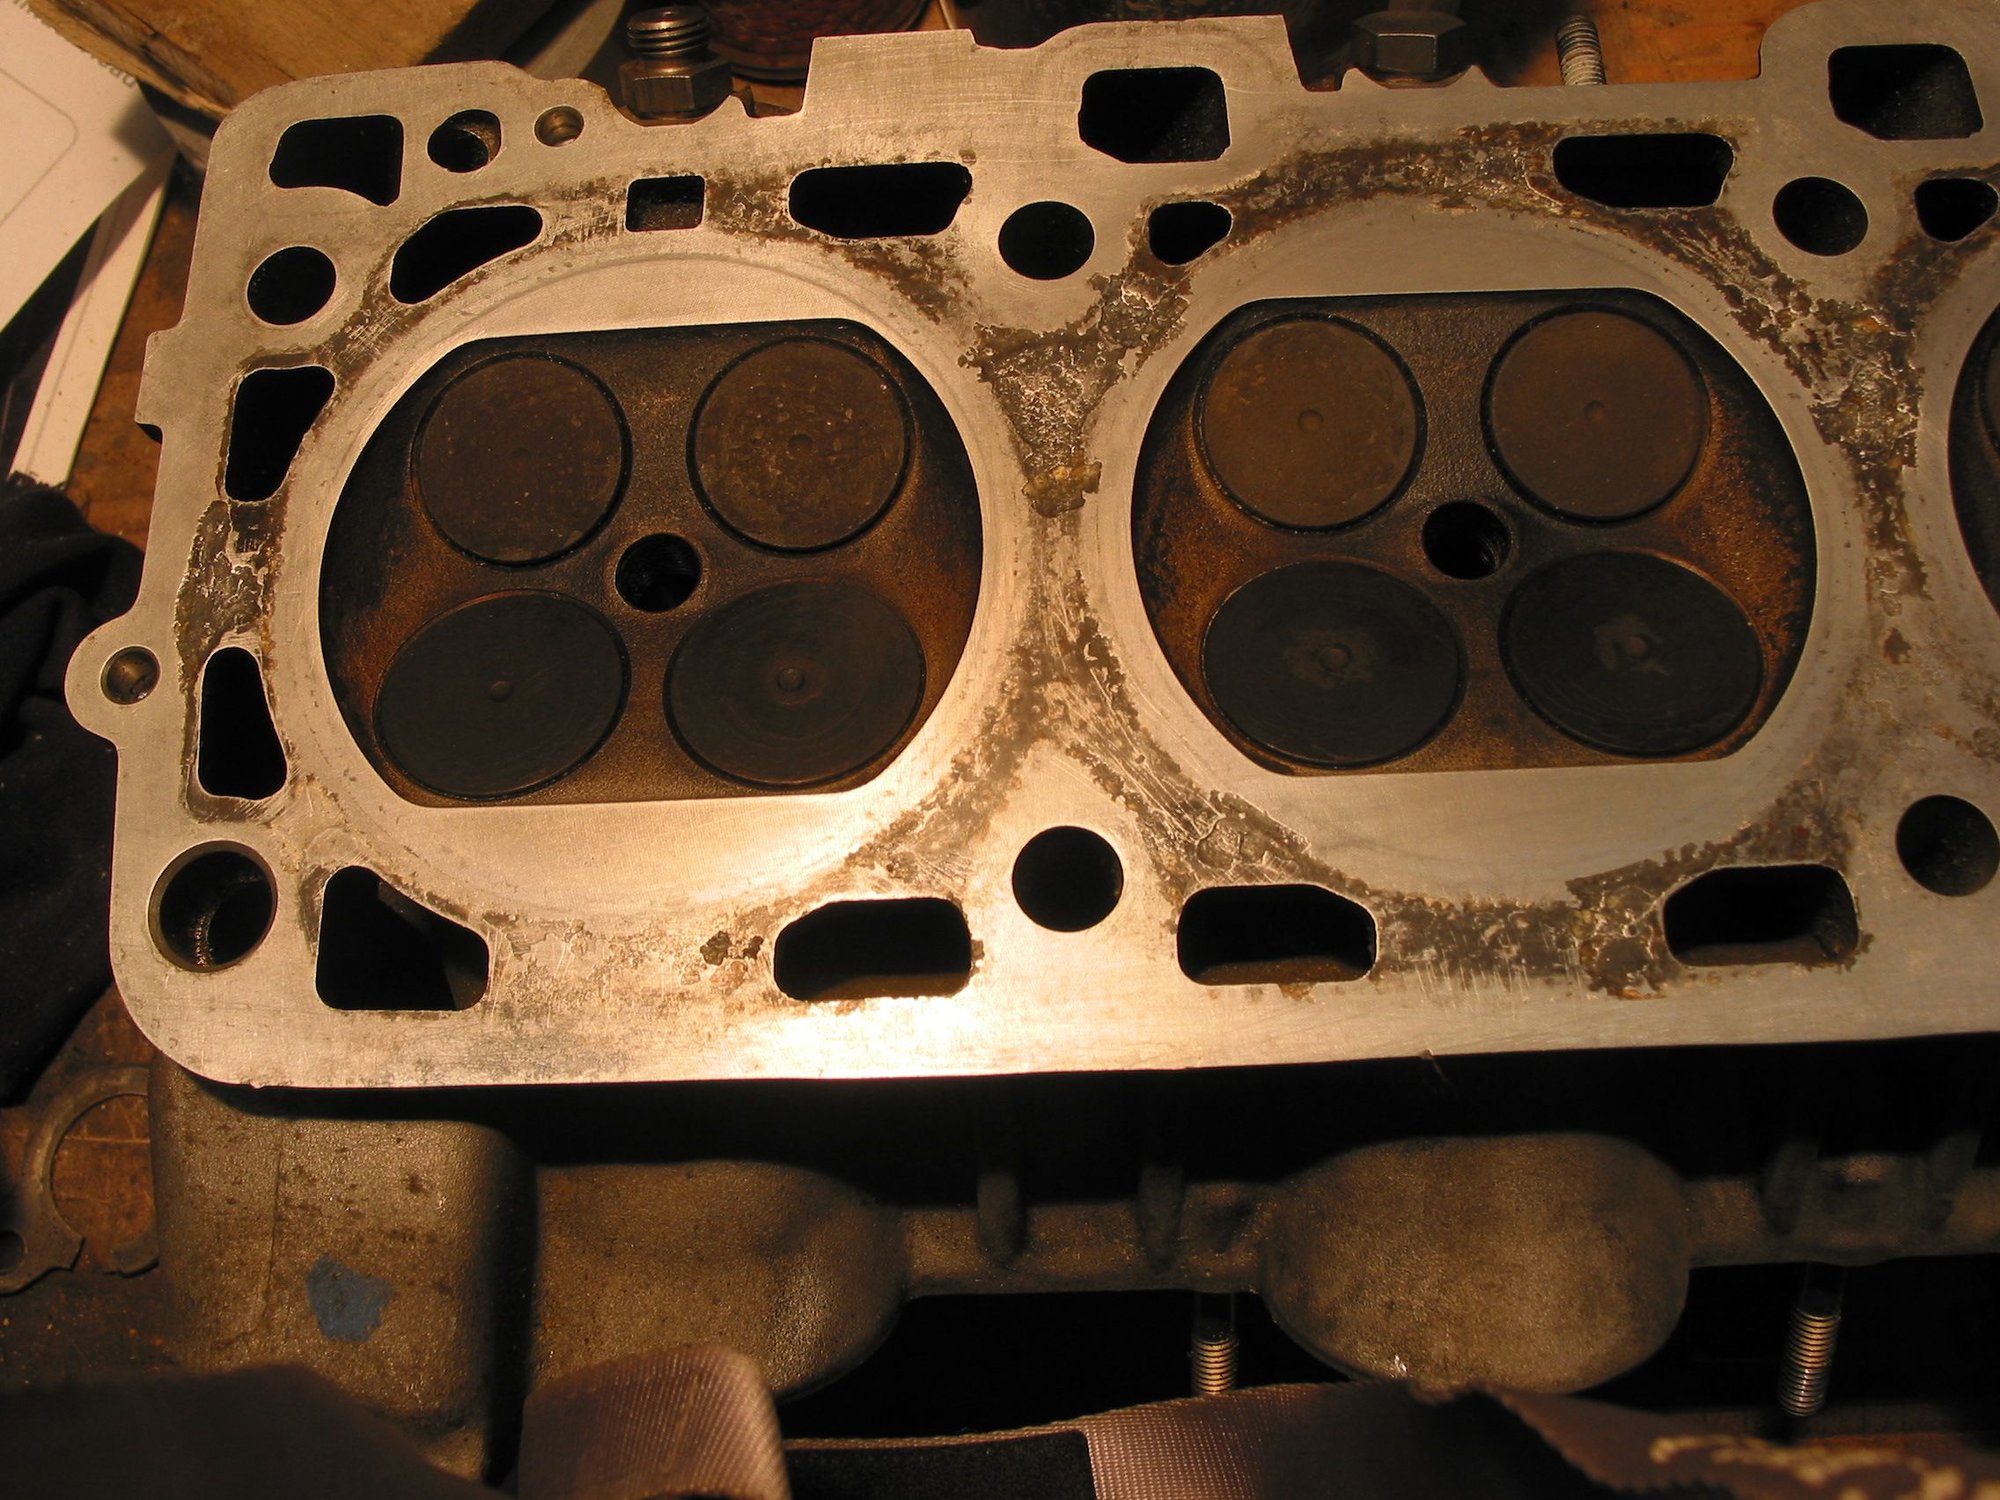
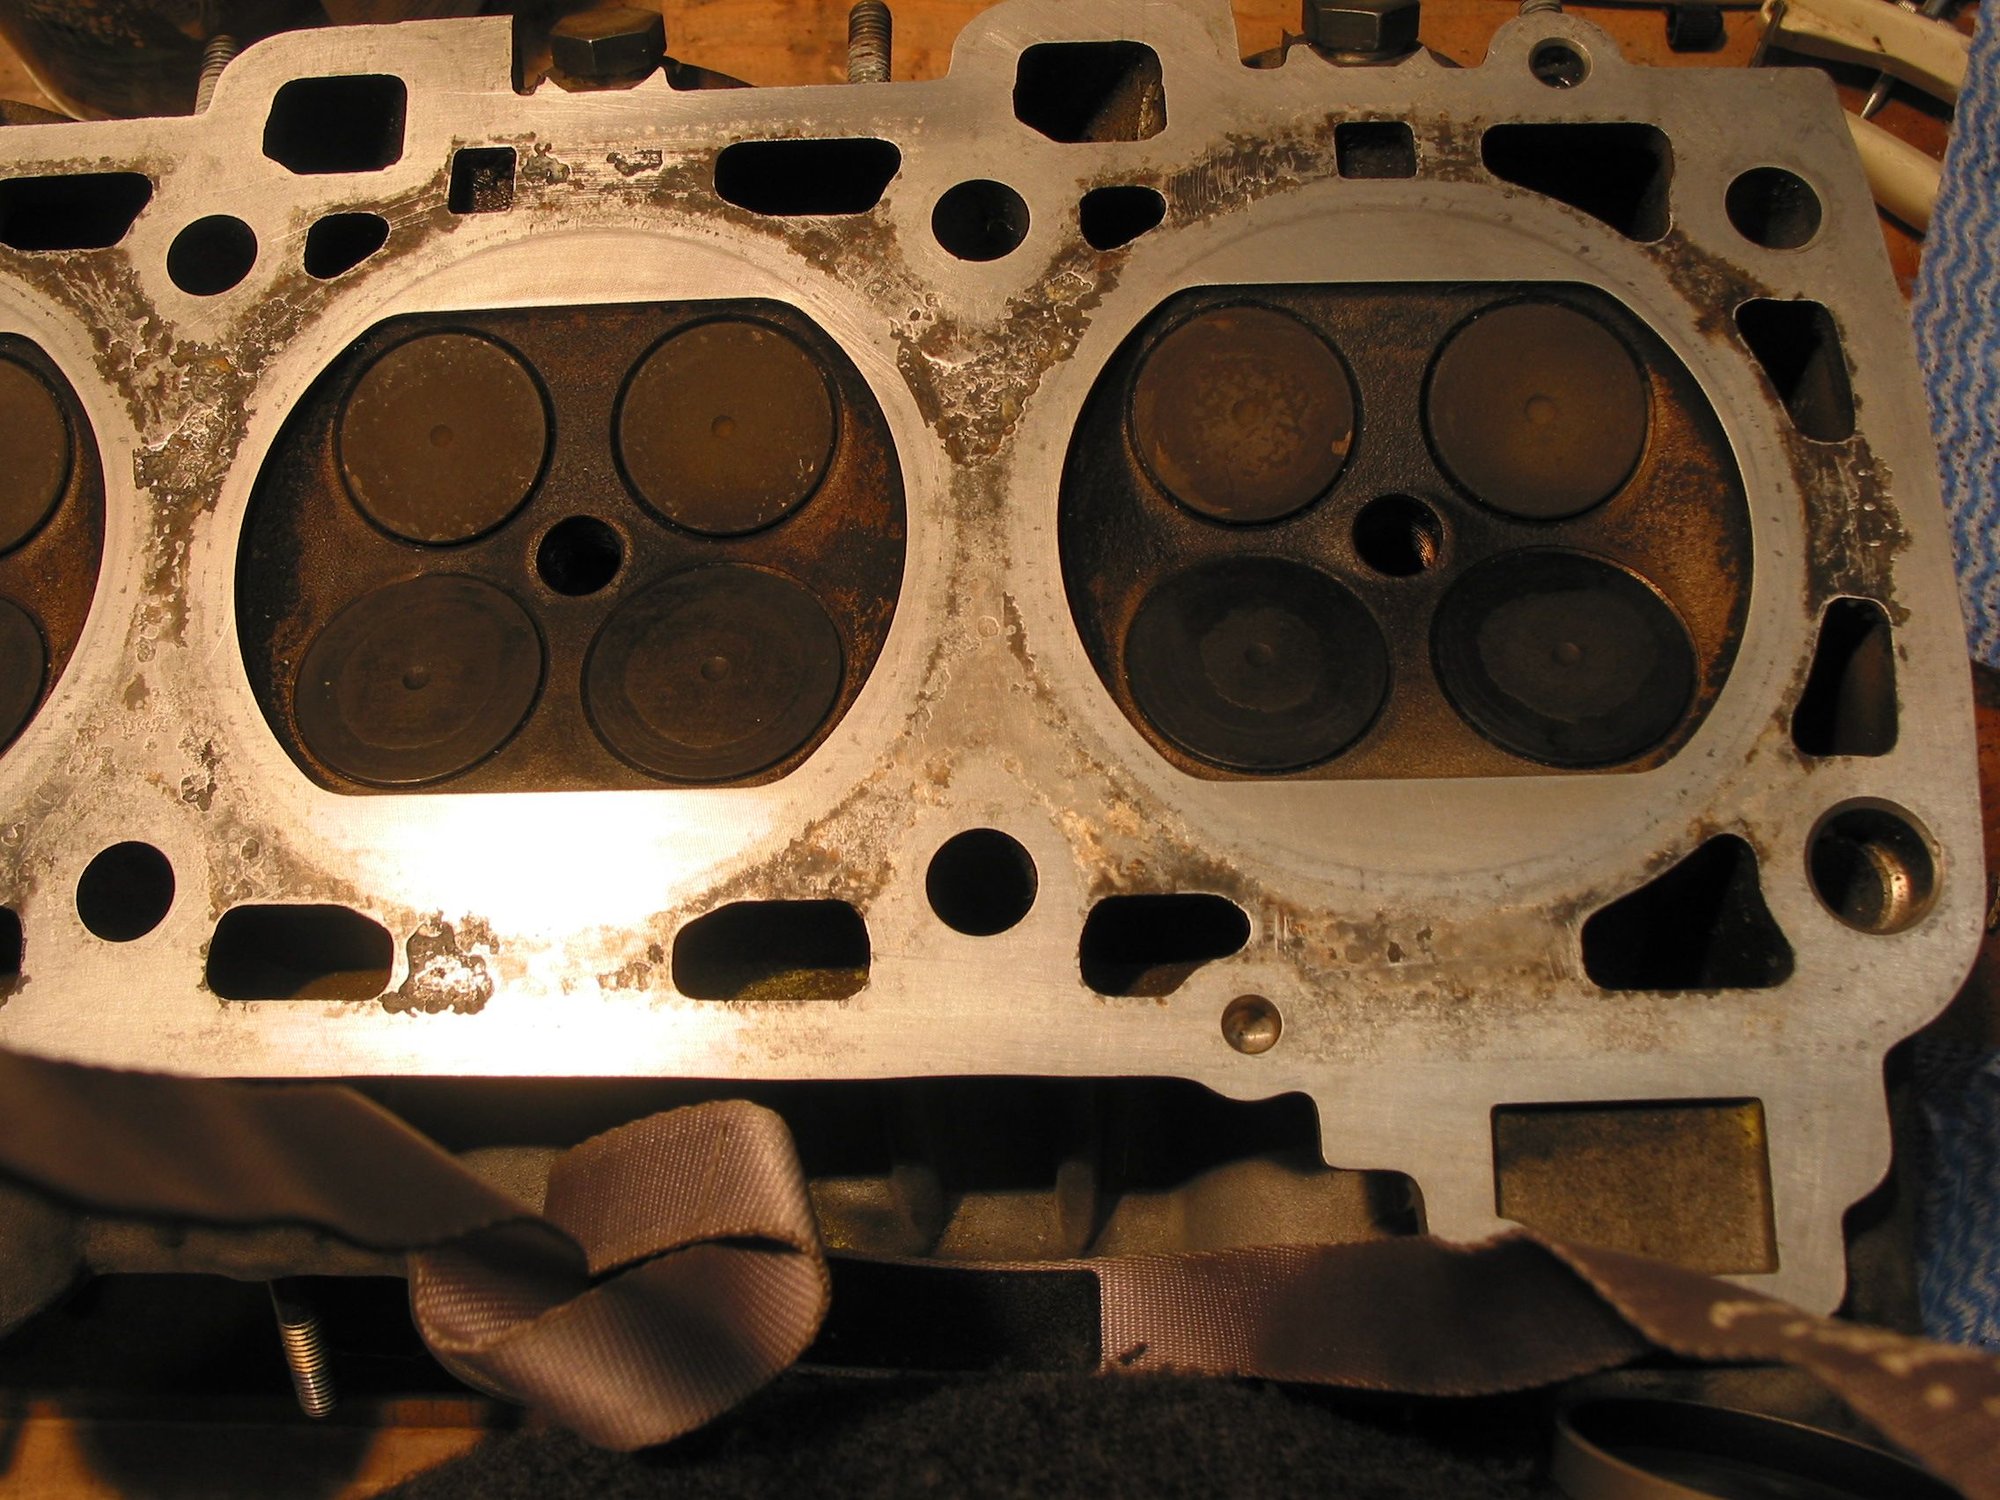
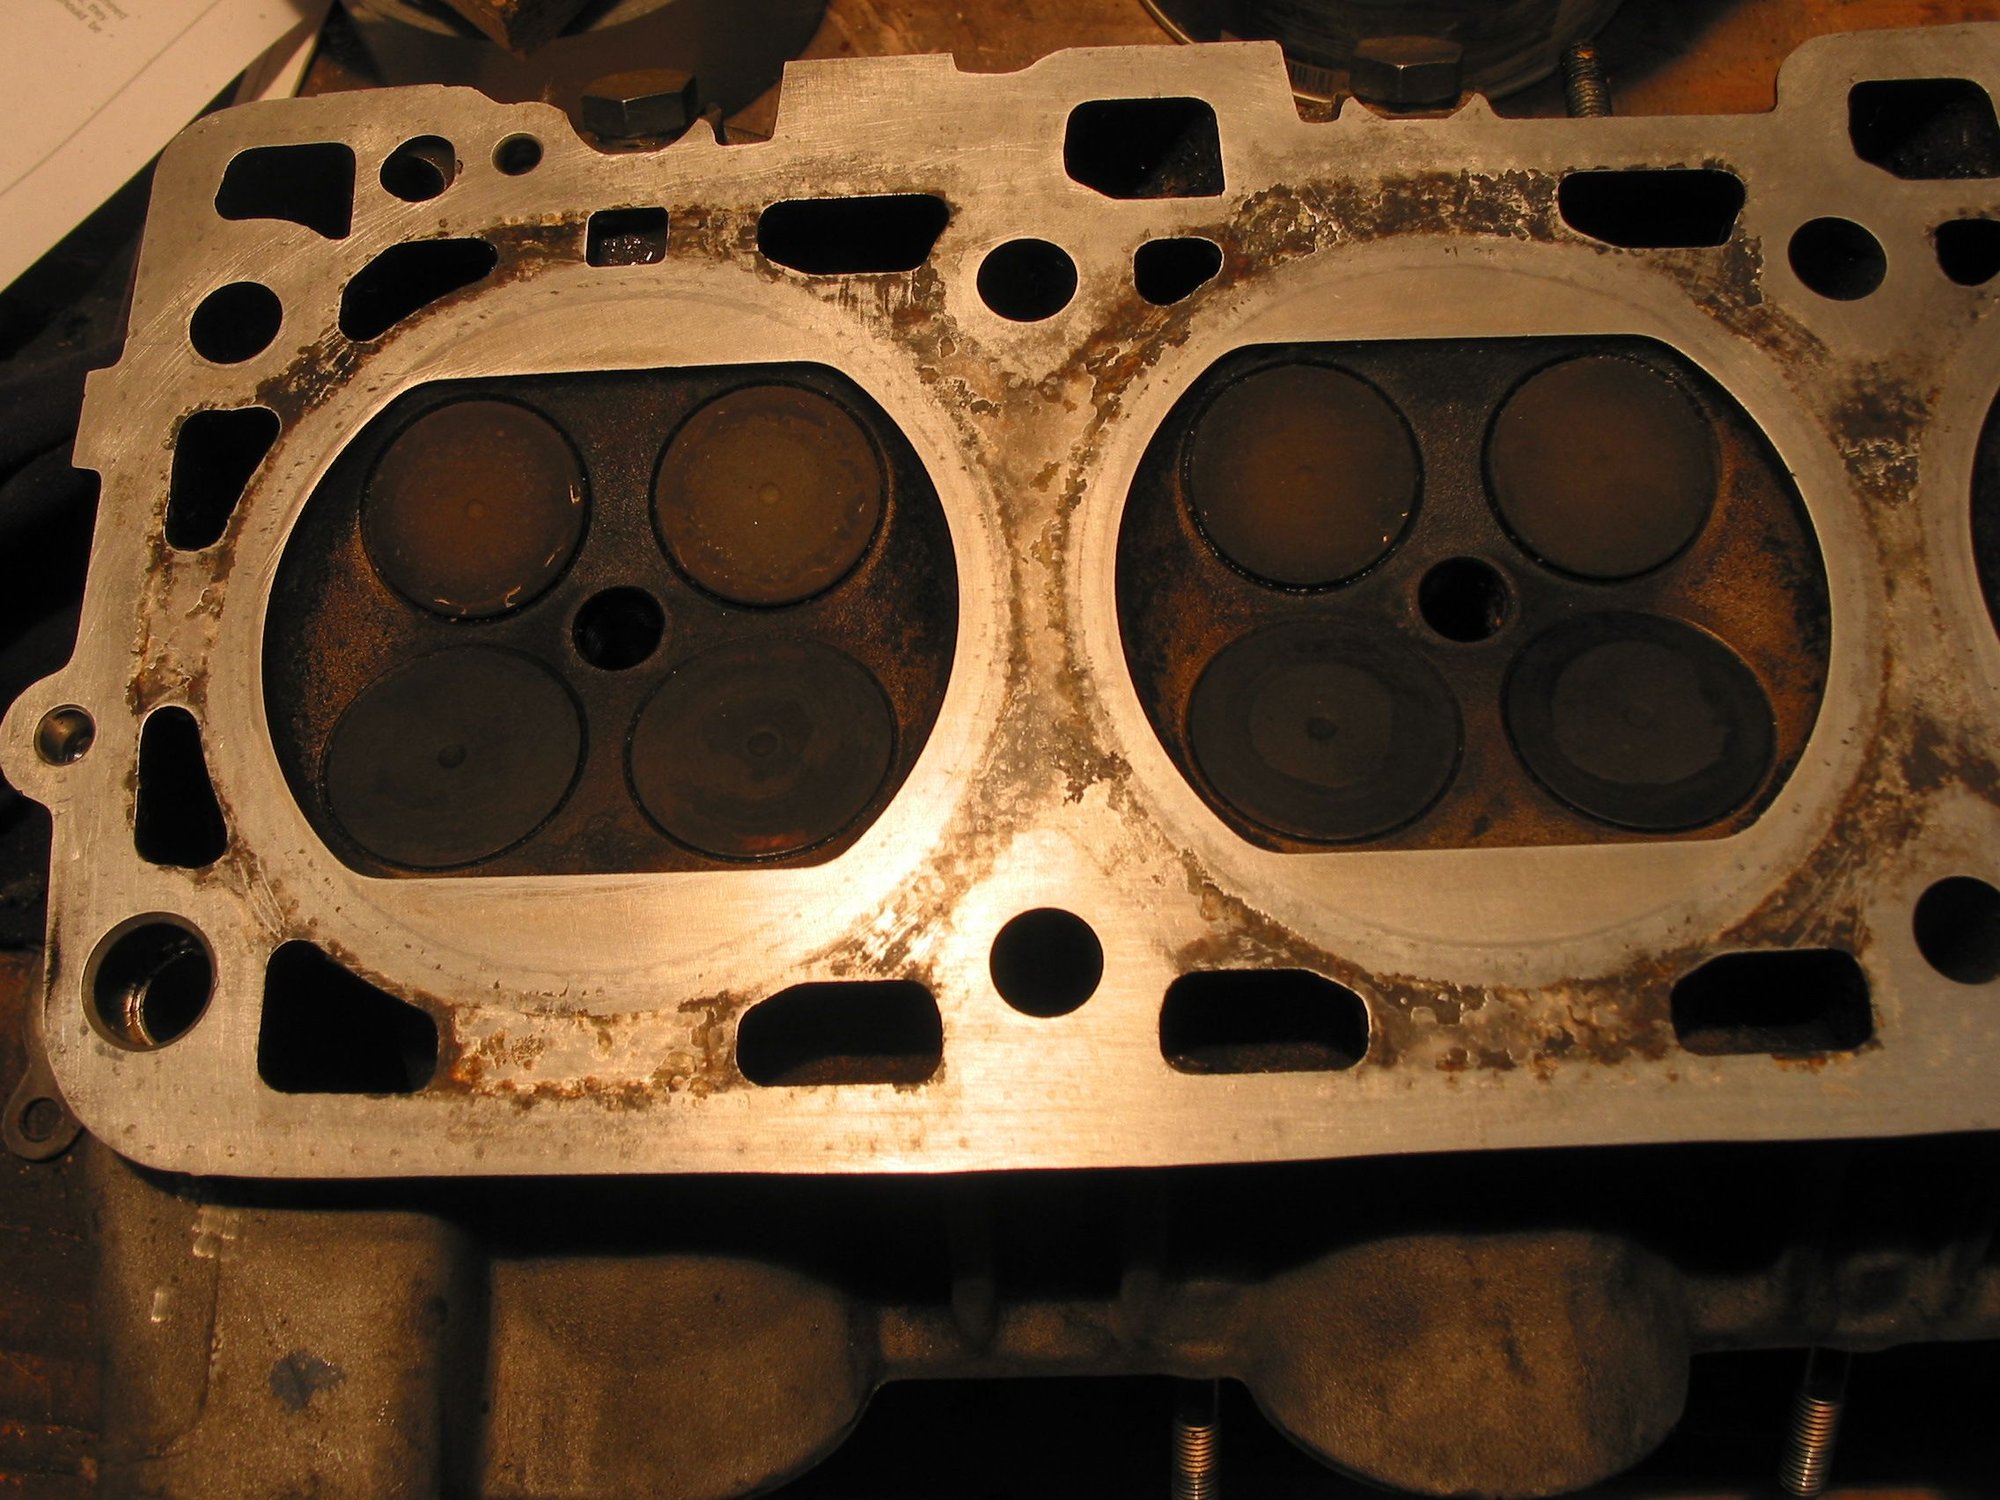
Pictures of heads after initial clean-off.
Both heads have significant 'erosion'. Initial measurements indicate teh deepest being around 0.8mm with most below 0.5mm.
Chambers are numbered left to right. Chambers 1 & 2 Chambers 3 & 4 Chambers 5 & 6 Chambers 7 & 8
I have measured the thickness of both heads between the head gasket and cam cover gasket surfaces in multiple places.
Head 1 - 4 measured consistently between 149.90 & 149.95mm.
Head 5 - 8 measured consistently between 149.95mm & 149.99mm.
Measuring from the surface protrusion just below the cam cover gasket surface on the exhaust side of the heads gives a thickness of 147.0mm, bang in the middle of new spec 146.9mm - 147.1mm..
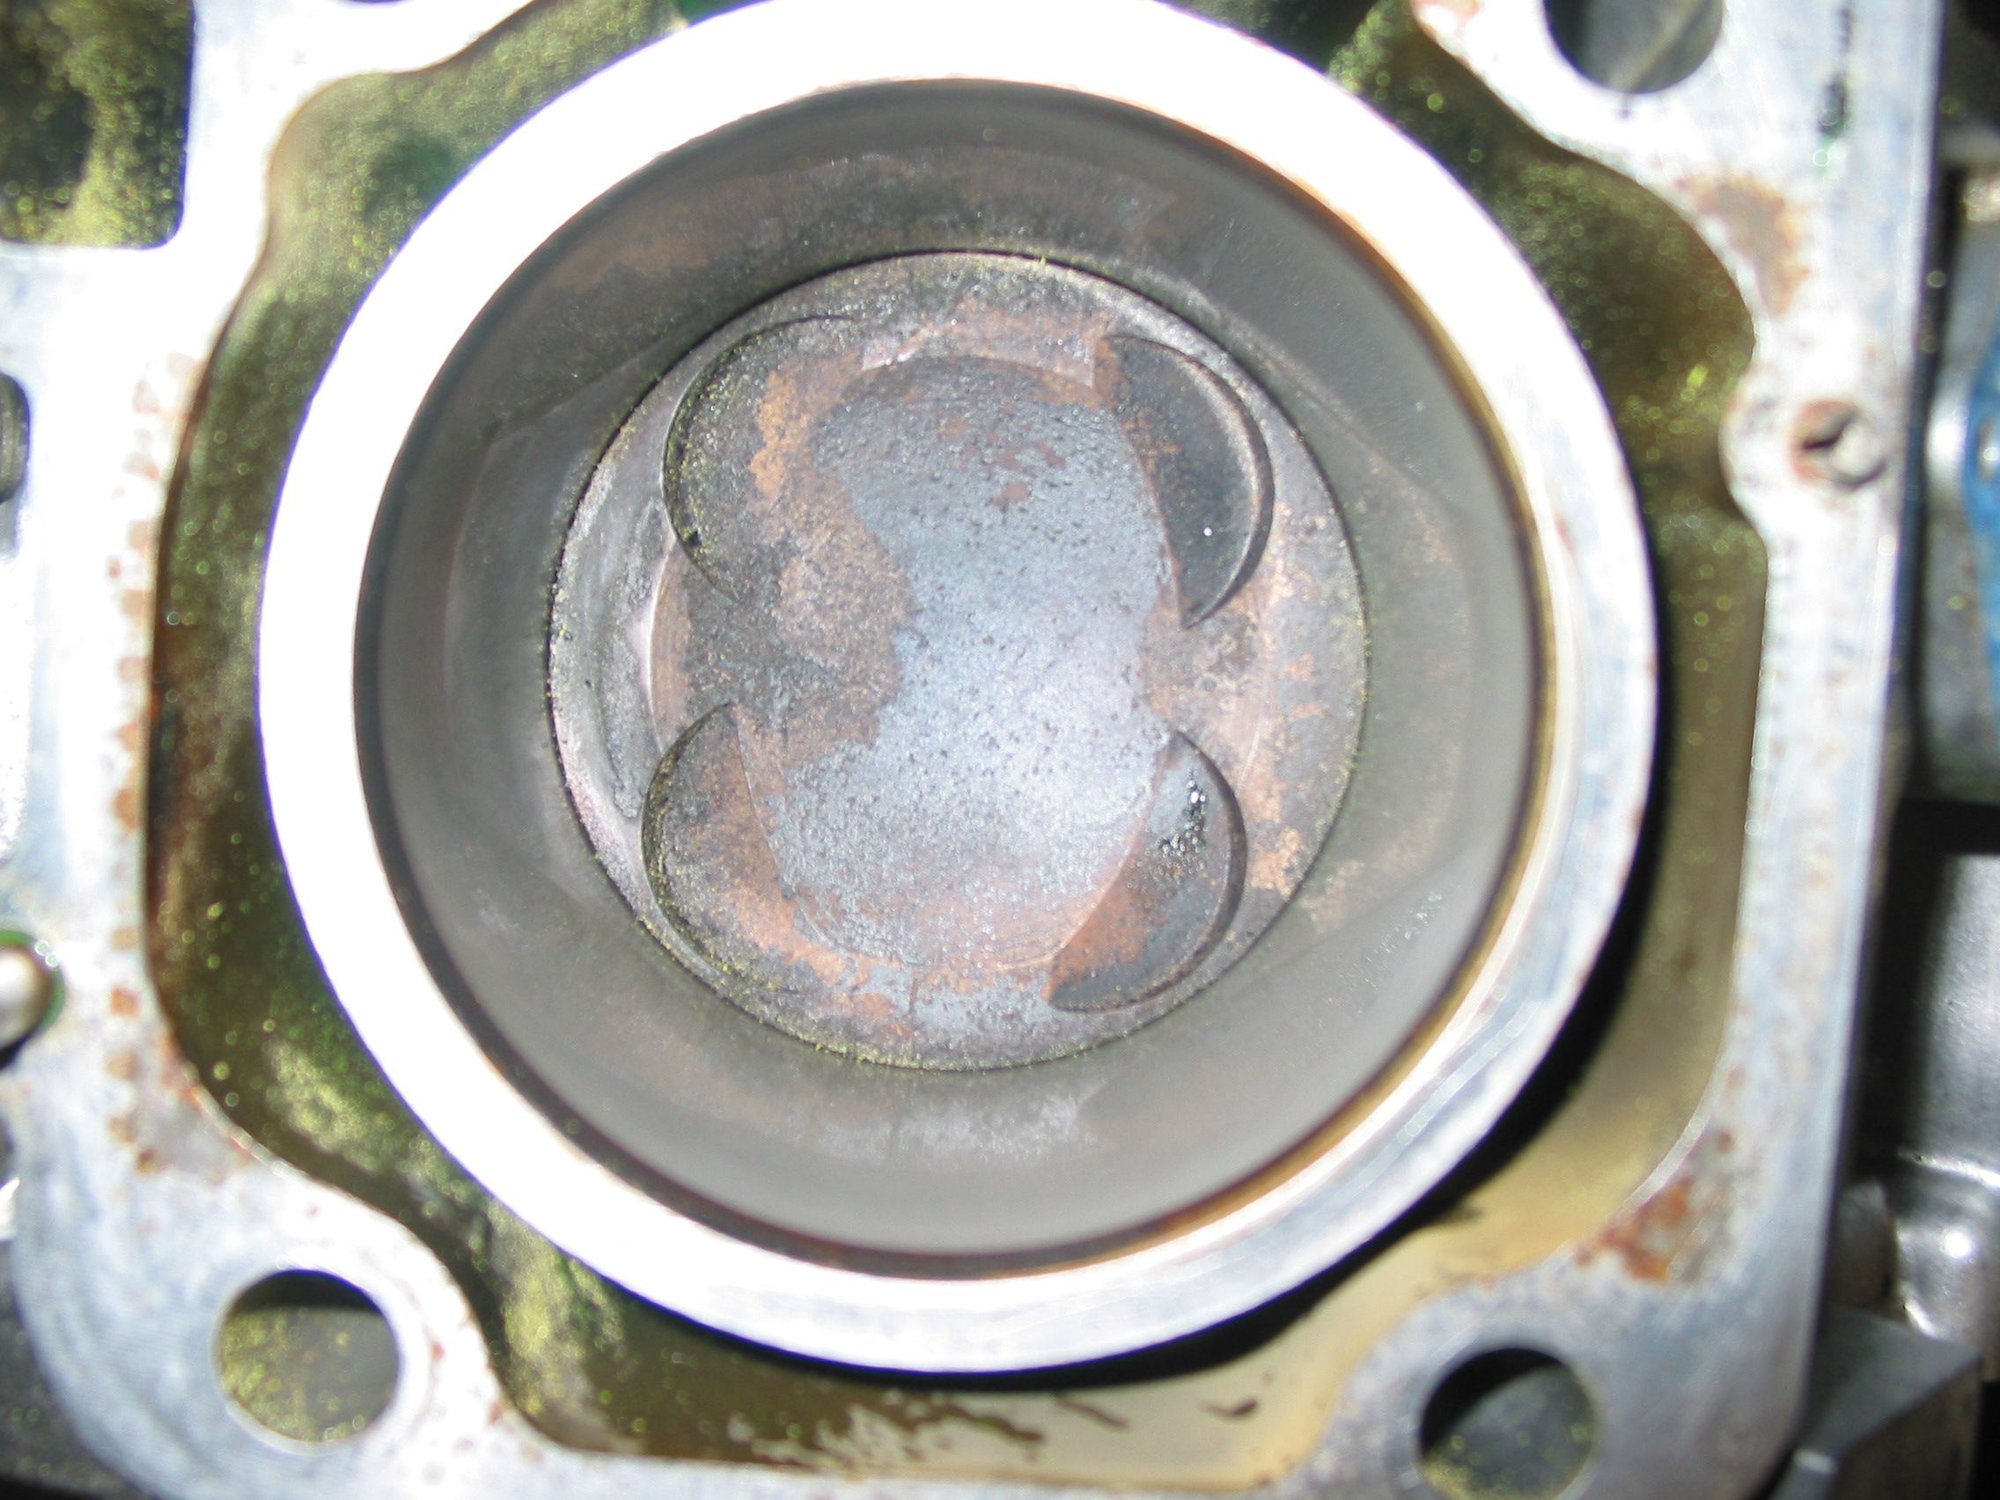
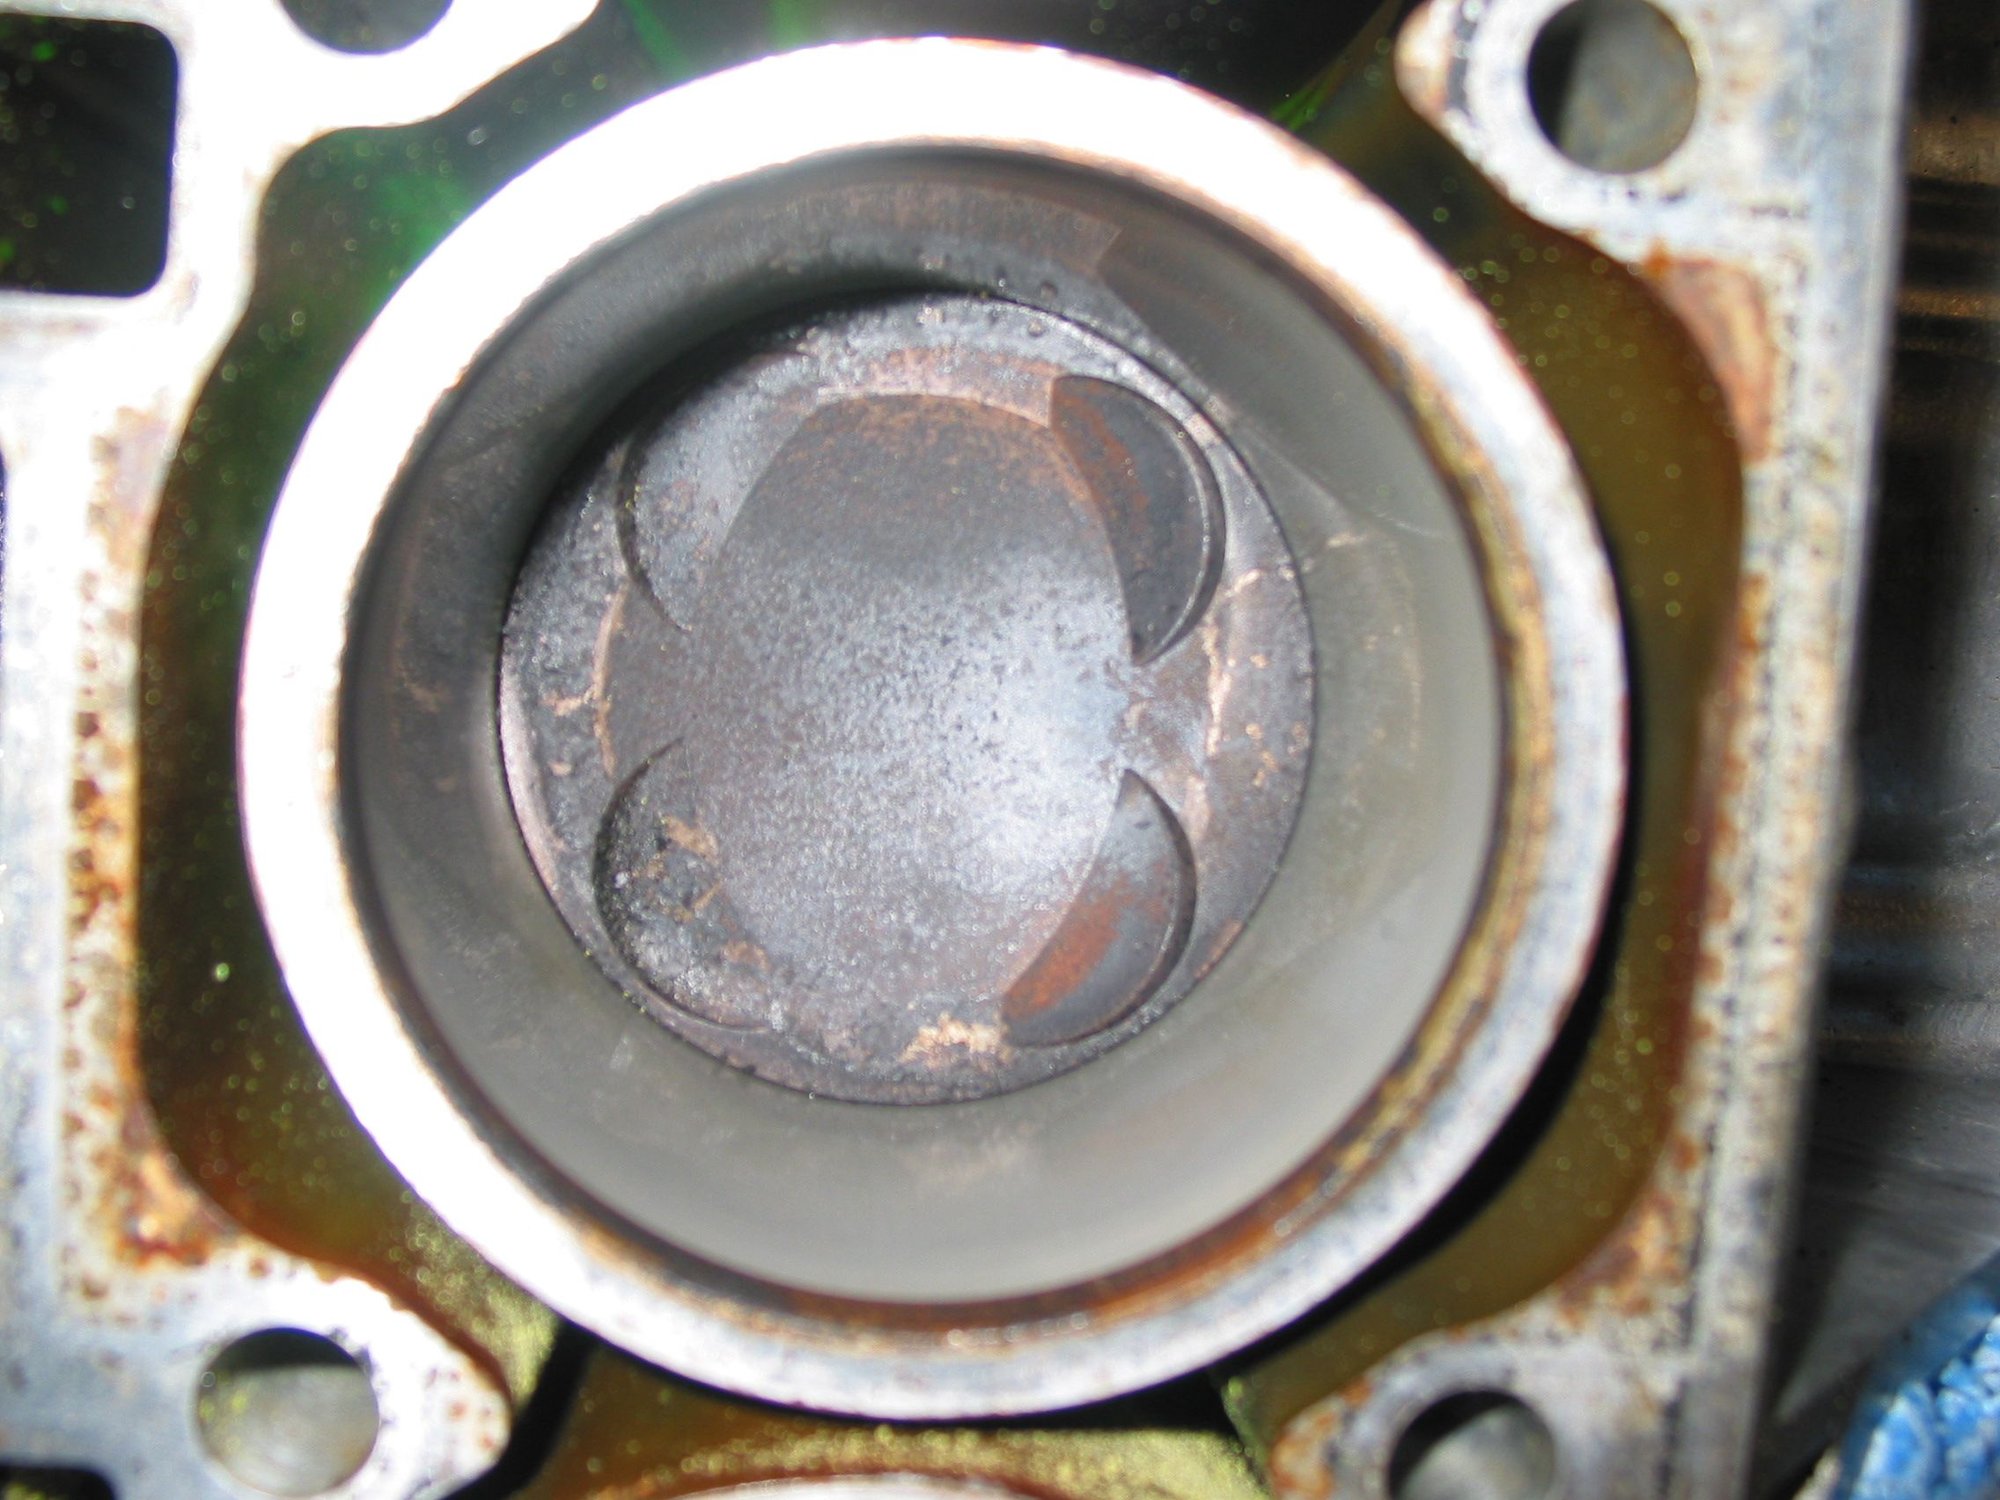
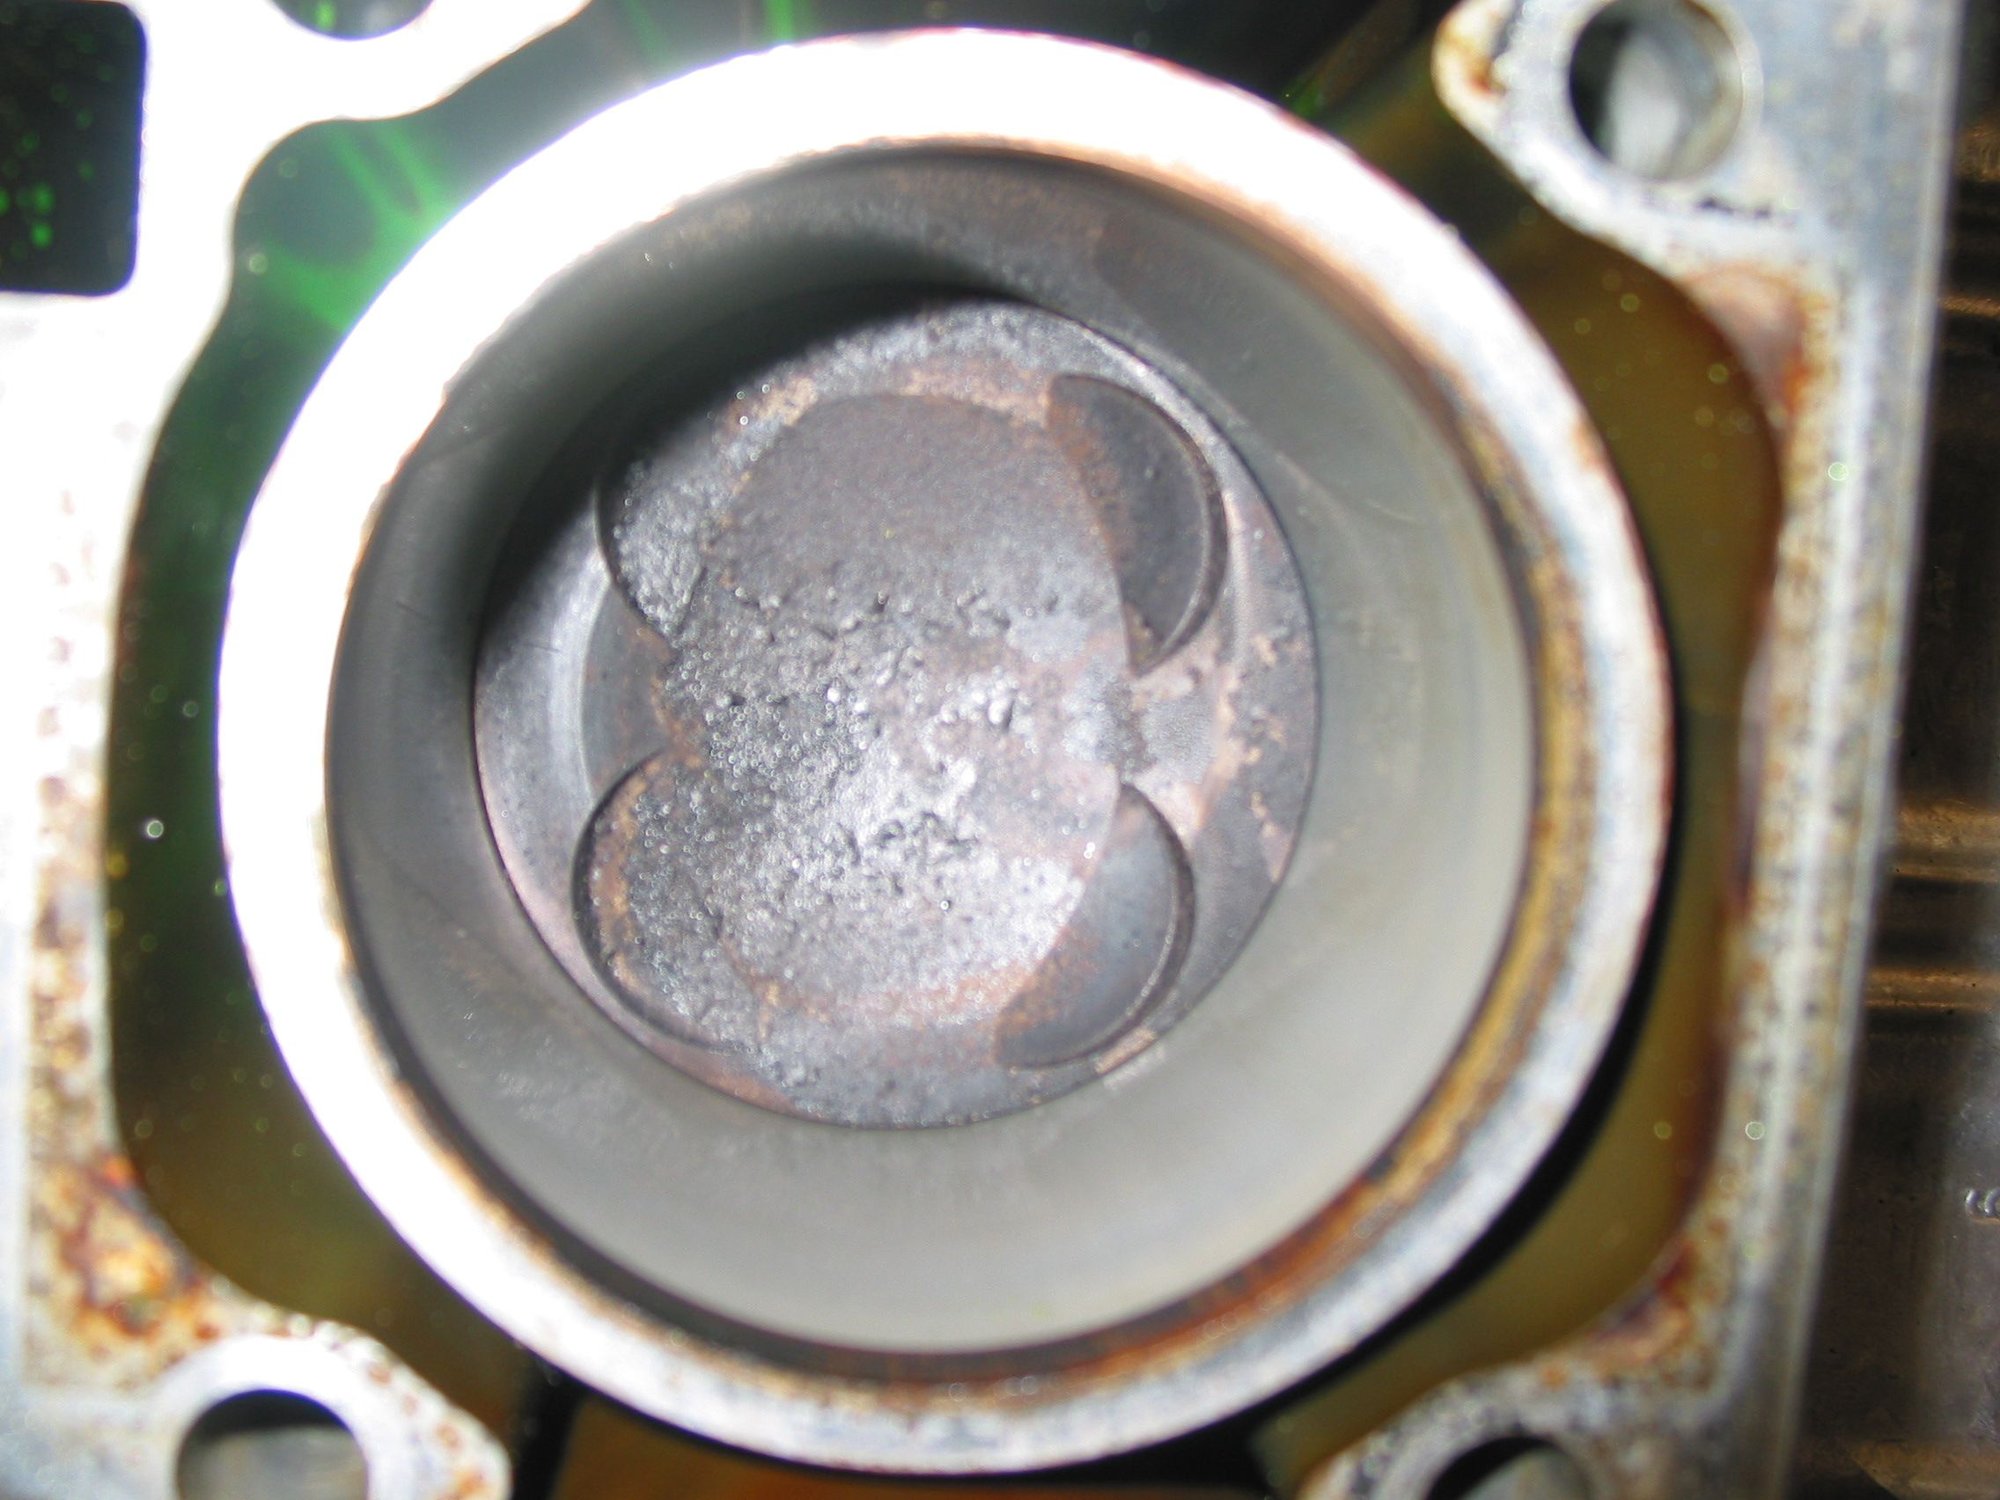
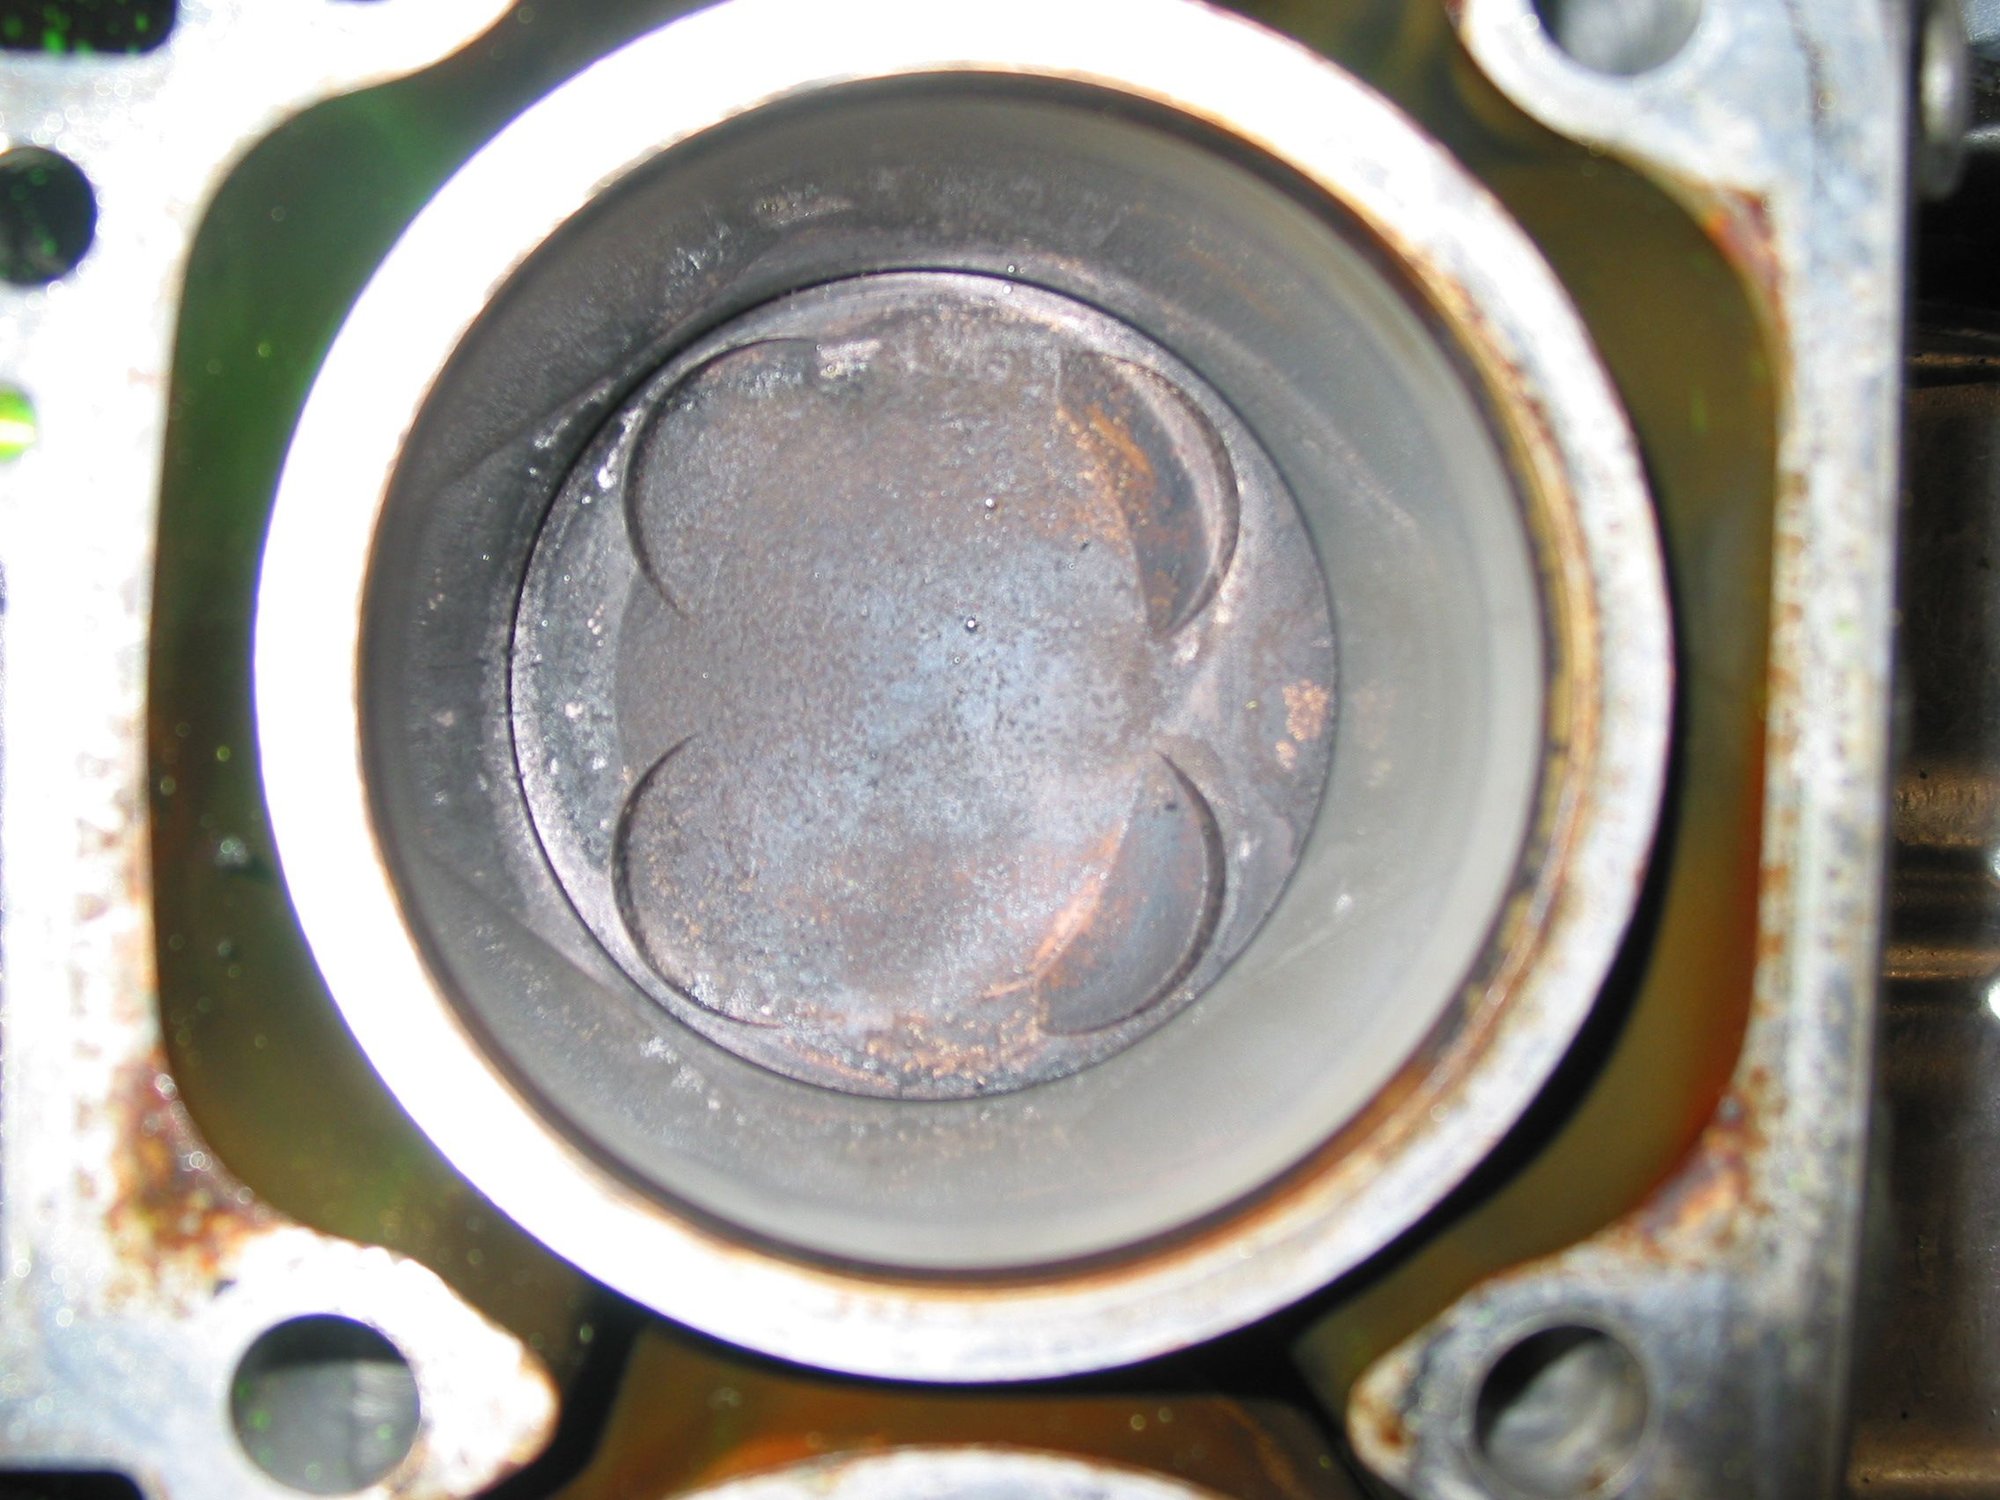
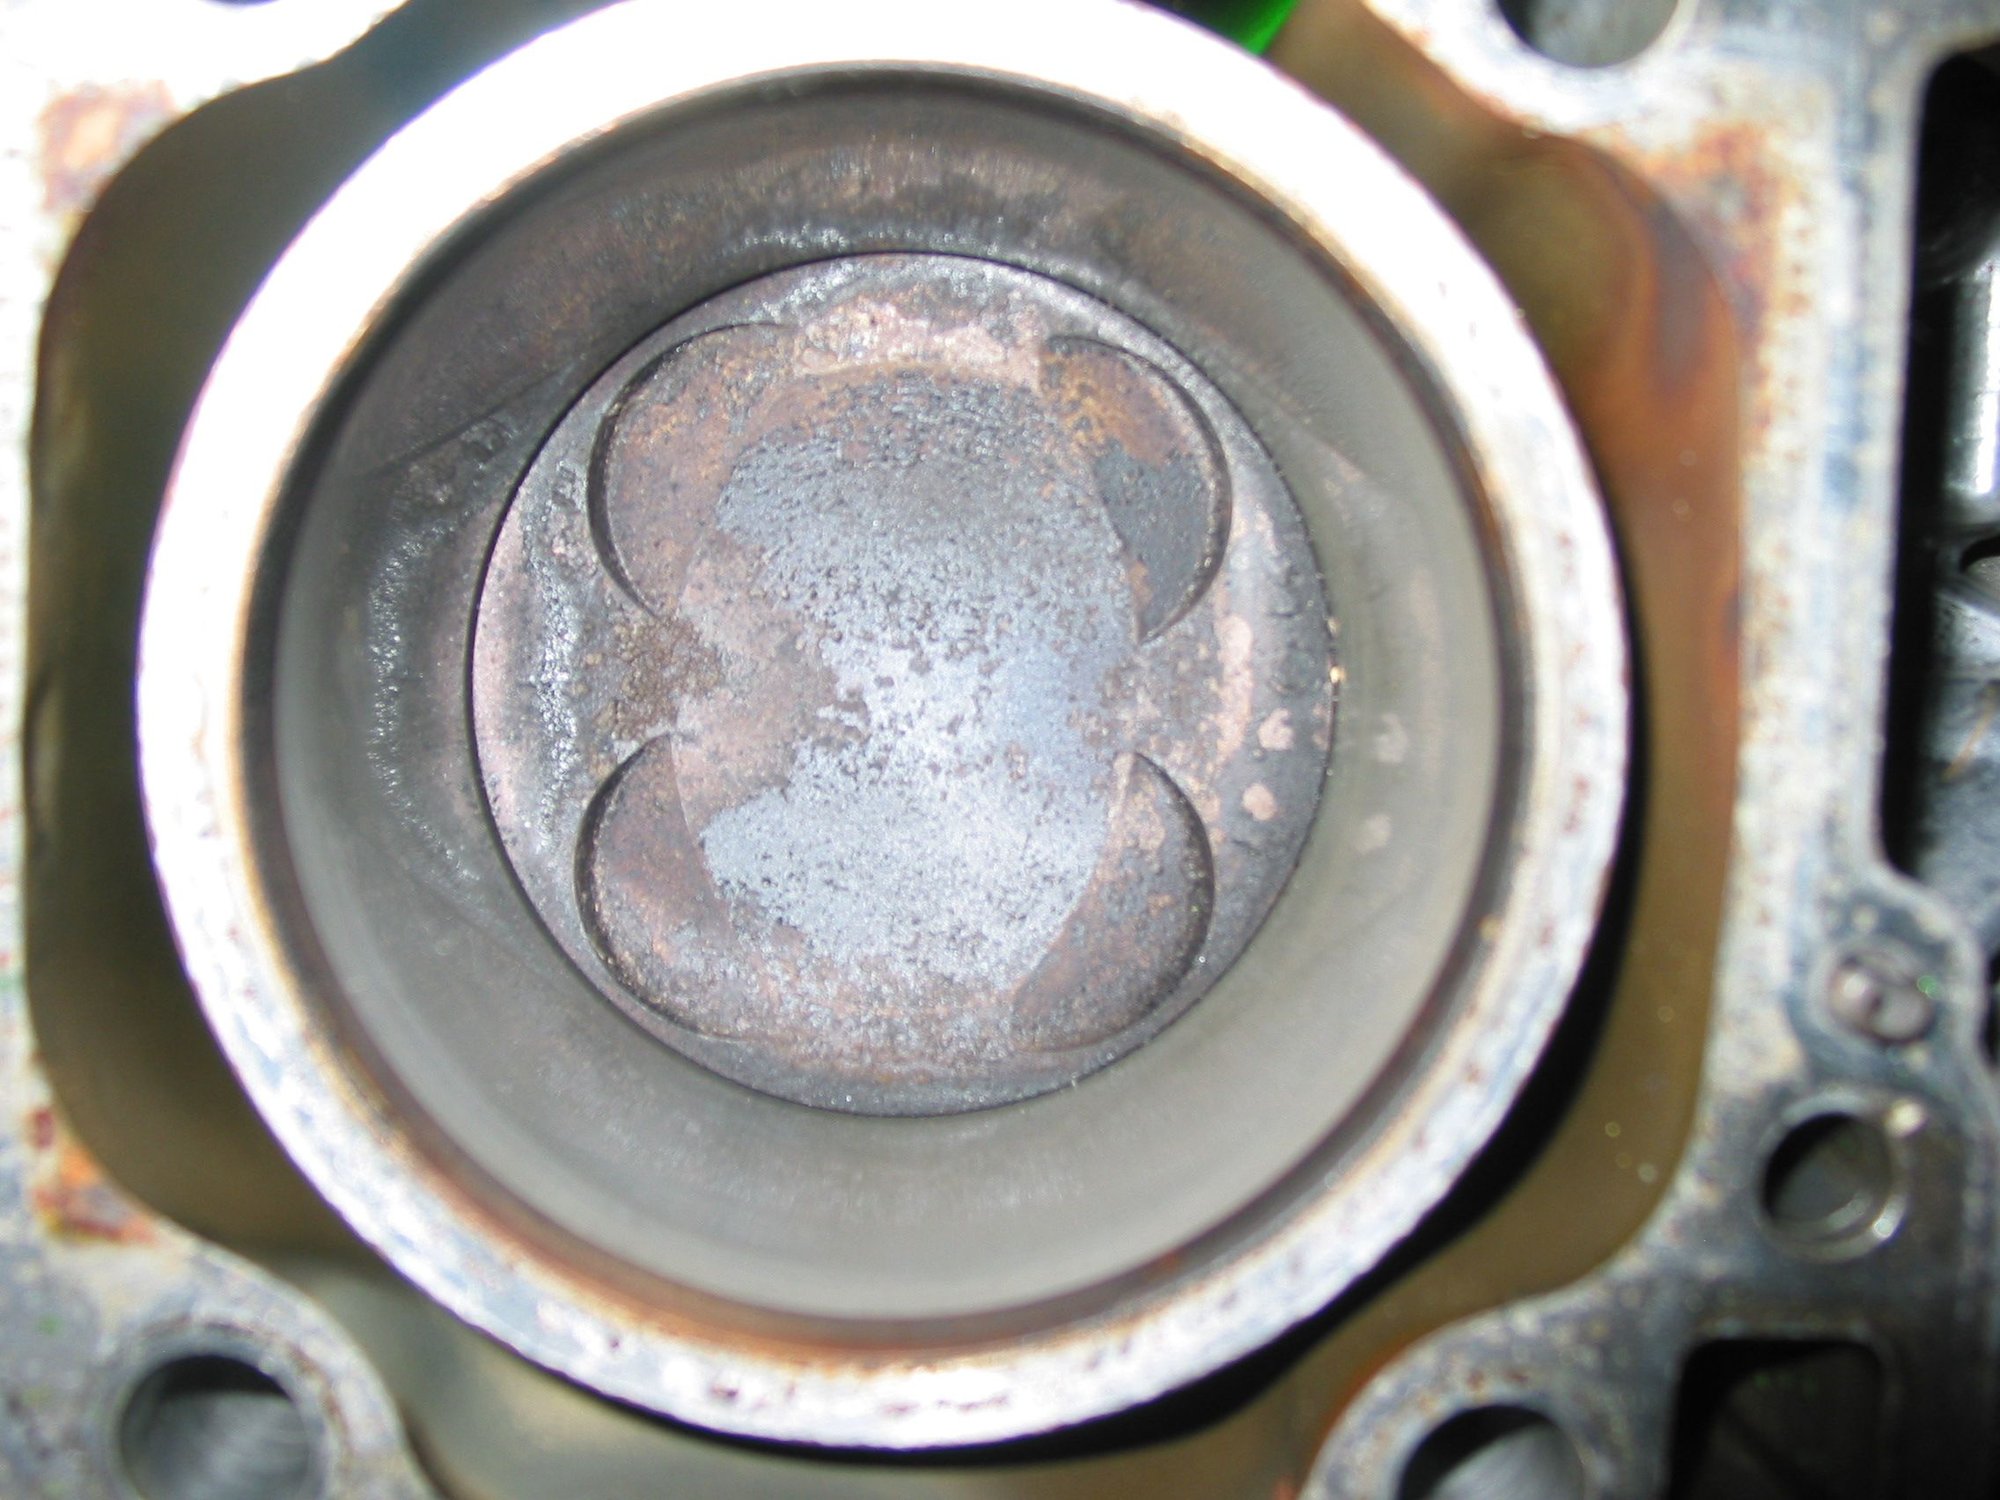
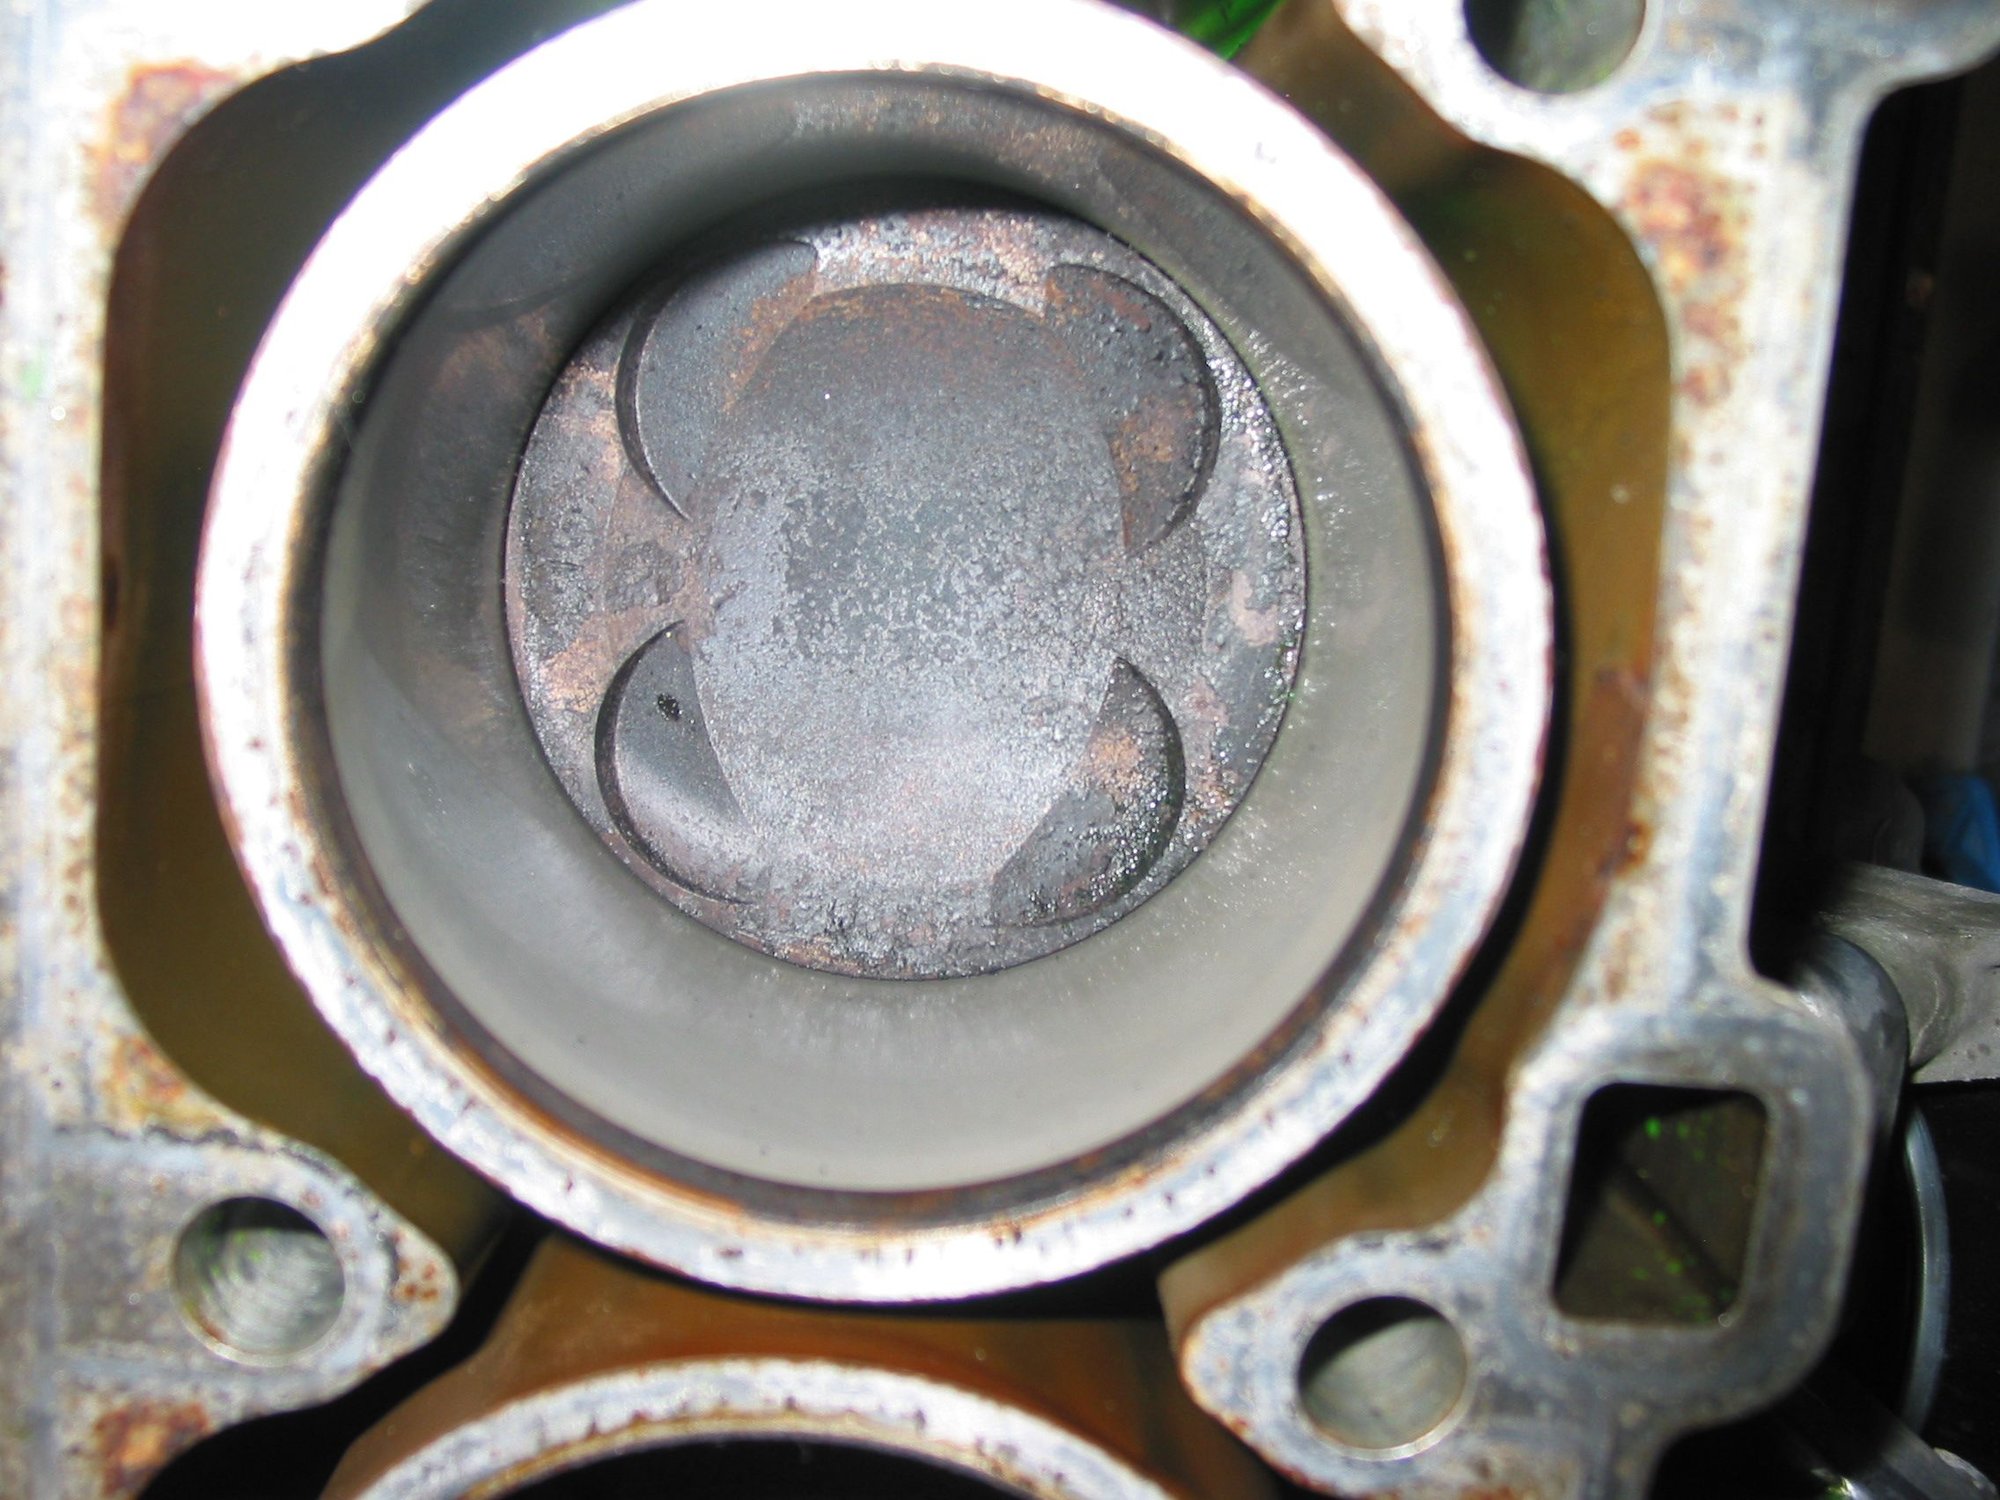
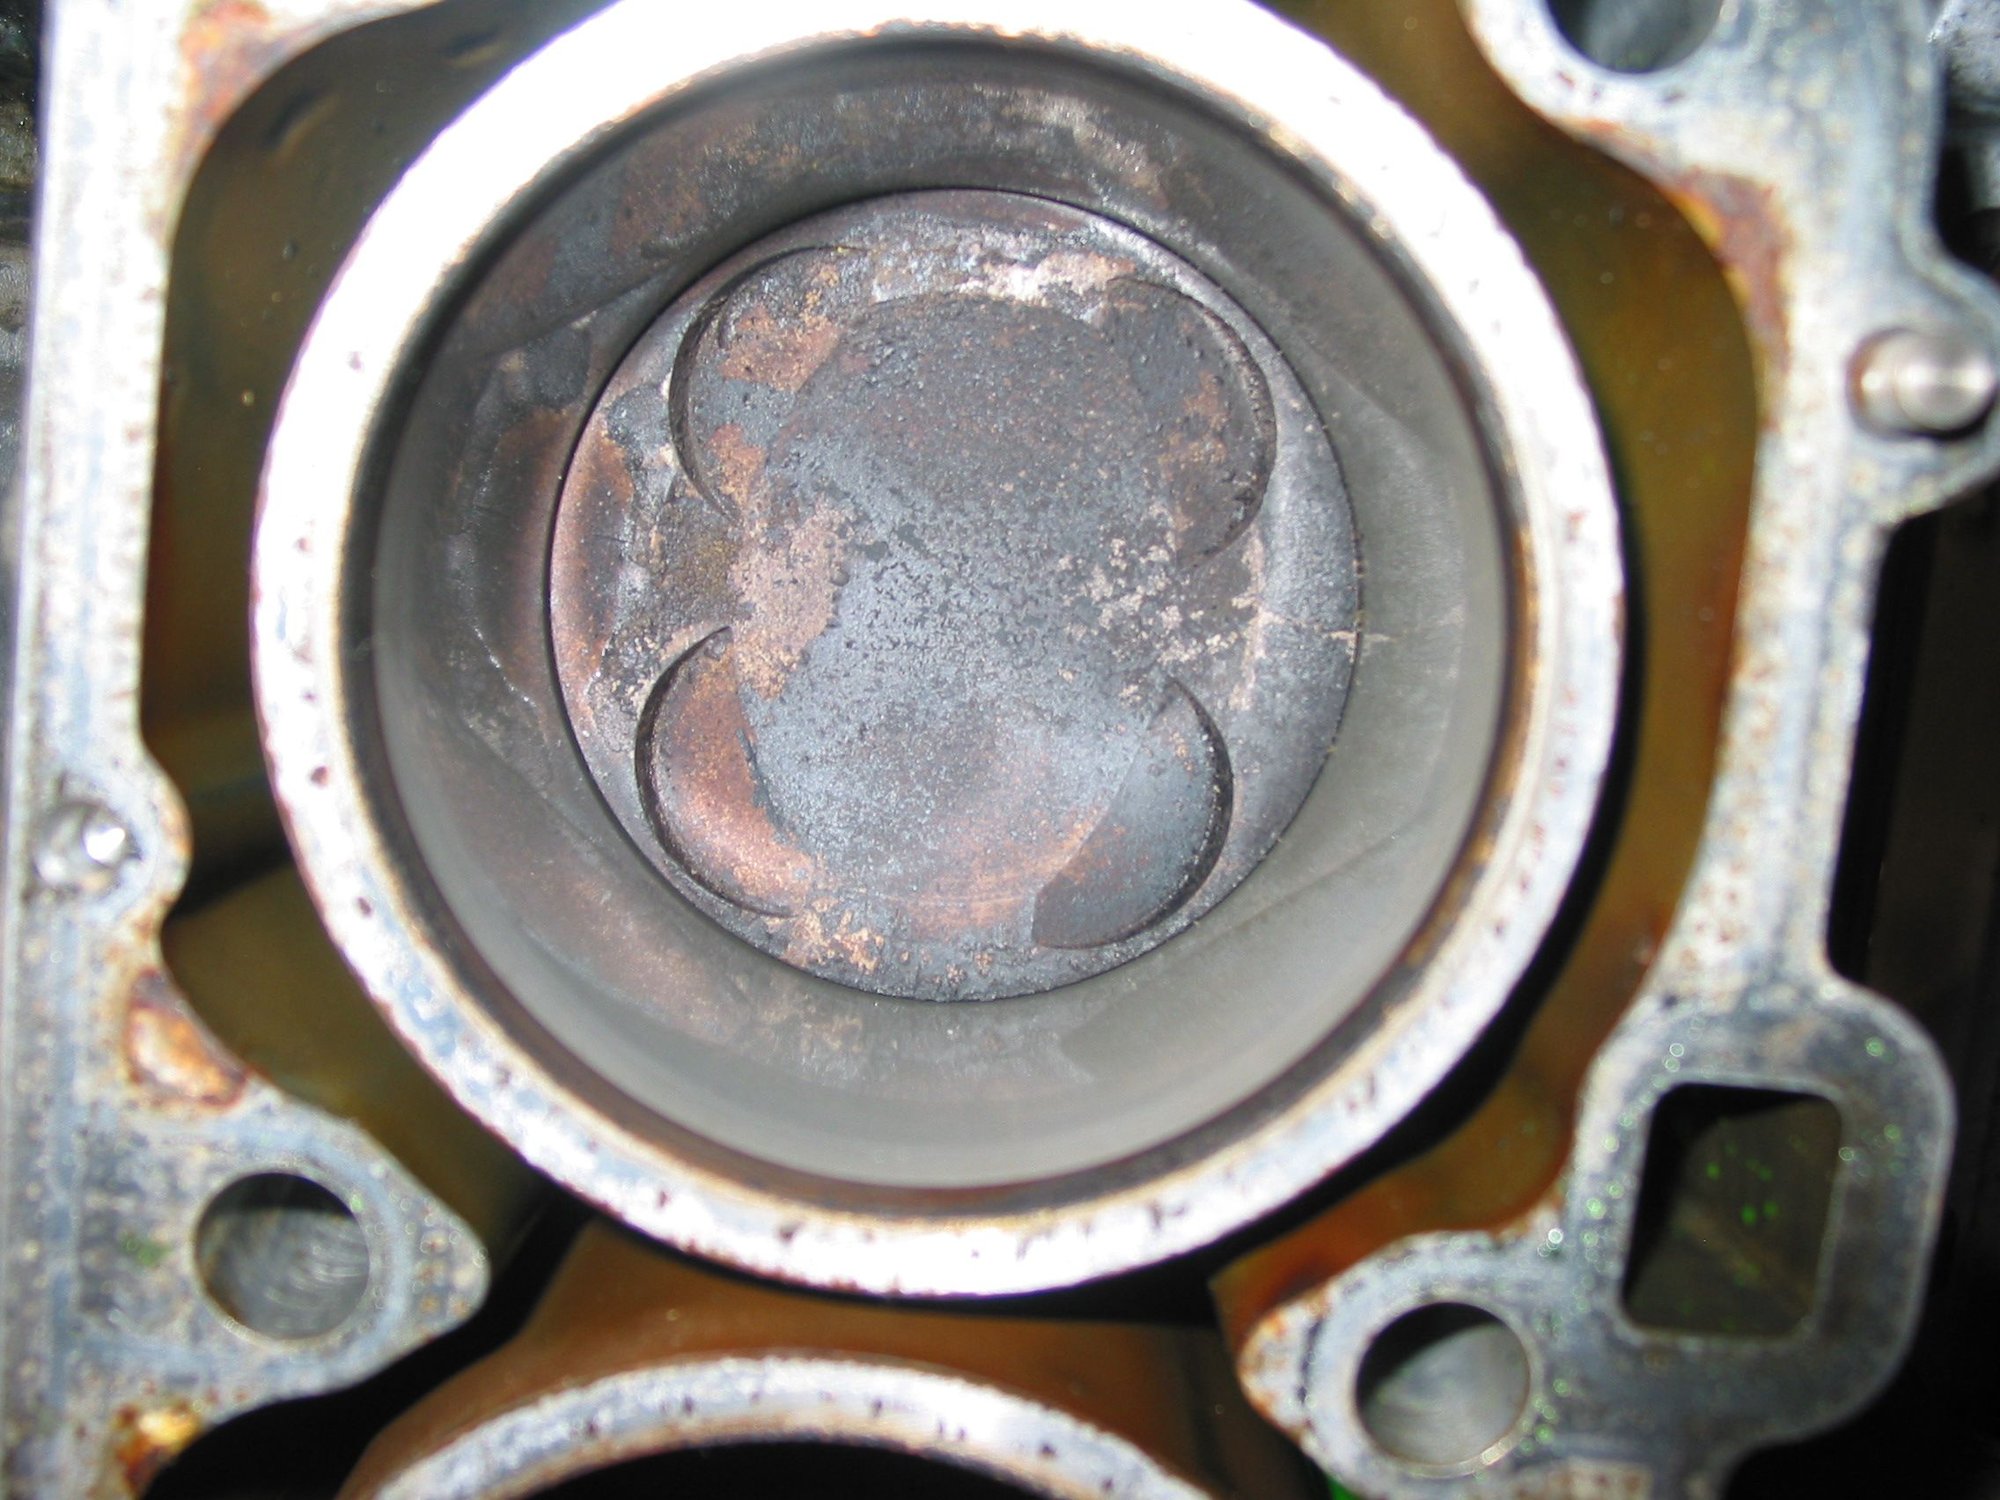
Photo's of the bores (with pistons still in place).
Bores are from 1 (top) to 8 (bottom).
At this stage I do not see a reason to remove them. I will measure them with a bore gauge in case something is amiss.
I will be checking rod bearings though and have a new set of nuts to use on reassembly.
In case anyone is interested or it helps someone in the future.
My long bolts, from the base of the washer, are 195mm long, protrude through the head by 120mm and have a threaded length of 107mm.
My short bolts, from the base of the washer, are 145mm long, protrude through the head by 70mm and have a threaded length of 37mm.
Everything I can find indicates that the torque spec for both length bolts are the same. A quick measurement of the distance from the top of the block to the start of the threads in the block indicates that all bolts, whether short or long, have roughly the same number of threads engaged.
Unfortunately the damage is more severe than I initially felt it might be but for what little it is worth we have seen much worse on this list.
The following is my assessment of what I can now see:
1. First of all the damage was initially caused by a crevice corrosion attack of the type I have been trying to inform the list about.
2. The attack has nothing to do with the coolant type you used or the change intervals - as I am concerned it is a consequence of an inherent design flaw that sooner or later will have potential to impact most if not all 928 and 968 models. Susceptibility to this issue and the speed and extent of propagation varies widely- as to why this is I have not as yet been able to figure out.
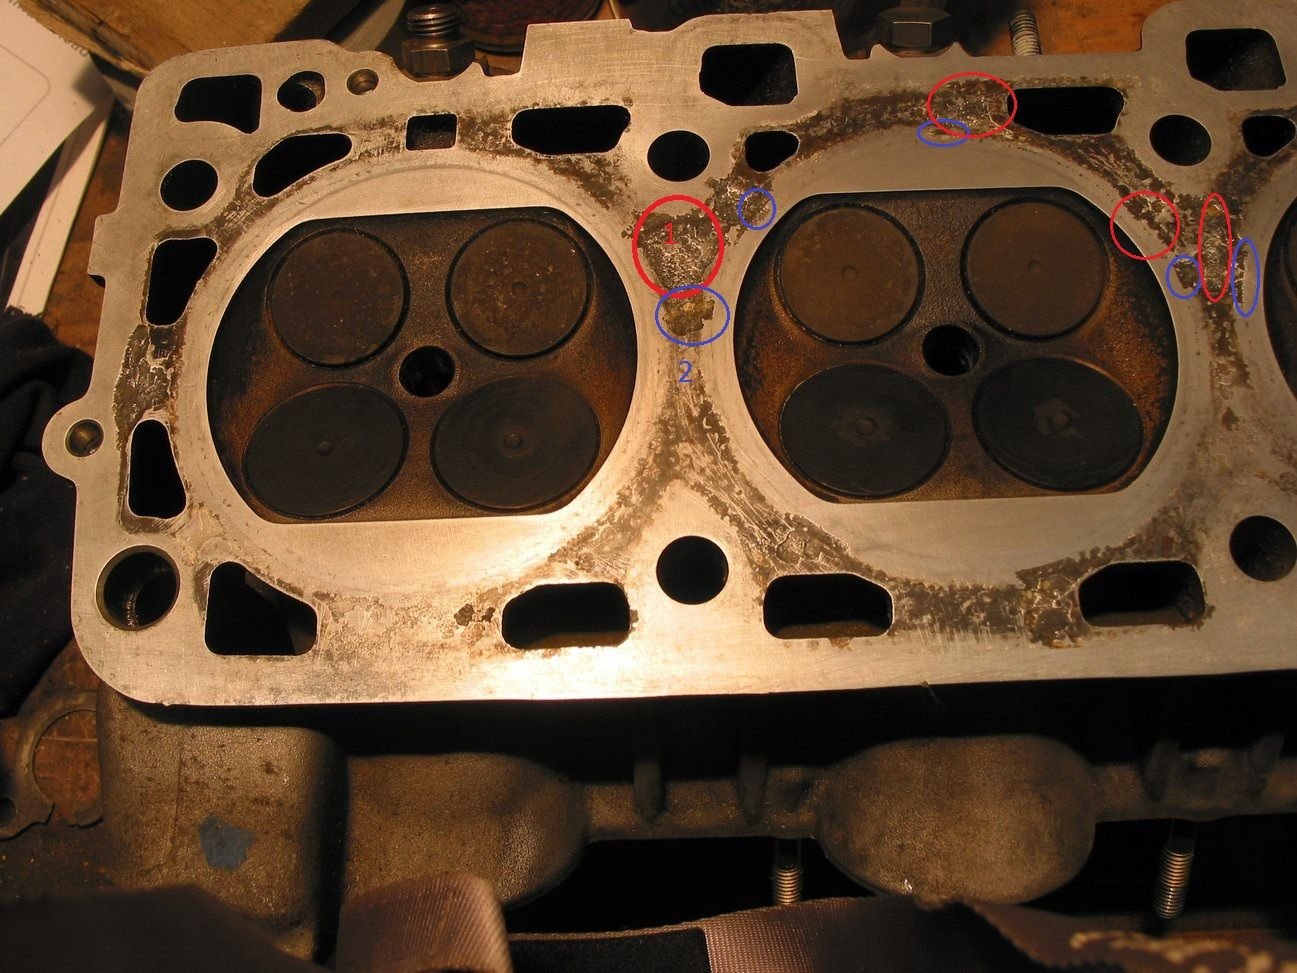
3. Although it is not too clear on your latest crop of photos one can still clearly see that the transfer passages and surfaces inside the head are unmarked. This screams that the coolant type/make had nothing to do with the attack and it is what happens to the coolant trapped between the head and the gasket that has initiated the attack mechanism in essence the sequence is stagnation, depletion of additive package, pH drops to 7, glycol then breaks down to form organic acids, pH drops further to about pH3, the alloy oxide layer breaks down, elecrons start flowing as an electrolytic cell is formed, the alloy is easily attacked at pH less than 4 and the acidic environment eats away at the gasket binder material. The galvanised mesh holding the gasket together is attacked and once the galvanised layer is gone the steel forms ferrous oxide- an orangy colour [can you see any signs of this?].
4. The interface between the head gasket, head and cylinder forms two concentric rings. The inner is the fire ring and that seals the combustion chamber. The outer ring is formed by the fibrous material and isolates the fire ring from the coolant or whatever acidic gunge forms between the gasket and the head.
5. In this case the gasket has been degraded up to the fire ring in a number of locations and that brought the gunge conjointly into contact with the head and the fire ring. When this happens a galvanic corrosion attack can then take place with the head material being the sacrificial anode - if you look at the annoted blue rings one can see the attrition looks a little bit different, no signs of pitting but material has disappeared. Ironic that I have been communicating with Uranium Joe on this very matter- a secondary consequence but potentially destructive nonetheless.
6. If you still have the coolant in your garage get some fish tank water quality test strips and measure the pH- I am pretty sure you will find it is still alkali.
7. The damage is not "erosion"- that would be damage due to mechanical abrasion which can happen if the fire ring blows.
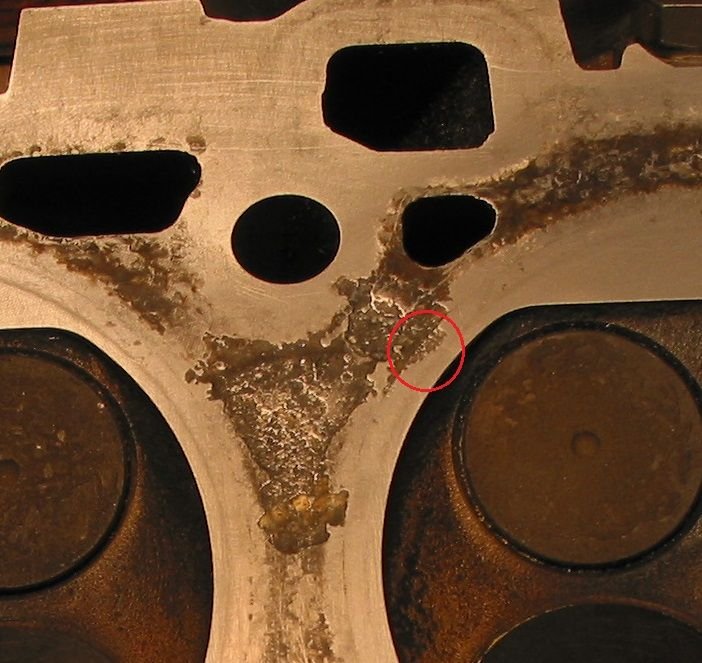
8. I have annoted one of your pics below that tells us me at least all one needs to know-the red circles are more obvious crevice attack sites [but not all of them on that pic alone] and the blue circles are possible galvanic corrosion attack sites- a consequence of the crevice attack and the gasket degradation.
9. One can see very clearly how the coolant has crossed from the transfer ports and into the gap [i.e. crevice].
10. When the crevice corrosion mechanism takes place the reaction liberates hydrogen. This hydrogen, due to its very small molecular size, can and will diffuse into the cast material of the head. This will need degassing prior to any welding repair assuming such is likely needed. This [as I recall] needs heat to 200C and held for about an hour.
11. GB also pointed out a week or two ago that the head bolts are regularly seeing hydrogen embrittlement. You need to be aware of this and we can chat about this in another post. You will also note that the corrosion has also started to breach one of the head bolt chambers but even so I would think hydrogen can migrate into this area by diffusion through the gasket and the casting.
Trust the above of interest- I trust it is a fair and accurate assessment and feel free to ask any questions. If anyone has a more credible explanation feel free to expound- the more we discuss this matter the closer we will be to finding a solution. Alternatively one can put it back the same way Porsche did and wait for it to happen all over again.
Time to review your recovery options- I can see several paths to recovery some conventional and some unconventional viz:
1. You need to establish just how severe the pitting damage is and just as importantly the depth.
2. The recovery process can be based on skimming the heads but with a stock gasket the options are somewhat limited. If the pits are deeper than 0.4mm then milling back to a perfectly flat surface may not be viable.
3. The traditional approach to recovery is alloy welding- as I noted earlier this route will require degassing. In this approach the corroded areas are ground out and then filled back with alloy rods of the appropriate metallurgy. If only the corroded areas are filled in then at the interface between base metal and filled in metal there will be a degree of undercut and this has to be machined out leaving a finish that will be slightly less than the stock dimension.
4. Another approach to consider that is non routine would be to grind out the corroded areas and fill with Belzona . When this has set the heads are machined back to stock dimension or slightly less. I have used this material with great success. Most of the corroded areas are not structural or critical to sealing integrity. If corrosion has undermined any of the fire ring surface or peripheral sealing I would not consider this route.
5. The solution I would be gravitating towards involves the use of a Cometic MLS gasket. These gaskets have what is in effect a three piece construction with stainless plates sat over a central structural plate. These gaskets have potential major advantages- they can easily be made to order with a thickness of up to 3mm and the gasket is structurally more rigid than the stock gasket thus when sandwiched between the head and the block I suspect it will form a much tighter seal around the transfer ports than the stock gasket ever can. I know Carl used to use these gaskets in his supercharged monsters but to be clear, I have no practical experience with them and you would need to do some homework in this regard. They can make completely custom gaskets [at a price] and if the order is a custom variant of a stock gasket [different bore or different thickness] they can be turned around in about the same time as a normal gasket with little price difference. The gasket faces are coated with viton and this may also help them seal at the transfer passages.
These gaskets usually require a much finer surface treatment than a fibre style gasket..be aware of those machining requirements.
These are -the- solution for MK3 supras..because of a grossly underengineerd heat bolt design...and will seep and fizz like a soda through the MLS gasket on a 'default' surface machining all the time. Absolutely an Ra of <30 at worst, where the OE Fel Pro needs <50-60...quite a difference.
Come what may, Myles is [I suspect] going to be facing machining of the heads no matter what option/approach he faces and for sure fitting MLS gaskets is not without specific requirements but then I would expect Cometic to to in a position to advise such- I seem to remember they advise RA50. As I understand Carl used them in his 1000 bhp build and they seemed to work OK for him - no idea whether the head studs he used would also need to be in play and it would be good if anyone who has experience of such in a 928 motor could chime in.
Whether or not Myles could get the block faces finished as needed in his locale only he can determine that. The path of least resistance may well be a rinse and repeat job. The entire point of brainstorming is to identify the possibilities and then evaluate them to determine the probabilities.
I would only go down this route if I was sure it would solve the base problem. From a practical point of view coating the vulnerable areas with a dollop of RTV might just do the trick in that it might just enable the gasket to stick to the head and exclude coolant from getting into the gap- that or defer such at least.
Hi Myles
Great write up - the 928 boys in Auckland are all following along closely! I suspect we will be up for the same job in the near future! Keep the pictures coming.
Warmest
Thank you Fred and Speedtoys for your comments and input.
Lots of investigating ahead. Hopefully Dr. Brown will also chime in with some comments.
Cheers
Myles
I went back and looked at the pictures of the heads you purchased (as back-ups.)
I would definitely use those heads, instead of these.
If you are concerned about using the heads off your engine and saving the spares you bought, my suggestion would be to keep the heads off of your engine, in the small chance that you will ever need to do this job again.
If they can be repaired today, they can be repaired thirty years from now!
Send your "spare heads" out and have them completely freshened.
Forget Porsche's valve guide specifications...or better yet, divide their wear limit by "4".
Have the seats and valves "kissed" by someone with a modern Serdi machine.
Have the decks "kissed" by someone that will take the time to indicate the head into the machine and cut it straight.
I've found that disagreeing with Fred is much like disagreeing with Kibort....almost futile.
It's far easier to simply allow him his theories regarding the one 928 he has any experience with.
His theory about "crevis corrosion" is fine...until one tries to explain the vast differences between condition of the various engines that get disassembled.
If the coolant was not/is not the problem, every head of the same age/mileage should look exactly the same as the next.....it is essentially the only variable!
This is completely absurd, of course!
While I may have some external "clues" about how different engines are going to look when they come apart, condition of the head surfaces is a complete mystery, until the heads come off.
Some heads, with a history of routine coolant changes, come off engines without any pitting.
Other heads, on vehicles where the coolant did not get changed on a regular basis (or used junk coolant), come off like yours....or even worse.
Buy some Pentofrost NF and distilled water, when you re-assemble.
Pay whatever it costs to ship it to you...it's a "rounding error" on this job.
(I had a very smart individual make a comment about using the factory recommended coolant when changing the coolant on a Kubota tractor: "The difference in price between buying Kubota's coolant and some generic coolant, won't pay for the part number tag on a Kubota head gasket set!" I'm pretty sure this is true for a 928, also!)
Fred is suggesting using a Cometic gasket.
He's obviously not tried a Cometic head gasket. (I personally believe that Cometic's "parent" company might be Rainbird.)
It requires "divine intervention" for these gaskets to seal on a 928 engine, following Cometic's directions....or not.
Insanity delivered in a very flat package!
And "filling" head flaws with an epoxy might work, if there was never any temperature change (like if the heads were left on a shelf in a temperature controlled garage.)
A few heat cycles of the head (installed on an engine), and I'm betting that any epoxy simply "falls" off.
Greg,
many thanks for chiming in and adding your wisdom and experience to this thread.
I would still be keen to receive your tips on repairing these heads if so required.
I will put these heads aside at the moment and have a close look at the spares I have.
I have not found a source for the Porsche recommended coolant in NZ but will keep hunting.
As a further note to the heads I removed, there is only one place where the damage has extended under the head gasket firing ring and that is for no. 2. Several other places have got to the edge of the ring, but not under.
The most damage was 'under' the places where the head gaskets were almost completely gone and there would have almost certainly been some coolant flow or at least rapid seepage. When I removed the heads (with the gaskets still stuck to them) these areas had the gasket 3mm - 5 mm separated from ( bulging below) the head. They were certainly not sitting against the head and were very porous.
I figure the more data points and details we can obtain the better placed we will be to solve this problem.
In a separate discussion with Greg in another thread yesterday I opined that if all else failed and I was putting my heads back together I would seriously consider using a non hardening sealant to hopefully bond those unsupported gsaket surfaces to the head such that coolant could not seep into the micro void between them.
I just took a look at your thread and the pictures of the damage once more and then lights came on- the damage to your heads is non structural and for the most part is not on critical sealing surfaces. With that in mind I am wondering if there is an easy solution to your problem simply by cleaning up the corroded patches with a de-burring tool of some kind to clean up the corroded surfaces, degrease the surface and then apply a non hardening RTV type sealant on all those unsupported surfaces filling in the troughs with the stuff and then quickly mount the heads as it goes off.
To clean up the heads in general you can get a sheet of 0.25 inch plate glass and tape a sheet of wet and dry to it and then "surf" the heads [and presumably block faces] to clean them up for assembly. Use a few grades progressively like 400, 600, 800 and 1000 and that should be more than fine enough for the stock gasket.
No need for a skim given you said they are flat compared to a reference machine finish tool [do you have such capability local to you?] , no need for welding.
The RTV used will be sandwiched between the head and the gasket and kill two birds with one stone- head use and corrosion mitigation.
Looking at your photos whereas there is encroachment to the fire ring in a couple of locations, when coating the unsupported surfaces with RTV, a dab of this stuff wshould suffice just avoid geting it under the fire ring. Even if you did I suspect it would squeez out but..?
Greg,
No idea if you have ever tried Belzona 1111- I can assure you it is amazingly good stuff. I have seen key ways repaired with it, shafts repaired and pump casing repairs operating up to 200C and 10 barg pressure- it is seriously good stuff. For the 928 I reckon it could very easily be used to repair water pump volutes as an alternative to your insert approach and some crankcase damage repairs- it is fully machinable .
Appreciate it is not the kind of approach you would normally use but as an option of last resort useful to have in the ammo locker as it were. Heat cycling - no issue.
Remember you can get whatever you want within 15 minutes of your shop- we can't!
On the gasket front and following on from our discussion yesterday, I am wondering if the "non predictability" factor in this debacle just might be down to the gasket performance. Just maybe initially it keeps the coolant out of the "crevice" but as the gasket ages, heat, vibration etc maybe takes its toll and at some point lets in coolant [rather than from day one] and then it goes down the slippery slope. In this regard maybe you have seen gaskets on examples that had little or no damage- did you spot anything "different" that might yeild a clue of some kind? The ones we see on the list generally get posted becuase of the damage. Also, what is the ratio you see of knackered heads to good heads and has that perceived ratio varied over the years?
Remember- we are brainstorming here - not making final recommendations-


 09-07-2021, 05:07 AM